Nissan X-Trail 32. Manual - part 1044


  Главная      Nissan     Nissan X-Trail 32 - Service Manual


поиск по сайту            


содержание   ..  1042  1043  1044  1045   ..


Nissan X-Trail 32. Manual - part 1044


TIMING CHAIN

EM-73

< UNIT DISASSEMBLY AND ASSEMBLY >

[MR20DD]

C

D

E

F

G

H

I

J

K

L

M

A

EM

N

P

O

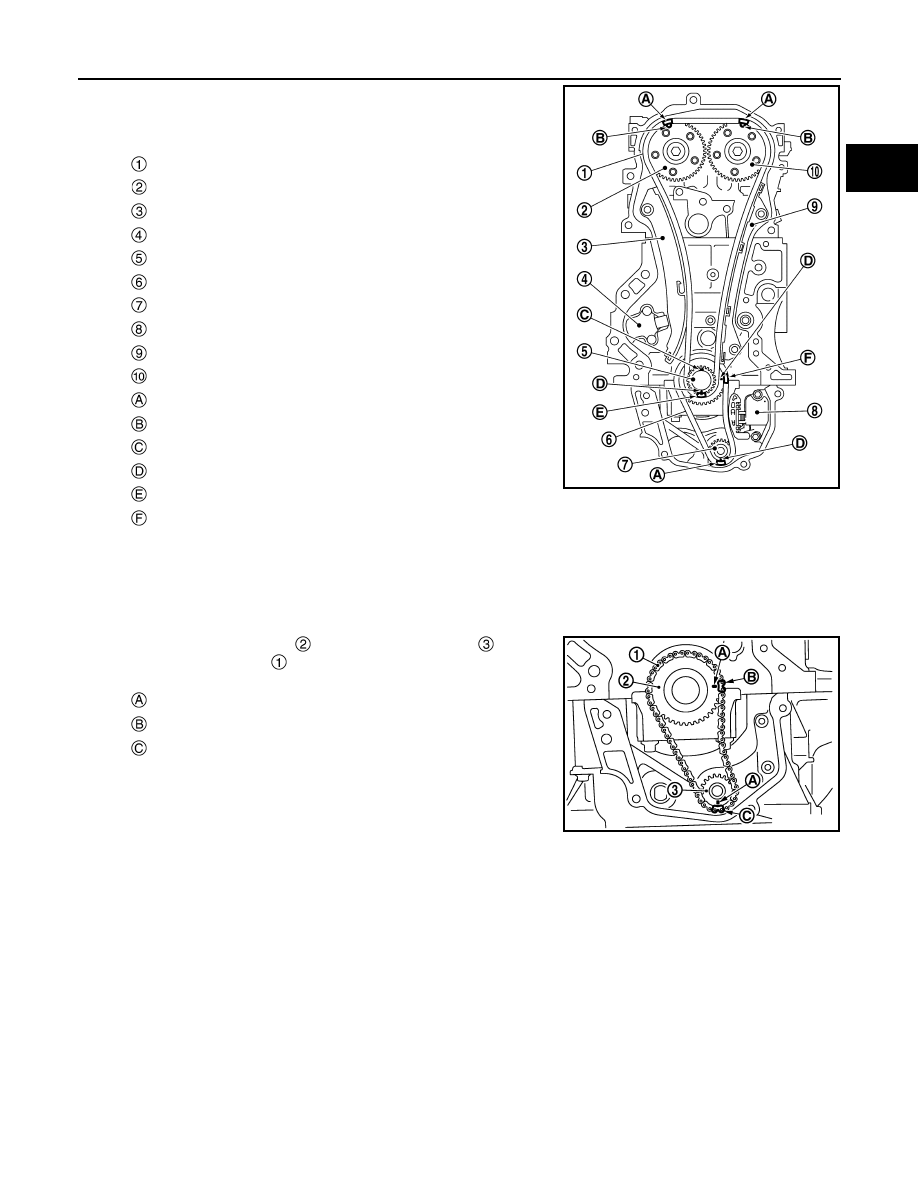
The figure shows the relationship between the matching mark on
each timing chain and that on the corresponding sprocket, with the
components installed.

*: There are two outer grooves in camshaft sprocket (INT). The wider one is a matching mark.

1.

Check that crankshaft key points straight up.

2.

If the tension guide (front cover side) is removed, install it to the front cover.

CAUTION:

Check the joint condition by sound or feeling.

3.

Install crankshaft sprocket 

, balancer unit sprocket 

 and bal-

ancer unit timing chain 

.

• Install it by aligning matching marks on each sprocket and bal-

ancer unit timing chain. 

• If these matching marks are not aligned, rotate the balancer

shaft slightly to correct the position.

CAUTION:

Check matching mark position of each sprocket after installing the balancer unit timing chain.

: Timing chain 

: Camshaft sprocket (EXH)

: Slack guide

: Timing chain tensioner

: Crankshaft sprocket

: Balancer unit timing chain

: Balancer unit sprocket

: Balancer unit timing chain tensioner

: Tension guide

: Camshaft sprocket (INT)

: Matching mark (dark blue link)

: Matching mark (stamping)

: Crankshaft key position (straight up)

: Matching mark (stamping)

: Matching mark (yellow link)

: Matching mark (white link)

: Matching mark (stamping)

: Matching mark (white link)

: Matching mark (dark blue link)

JSBIA5003ZZ

PBIC3171J

EM-74

< UNIT DISASSEMBLY AND ASSEMBLY >

[MR20DD]

TIMING CHAIN

4.

Hold the WAF part of balancer unit shaft [WAF: 19 mm (0.75 in)]

, and then tighten the balancer shaft sprocket bolt.

CAUTION:

• Secure the balancer unit shaft with the WAF part.
• Never loosen the balancer shaft sprocket bolt by tighten-

ing the balancer unit timing chain.

5.

Install balancer unit timing chain tensioner 

.

• Fix the plunger at the most compressed position using a stop-

per pin (A), and then install it.

• Securely pull out (

) the stopper pin after installing the bal-

ancer unit timing chain tensioner.

• Check matching mark position of balancer unit timing chain

and each sprocket again.

: Oil pan (upper)

: Engine front

PBIC3168J

JPBIA5119ZZ

TIMING CHAIN

EM-75

< UNIT DISASSEMBLY AND ASSEMBLY >

[MR20DD]

C

D

E

F

G

H

I

J

K

L

M

A

EM

N

P

O

6.

Align the matching marks of each sprocket with the matching
marks of timing chain.

*: There are 2 outer grooves in camshaft sprocket (INT). The wider one is a
matching mark.

• If these matching marks are not aligned, rotate the camshaft

slightly by holding the hexagonal portion to correct the posi-
tion.

CAUTION:

Check matching mark position of each sprocket and timing
chain again after installing the timing chain.

7.

Install the tension guide 

 and the slack guide 

.

: Camshaft sprocket (EXH)

: Camshaft sprocket (INT)

: Timing chain

: Matching mark (dark blue link)

: Matching mark (stamping)

: Matching mark (yellow link)

: Matching mark (stamping)

JPBIA5153ZZ

: Timing chain

JPBIA5155ZZ

EM-76

< UNIT DISASSEMBLY AND ASSEMBLY >

[MR20DD]

TIMING CHAIN

8.

Install timing chain tensioner 

.

• Fix the plunger at the most compressed position using a stop-

per pin (A), and then install it.

• Securely pull out the stopper pin after installing the timing

chain tensioner.

9.

Check matching mark position of timing chain and each sprocket again.

10. Install front oil seal. Refer to 

EM-90, "FRONT OIL SEAL : Removal and Installation"

.

11. Install front cover with the following procedure:

a.

Install new O-ring to cylinder block. 

CAUTION:

• Do not reuse O-ring.
• Never misalign O-ring.

b.

Apply a continuous bead of liquid gasket (A) with a tube presser
(commercial service tool) to front cover 

 as shown in the fig-

ure. 

Use Genuine Liquid Gasket (Three Bond 1217H) or equiva-
lent.

c.

Check that matching marks of timing chain and each sprocket are still aligned. Then install front cover.

CAUTION:

• Check O-ring on cylinder block is correctly installed.
• Be careful not to damage front oil seal by interference with front end of crankshaft.

JPBIA4395ZZ

: 4.0 - 5.6 mm (0.157 - 0.220 in)

φ

3.4 - 4.4 mm (0.134 - 0.173 in)

: Engine outside

JPBIA6822ZZ


содержание   ..  1042  1043  1044  1045   ..