Qashqai J11. Engine lubrication system (HRA2DDT, K9K, MR20DD) - part 4


  Index      Nissan     Qashqai J11. Engine lubrication system (HRA2DDT, K9K, MR20DD). Service and Repair Manual


Search            copyright infringement  


Content      ..     2      3      4     


Qashqai J11. Engine lubrication system (HRA2DDT, K9K, MR20DD) - part 4


ENGINE OIL

LU-49

< PERIODIC MAINTENANCE >

[R9M]

C

D

E

F

G

H

I

J

K

L

M

A

LU

N

P

O

5.

Check oil pressure with engine running under no-load.
NOTE:
When engine oil temperature is low, engine oil pressure becomes high.

If difference is extreme, check oil passage and oil pump for oil leakage.

6.

After the inspections, install oil pressure switch with the following procedure:

a.

Tighten oil pressure switch to specification.

b.

Check engine oil level.

c.

After warming up engine, check that there is no leakage of engine oil with running engine.

Draining

INFOID:0000000010284225

WARNING:

• Be careful not to get burned, as engine oil may be hot.
• Prolonged and repeated contact with used engine oil may cause skin cancer. Try to avoid direct skin

contact with used engine oil. If skin contact is made, wash thoroughly with soap or hand cleaner as
soon as possible. 

1.

Warm up the engine, and check for engine oil leakage from engine components. Refer to 

LU-48, "Inspec-

tion"

.

2.

Stop the engine and wait for 10 minutes.

3.

Remove engine undercover.

4.

Loosen oil level gauge.

5.

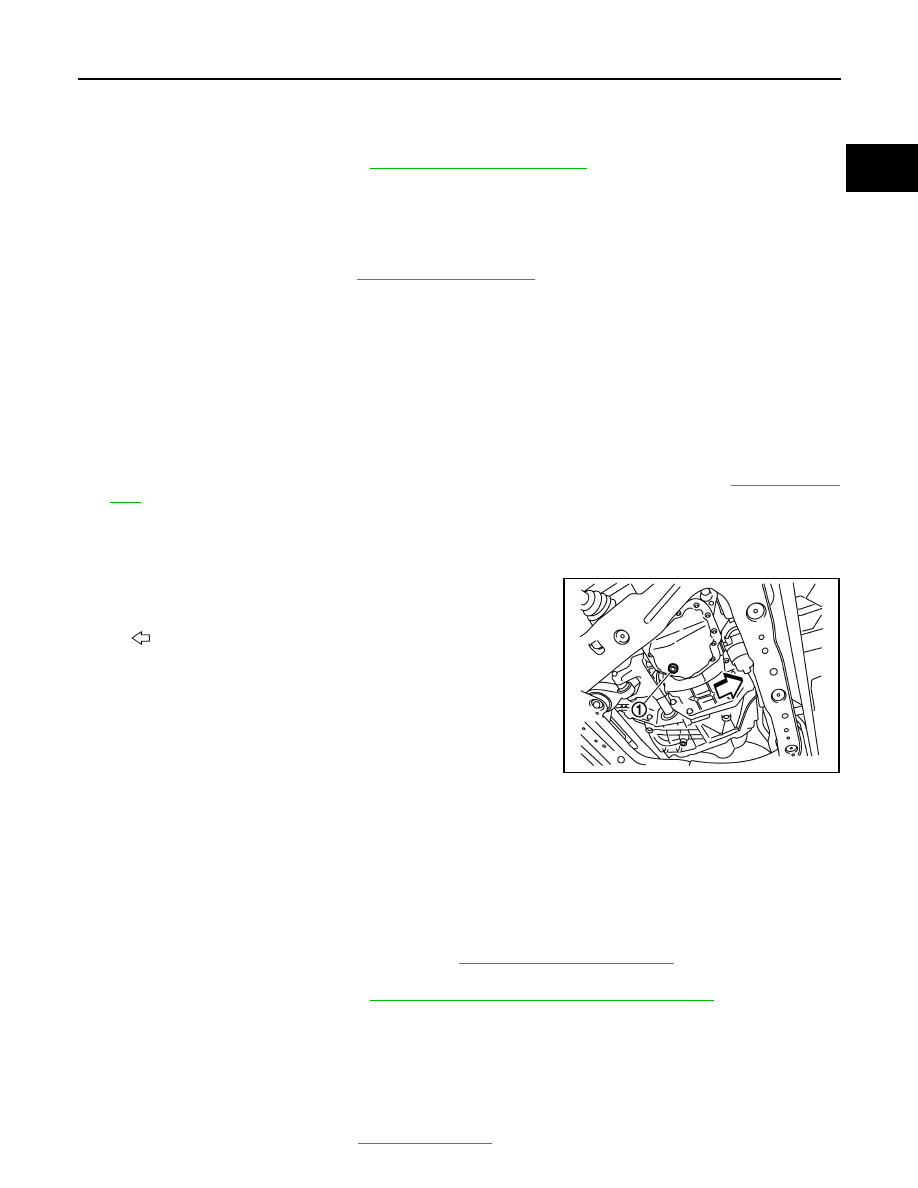
Remove oil pan drain plug (1) using a square driver [8 mm
(0.315 in)]. Drain engine oil.

Refilling

INFOID:0000000010284226

1.

Install drain plug with new washer.

CAUTION:

Be sure to clean drain plug and install with new washer.

2.

Refill with new engine oil.
Engine oil specification and viscosity: Refer to 

MA-59, "Fluids and Lubricants"

.

CAUTION:

• The refill capacity depends on the engine oil temperature and drain time. Use these specifica-

tions for reference only.

• Always use oil level gauge to determine the proper amount of engine oil in the engine.

3.

Warm up engine and check area around drain plug and oil filter body for engine oil leakage.

4.

Stop engine and wait for 10 minutes.

5.

Check the engine oil level. Refer to 

LU-48, "Inspection"

.

Engine oil pressure

Refer to 

LU-57, "Engine Oil Pressure"

.

Tightening torque

: Refer to 

LU-53, "Exploded View"

.

: Vehicle front

E1BIA0601ZZ

Tightening torque

: 50 N·m (5.1 Kg-m, 37 ft-lb)

Engine oil capacity

Refer to 

LU-57, "Periodical Maintenance Specification"

.

LU-50

< PERIODIC MAINTENANCE >

[R9M]

ENGINE OIL

6.

Perform "Engine oil data reset". Refer to 

EC9-159, "Work Procedure"

.

OIL FILTER

LU-51

< PERIODIC MAINTENANCE >

[R9M]

C

D

E

F

G

H

I

J

K

L

M

A

LU

N

P

O

OIL FILTER

Removal and Installation

INFOID:0000000010284227

REMOVAL

WARNING:

Be careful not to get burned when engine and engine oil may be hot.

CAUTION:

• When removing, prepare a shop cloth to absorb any engine oil leakage or spillage.
• Completely wipe off any engine oil that adheres to engine and vehicle.

1.

Remove engine undercover.

2.

Loosen oil filter body (1) using a socket [27 mm (1.06 in)]. 
• Loosen oil filter body until orifice (A) of the oil filter body is

exposed, and then drain engine oil.

• Catch the engine oil drip, using a tray or waste.

CAUTION:

Completely wipe clean any engine oil remaining on oil fil-
ter body or vehicle.

3.

Remove oil filter body (3), and then remove oil filter (1) and O-
ring (2).

• Push the O-ring in the one direction by hand, and then pick a

pushed out-part with fingers to remove the O-ring.

CAUTION:

Never use wires or screwdrivers to prevent the oil filter
body from damage.

INSTALLATION

1.

Completely remove all foreign objects adhering to the inside of oil filter body or O-ring mounting area.

E1BIA0602ZZ

A

: Oil cooler side

E1BIA0600ZZ

LU-52

< PERIODIC MAINTENANCE >

[R9M]

OIL FILTER

2.

Install oil filter (1) and O-ring (2) to oil filter body (3).

CAUTION:

Be sure to use a new O-ring.
• Securely press the oil filter into the oil filter body.
• When installing an O-ring, apply engine oil all around the O-

ring. 

3.

Install oil filter body assembly to oil cooler.

Inspection

INFOID:0000000010284228

INSPECTION AFTER INSTALLATION

1.

Check that the engine oil level. Refer to 

LU-48, "Inspection"

.

2.

Start the engine, and check that there is no leak of engine oil.

3.

Stop the engine and wait for 10 minutes.

4.

Check that the engine oil level, and adjust the level. Refer to 

LU-48, "Inspection"

.

A

: Oil cooler side

E1BIA0600ZZ

Oil filter body:

25Nm (2.6 kg-m, 18 ft-lb)

OIL COOLER

LU-53

< REMOVAL AND INSTALLATION >

[R9M]

C

D

E

F

G

H

I

J

K

L

M

A

LU

N

P

O

REMOVAL AND INSTALLATION

OIL COOLER

Exploded View

INFOID:0000000010284229

Refer to 

GI-4, "Components"

 for symbol marks in the figure.

Removal and Installation

INFOID:0000000010284230

REMOVAL

WARNING:

Be careful not to get burn yourself, as engine oil and engine coolant may be hot.
1.

Drain engine coolant from radiator. Refer to 

CO-89, "Draining"

.

CAUTION:

Perform this step when the engine is cold.

2.

Disconnect water hose from oil cooler.

CAUTION:

Never adhere the engine coolant to electronic equipments. (alternator etc.)

3.

Remove oil pressure switch, if necessary.

CAUTION:

Handle oil pressure switch carefully and avoid impacts.

4.

Remove oil cooler.

1.

Oil cooler bolt

2.

Oil cooler

3.

Gasket

4.

Cylinder block

5.

oil pressure sensor

6.

Oil filter body

7.

O-ring

8.

Oil filter

A.

Refer to 

LU-53

E1BIA0598GB

LU-54

< REMOVAL AND INSTALLATION >

[R9M]

OIL COOLER

• Loosen mounting bolts in reverse order as shown in the figure.

INSTALLATION

Note the following, and install in the reverse order of removal.

Oil Cooler

• Tighten mounting bolts in the following steps in numerical order as

shown in the figure.

1.

Tighten mounting bolts No.1 and 6.

2.

Tighten all mounting bolts.

Inspection

INFOID:0000000010284231

INSPECTION AFTER REMOVAL

Oil Cooler

Check that oil cooler for cracks. Check that oil cooler for clogging by blowing through engine coolant inlet. If
necessary, replace oil cooler.

INSPECTION AFTER INSTALLATION

1.

Check that the engine oil level and the engine coolant level and add engine oil and engine coolant. Refer
to 

LU-48, "Inspection"

 and 

LU-48, "Inspection"

.

2.

Start the engine, and check that there is no leakage of engine oil or engine coolant.

3.

Stop the engine and wait for 10 minutes.

4.

Check that the engine oil level and the engine coolant level again. Refer to 

LU-48, "Inspection"

 and 

CO-

89, "Draining"

.

E1BIA0599ZZ

: 10 N·m (1 kg-m, 7 ft-lb)

: 10 N·m (1 kg-m, 7 ft-lb)

E1BIA0599ZZ

OIL PUMP

LU-55

< REMOVAL AND INSTALLATION >

[R9M]

C

D

E

F

G

H

I

J

K

L

M

A

LU

N

P

O

OIL PUMP

Exploded View

INFOID:0000000010831739

Refer to 

GI-4, "Components"

 for symbol marks in the figure.

Removal and Installation

INFOID:0000000010833147

REMOVAL

1.

Remove oil pan (lower). Refer to 

EM-396, "Removal and Installation"

.

2.

Remove oil strainer with the following procedure:
• Remove oil strainer mounting bolt (A). 
• Remove oil strainer

3.

Remove oil pump with the following procedure:
• Remove oil pump bolts (B).
• Disengage oil pump with sprocket assembly from oil pump

drive chain.

• Remove oil pump.

1.

Oil strainer

2.

Oil strainer gasket

3.

Cylinder block

4.

Oil pump

5.

Oil pump sprocket

6.

Crankshaft

7.

Oil pump drive chain

8.

Crankshaft sprocket (oil pump drive 
chain)

A.

Refer to 

LU-55, "Removal and Instal-

lation"

E1BIA1218GB

E1BIA0659ZZ

LU-56

< REMOVAL AND INSTALLATION >

[R9M]

OIL PUMP

INSTALLATION

CAUTION:

• Before crank the engine, rotate crankshaft by hand to be sure that oil pump chain is correctly install

on the oil pump sprocket.

1.

Install oil pump with the following procedure:

a.

Install oil pump.

CAUTION:

Check that oil pump chain is correctly install on the oil
pump sprocket.

b.

Tighten oil pump mounting bolts (B) in two steps.

c.

Install oil strainer.

CAUTION:

Never reuse oil strainer gasket.

d.

Tighten oil stainer bolt (B).

2.

Install oil pan (lower). Refer to 

EM-396, "Removal and Installation"

a.

1st step: 5.0 N·m (0.51 kg-m, 44 in-lb)

2nd step: 25.0 N·m (2.6 kg-m, 18 ft-lb)

: 10.0 N·m (1 kg-m, 7 ft-lb)

E1BIA0659ZZ

SERVICE DATA AND SPECIFICATIONS (SDS)

LU-57

< SERVICE DATA AND SPECIFICATIONS (SDS) 

[R9M]

C

D

E

F

G

H

I

J

K

L

M

A

LU

N

P

O

SERVICE DATA AND SPECIFICATIONS (SDS)

SERVICE DATA AND SPECIFICATIONS (SDS)

Periodical Maintenance Specification

INFOID:0000000010284232

ENGINE OIL CAPACITY (APPROXIMATE)

Unit: 

 (lmp qt)

Engine Oil Pressure

INFOID:0000000010284233

Unit: kPa (bar, kg/cm

2

, psi)

*: Engine oil temperature at 80

°

C (176

°

F)

Drain and refill 

With oil filter change

5.5 (4-7/8)

Without oil filter change

5.1 (4-1/2)

Dry engine (Overhaul)

6.6 (5-7/8)

Engine speed

Approximate discharge pressure*

Idle speed

More than 70 (0.7, 0.7, 10)

1,750 rpm

More than 150 (1.5, 1.5 , 22) 

4,000 rpm

More than 360 (3.6, 3.7 , 52) 


Content      ..     2      3      4