Nissan Qashqai J11. Manual - part 819


  Index      Nissan     Nissan Qashqai J11 - Service and Repair Manual


Search            


Content   ..  817  818  819  820   ..


Nissan Qashqai J11. Manual - part 819


DLN-192

< SYMPTOM DIAGNOSIS >

[REAR FINAL DRIVE: R145]

NOISE, VIBRATION AND HARSHNESS (NVH) TROUBLESHOOTING

SYMPTOM DIAGNOSIS

NOISE, VIBRATION AND HARSHNESS (NVH) TROUBLESHOOTING

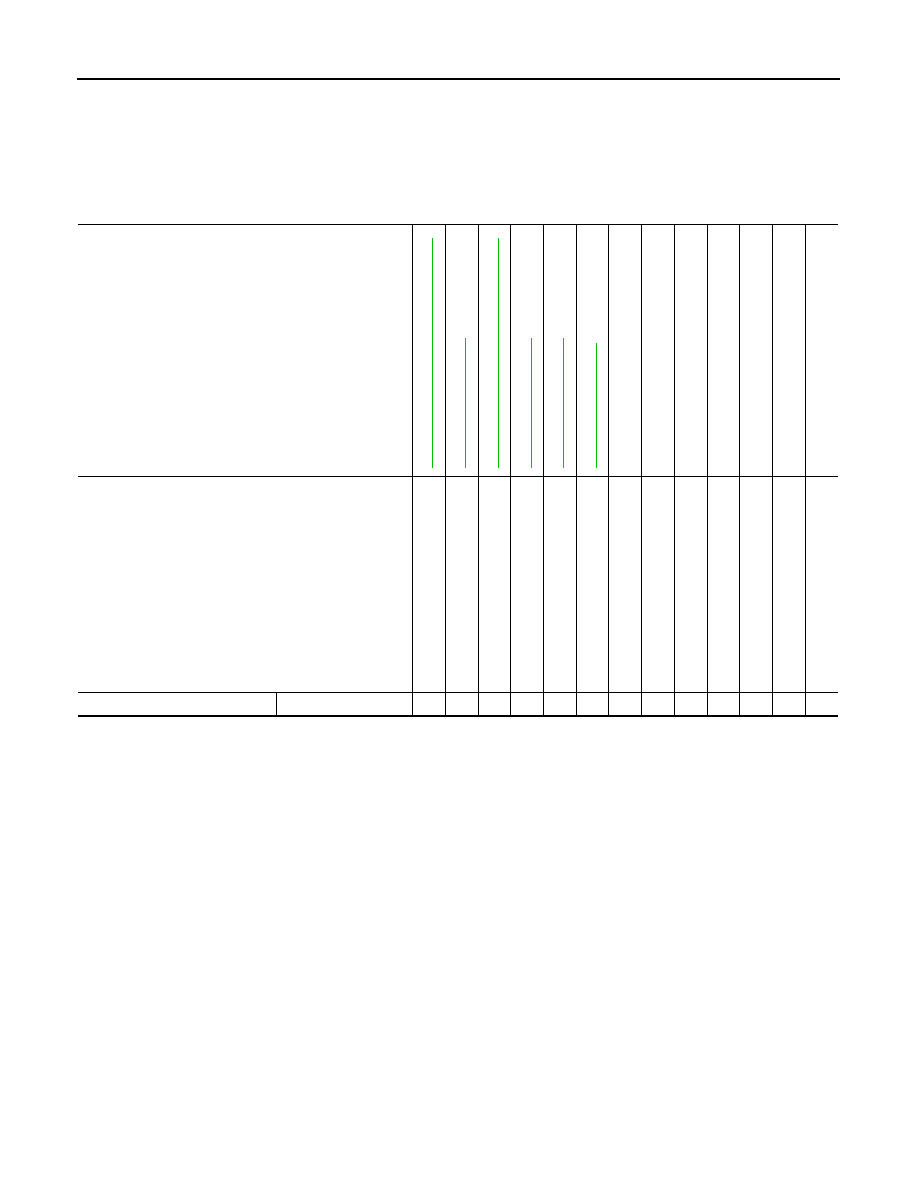
NVH Troubleshooting Chart

INFOID:0000000010288393

Use the chart below to help you find the cause of the symptom. If necessary, repair or replace these parts.

×

: Applicable

Reference

DL

N-2

2

7

, "I

ns

pe

ct

ion

 Af

ter Di

sa

ss

em

bl

y"

DLN

-22

4,

 "Ad

just

m

en

t"

DL

N-2

2

7

, "I

ns

pe

ct

ion

 Af

ter Di

sa

ss

em

bl

y"

DLN

-22

4,

 "Ad

just

m

en

t"

DLN

-22

4,

 "Ad

just

m

en

t"

DLN

-19

9,

 "In

s

p

e

c

ti

o

n"

NVH in DLN section

NVH in F

AX, 

RAX, FSU and 

R

S

U sections

NVH in WT section

NVH in WT section

NVH i

n

 F

AX and RAX 

secti

o

n

NVH in B

R

 section

NVH in S

T

 section

Possible cause and SUSPECTED PARTS

Gea

r to

ot

h ro

ug

h

Ge

ar co

nt

a

c

t im

pro

p

e

r

T

o

o

th su

rfac

es

 wo

rn

Ba

ck

la

sh

 in

co

rrec

t

Com

p

ani

on

 fl

an

ge

 ex

ce

ss

iv

run

o

u

t

Ge

ar oi

l im

pro

p

e

r

PROPELLER S

H

AFT

AXLE AND S

U

S

PENSION

TI

RE

ROAD WHEE

L

DRIVE SHAFT

BRAKE

STE

E

RING

Symptom

Noise

×

×

×

×

×

×

×

×

×

×

×

×

×

PRECAUTIONS

DLN-193

< PRECAUTION >

[REAR FINAL DRIVE: R145]

C

E

F

G

H

I

J

K

L

M

A

B

DLN

N

O

P

PRECAUTION

PRECAUTIONS

Service Notice or Precautions for Rear Final Drive

INFOID:0000000010288394

CAUTION:

• Check for the correct installation status prior to removal or disassembly. If matching marks are

required, be certain they do not interfere with the function of the parts when applied.

• Overhaul should be done in a clean work area, it is preferable to work in dustproof area.
• Before disassembly, using steam or white gasoline, completely remove sand and mud from the exte-

rior of the unit, preventing them from entering into the unit during disassembly or assembly.

• Check appearance of the disassembled parts for damage, deformation, and unusual wear. Replace

them with a new one if necessary.

• Gaskets, seals and O-rings should be replaced any time when the unit is disassembled.
• In principle, tighten bolts or nuts gradually in several steps working diagonally from inside to out-

side. If tightening sequence is specified, observe it.

• Clean and flush the parts sufficiently and blow-dry them.
• Be careful not to damage sliding surfaces and mating surfaces.
• When applying sealant, remove the old sealant from the mounting surface; then remove any mois-

ture, oil, and foreign materials from the application and mounting surfaces.

• Always use shop paper for cleaning the inside of components.
• Avoid using cotton gloves or shop rags to prevent entering of lint.
• During assembly, observe the specified tightening torque, and apply new gear oil, petroleum jelly, or

multi-purpose grease as specified for each vehicle, if necessary.

Precautions for Removing Battery Terminal

INFOID:0000000010508560

• With the adoption of Auto ACC function, ACC power is automatically supplied by operating the intelligent key

or remote keyless entry or by opening/closing the driver side door. In addition, ACC power is supplied even
after the ignition switch is turned to the OFF position, i.e. ACC power is supplied for a certain fixed time.

• When disconnecting the 12V battery terminal, turn off the ACC

power before disconnecting the 12V battery terminal, observing
“How to disconnect 12V battery terminal” described below.
NOTE:
Some ECUs operate for a certain fixed time even after ignition
switch is turned OFF and ignition power supply is stopped. If the
battery terminal is disconnected before ECU stops, accidental DTC
detection or ECU data damage may occur.

•  For vehicles with the 2-batteries, be sure to connect the main bat-

tery and the sub battery before turning ON the ignition switch.
NOTE:
If the ignition switch is turned ON with any one of the terminals of
main battery and sub battery disconnected, then DTC may be detected.

•  After installing the 12V battery, always check "Self Diagnosis Result" of all ECUs and erase DTC.

NOTE:
The removal of 12V battery may cause a DTC detection error.

HOW TO DISCONNECT 12V BATTERY TERMINAL

Disconnect 12V battery terminal according to Instruction 1 or Instruction 2 described below.
For vehicles parked by ignition switch OFF, refer to Instruction 2.

INSTRUCTION 1

1.

Open the hood.

2.

Turn key switch to the OFF position with the driver side door opened.

3.

Get out of the vehicle and close the driver side door.

4.

Wait at least 3 minutes. For vehicle with the engine listed below, remove the battery terminal after a lapse
of the specified time.

SEF289H

D4D engine

: 20 minutes

HRA2DDT

: 12 minutes

DLN-194

< PRECAUTION >

[REAR FINAL DRIVE: R145]

PRECAUTIONS

CAUTION:

While waiting, never operate the vehicle such as locking, opening, and closing doors. Violation of
this caution results in the activation of ACC power supply according to the Auto ACC function.

5.

Remove 12V battery terminal.

CAUTION:

After installing 12V battery, always check self-diagnosis results of all ECUs and erase DTC.

INSTRUCTION 2 (FOR VEHICLES PARKED BY IGNITION SWITCH OFF)

1.

Unlock the door with intelligent key or remote keyless entry.
NOTE:
At this moment, ACC power is supplied.

2.

Open the driver side door.

3.

Open the hood.

4.

Close the driver side door.

5.

Wait at least 3 minutes.

CAUTION:

While waiting, never operate the vehicle such as locking, opening, and closing doors. Violation of
this caution results in the activation of ACC power supply according to the Auto ACC function.

6.

Remove 12V battery terminal.

CAUTION:

After installing 12V battery, always check self-diagnosis results of all ECUs and erase DTC.

K9K engine

: 4 minutes

M9R engine

: 4 minutes

R9M engine

: 4 minutes

V9X engine

: 4 minutes

PREPARATION

DLN-195

< PREPARATION >

[REAR FINAL DRIVE: R145]

C

E

F

G

H

I

J

K

L

M

A

B

DLN

N

O

P

PREPARATION

PREPARATION

Special Service Tools

INFOID:0000000010288395

Tool number
Tool name

Description

KV38100200
Drift
a: 65 mm (2.56 in) dia.
b: 49 mm (1.93 in) dia.

• Installing front oil seal
• Installing side oil seal

ST27861000
Drift
a: 62 mm (2.44 in) dia.
b: 52 mm (2.05 in) dia.

Installing front oil seal

ST35271000
Drift
a: 72 mm (2.83 in) dia.
b: 63 mm (2.48 in) dia.

Installing center oil seal

ST33052000
Drift
a: 22 mm (0.87 in) dia.
b: 28 mm (1.10 in) dia.

Removing side bearing inner race

KV38108400
Pinion nut wrench

Removing and installing drive pinion nut

KV38109500
Drive pinion socket

• Removing and installing drive pinion nut
• Measuring preload torque

ZZA1143D

ZZA0832D

ZZA0814D

ZZA1023D

ZZA1206D

ZZA1205D


Content   ..  817  818  819  820   ..