Nissan Qashqai J11. Manual - part 600


  Index      Nissan     Nissan Qashqai J11 - Service and Repair Manual


Search            


Content   ..  598  599  600  601   ..


Nissan Qashqai J11. Manual - part 600


CL-6

< PREPARATION >

PREPARATION

PREPARATION

PREPARATION

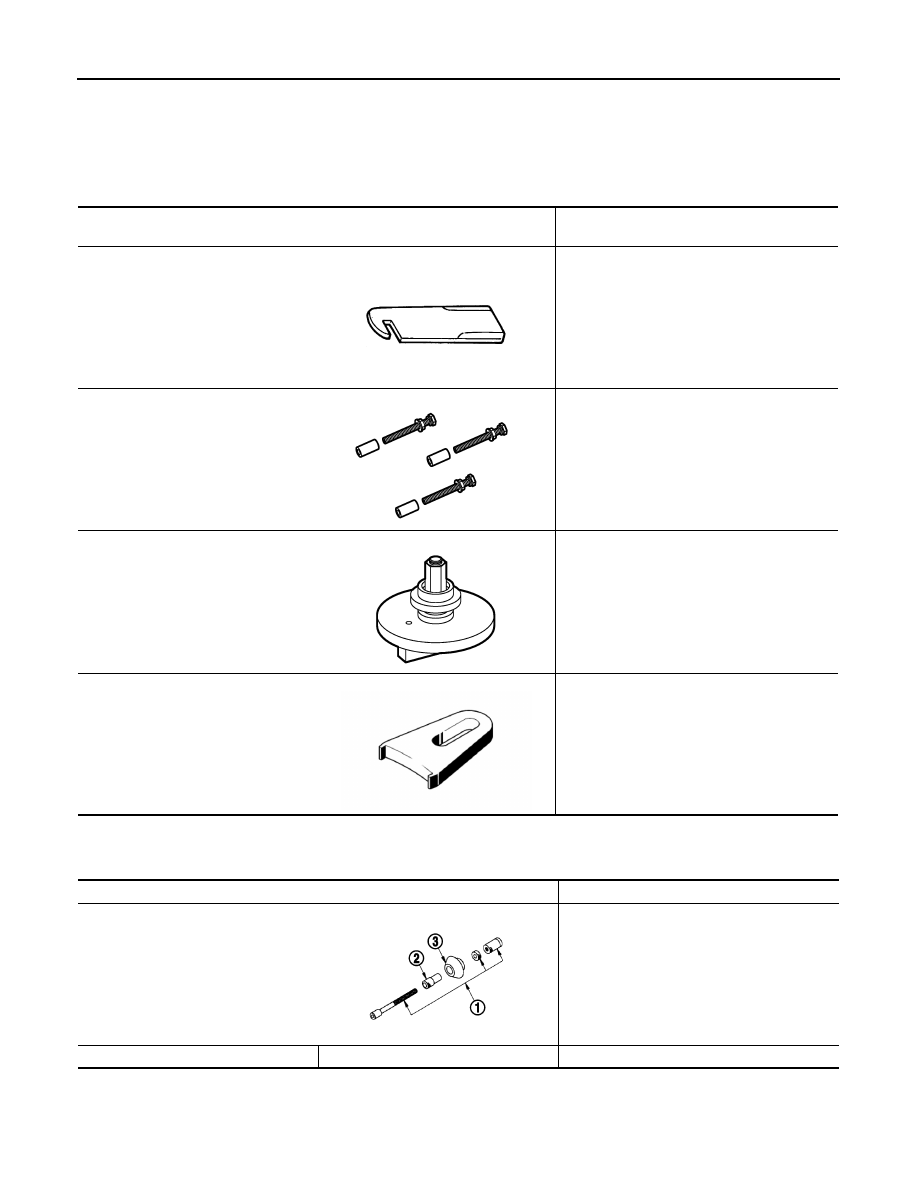
Special Service Tools

INFOID:0000000010288555

Commercial Service Tools

INFOID:0000000010288556

Tool number
Tool name

Description

ST20050240
Diaphragm adjusting wrench

Adjusting unevenness of diaphragm spring of 
clutch cover


Emb.1761
Kit for clutch cover removal and instal-
lation

Holding the clutch cover.
Assembly of three bolts, three spacers, and 
three nuts.


Emb.1604
Clutch compression tool 

Rearming the clutch cover compensation sys-
tem.


Mot.1431
Flywheel locking tool 

Locking the flywheel.

ZZA0508D

E1BIA0775ZZ

E1BIA0778ZZ

JMAIA0431ZZ

Tool name

Description

Clutch aligner
1: Center shaft
2: Attachment
3: Guide

Installing clutch disc

SAC tool (Self Adjusting Clutch)

Installing clutch cover on R9M engine

PCIB0017E

CLUTCH PEDAL

CL-7

< PERIODIC MAINTENANCE >

C

E

F

G

H

I

J

K

L

M

A

B

CL

N

O

P

PERIODIC MAINTENANCE

CLUTCH PEDAL

Inspection and Adjustment

INFOID:0000000010288557

INSPECTION

1.

Check to see if the master cylinder rod end moves freely. It
should not be bound by the clutch pedal. 
• If the rod end does not move freely, remove the rod end and

check for deformation or damage on the rod end. Leave the
rod end removed for step 2. 

2.

Check the clutch pedal stroke for free range of movement.

a.

With the master cylinder rod end removed, manually move the
clutch pedal up and down to determine if it moves freely.

b.

If any sticking is noted, replace the clutch pedal assembly.
Reverify that the master cylinder rod end moves freely. 

3.

Inspect the ASCD clutch switch position and Interlock clutch
switch position

a.

If the rod end does not move freely, check that the ASCD clutch switch and Interlock clucth switch are not
applying pressure to the clutch pedal causing the rod end to bind. To adjust, disconnect the ASCD clutch
switch electrical connector and turn the ASCD clutch switch.

b.

Connect the ASCD clutch switch and Interlock clutch switch electrical connector.

4.

Check the clutch hydraulic system components (master cylinder assembly, CSC) for sticking or binding.

a.

If any sticking or binding is noted, repair or replace the related parts as necessary.

b.

If any hydraulic system repair is necessary, bleed the clutch hydraulic system. Refer to 

CL-8, "Air Bleeding

Procedure"

.

NOTE:
Do not use a vacuum assist or any other type of power bleeder on this system. Use of a vacuum assist or
power bleeder will not purge all of the air from the system.

ADJUSTMENT

Adjust ASCD clutch switch (1) position and Interlock clutch  switch
(2) position so that clearance between clutch pedal  and thread end
of ASCD clutch switch and Interlock clutch switch, with clutch pedal
fully released, is within specification “A” or "B".

PCIB1491E

Clearance “A”

Refer to 

CL-31, "Clutch Pedal"

.

Clearance “B”

Refer to 

CL-31, "Clutch Pedal"

.

E1DIA0228ZZ

CL-8

< PERIODIC MAINTENANCE >

CLUTCH FLUID

CLUTCH FLUID

Inspection

INFOID:0000000010288558

CLUTCH FLUID LEVEL

• Check that the fluid level in the reservoir tank is within the specified

range (MAX – MIN lines).

• Visually check for any clutch fluid leakage around the reservoir

tank.

• Check the clutch system for any leakage if the fluid level is

extremely low (lower than MIN).

Air Bleeding Procedure

INFOID:0000000010288559

NOTE:
Do not use a vacuum assist or any other type of power bleeder on this system. Use of a vacuum assist or
power bleeder will not purge all the air from the system.

CAUTION:

• Monitor clutch fluid level in reservoir tank to make sure it does not empty.
• Keep painted surface on the body or other parts free of clutch fluid. If it spills, wipe up immediately

and wash the affected area with water.

• Bleed the air of bleeding connector (1).

1.

Fill reservoir tank with new clutch fluid.

2.

Connect a transparent vinyl hose to air bleeder of bleeding con-
nector.

3.

“Depress” and “release” the clutch pedal slowly and fully 15
times at an interval of 2 to 3 seconds and release the clutch
pedal.

4.

Push the lock pin (1) of the bleeding connector (2), and maintain
the position.

CAUTION:

Hold it to prevent releasing clutch tube from bleeding con-
nector when fluid pressure is applied in the tube.

JPFIA0007ZZ

PCIB1494E

JPDIB0041ZZ

CLUTCH FLUID

CL-9

< PERIODIC MAINTENANCE >

C

E

F

G

H

I

J

K

L

M

A

B

CL

N

O

P

5.

Slide clutch tube (1) in the direction of the arrow as shown in the
figure.

6.

Depress the clutch pedal soon and hold it, and then bleed the air
from the piping.

CAUTION:

Hold it to prevent releasing clutch tube from bleeding con-
nector when fluid pressure is applied in the tube.

7.

Return clutch tube and lock pin to their original positions.

8.

Release clutch pedal and wait for 5 seconds.

9.

Repeat steps 3 to 8 until no bubbles are observed in the clutch fluid.

2

: Clutch housing

Dimension “A”

: 10 mm (0.39 in)

JPDIB0042ZZ


Content   ..  598  599  600  601   ..