Nissan Qashqai J11. Manual - part 2273


  Index      Nissan     Nissan Qashqai J11 - Service and Repair Manual


Search            


Content   ..  2271  2272  2273  2274   ..


Nissan Qashqai J11. Manual - part 2273


ENGINE MAINTENANCE (R9M)

MA-127

< PERIODIC MAINTENANCE >

C

D

E

F

G

H

I

J

K

L

M

B

MA

N

O

A

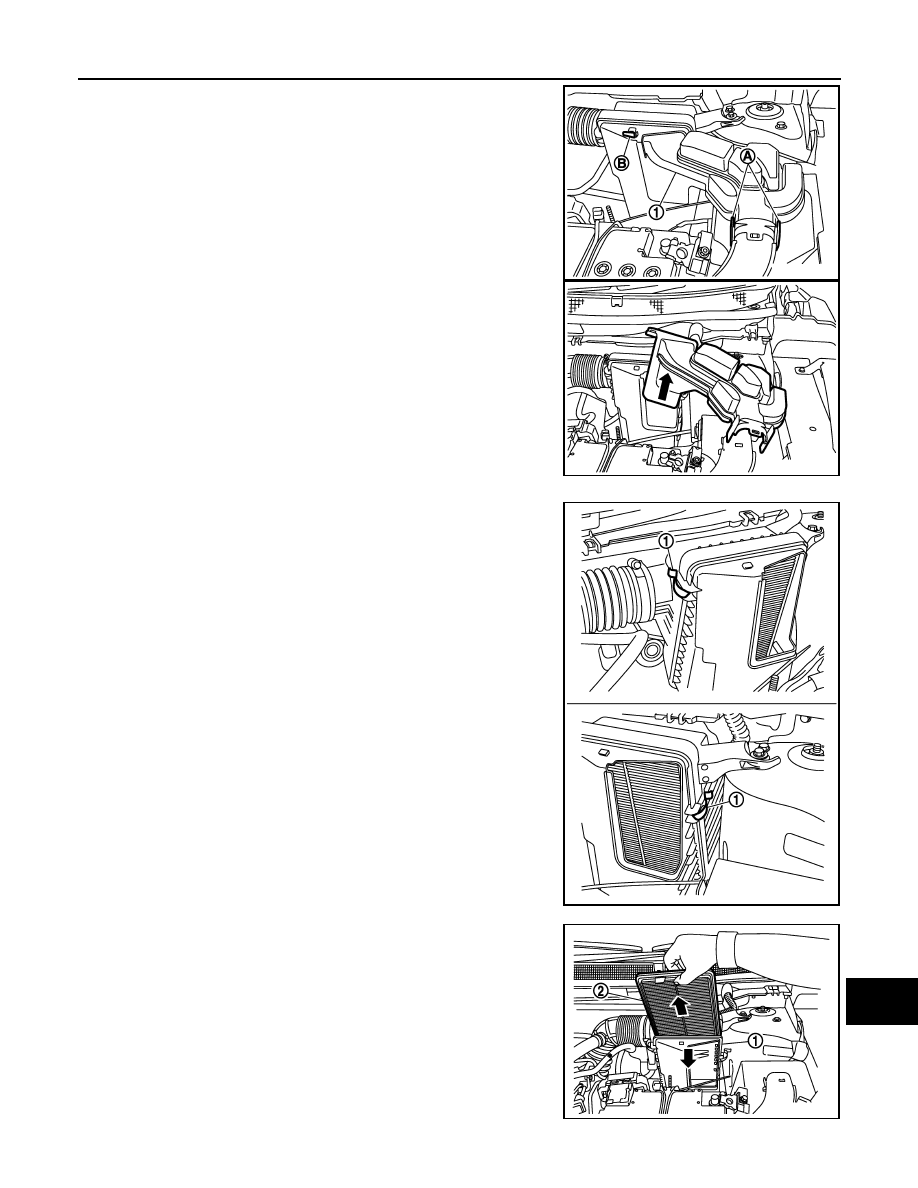
• To remove air duct 2 (1), pinch pawl (A) to unlock, move pawl

(B) frontward and remove air duct 2 upward.

2.

Unhook air cleaner body clips (1)

3.

Separate air cleaner cover (1) from air cleaner body and remove
air cleaner filter (2). 

INSTALLATION

E1BIA1728ZZ

E1BIA1003ZZ

E1BIA1004ZZ

E1BIA1005ZZ

MA-128

< PERIODIC MAINTENANCE >

ENGINE MAINTENANCE (R9M)

Install in the reverse order of removal.

ENGINE OIL

ENGINE OIL : Inspection

INFOID:0000000011497357

ENGINE OIL LEVEL

NOTE:
Before starting engine, put vehicle horizontally and check that the engine oil level. If engine is already started,
stop it and allow 10 minutes before checking.

1.

Pull out oil level gauge and wipe it clean.

2.

Insert oil level gauge and check that the engine oil level is within
the range (A) shown in the figure.

3.

If it is out of range, adjust it.

4.

When replacing engine oil this procedure must be performed.
Refer to 

EC9-138, "Special Repair Requirement List"

ENGINE OIL APPEARANCE

• Check that engine oil for white turbidity or heavy contamination.
• If engine oil becomes turbid and white, it is highly probable that it is contaminated with engine coolant.

Repair or replace damaged parts.

ENGINE OIL LEAKAGE 

Check for engine oil leakage around the following area.
• Oil pan (upper and lower)
• Oil pan drain plug
• Oil pressure switch
• Oil level sensor
• Oil filter body
• Oil cooler
• Fuel pump
• Vacuum pump
• Turbocharger
• Crankshaft position sensor
• Camshaft position sensor
• Front cover
• Mating surface between cylinder head and cylinder head housing
• Mating surface between cylinder block and cylinder head
• Mating surface between cylinder head housing and oil separator
• Front oil seal
• Rear oil seal retainer

OIL PRESSURE CHECK

WARNING:

• Be careful not to get burned, as engine oil may be hot.
• When checking engine oil pressure, shift position should be “Neutral”, and apply parking brake

securely.

1.

Check engine oil level.

2.

Disconnect harness connector at oil pressure switch, and remove oil pressure switch using a deep socket.

CAUTION:

Handle oil pressure switch carefully and avoid impacts.

3.

Install oil pressure gauge set [SST:KV113E0020 (Mot.836-05)].

4.

Start engine and warm it up to normal operating temperature.

5.

Check oil pressure with engine running under no-load.

JPBIA0756ZZ

ENGINE MAINTENANCE (R9M)

MA-129

< PERIODIC MAINTENANCE >

C

D

E

F

G

H

I

J

K

L

M

B

MA

N

O

A

NOTE:
When engine oil temperature is low, engine oil pressure becomes high.

If difference is extreme, check oil passage and oil pump for oil leakage.

6.

After the inspections, install oil pressure switch with the following procedure:

a.

Tighten oil pressure switch to specification.

b.

Check engine oil level.

c.

After warming up engine, check that there is no leakage of engine oil with running engine.

ENGINE OIL : Draining

INFOID:0000000011497358

WARNING:

• Be careful not to get burned, as engine oil may be hot.
• Prolonged and repeated contact with used engine oil may cause skin cancer. Try to avoid direct skin

contact with used engine oil. If skin contact is made, wash thoroughly with soap or hand cleaner as
soon as possible. 

1.

Warm up the engine, and check for engine oil leakage from engine components. Refer to 

MA-128,

"ENGINE OIL : Inspection"

.

2.

Stop the engine and wait for 10 minutes.

3.

Remove engine undercover.

4.

Loosen oil level gauge.

5.

Remove oil pan drain plug (1) using a square driver [8 mm
(0.315 in)]. Drain engine oil.

ENGINE OIL : Refilling

INFOID:0000000011497359

1.

Install drain plug with new washer.

CAUTION:

Be sure to clean drain plug and install with new washer.

2.

Refill with new engine oil.
Engine oil specification and viscosity: Refer to 

MA-64, "Fluids and Lubricants"

.

CAUTION:

• The refill capacity depends on the engine oil temperature and drain time. Use these specifica-

tions for reference only.

• Always use oil level gauge to determine the proper amount of engine oil in the engine.

3.

Warm up engine and check area around drain plug and oil filter body for engine oil leakage.

4.

Stop engine and wait for 10 minutes.

5.

Check the engine oil level. Refer to 

MA-128, "ENGINE OIL : Inspection"

.

Engine oil pressure

Refer to 

LU-71, "Engine Oil Pressure"

.

Tightening torque

: Refer to 

LU-67, "Exploded View"

.

: Vehicle front

E1BIA0601ZZ

Tightening torque

: 50 N·m (5.1 Kg-m, 37 ft-lb)

Engine oil capacity

Refer to 

LU-71, "Periodical Maintenance Specification"

.

MA-130

< PERIODIC MAINTENANCE >

ENGINE MAINTENANCE (R9M)

6.

Perform "Engine oil data reset". Refer to 

EC9-154, "Work Procedure"

.

OIL FILTER

OIL FILTER : Removal and Installation

INFOID:0000000011497368

REMOVAL

WARNING:

Be careful not to get burned when engine and engine oil may be hot.

CAUTION:

• When removing, prepare a shop cloth to absorb any engine oil leakage or spillage.
• Completely wipe off any engine oil that adheres to engine and vehicle.

1.

Remove engine undercover.

2.

Loosen oil filter body (1) using a socket [27 mm (1.06 in)]. 
• Loosen oil filter body until orifice (A) of the oil filter body is

exposed, and then drain engine oil.

• Catch the engine oil drip, using a tray or waste.

CAUTION:

Completely wipe clean any engine oil remaining on oil fil-
ter body or vehicle.

3.

Remove oil filter body (3), and then remove oil filter (1) and O-
ring (2).

• Push the O-ring in the one direction by hand, and then pick a

pushed out-part with fingers to remove the O-ring.

CAUTION:

Never use wires or screwdrivers to prevent the oil filter
body from damage.

INSTALLATION

1.

Completely remove all foreign objects adhering to the inside of oil filter body or O-ring mounting area.

E1BIA0602ZZ

A

: Oil cooler side

E1BIA0600ZZ


Content   ..  2271  2272  2273  2274   ..