Nissan Qashqai J11. Manual - part 84
 

  Index      Nissan     Nissan Qashqai J11 - Service and Repair Manual


Search            


Content   ..  82  83  84  85   ..


Nissan Qashqai J11. Manual - part 84


AIR CLEANER FILTER

EM-275

< PERIODIC MAINTENANCE >

[K9K]

C

D

E

F

G

H

I

J

K

L

M

A

EM

N

P

O

AIR CLEANER FILTER

Removal and Installation

INFOID:0000000010282054

REMOVAL

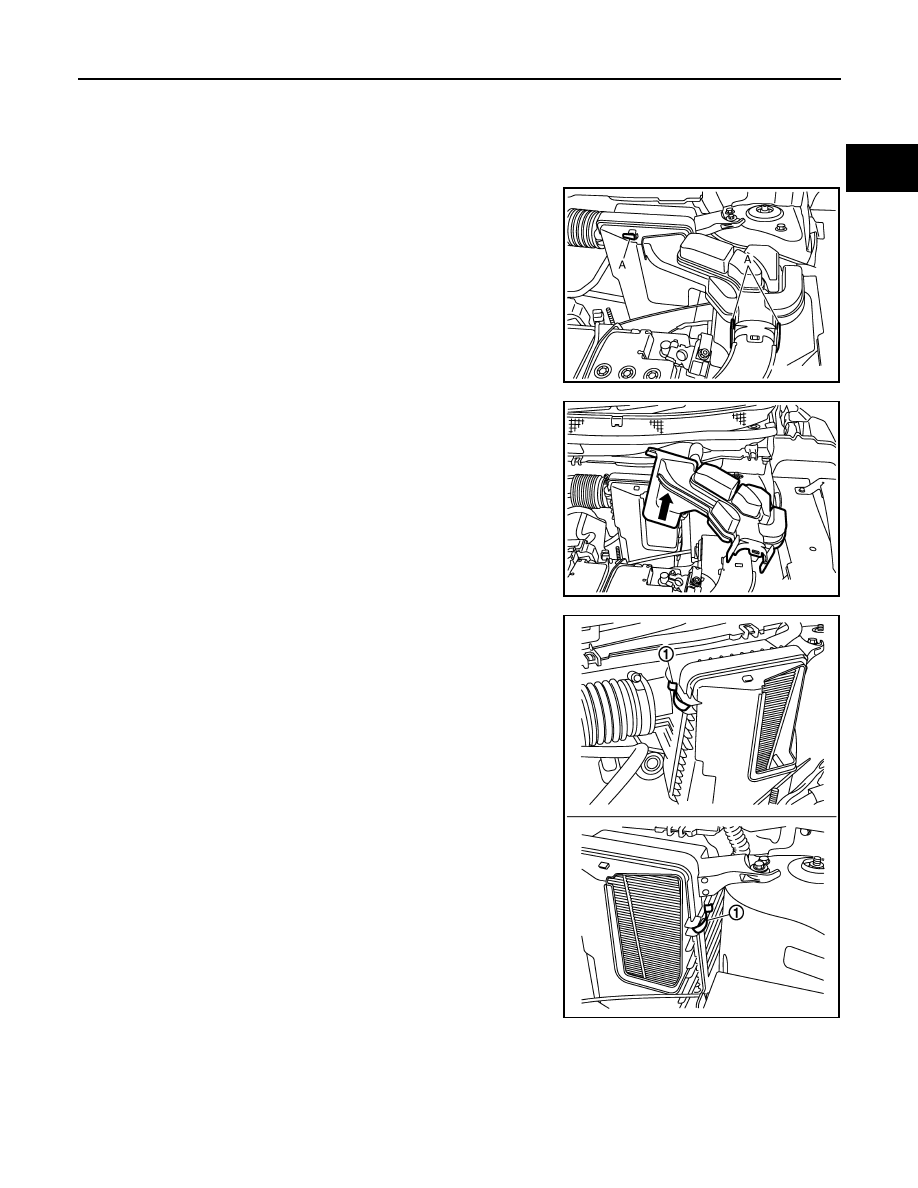
1.

Press the points (A) to separate air resonator from air duct and
air cleaner filter unit.

2.

Remove air resonator following the arrow.

3.

Unhook clips (1) on the air cleaner filter holder.

E1BIA1002ZZ

E1BIA1003ZZ

E1BIA1004ZZ

EM-276

< PERIODIC MAINTENANCE >

[K9K]

AIR CLEANER FILTER

4.

Separate air cleaner filter holder (1) from air cleaner filter unit
and remove air cleaner filter (2). 

INSTALLATION

Install in the reverse order of removal.

E1BIA1005ZZ

DRIVE BELT AUTO-TENSIONER

EM-277

< REMOVAL AND INSTALLATION >

[K9K]

C

D

E

F

G

H

I

J

K

L

M

A

EM

N

P

O

REMOVAL AND INSTALLATION

DRIVE BELT AUTO-TENSIONER

Exploded View

INFOID:0000000010282057

WITH A/C

Refer to 

GI-4, "Components"

 for symbols in the figure.

WITHOUT A/C

Refer to 

GI-4, "Components"

 for symbols in the figure.

E1BIA0372GB

1.

Drive belt auto-tensioner

2.

Drive belt

3.

Multifunction bracket

E1BIA1196GB

1.

Drive belt auto-tensioner

2.

Multifunction bracket

3.

Drive beltt

4.

Idler pulley

5.

Idler pulley cover

6.

Cranshaft pulley

A.

Refer to 

EM-331

EM-278

< REMOVAL AND INSTALLATION >

[K9K]

DRIVE BELT AUTO-TENSIONER

Removal and Installation

INFOID:0000000010282058

CAUTION:

• Replace any belt that has been removed with a new one.
• Auto-tensioner must be replaced with new ones when the belt is replaced.
• Do not run the engine without the drive belts to avoid damaging the crankshaft pulley.

REMOVAL

1.

Remove engine undercover.

2.

Remove RH front wheel.

3.

Remove right side splash cover.

4.

Remove drive belt. Refer to 

EM-273, "Removal and Installation"

.

5.

Remove auto-tensioner.

6.

Remove idler pulley (Models without A/C only)

INSTALLATION

1.

Install auto-tensioner mounting bolt.

Align the notch and tighten mounting bolt.

2.

Install idler pulley (Models without A/C only)

3.

Install the drive belt. Refer to 

EM-273, "Removal and Installation"

.

4.

Release drive belt auto-tensioner, and apply tension to drive belt.

5.

Turn crankshaft pulley clockwise several times to equalize tension between each pulley.

 40.0 N·m (4.1 kg-m, 30 ft-lb)

MBIB0558E

 40.0 N·m (4.1 kg-m, 30 ft-lb)


Content   ..  82  83  84  85   ..