Nissan Juke F15. Manual - part 907


  Index      Nissan     Nissan Juke F15 (2015 year) - Service and Repair Manual


Search            


Content   ..  905  906  907  908   ..


Nissan Juke F15. Manual - part 907


INT-32

< REMOVAL AND INSTALLATION >

HEADLINING

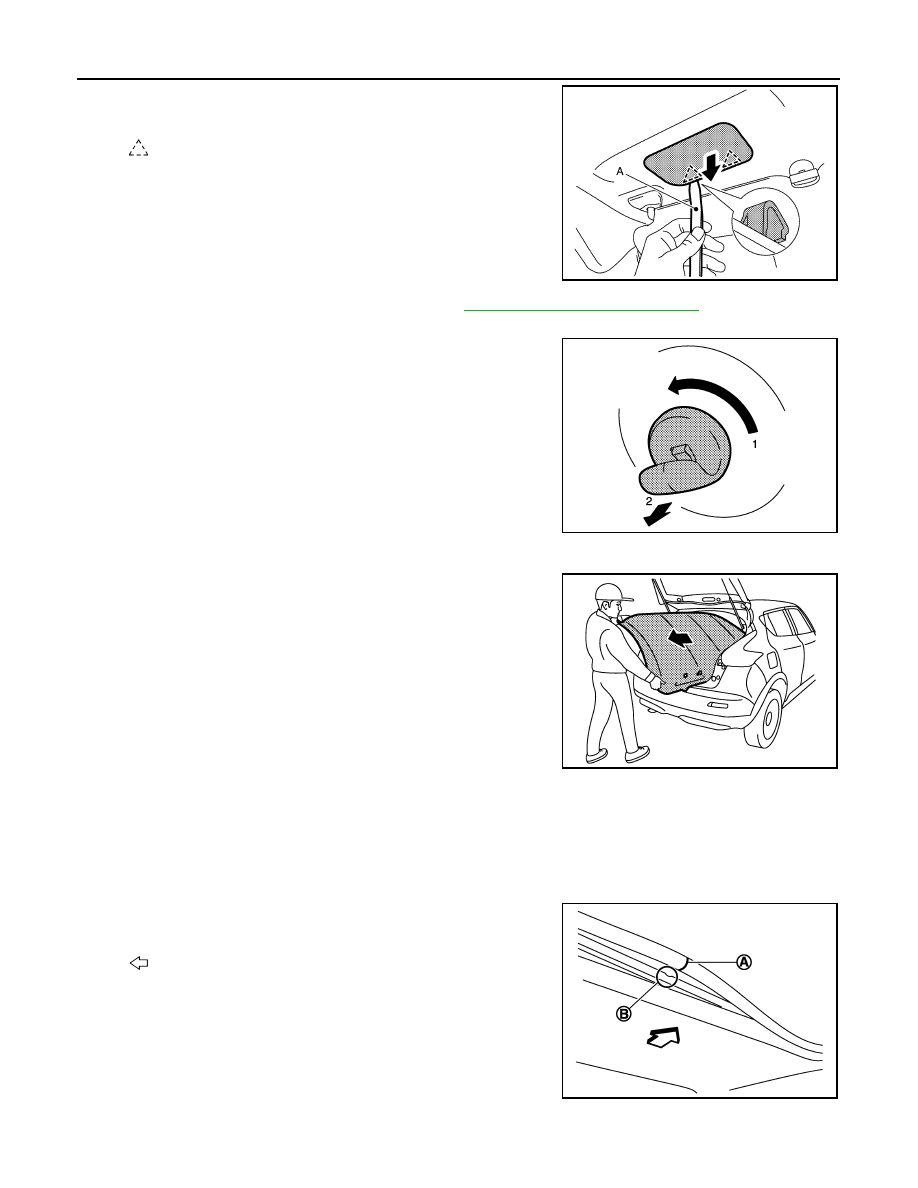
1. Disengage front roof finisher fixing pawls with a remover

tool (A).

2. Disconnect harness connector, and then remove front roof

finisher.

12. Remove front seat assembly (passenger). Refer to 

SE-21, "Removal and Installation"

.

13. Remove sun visor holder (LH and RH)

Rotate 90

°. Remove toward vehicle lower.

14. Remove headlining clips.
15. Remove headlining assembly through the back door.

CAUTION:

• Two workers are required for removal in order to prevent

damage.

• Apply protective tape to the portion where contact may

occur during work.

• Never bend headlining when removing.

INSTALLATION

Note the following items, and install in the reverse order of removal.

CAUTION:

• When installing headlining, start by installing both sun visor holders and headlining clips in order to

keep the headlining in position.

• Never bend headlining when installing.

• Be careful that the surface is not wrinkled when installing.

• Align sunroof welt connection (A) to (B) when installing sun-

roof welt.

: Pawl

JMJIA4751ZZ

JMJIA4401ZZ

JMJIA4402ZZ

: Vehicle front

JMJIA4708ZZ

LUGGAGE FLOOR TRIM

INT-33

< REMOVAL AND INSTALLATION >

C

D

E

F

G

H

I

K

L

M

A

B

INT

N

O

P

LUGGAGE FLOOR TRIM

Exploded View

INFOID:0000000012199185

2WD models

JMJIA4714ZZ

1.

Rear pillar cap RH

2.

Luggage side upper finisher RH

3.

Luggage side lower finisher RH

4.

Luggage floor board

5.

Luggage side upper finisher LH

6.

Rear pillar cap LH

7.

Seat belt hook LH
(Models with woofer)

8.

Luggage side lower finisher LH
(Models with woofer)

9.

Shock absorber mask LH
(Models with woofer)

10. Luggage floor rear center spacer

(Models with spare tire)

11. Spare tire clamp

(Models with spare tire)

12. Repair kit holder

(Models without spare tire)

13. Luggage rear plate

14. Luggage side lower finisher grille RH 15. Luggage room lamp

16. Shock absorber mask RH

17. Seat belt hook RH

18. Luggage floor box

19. Seat belt hook LH

20. Luggage side lower finisher LH

21. Shock absorber mask LH

22. Luggage side lower finisher grille LH

: Clip

: Pawl

INT-34

< REMOVAL AND INSTALLATION >

LUGGAGE FLOOR TRIM

AWD models

: Metal clip

: Vehicle front

JMJIA4715ZZ

1.

Rear pillar cap RH

2.

Luggage side upper finisher RH

3.

Luggage side lower finisher RH

4.

Luggage floor board

5.

Luggage side upper finisher LH

6.

Rear pillar cap LH

7.

Seat belt hook LH
(Models with woofer)

8.

Luggage side lower finisher LH
(Models with woofer)

9.

Shock absorber mask LH
(Models with woofer)

10. Luggage rear plate

11. Luggage side lower finisher grille RH 12. Luggage room lamp

13. Shock absorber mask RH

14. Seat belt hook RH

15. Seat belt hook LH

16. Luggage side lower finisher LH

17. Shock absorber mask LH

18. Luggage side lower finisher grille LH

19. Luggage floor rear spacer LH

20. Spare tire clamp

21. Luggage floor rear spacer RH

: Clip

: Pawl

: Metal clip

: Vehicle front

LUGGAGE FLOOR TRIM

INT-35

< REMOVAL AND INSTALLATION >

C

D

E

F

G

H

I

K

L

M

A

B

INT

N

O

P

LUGGAGE REAR PLATE
LUGGAGE REAR PLATE : Removal and Installation

INFOID:0000000012199186

CAUTION:

• When removing, always use a remover tool that is made of plastic.

• Never damage the body.

REMOVE

1. Remove back door weather-strip. Refer to 

DLK-152, "BACK DOOR WEATHER-STRIP : Removal and

Installation"

 (with Intelligent Key System).

2. Disengage luggage rear plate fixing metal clip with a remover

tool (A), and then remove luggage rear plate.

INSTALLATION

Note the following items, and install in the reverse order of removal.

CAUTION:

When installing luggage rear plate, check that metal clips are securely in body panel holes, and press

them in.

LUGGAGE SIDE LOWER FINISHER
LUGGAGE SIDE LOWER FINISHER : Removal and Installation

INFOID:0000000012199187

REMOVAL

CAUTION:

• When removing, always use a remover tool that is made of plastic.

• Never damage the body.
1. Remove luggage room lamp. Refer to 

INL-49, "Removal and Installation"

.

2. Remove luggage floor board.
3. Remove luggage floor box (Models with 2WD).
4. Remove luggage rear plate. Refer to 

INT-35, "LUGGAGE REAR PLATE : Removal and Installation"

.

5. Remove rear body side welt. Refer to 

INT-21, "BODY SIDE WELT : Removal and Installation"

.

6. Remove rear seat cushion. Refer to 

SE-32, "SEAT CUSHION : Removal and Installation"

.

7. Remove rear seat back. Refer to 

SE-33, "SEATBACK : Removal and Installation"

.

8. Remove side hinge of seatback hinge. Refer to 

SE-38, "SEATBACK HINGE : Removal and Installation"

.

9. Disengage luggage side lower finisher fixing clips with a

remover tool (A), and then remove luggage side lower finisher.

INSTALLATION

Note the following item, and install in the reverse order of removal.

: Metal clip

JMJIA4404ZZ

: Clip

JMJIA4405ZZ


Content   ..  905  906  907  908   ..