Nissan Juke F15. Manual - part 271


  Index      Nissan     Nissan Juke F15 (2015 year) - Service and Repair Manual


Search            


Content   ..  269  270  271  272   ..


Nissan Juke F15. Manual - part 271


NOISE, VIBRATION AND HARSHNESS (NVH) TROUBLESHOOTING

DLN-89

< SYMPTOM DIAGNOSIS >

[TRANSFER: TY21B]

C

E

F

G

H

I

J

K

L

M

A

B

DLN

N

O

P

NOISE, VIBRATION AND HARSHNESS (NVH) TROUBLESHOOTING

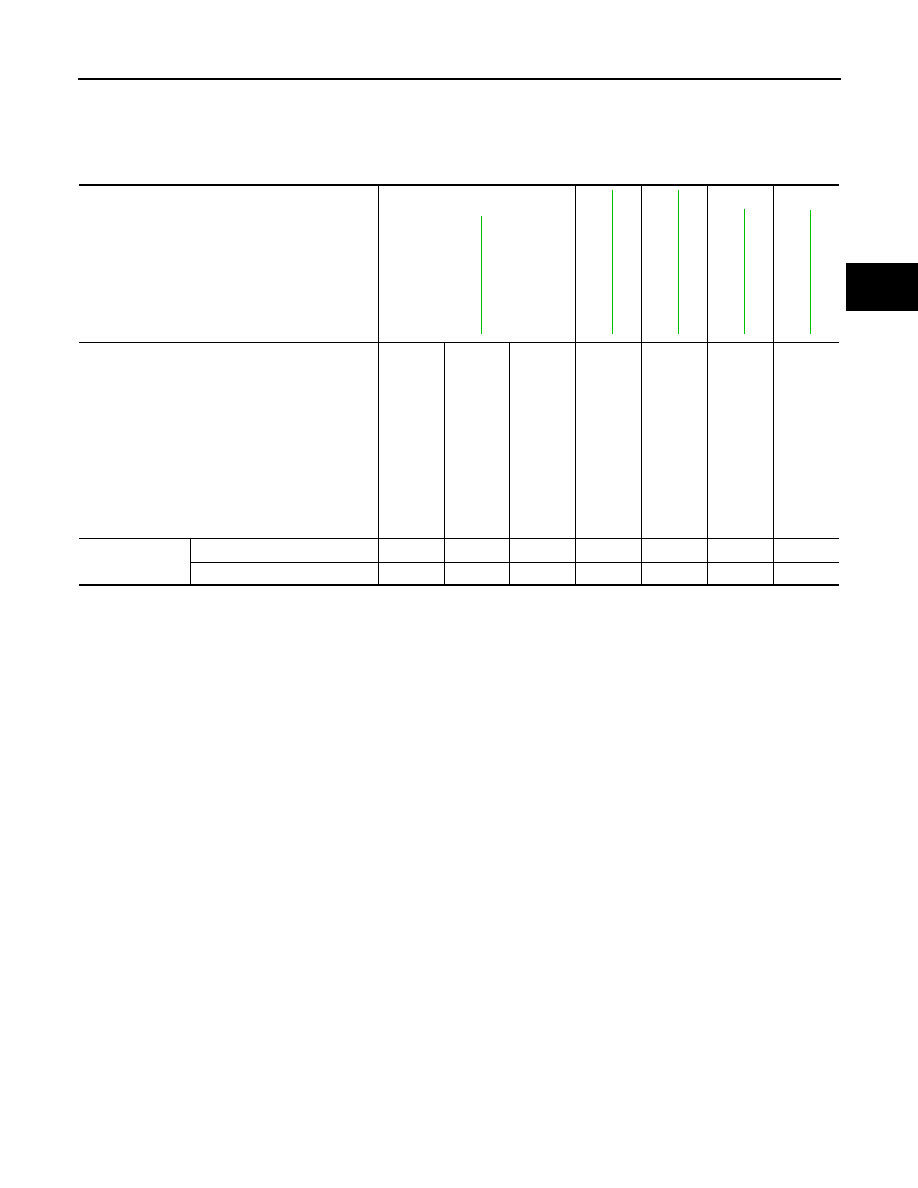
NVH Troubleshooting Chart

INFOID:0000000012199455

Use the chart below to find the cause of the symptom. The numbers indicate the order of the inspection. If necessary, repair or replace these

parts.

Reference

DLN-90, "

Insp

ectio

n"

DLN-96, "

Ex

pl

od

ed

 V

iew

"

DLN-96, "

Ex

pl

od

ed

 V

iew

"

DLN-109, "

In

spec

tion

"

DLN-1

1

5, "

Insp

ectio

n"

SUSPECTED PARTS
(Possible cause)

T

R

ANSFER OIL (Level 

low

)

T

R

ANSFER OIL (W

rong)

T

R

ANSFER OIL (Level 

too high)

LI

QUI

D

 GASKET (Dam

ag

ed

)

OIL

 SEAL

 (W

orn

 or da

ma

ge

d)

GEAR

 (W

orn

 o

da

ma

ge

d)

B

EARING

 (W

orn

 or 

da

ma

ge

d)

Symptom

Noise

1

2

3

3

3

Transfer  oil  leakage

3

1

2

2

DLN-90

< PERIODIC MAINTENANCE >

[TRANSFER: TY21B]

TRANSFER OIL

PERIODIC MAINTENANCE

TRANSFER OIL

Inspection

INFOID:0000000012199456

OIL LEAKAGE

Check transfer surrounding area (oil seal, drain plug, filler plug, and transfer case etc.) for oil leakage.

OIL LEVEL

1. Remove filler plug (1) and gasket. Then check that oil is filled up

from mounting hole for the filler plug.

CAUTION:

Never start engine while checking oil level.

2. Before installing filler plug, set a new gasket. Install filler plug on

transfer and tighten to the specified torque. Refer to 

DLN-116,

"Exploded View"

.

CAUTION:

Never reuse gasket.

Draining

INFOID:0000000012199457

1. Run the vehicle to warm up the transfer unit sufficiently.
2. Stop the engine and remove the drain plug (1) and gasket to

drain the transfer oil.

3. Before installing drain plug, set a new gasket. Install drain plug

on the transfer and tighten to the specified torque. Refer to 

DLN-

116, "Exploded View"

.

CAUTION:

Never reuse gasket.

Refilling

INFOID:0000000012199458

1. Remove filler plug (1) and gasket. Then fill oil up to mounting

hole for the filler plug.

CAUTION:

Carefully fill the oil. (Fill up for approximately 3 minutes.)

2. Leave the vehicle for 3 minutes, and check the oil level again.
3. Before installing filler plug, set a new gasket. Install filler plug on transfer and tighten to the specified

torque. Refer to 

DLN-116, "Exploded View"

.

CAUTION:

Never reuse gasket.

: Vehicle front

JSDIA2080ZZ

: Vehicle front

JSDIA2081ZZ

: Vehicle front

Oil and viscosity

: Refer to 

MA-11, "Fluids 

and Lubricants"

.

Oil capacity

: Refer to 

DLN-120, "Gen-

eral Specifications"

.

JSDIA2080ZZ

AWD CONTROL MODULE

DLN-91

< REMOVAL AND INSTALLATION >

[TRANSFER: TY21B]

C

E

F

G

H

I

J

K

L

M

A

B

DLN

N

O

P

REMOVAL AND INSTALLATION

AWD CONTROL MODULE

Exploded View

INFOID:0000000012199459

Removal and Installation

INFOID:0000000012199460

REMOVAL

1. Turn the ignition switch OFF.
2. Remove front seat (left side). Refer to 

SE-21, "Removal and Installation"

.

3. Remove dush side finisher (left side). Refer to 

INT-21, "DASH SIDE FINISHER : Removal and Installa-

tion"

.

4. Remove front and rear kicking plate inner. Refer to 

INT-19, "KICKING PLATE INNER : Removal and

Installation"

.

5. Remove rear seat cushion. Refer to 

SE-32, "SEAT CUSHION : Removal and Installation"

.

6. Remove outer anchor of front seat belt (passenger side). Refer to 

SB-5, "Exploded View"

.

7. Remove harness clip.
8. Turn floor carpet. Refer to 

INT-24, "Removal and Installation"

.

9. Disconnect AWD control module harness connector.
10. Remove AWD control module mounting nuts.
11. Remove AWD control module.

INSTALLATION

Note the following, and install in the reverse order of removal.

• When installing AWD control module, install it following procedure.

1.

AWD control module

2.

AWD control module harness con-
nector

: Vehicle front

: N·m (kg-m, in-lb)

JSDIA2374GB

DLN-92

< REMOVAL AND INSTALLATION >

[TRANSFER: TY21B]

AWD CONTROL MODULE

1. Align the securing holes (A) of bracket as shown in the figure

and temporarily tighten mounting bolts.

2. When replace AWD control module, hold AWD control module

and remove protector paper on the adhesion area of bracket to

bond to the front floor (LH).

3. Tighten mounting bolts to the specified torque.
• When replacing AWD control module, perform writing unit parame-

ter. Refer to 

DLN-42, "Work Procedure"

.

: Vehicle front

JSDIA2375ZZ


Content   ..  269  270  271  272   ..