Nissan Juke F15. Manual - part 244


  Index      Nissan     Nissan Juke F15 (2015 year) - Service and Repair Manual


Search            


Content   ..  242  243  244  245   ..


Nissan Juke F15. Manual - part 244


DLK-156

< REMOVAL AND INSTALLATION >

[WITH INTELLIGENT KEY SYSTEM]

HOOD LOCK

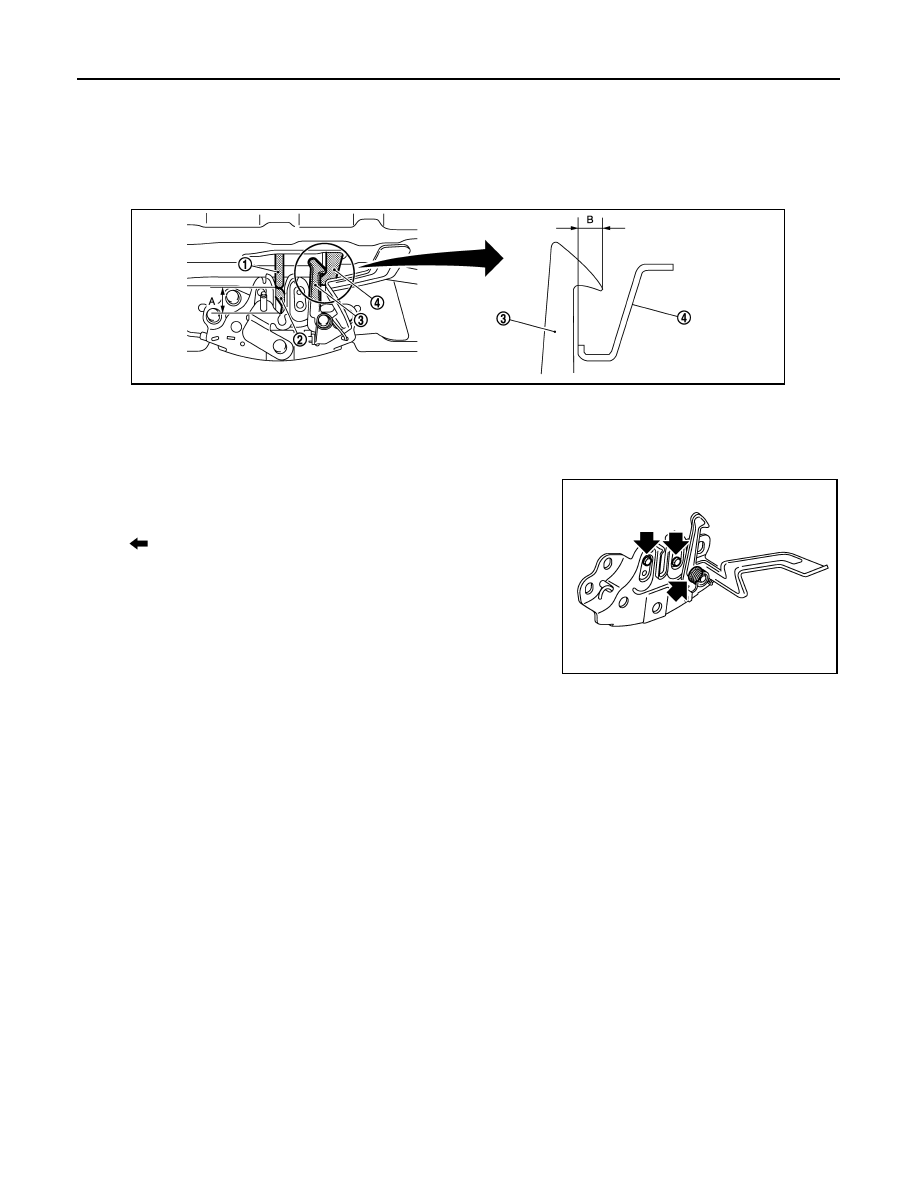
2. Check that primary latch is securely engaged with primary striker when hood assembly is closed [free-fall

from approximately 200 mm (7.874 in) height].

CAUTION:

Never free-fall hood assembly from a height of 300 (11.811 in) mm or more.

3. While operating the hood opener carefully, check that the front end of the hood is lifted by approximately

20 mm (0.787 in) (A). Also, check that the hood opener returns to the original position.

4. Check that secondary latch is properly engaged with secondary striker [6.8 mm (0.268 in)] (B).
5. Check the hood lock lubrication condition. If necessary, apply

body grease to hood lock.

1.

Primary striker

2.

Primary latch

3.

Secondary latch

4.

Secondary striker

: Grease up point

JMKIA5673ZZ

JMKIA5674ZZ

FRONT DOOR LOCK

DLK-157

< REMOVAL AND INSTALLATION >

[WITH INTELLIGENT KEY SYSTEM]

C

D

E

F

G

H

I

J

L

M

A

B

DLK

N

O

P

FRONT DOOR LOCK

Exploded View

INFOID:0000000012196734

DOOR LOCK
DOOR LOCK : Removal and Installation

INFOID:0000000012196735

REMOVAL

1. Remove front door glass and front door lower sash (rear). Refer to 

GW-17, "Removal and Installation"

.

2. Remove inside handle. Refer to 

DLK-158, "INSIDE HANDLE : Removal and Installation"

.

3. Disengage inside handle cable and lock knob cable from cable clip.
4. Remove outside handle bracket. Refer to 

DLK-158, "OUTSIDE HANDLE : Removal and Installation"

.

5. Remove door lock assembly TORX bolts.
6. Disconnect door lock actuator connector, and then remove door lock assembly.

1.

Door key cylinder assembly (driver 
side)
Outside handle escutcheon (passen-
ger side)

2.

Rear gasket

3.

Outside handle bracket

4.

TORX bolt

5.

Key rod (driver side)

6.

Door lock assembly

7.

Inside handle

8.

Outside handle

9.

Front gasket

10. Cable clip

: Pawl 

: Vehicle front

: Always replace after every disassembly.

: N·m (kg-m, in-lb)

: Body grease

JMKIA5883GB

DLK-158

< REMOVAL AND INSTALLATION >

[WITH INTELLIGENT KEY SYSTEM]

FRONT DOOR LOCK

INSTALLATION

Note the following items, and install in the reverse order of removal.

CAUTION:

• Never reuse TORX bolt. Always replace it with a new one when it is removed.

• Check door open/close, lock/unlock operation after installation. 

• Check door lock cable is properly engaged with outside handle bracket.

• Check door lock assembly for poor lubrication. Apply body

grease to door lock if necessary.

INSIDE HANDLE
INSIDE HANDLE : Removal and Installation

INFOID:0000000012196736

REMOVAL

1. Remove front door finisher. Refer to 

INT-13, "Removal and Installation"

.

2. Remove inside handle mounting bolt (A).
3. Disengage inside handle (1) from door panel (2) while sliding

inside handle toward vehicle rear, and then separate inside han-

dle.

4. Disengage inside handle cable (3) and lock knob cable (2), and

then remove inside handle (1).

INSTALLATION

Note the following item, and install in the reverse order of removal.

CAUTION:

Check door open/close, lock/unlock operation after installation.

OUTSIDE HANDLE
OUTSIDE HANDLE : Removal and Installation

INFOID:0000000012196737

REMOVAL

1. Fully close the front door glass.
2. Remove front door finisher. Refer to 

INT-13, "Removal and Installation"

.

: Grease up point

JMKIA5892ZZ

: Vehicle front

JMKIA5884ZZ

JMKIA5885ZZ

FRONT DOOR LOCK

DLK-159

< REMOVAL AND INSTALLATION >

[WITH INTELLIGENT KEY SYSTEM]

C

D

E

F

G

H

I

J

L

M

A

B

DLK

N

O

P

3. Remove sealing screen.

NOTE:

Cut the butyl-tape so that some parts of the butyl-tape do not remain on the sealing screen, if the sealing

screen is reused. 

4. Disengage lock holder (1), and then separate key rod (3) from

door lock assembly (2).(Driver side)

5. Disconnect harness connector of door antenna (1) and door

request switch (2) and remove harness clamp (3).

6. Remove grommet (1) of door side. Loosen, through grommet

hole, TORX bolt (2) that fixes door lock cylinder. (For passenger

side, TORX bolt fixes outside handle escutcheon.)

7. While pulling outside handle, remove door key cylinder assem-

bly (diver side) or outside handle escutcheon (passenger side).

JMKIA5886ZZ

: Vehicle front

JMKIA5887ZZ

JMKIA5888ZZ

JMKIA0560ZZ


Content   ..  242  243  244  245   ..