Nissan Juke F15. Manual - part 1118


  Index      Nissan     Nissan Juke F15 (2015 year) - Service and Repair Manual


Search            


Content   ..  1116  1117  1118  1119   ..


Nissan Juke F15. Manual - part 1118


REAR SEAT

SE-37

< REMOVAL AND INSTALLATION >

C

D

E

F

G

H

I

K

L

M

A

B

SE

N

O

P

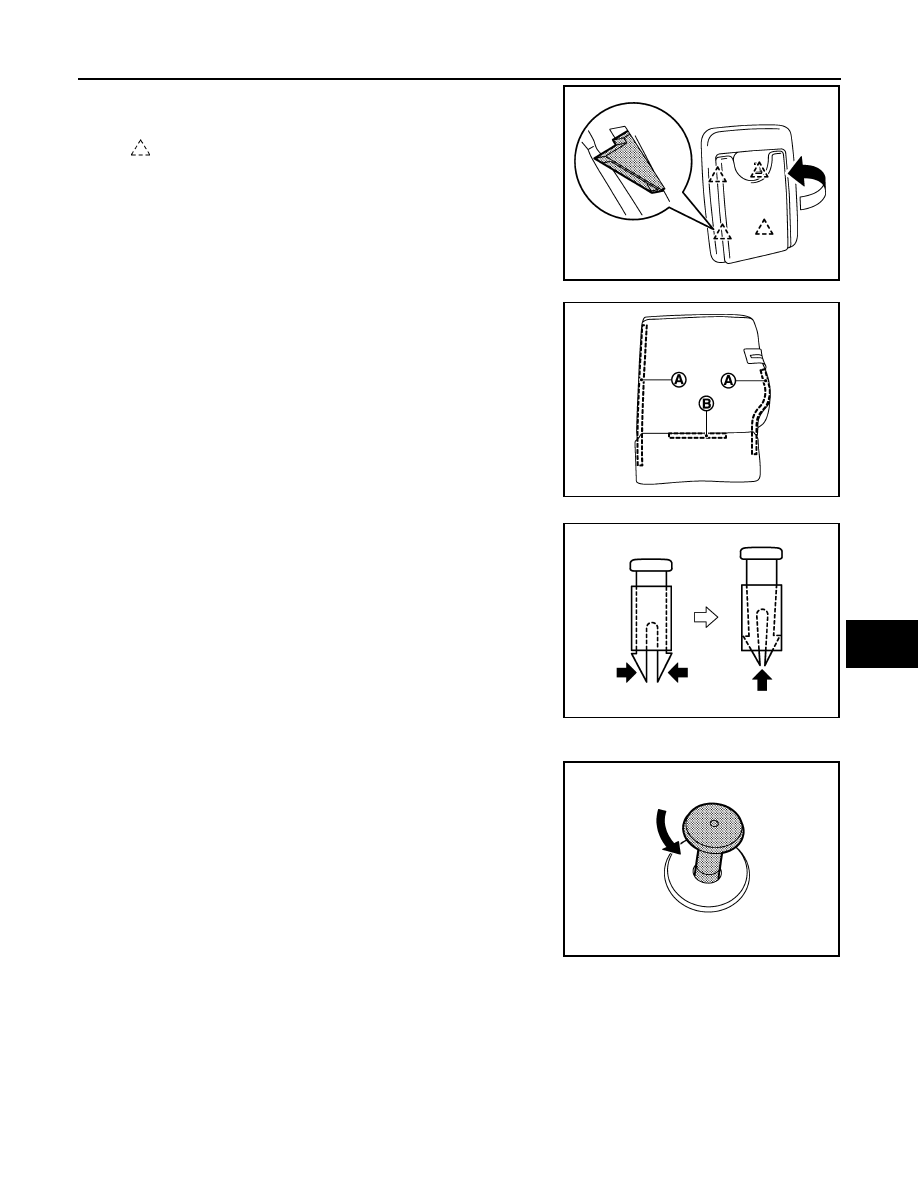
2. Pull tether cover in direction indicated by the arrow as

shown in the figure. Remove tether cover.

3. Open seatback fastener (A) and remove seatback retainer

(B).

4. Use pincers, etc., to press up pawls as shown by the arrows

in the figure, and remove headrest holder from seatback.

CAUTION:

Before installing headrest holder check its orientation.

(front/rear and right/left)

2. Remove seatback lock knob finisher.

1. Rotate seatback lock knob counterclockwise. Remove seat-

back lock knob.

: Pawl

JMJIA4611ZZ

JMJIA4369ZZ

PIIB4084J

JMJIA4374ZZ

SE-38

< REMOVAL AND INSTALLATION >

REAR SEAT

2. Push up seatback lock knob finisher while pressing pawls

indicated by arrows as shown in the figure. Remove seat-

back lock finisher from seatback.

CAUTION:

When installing seatback lock knob finisher, check

front and rear orientation and be careful to install it nor-

mally.

3. Remove seatback trim and seatback pad from seatback frame.
4. Remove hog rings, and separate the seatback trim and seatback pad.

CAUTION:

Before performing separating operation, check the installation position of hog rings.

5. Remove seatback silencer from seatback frame.
6. Remove seatback lock assembly mounting bolts, and then remove seatback lock assembly from seatback

frame.

INSTALLATION

Note the following, and assemble in the reverse order of disassembly.

CAUTION:

Always install the hog ring in position.

SEATBACK HINGE
SEATBACK HINGE : Removal and Installation

INFOID:0000000012196888

CENTER HINGE

Removal

1. Remove seatback LH and RH from the vehicle.

Refer to 

SE-33, "SEATBACK : Removal and Installation"

.

2. Remove seat cushion from the vehicle.

Refer to 

SE-32, "SEAT CUSHION : Removal and Installation"

.

3. Remove center hinge mounting bolts, and then remove center hinge from the vehicle.

Installation

Note the following items, and install in the reverse order of removal.

CAUTION:

When installing center hinge, tighten mounting bolts to the specified torque according to the numeri-

cal order as shown in the figure

JMJIA4375ZZ

REAR SEAT

SE-39

< REMOVAL AND INSTALLATION >

C

D

E

F

G

H

I

K

L

M

A

B

SE

N

O

P

1. Temporarily tighten mounting bolt (1).

2. Tighten mounting bolts in numerical order (2 and 3 as

shown in the figure) to the specified torque.

For the specified torque, refer to 

SE-29, "Exploded View"

.

SIDE HINGE

Removal

1. Remove seatback from the vehicle.

Refer to 

SE-33, "SEATBACK : Removal and Installation"

.

2. Remove side hinge mounting bolt, and then remove side hinge from luggage side lower finisher.

Installation

Installation is the reverse order of removal. Tighten bolts to the specified torque.

For the specified torque, refer to 

SE-29, "Exploded View"

.

SEATBACK STRIKER
SEATBACK STRIKER : Removal and Installation

INFOID:0000000012196889

REMOVAL

1. Remove seatback LH and RH from the vehicle.

Refer to 

SE-33, "SEATBACK : Removal and Installation"

.

2. Remove seat cushion from the vehicle.

Refer to 

SE-32, "SEAT CUSHION : Removal and Installation"

.

3. Remove side hinge from the vehicle.

Refer to 

SE-38, "SEATBACK HINGE : Removal and Installation"

.

4. Remove luggage side lower finisher from the vehicle.

Refer to 

INT-35, "LUGGAGE SIDE LOWER FINISHER : Removal and Installation"

.

5. Remove outer anchor mounting anchor bolt, and then remove outer anchor.
6. Remove mounting bolts or nuts of striker, and then remove striker from the vehicle.

INSTALLATION

Note the following items, and install in the reverse order of removal.

CAUTION:

When installing striker, tighten mounting bolts or nuts to the specified torque according to the numer-

ical order as shown in the figure.

: Vehicle front

JMJIA4608ZZ

SE-40

< REMOVAL AND INSTALLATION >

REAR SEAT

1. Temporarily tighten mounting bolts in numerical order (1

and 2 as shown in the figure).

2. Tighten mounting bolts or nuts to the specified torque in

numerical order (3, 4, and 5 as shown in the figure).

For the specified torque, refer to 

SE-29, "Exploded View"

.

: Vehicle front

JMJIA4455GB


Content   ..  1116  1117  1118  1119   ..