Nissan Tiida C11. Manual - part 839


  Главная      Nissan     Nissan Tiida C11 - Service Manual


поиск по сайту            


содержание   ..  837  838  839  840   ..


Nissan Tiida C11. Manual - part 839


HAC-20

< COMPONENT DIAGNOSIS >

[MANUAL AIR CONDITIONER]

BLOWER MOTOR

2.

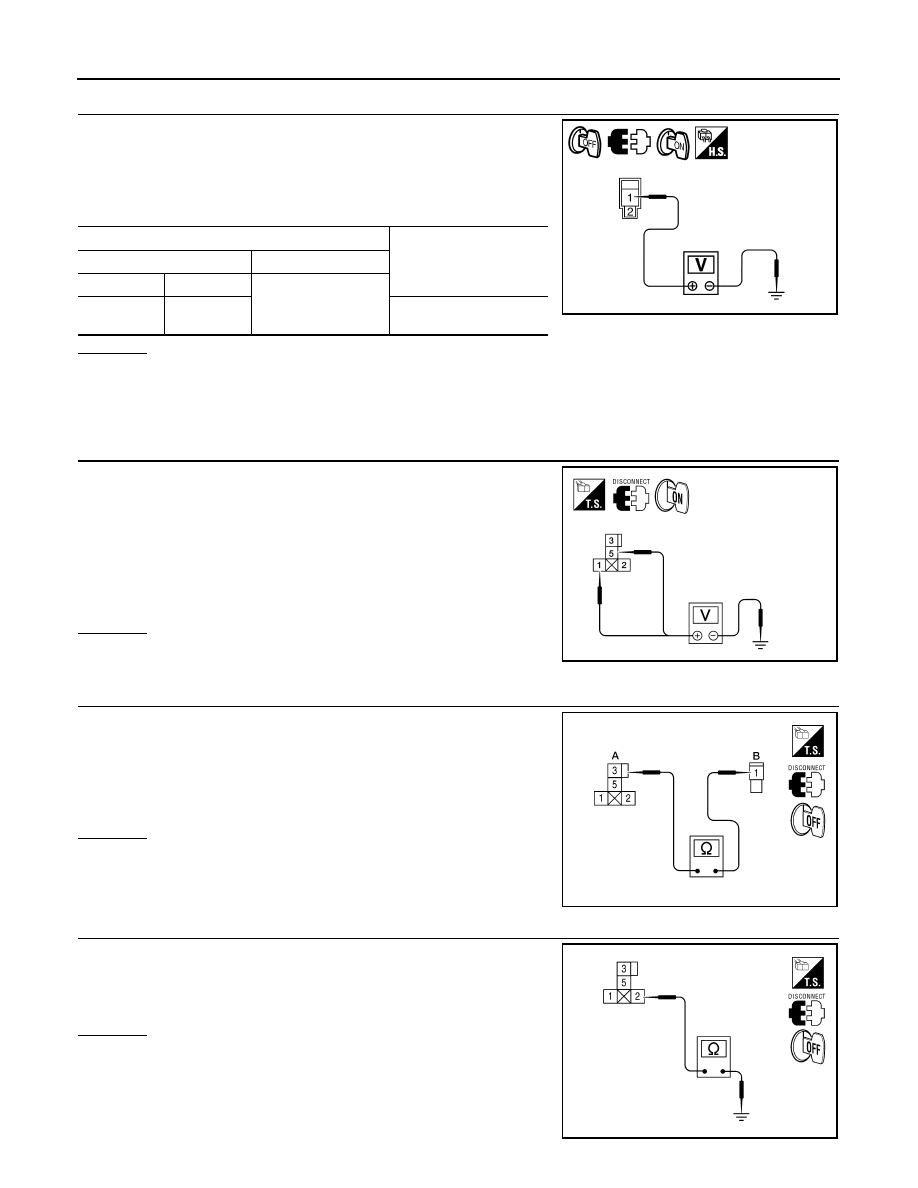
CHECK POWER SUPPLY FOR FRONT BLOWER MOTOR

1.

Turn ignition switch OFF.

2.

Disconnect front blower motor connector.

3.

Turn ignition switch ON.

4.

Check voltage between front blower motor harness connector
M62 terminal 1 and ground.

OK or NG

OK

>> GO TO 6.

NG

>>

Check power supply circuit and 15A fuses [Nos. 15 and 17, located in the fuse block (J/B)].

• If fuses are OK, reinstall fuses and GO TO 3.    
• If fuses are NG, replace fuse and check harness for short circuit. Repair or replace if necessary.

3.

CHECK BLOWER MOTOR RELAY POWER SUPPLY CIRCUITS

1.

Turn ignition switch OFF.

2.

Disconnect blower motor relay connector.

3.

Turn ignition switch ON.

4.

Check voltage between blower motor relay harness connector J-
1 terminal 1, 5 and ground.

OK or NG

OK

>> GO TO 4.

NG

>> Repair harness or connector.

4.

CHECK BLOWER MOTOR RELAY (SWITCH SIDE) CIRCUIT FOR OPEN

1.

Turn ignition switch OFF.

2.

Check continuity between blower motor relay harness connector
J-1 (A) terminal 3 and front blower motor harness connector
M62 (B) terminal 1.

OK or NG

OK

>> GO TO 5.

NG

>> Repair harness or connector.

5.

CHECK BLOWER MOTOR RELAY GROUND CIRCUIT

Check continuity between blower motor relay harness connector J-1
terminal 2 and ground.

OK or NG

OK

>> Replace blower motor relay.

NG

>> Repair harness or connector.

Terminals

Voltage

(Approx.)

(+)

(

)

Connector

Terminal

Ground

Front blower 

motor: M62

1

Battery voltage

WJIA2228E

1 - Ground

Battery voltage should exist.

5 - Ground

Battery voltage should exist.

WJIA1783E

Continuity should exist.

WJIA2263E

Continuity should exist.

WJIA2264E

BLOWER MOTOR

HAC-21

< COMPONENT DIAGNOSIS >

[MANUAL AIR CONDITIONER]

C

D

E

F

G

H

J

K

L

M

A

B

HAC

N

O

P

6.

CHECK FRONT BLOWER MOTOR

Check continuity between front blower motor terminals 1 and 2.
NOTE:
Ensure that there are no foreign particles inside the A/C unit assem-
bly for a smooth rotation of the front blower motor.

OK or NG

OK

>> GO TO 7.

NG

>> Replace front blower motor. Refer to 

XX-XX, "*****"

.

7.

CHECK CIRCUIT CONTINUITY BETWEEN FRONT BLOWER MOTOR AND FRONT AIR CONTROL

1.

Disconnect front air control connector.

2.

Check continuity between front blower motor harness connector
M62 (A) terminal 2 and front air control harness connector M33
(B) terminal 13.

OK or NG

OK

>> GO TO 8.

NG

>> Repair harness or connector.

8.

CHECK FAN SWITCH

Check continuity between front air control terminal 9 and 10, 11, 12,
13, 14.

OK or NG

OK

>> GO TO 9.

NG

>> Replace front air control. Refer to 

XX-XX, "*****"

.

9.

CHECK FAN SWITCH GROUND CIRCUIT

Check continuity between front air control harness connector M33
terminal 9 and ground.

OK or NG

OK

>> Inspection End.

NG

>> Repair harness or connector.

10.

CHECK CIRCUIT CONTINUITY BETWEEN FRONT AIR CONTROL AND FRONT BLOWER MOTOR

RESISTOR

1 - 2

: Continuity should exist.

WJIA2230E

2 - 13

: Continuity should exist.

AWIIA0339ZZ

Terminals

Condition

Continuity

9

14

Blower control dial: OFF

Yes

10

Blower control dial: 1-speed

11

Blower control dial: 2-speed

12

Blower control dial: 3-speed

13

Blower control dial: 4-speed

SJIA0732E

Continuity should exist.

SJIA0734E

HAC-22

< COMPONENT DIAGNOSIS >

[MANUAL AIR CONDITIONER]

BLOWER MOTOR

1.

Turn ignition switch OFF.

2.

Disconnect front blower motor resistor and front air control con-
nectors.

3.

Check continuity between front air control harness connector
M33 (A) terminals and front blower motor resistor harness con-
nector M95 (B) terminals.

OK or NG

OK

>> GO TO 11.

NG

>> Repair harness or connector.

11.

CHECK FAN SWITCH

Check continuity between front air control terminal 9 and 10, 11, 12,
13, 14.

OK or NG

OK

>> Replace the front blower motor resistor. Refer to 

XX-XX, "*****"

.

NG

>> Replace front air control. Refer to 

XX-XX, "*****"

.

A

B

Continuity

Connector

Terminal

Connector

Terminal

Front air control: 

M33

10

Front blower 

motor resistor: 

M95

1

Yes

11

12

3

13

4

SJIA0733E

Terminals

Condition

Continuity

9

14

Fan control dial: OFF

Yes

10

Fan control dial: 1-speed

11

Fan control dial: 2-speed

12

Fan control dial: 3-speed

13

Fan control dial: 4-speed

SJIA0732E

MAGNET CLUTCH

HAC-23

< COMPONENT DIAGNOSIS >

[MANUAL AIR CONDITIONER]

C

D

E

F

G

H

J

K

L

M

A

B

HAC

N

O

P

MAGNET CLUTCH

System Description

INFOID:0000000001547069

SYSTEM DESCRIPTION

Intake sensor controls A/C compressor operation by intake air temperature and signal from ECM.
The defrost A/C switch controls A/C compressor operation by the BCM when the mode switch is turned to the

 (DEF) position.

Low Temperature Protection Control

When intake air temperatures are higher than 4

°

C (39

°

F), the com-

pressor turns ON. The compressor turns OFF when intake air tem-
peratures are lower than 2

°

C (36

°

F).

Magnet Clutch Component Function Check

INFOID:0000000001547070

SYMPTOM: Magnet clutch does not engage.

INSPECTION FLOW

1.

CONFIRM SYMPTOM BY PERFORMING OPERATIONAL CHECK - MAGNET CLUTCH

1.

Turn ignition switch ON.

2.

Turn blower control dial to the desired (1 to 4 speed) position.

3.

Press the A/C switch. A/C indicator will turn on. 

4.

Confirm that the compressor clutch engages (sound or visual inspection).

Can the symptom be duplicated?

YES

>> GO TO 3.

NO

>> GO TO 2.

2.

CHECK FOR ANY SYMPTOMS 

Perform a complete operational check for any symptoms. Refer to 

HAC-6, "Operational Check"

.

Does another symptom exist?

YES

>> Refer to 

HAC-5, "How to Perform Trouble Diagnosis For Quick and Accurate Repair"

NO

>> System OK.

3.

CHECK FOR SERVICE BULLETINS

Check for any service bulletins.

>> GO TO 4.

4.

CHECK COMPRESSOR BELT TENSION

Check compressor belt tension. Refer to 

EM-15, "Checking"

 (HR16DE) or 

EM-142, "Checking Drive Belts"

(MR18DE) or 

EM-263, "Inspection and Adjustment"

 (K9K).

OK or NG

OK

>> GO TO 5.

NG

>> Adjust or replace A/C compressor belt. 

5.

CHECK REFRIGERANT PRESSURE

Check refrigerant pressure with manifold gauge connected. Refer to 

HAC-73, "Component Function Check"

OK or NG

OK

>> GO TO 6.

SJIA0741E


содержание   ..  837  838  839  840   ..