Nissan Tiida C11. Manual - part 1368


  Главная      Nissan     Nissan Tiida C11 - Service Manual


поиск по сайту            


содержание   ..  1366  1367  1368  1369   ..


Nissan Tiida C11. Manual - part 1368


DISASSEMBLY

TM-523

< DISASSEMBLY AND ASSEMBLY >

[TYPE 2 (4AT: RE4F03B)]

C

E

F

G

H

I

J

K

L

M

A

B

TM

N

O

P

b.

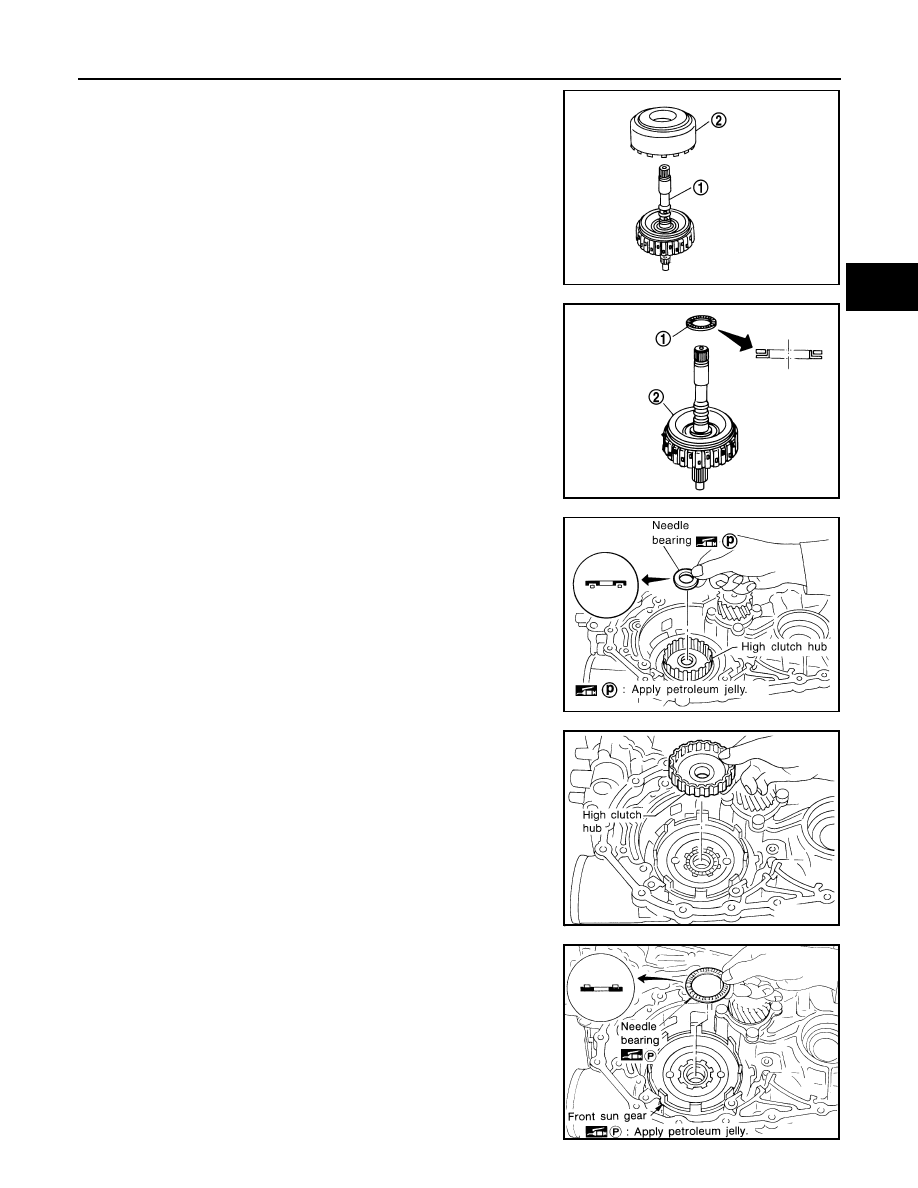
Remove input shaft assembly (high clutch assembly) (1) from
reverse clutch assembly (2).

c.

Remove needle bearing (1) from input shaft assembly (high
clutch drum) (2).
• Inspect needle bearing (1) and input shaft assembly (high

clutch drum) (2), and replace if damaged or worn.

32. Remove needle bearing from high clutch hub.

• Inspect needle bearing, and replace if damaged or worn.

33. Remove high clutch hub from front sun gear.

• Inspect high clutch hub, and replace if damaged or worn.

34. Remove needle bearing from front sun gear.

• Inspect needle bearing, and replace if damaged or worn.

SCIA6958E

SCIA6959E

SAT371D

SAT370D

SAT369D

TM-524

< DISASSEMBLY AND ASSEMBLY >

[TYPE 2 (4AT: RE4F03B)]

DISASSEMBLY

35. Remove front sun gear from front planetary carrier.

36. Remove needle bearing (1) from front sun gear (2).

• Inspect needle bearing (1) and front sun gear (2), and

replace if damaged or worn.

37. Remove front planetary carrier and low one-way clutch according to the following procedures.

a.

Remove snap ring using suitable tool.

b.

Remove low one-way clutch (1) and front planetary carrier (2) as
a set from transaxle case.

SAT368D

SCIA6960E

SCIA3633E

SCIA5896J

DISASSEMBLY

TM-525

< DISASSEMBLY AND ASSEMBLY >

[TYPE 2 (4AT: RE4F03B)]

C

E

F

G

H

I

J

K

L

M

A

B

TM

N

O

P

c.

Check that low one-way clutch rotates counter-clockwise around
front planetary carrier. Then try to turn it clockwise and check
that it is locked.
• Replace low one-way clutch if necessary.

d.

Remove low one-way clutch from front planetary carrier by turn-
ing it in the direction of unlock.
• Inspect low one-way clutch, and replace if damaged or

worn.

e.

Remove needle bearing (1) from front planetary carrier (2).
• Inspect needle bearing (1) and front planetary carrier (2),

and replace if damaged or worn.

f.

Check clearance between pinion washer and front planetary
carrier using feeler gauge.

• Replace front planetary carrier if the clearance exceeds

allowable limit.

38. Remove rear planetary carrier and rear sun gear according to the following procedures.

a.

Remove rear planetary carrier (with rear sun gear) from tran-
saxle case.

SAT048D

SCIA6047J

Standard clearance and allowable limit:

Refer to 

TM-323, "Planetary Carrier"

.

SAT050D

SAT051D

TM-526

< DISASSEMBLY AND ASSEMBLY >

[TYPE 2 (4AT: RE4F03B)]

DISASSEMBLY

b.

Remove rear sun gear from rear planetary carrier.
• Inspect rear sun gear, and replace if damaged or worn.

c.

Remove needle bearing (1) from rear planetary carrier (2).
• Inspect needle bearing (1) and rear planetary carrier (2),

and replace if damaged or worn.

d.

Check clearance between pinion washer and rear planetary car-
rier using feeler gauge.

• Replace rear planetary carrier if the clearance exceeds

allowable limit.

39. Remove rear internal gear (1) and forward clutch hub (2) as a

set from forward clutch drum.

40. Remove needle bearing (1) from rear internal gear (2).

• Inspect needle bearing (1), and replace if damaged or

worn.

SAT052D

SCIA5927J

Standard clearance and allowable limit:

Refer to 

TM-323, "Planetary Carrier"

.

SAT054D

SCIA5897J

SCIA6041J


содержание   ..  1366  1367  1368  1369   ..