Nissan Tiida C11. Manual - part 1355


  Главная      Nissan     Nissan Tiida C11 - Service Manual


поиск по сайту            


содержание   ..  1353  1354  1355  1356   ..


Nissan Tiida C11. Manual - part 1355


PREPARATION

TM-471

< PREPARATION >

[TYPE 2 (4AT: RE4F03B)]

C

E

F

G

H

I

J

K

L

M

A

B

TM

N

O

P

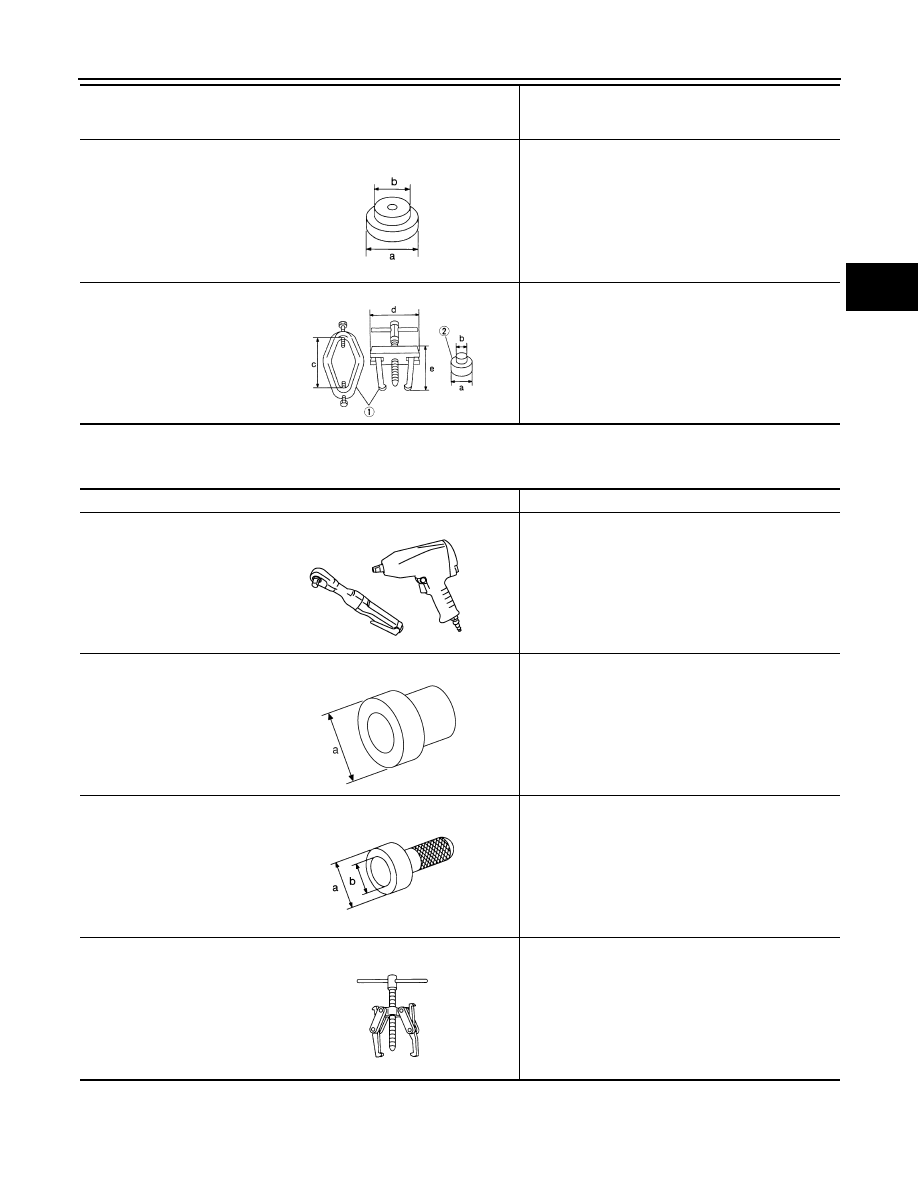
Commercial Service Tool

INFOID:0000000001731414

ST30633000
(       —       )
Drift

Installing differential side bearing outer races
a: 67 mm (2.48 in) dia.
b: 49 mm (1.93 in) dia.

ST3306S001
(J-22888-D)
Differential side bearing pull-
er set
1.

ST33051001
Puller

2.

ST33061000
Adapter

Removing differential side bearing inner race
a: 38 mm (1.50 in) dia.
b: 28.5 mm (1.122 in) dia.
c: 130 mm (5.12 in)
d: 135 mm (5.31 in)
e: 100 mm (3.94 in)

Tool number
(Kent-Moore No.)
Tool name

Description

NT073

AMT153

Tool name

Description

Power tool

Loosening bolts and nuts

Drift

Installing manual shaft oil seal
a: 22 mm (0.87 in) dia.

Drift

Installing RH differential side oil seal
a: 54 mm (2.13 in) dia.
b: 47 mm (1.85 in) dia.

Puller

• Removing idler gear bearing inner race
• Removing and installing band servo piston snap 

ring

PBIC0190E

SCIA7105E

NT115

NT077

TM-472

< PREPARATION >

[TYPE 2 (4AT: RE4F03B)]

PREPARATION

Drift

Removing idler gear bearing inner race
a: 34 mm (1.34 in) dia.

Drift

Installing differential side bearings
a: 45 mm (1.77 in) dia.
b: 41 mm (1.61 in) dia.

Pin punch

Aligning groove of manual shaft and hole of transaxle 
case
a: 2 mm (0.08 in) dia.

Drift

Removing idler gear bearing inner race
a: 34 mm (1.34 in) dia.

Drift

Installing radial needle bearing on bearing retainer
a: 36 mm (1.42 in) dia.

Tool name

Description

SCIA7105E

NT115

NT410

NT109

NT083

A/T FLUID

TM-473

< ON-VEHICLE MAINTENANCE >

[TYPE 2 (4AT: RE4F03B)]

C

E

F

G

H

I

J

K

L

M

A

B

TM

N

O

P

ON-VEHICLE MAINTENANCE

A/T FLUID

Checking A/T Fluid

INFOID:0000000001728296

1.

Warm up engine.

2.

Check for A/T fluid leakage.

3.

Before driving, A/T fluid level can be checked at A/T fluid tem-
peratures of 30 to 50

°

C (86 to 122

°

F) using the “COLD” range

on A/T fluid level gauge.

a.

Park vehicle on level surface and set parking brake.

b.

Start engine and move selector lever through each gear posi-
tion. Leave selector lever in “P” position.

c.

Check A/T fluid level with engine idling.

d.

Remove A/T fluid level gauge and wipe clean with lint-free cloth.

CAUTION:

When wiping the A/T fluid level gauge, always use lint-free
cloth.

e.

Re-insert A/T fluid level gauge into A/T fluid charging pipe as far
as it will go.

CAUTION:

Firmly secure the A/T fluid level gauge to the A/T fluid
charging pipe using the stopper attached.

f.

Remove A/T fluid level gauge and note reading. If reading is at
low side of range, add A/T fluid to the A/T fluid charging pipe.

CAUTION:

Do not overfill.

4.

Drive vehicle for approximately 5 minutes.

5.

Re-check A/T fluid level at A/T fluid temperatures of 50 to 80

°

C (122 to 176

°

F) using “HOT” range on A/T

fluid level gauge.

CAUTION:

• When wiping the A/T fluid level gauge, always use lint-free cloth.
• Firmly secure the A/T fluid level gauge to the A/T fluid charging pipe using the stopper attached.

6.

Check A/T fluid condition and make any necessary repairs. If the A/T fluid smells burnt, contains frictional
material (clutches, bands, etc.), or if the A/T is repaired, overhauled, or replaced, inspect and clean the A/
T fluid cooler mounted in the radiator. Refer to 

TM-474, "A/T Fluid Cooler Cleaning"

.

7.

Install the removed A/T fluid level gauge into the A/T fluid charging pipe.

CAUTION:

Firmly secure the A/T fluid level gauge to the A/T fluid charging pipe using the stopper attached.

Changing A/T Fluid

INFOID:0000000001728297

1.

Warm up A/T fluid.

2.

Stop engine.

3.

Drain A/T fluid by removing the drain plug from the transaxle.

4.

Reinstall the drain plug and new gasket and tighten to the specified torque.

CAUTION:

Do not reuse drain plug gasket.

SCIA3451E

SMA051D

Drain plug:

Refer to 

TM-213, "Component"

.

TM-474

< ON-VEHICLE MAINTENANCE >

[TYPE 2 (4AT: RE4F03B)]

A/T FLUID

5.

Refill the transaxle with new specified A/T fluid through the A/T fluid charging pipe. Always refill the tran-
saxle with the same volume of A/T fluid that was drained out.

6.

Run engine at idle speed for 5 minutes.

7.

Check A/T fluid level and condition. Refer to 

TM-473, "Checking A/T Fluid"

.

A/T Fluid Cooler Cleaning

INFOID:0000000001731917

Whenever the A/T is repaired, overhauled, or replaced, the A/T fluid cooler mounted in the radiator must be
inspected and cleaned.
Metal debris and friction material, if present, can become trapped in the A/T fluid cooler. This debris can con-
taminate the newly serviced A/T or, in severe cases, can block or restrict the flow of A/T fluid. In either case,
malfunction of the newly serviced A/T may result.
Debris, if present, may build up as A/T fluid enters the cooler inlet. It will be necessary to back flush the cooler
through the cooler outlet in order to flush out any built up debris.

A/T FLUID COOLER CLEANING PROCEDURE

1.

Identify the A/T inlet and outlet fluid cooler hoses.

2.

Position an oil pan under the A/T inlet and outlet fluid cooler
hoses.

3.

Disconnect the A/T fluid cooler inlet and outlet rubber hoses
from the steel cooler tubes or bypass valve.
NOTE:
Replace the cooler hoses if rubber material from the hose
remains on the tube fitting.

4.

Allow any A/T fluid that remains in the cooler hoses to drain into
the oil pan.

5.

Insert the extension adapter hose of a can of Transmission
Cooler Cleaner (Nissan P/N 999MP-AM006) into the cooler out-
let hose.

CAUTION:

• Wear safety glasses and rubber gloves when spraying the

Transmission Cooler Cleaner.

• Spray Transmission Cooler Cleaner only with adequate

ventilation.

• Avoid contact with eyes and skin.
• Do not breath vapors or spray mist.

6.

Hold the hose and can as high as possible and spray Transmis-
sion Cooler Cleaner in a continuous stream into the cooler outlet
hose until A/T fluid flows out of the cooler inlet hose for 5 seconds. 

7.

Insert the tip of an air gun into the end of the cooler outlet hose.

8.

Wrap a shop rag around the air gun tip and end of cooler outlet
hose.

9.

Blow compressed air regulated to 5 - 9 kg/cm

2

 (70 - 130 psi) through the cooler outlet hose for 10 seconds

to force out any remaining A/T fluid.

10. Repeat steps 5 through 9 three additional times.

Fluid grade and capacity:

Refer to 

MA-19, "Fluids and Lubricants"

.

SCIA5628E

SCIA5629E

SCIA5630E


содержание   ..  1353  1354  1355  1356   ..