Nissan Tiida C11. Manual - part 1313


  Главная      Nissan     Nissan Tiida C11 - Service Manual


поиск по сайту            


содержание   ..  1311  1312  1313  1314   ..


Nissan Tiida C11. Manual - part 1313


ASSEMBLY

TM-303

< DISASSEMBLY AND ASSEMBLY >

[TYPE 1 (4AT: RE4F03B)]

C

E

F

G

H

I

J

K

L

M

A

B

TM

N

O

P

Assembly (2)

INFOID:0000000001730998

1.

Remove paper rolled around bearing retainer.
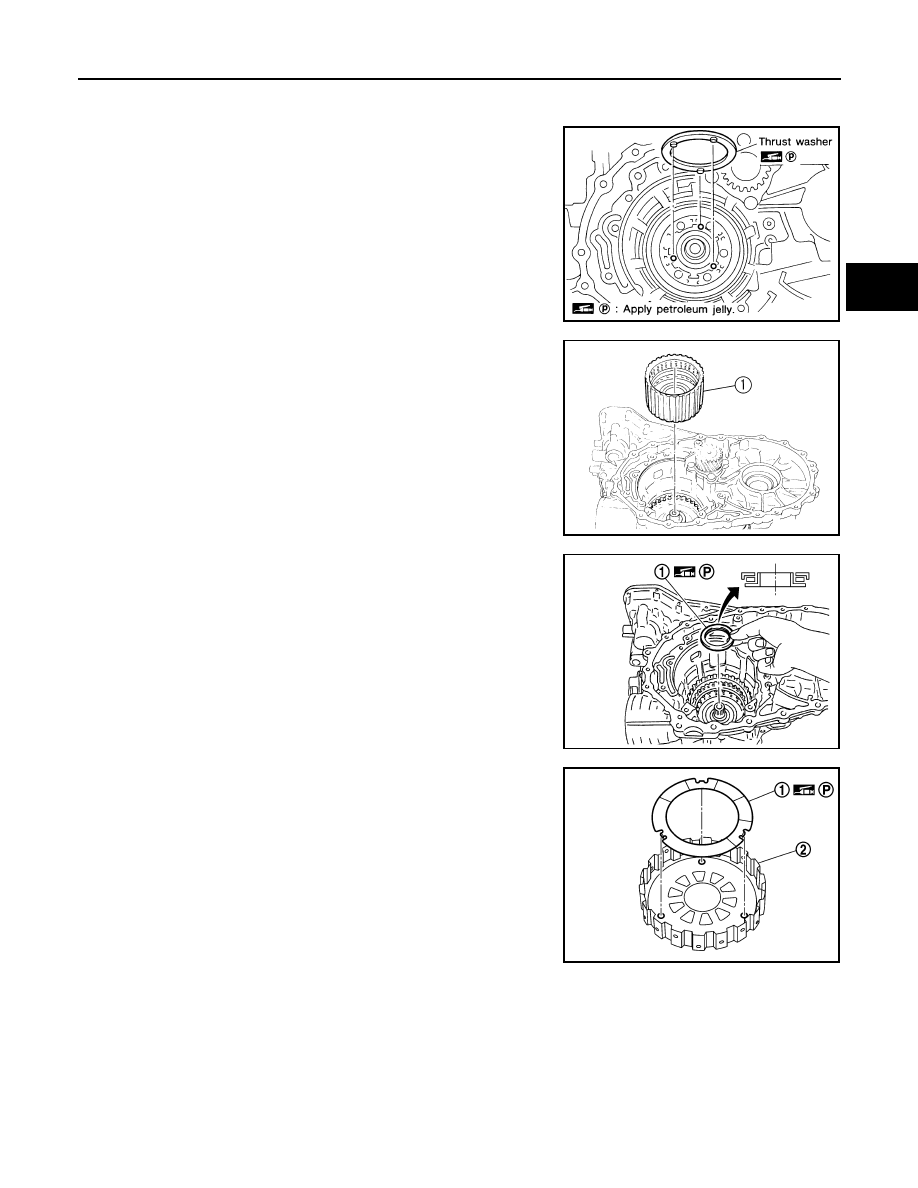
2.

Install thrust washer on bearing retainer.

CAUTION:

Align pawls of thrust washer with holes of bearing retainer.

3.

Install forward clutch assembly and overrun clutch assembly (1)
into transaxle case.

CAUTION:

• Align teeth of low & reverse brake drive plates before

installing.

• Make sure that bearing retainer seal rings are not spread.

4.

Install needle bearing (1) on bearing retainer.

CAUTION:

Be careful with the direction of needle bearing.

5.

Install thrust washer (1) on overrun clutch hub (2).

CAUTION:

Align pawls of thrust washer (1) with holes of overrun
clutch hub (2).

SAT354D

SCIA5900J

SCIA5926J

SCIA5899J

TM-304

< DISASSEMBLY AND ASSEMBLY >

[TYPE 1 (4AT: RE4F03B)]

ASSEMBLY

6.

Install overrun clutch hub (1) into forward clutch drum.

CAUTION:

Align teeth of overrun clutch drive plates before installing.

7.

Hold forward clutch hub, and check that rear internal gear locks
when tried to rotate counterclockwise.

CAUTION:

If rear internal gear rotates counterclockwise, check instal-
lation direction of forward one-way clutch.

8.

Install needle bearing (1) on rear internal gear (2).

CAUTION:

Be careful with the direction of needle bearing (1).

9.

Install rear internal gear (1) and forward clutch hub (2) as a set
into forward clutch drum.

CAUTION:

Align teeth of forward clutch drive plates before installing.

10. Install needle bearing (1) on rear planetary carrier (2).

CAUTION:

Be careful with the direction of needle bearing (1).

SCIA5898J

SCIA7078E

SCIA6041J

SCIA5897J

SCIA5927J

ASSEMBLY

TM-305

< DISASSEMBLY AND ASSEMBLY >

[TYPE 1 (4AT: RE4F03B)]

C

E

F

G

H

I

J

K

L

M

A

B

TM

N

O

P

11. Install rear sun gear on rear planetary carrier.

CAUTION:

Be careful with the direction of rear sun gear.

12. Install rear planetary carrier in transaxle case.

13. Install needle bearing (1) on front planetary carrier (2).

CAUTION:

Be careful with the direction of needle bearing (1).

14. Install low one-way clutch to front planetary carrier by turning it

in the direction of unlock.

15. Check that low one-way clutch rotates counterclockwise around

front planetary carrier. Then try to turn it clockwise and check
that it is locked.

16. Install front planetary carrier (2) and low one-way clutch (1) as a

set into transaxle case.

SAT052D

SAT051D

SCIA6047J

SAT048D

SCIA5896J

TM-306

< DISASSEMBLY AND ASSEMBLY >

[TYPE 1 (4AT: RE4F03B)]

ASSEMBLY

17. Install snap ring into transaxle case using suitable tool.

18. Install needle bearing (1) on front sun gear (2).

CAUTION:

Be careful with the direction of needle bearing (1).

19. Install front sun gear on front planetary carrier.

20. Install needle bearing on front sun gear.

CAUTION:

Be careful with the direction of needle bearing.

21. Install high clutch hub on front sun gear.

SCIA3633E

SCIA6960E

SAT368D

SAT369D

SAT370D


содержание   ..  1311  1312  1313  1314   ..