Nissan Tiida C11. Manual - part 1072


  Главная      Nissan     Nissan Tiida C11 - Service Manual


поиск по сайту            


содержание   ..  1070  1071  1072  1073   ..


Nissan Tiida C11. Manual - part 1072


ENGINE MAINTENANCE (K9K)

MA-45

< ON-VEHICLE MAINTENANCE >

C

D

E

F

G

H

I

J

K

L

M

B

MA

N

O

A

• Pull negative-pressure valve to open it, and make sure that it is

completely closed when released.

- Make sure that there is no dirt or damage on the valve seat of radi-

ator cap negative-pressure valve. 

- Make sure that the valve operates properly in the opening and

closing conditions.

• Check radiator cap relief pressure using suitable tool.

- When connecting the radiator cap to the tester, apply water or

coolant to the cap seal surface. 

- Replace the radiator cap if there is an abnormality in the negative-

pressure valve, or if the open-valve pressure is outside of the stan-
dard values.

• Replace radiator cap if there it does not comply to specifications to the above three checks.

CAUTION:

When installing radiator cap, thoroughly wipe out the radiator filler neck to remove any waxy residue
or foreign material.

RADIATOR : Checking Radiator

INFOID:0000000001730885

Check radiator for mud or clogging. If necessary, clean radiator as follows.
• Be careful not to bend or damage radiator fins.
• When radiator is cleaned without removal, remove all surrounding parts such as cooling fan, radiator shroud

and horns. Then tape harness and connectors to prevent water from entering.

1.

Apply water by hose to the back side of the radiator core vertically downward.

2.

Apply water again to all radiator core surface once per minute.

3.

Stop washing if any stains no longer flow out from radiator.

4.

Blow air into the back side of radiator core vertically downward.
• Use compressed air lower than 490 kPa (4.9 bar, 5 kg/cm

2

, 71 psi) and keep distance more than 30 cm

(11.8 in). 

5.

 Blow air again into all the radiator core surfaces once per minute until no water sprays out.
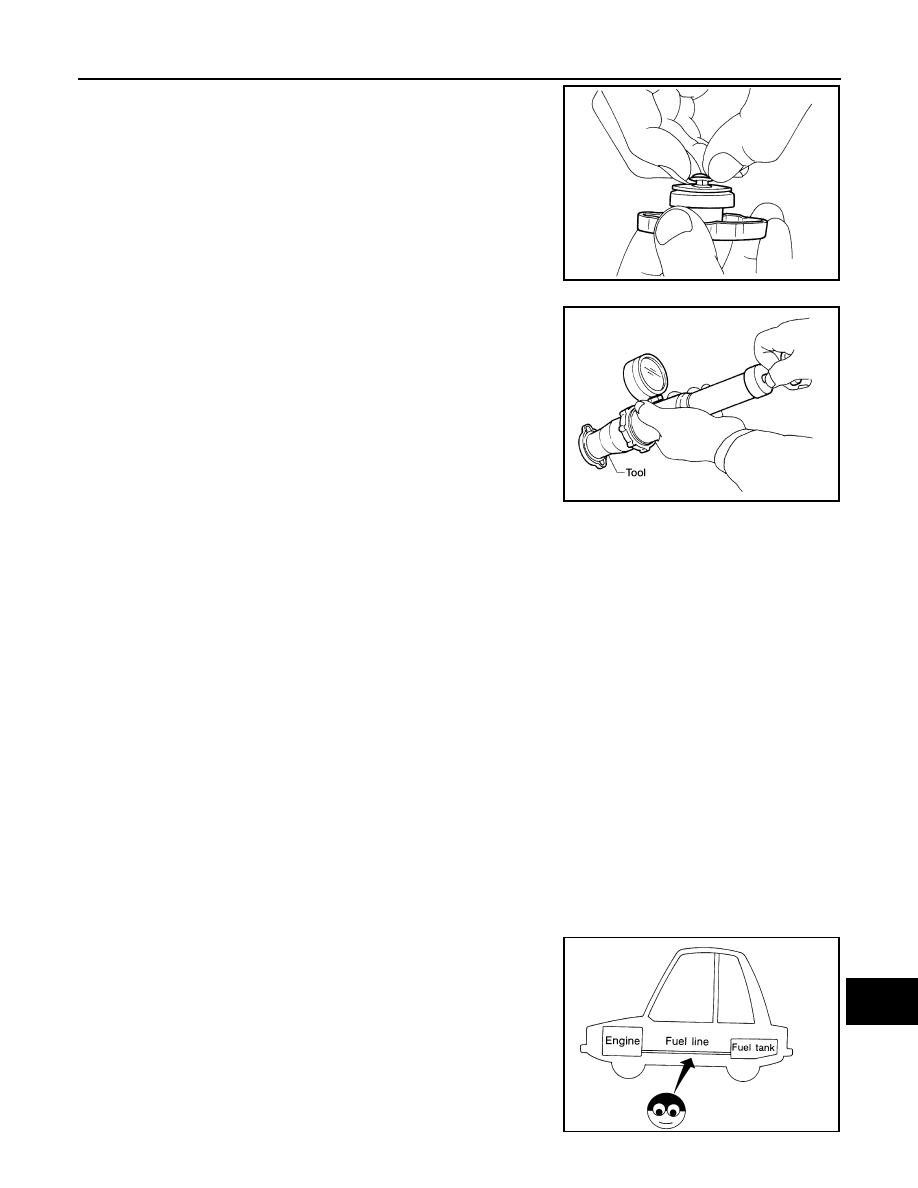
FUEL LINES

FUEL LINES : Inspection

INFOID:0000000001277645

Inspect fuel lines, filler cap and tank for improper attachment, leaks,
cracks, damage, loose connections, chafing or deterioration.
If necessary, repair or replace damaged parts.

SMA967B

Standard: 78 – 98 kPa (0.78 - 0.98 bar, 0.8 – 1.0 kg/cm

2

, 11 

– 14 psi)

Limit: 59 kPa (0.59 bar, 0.6 kg/cm

2

, 9 psi)

WBIA0570E

SMA803A

MA-46

< ON-VEHICLE MAINTENANCE >

ENGINE MAINTENANCE (K9K)

AIR CLEANER FILTER

AIR CLEANER FILTER : Removal and Installation

INFOID:0000000001730875

REMOVAL

1.

Push the tabs (A) of both ends of the air cleaner cover (1) into
the inside (B).

2.

Pull up the air cleaner cover (1) and remove it (C).

3.

Remove air cleaner filter (1) and holder (2) assembly from the
air cleaner case.

4.

Remove the air cleaner filter (1) from the holder (2).

INSPECTION AFTER REMOVAL

It is necessary to clean air cleaner filter or replace it at the recommended intervals, more often under dusty
conditions. Refer to 

MA-7, "Periodic Maintenance"

.

• Blow air into the back side of air cleaner filter until no objects spray

out.

INSTALLATION

Installation is in the reverse order of removal.
• Install the air cleaner cover (1) in the direction shown.

ENGINE OIL

PBIC3557J

PBIC3558J

SMA384C

2

: Air cleaner filter

3

: Holder

PBIC3559J

ENGINE MAINTENANCE (K9K)

MA-47

< ON-VEHICLE MAINTENANCE >

C

D

E

F

G

H

I

J

K

L

M

B

MA

N

O

A

ENGINE OIL : Inspection

INFOID:0000000001730878

OIL LEVEL AND MUDDINESS

• Before starting the engine, check the oil level placing the vehicle

on a level surface. If the engine is already started, stop it and allow
10 minutes before checking.

• Make sure the oil level is within the range shown.
• If it is out of range, adjust it.
• Check the oil for white turbidity or remarkable contamination.
• If the oil becomes turbid and white, it is highly probable that it is

contaminated with coolant. Find the cause and repair.

OIL LEAKAGE

Check for oil leakage around the following area.
• Oil  pan
• Oil pan drain plug
• Oil pressure switch
• Oil filter bracket
• Vacuum pump
• Oil pump housing
• Mating surface between cylinder block and cylinder head
• Mating surface between cylinder head and rocker cover
• Oil cooler
• Crankshaft oil seals

OIL PRESSURE CHECK

WARNING:

• Be careful not to burn yourself, as the engine oil is hot.
• Oil pressure check should be done in Neutral “N” position.

1.

Check the engine oil level.

2.

Remove engine undercover using power tool.

3.

Disconnect the electrical connector (A) and remove the oil pres-
sure switch (1) to connect the oil pressure gauge [SST:
KV113E0020 (Mot. 836-05)].

4.

After warming up the engine, make sure oil pressure corre-
sponding to the engine speed is produced.

5.

After checking, install the oil pressure switch (1) as follows.

a.

Remove old sealant adhering to the oil pressure switch (1) and
engine.

b.

Apply thread sealant.
Use Genuine Liquid Gasket or equivalent.

6.

Start engine and check for oil leakage.

ENGINE OIL : Draining

INFOID:0000000001730876

WARNING:

• Be careful not to burn yourself, as the engine oil is hot.

MBIB0548E

Idle speed

: Refer to 

LU-33, "Engine Oil Pressure"

.

3000 rpm

Refer to 

LU-33, "Engine Oil Pressure"

.

Oil pressure switch:

: 25 N·m (2.55 kg-m, 18.4 ft-lb)

ALBIA0418ZZ

MA-48

< ON-VEHICLE MAINTENANCE >

ENGINE MAINTENANCE (K9K)

• Prolonged and repeated contact with used engine oil may cause skin cancer: try to avoid direct skin

contact with used oil. If skin contact is made, wash thoroughly with soap or hand cleaner as soon as
possible. 

1.

Put the vehicle on a level surface.

2.

Warm up engine, and check for oil leakage from engine components.

3.

Stop engine and wait for 10 minutes.

4.

Loosen oil filler cap.

5.

Remove drain plug and then drain engine oil.

ENGINE OIL : Refilling

INFOID:0000000001730877

1.

Refill with new engine oil.

• The refill capacity depends on the oil temperature and drain time.

Use these specifications for reference only.
Always use the dipstick to determine when the proper amount of oil
is in the engine.

CAUTION:

• Be sure to clean drain plug and install with new washer.
• The refill capacity depends on the oil temperature and drain

time. Use these specifications for reference only.
Always use the dipstick to determine when the proper amount of oil is in the engine.

2.

Warm up engine and check area around drain plug and oil filter for oil leakage.

3.

Stop engine and wait for 10 minutes.

4.

Check oil level and add engine oil as necessary. Refer to 

LU-26, "Inspection"

.

OIL FILTER

OIL FILTER : Replacement

INFOID:0000000001730879

1.

Remove engine undercover using power tool.

2.

Using an oil filter wrench [SST: KV113C0010 (Mot. 1329)],
remove oil filter.

CAUTION:

• Be careful not to get burned when the engine and engine

oil are hot.

• When removing, prepare a shop cloth to absorb any oil

leakage or spillage.

• Do not allow engine oil to adhere to the drive belts.
• Completely wipe off any oil that adhere to the engine and

the vehicle.

3.

Remove foreign materials adhering to the oil filter installation
surface.

4.

Install oil filter bracket to oil cooler.

CAUTION:

Install oil filter bracket, positioning lug in the hole of oil cooler.

Oil capacity 
(Approximate)

: Refer to 

MA-19, "Fluids and 

Lubricants"

.

MBIB0548E

MBIB0551E


содержание   ..  1070  1071  1072  1073   ..