Mitsubishi Outlander (2022 year). Manual in english - page 12
VENTILATORS
it misaligned or bent, the sensing zone may
be altered and the MOD system may not
detect objects properly.
. When the temperature is extremely high or
low, the screen may not display objects
clearly. This is not a malfunction.
NOTE:
The green MOD icon will change to orange if
one of the following has occurred.
. When the system is malfunctioning.
. When the component temperature
reaches a high level (icon will blink).
. When the rearview camera has detected
WAE0426X
WAE0444X
a blockage (icon will blink).
SYSTEM MAINTENANCE
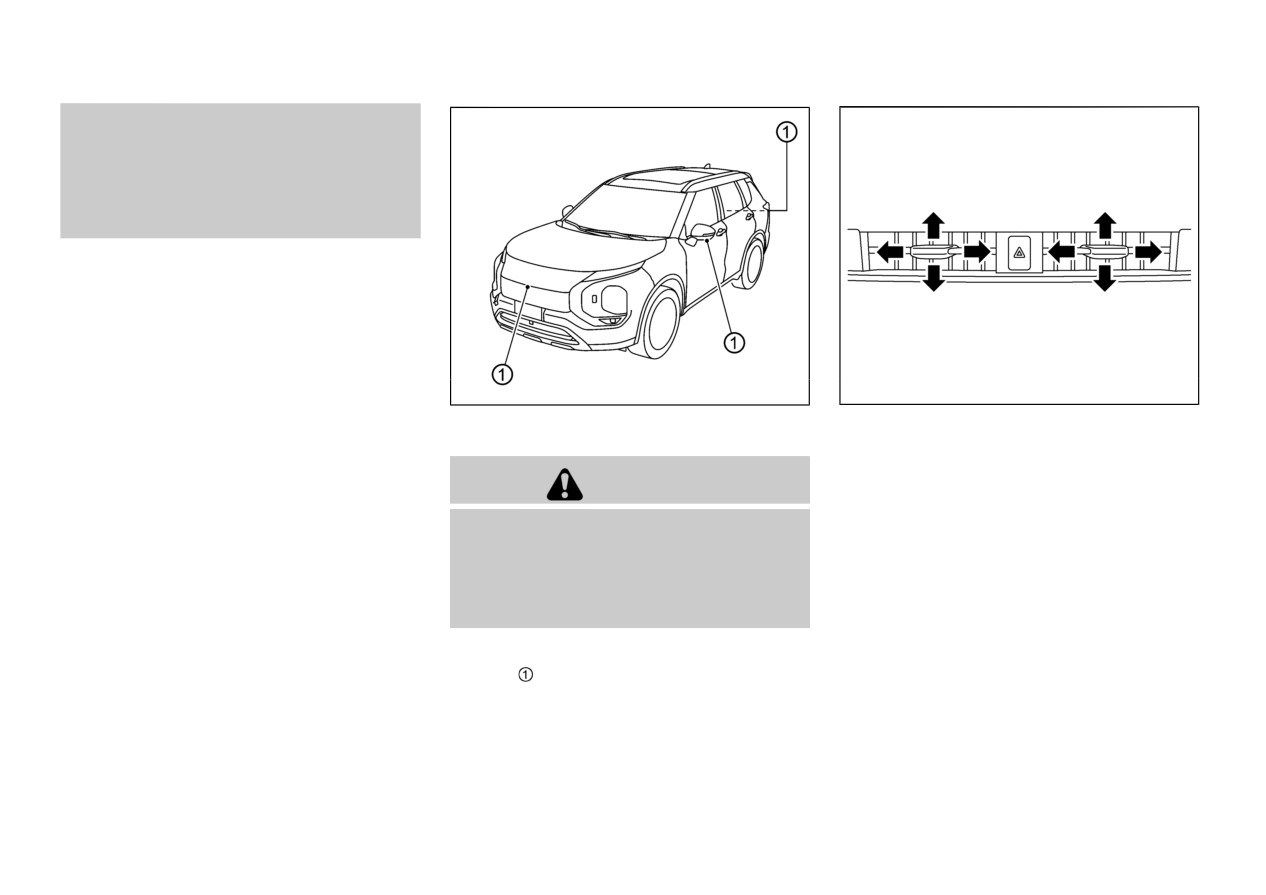
CENTER VENTILATORS
If the icon light continues to illuminate in
Adjust the air flow direction of the ventilators
orange, have the MOD system checked. It is
by moving the center knob (up/down, left/right)
CAUTION
recommended that you visit an authorized
until the desired position is achieved.
Mitsubishi Motors dealer for this service.
To close the vent, fully move the knob to the
. Do not use alcohol, benzine or thinner to
clean the camera. This will cause disco-
outer side.
loration.
. Do not damage the camera as the monitor
screen may be adversely affected.
If dirt, rain or snow accumulates on any of the
cameras
, the MOD system may not operate
properly. Clean the camera by wiping with a
cloth dampened with a diluted mild cleaning
agent and then wiping with a dry cloth.
4-26
Monitor, heater, air conditioner, audio and phone systems
WAE0445X
WAE0446X
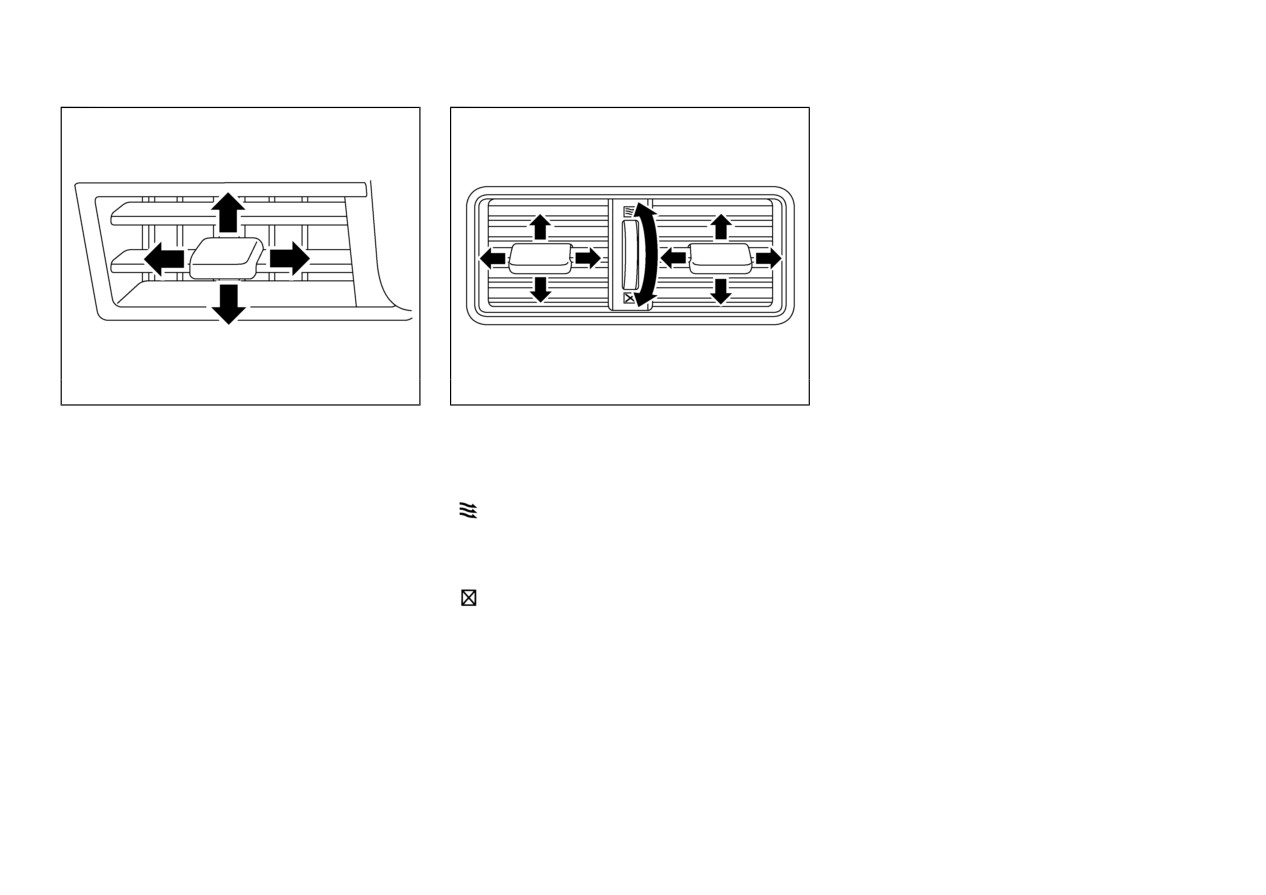
SIDE VENTILATORS
REAR VENTILATORS
Adjust the air flow direction of the ventilators
Open/close the ventilators by moving the
by moving the center knob (up/down, left/right)
control to either direction.
until the desired position is achieved.
:
This symbol indicates that the venti-
To close the vent, fully move the knob to the
lators are open. Moving the side
outer side.
control to this direction will open the
ventilators.
:
This symbol indicates that the venti-
lators are closed. Moving the side
control to this direction will close the
ventilators.
Adjust the air flow direction of the ventilators
by moving the center knob (up/down, left/right)
until the desired position is achieved.
Monitor, heater, air conditioner, audio and phone systems
4-27
HEATER AND AIR CONDITIONER
degree than with a lower engine speed. Fully
depress the brake pedal to prevent the vehicle
WARNING
from creeping.
The heater and air conditioner operate
The heater and air conditioner operate when the
only when the engine is running.
engine is running. The air blower will operate
Never leave children or adults who would
even if the engine is turned off and the ignition
normally require the support of others
switch is placed in the ON position.
alone in the vehicle. Pets should not be left
alone either. They could unknowingly
NOTE:
activate switches or controls and inadver-
. Odors from inside and outside the vehicle
tently become involved in a serious acci-
can build up in the air conditioner unit.
dent and injure themselves. On hot, sunny
Odor can enter the passenger compart-
days, temperatures in a closed vehicle
ment through the ventilators.
could quickly become high enough to cause
severe or possibly fatal injuries to people
. When parking, set the heater and air
or animals.
conditioner controls to turn off air
recirculation to allow fresh air into the
Do not use the recirculation mode for long
periods as it may cause the interior air to
passenger compartment. This should
become stale and the windows to fog up.
help reduce odors inside the vehicle.
Do not adjust the heating and air con-
ditioning controls while driving so that full
attention may be given to vehicle opera-
tion.
CAUTION
The engine speed may increase when the air
conditioning is operating. With an increased
engine speed, a Continuously Variable Trans-
mission (CVT) vehicle will creep to a greater
4-28
Monitor, heater, air conditioner, audio and phone systems
temperature.
. You can individually set temperatures for
the driver’s side and front passenger’s
side when the indicator light on the
SYNC button is not illuminated.
A visible mist may be seen coming from the
ventilators in hot, humid conditions as the air is
cooled rapidly. This does not indicate a
malfunction.
Heating (A/C OFF):
The air conditioner does not activate in this
mode. Use this mode when you only need to
WAE0447X
heat.
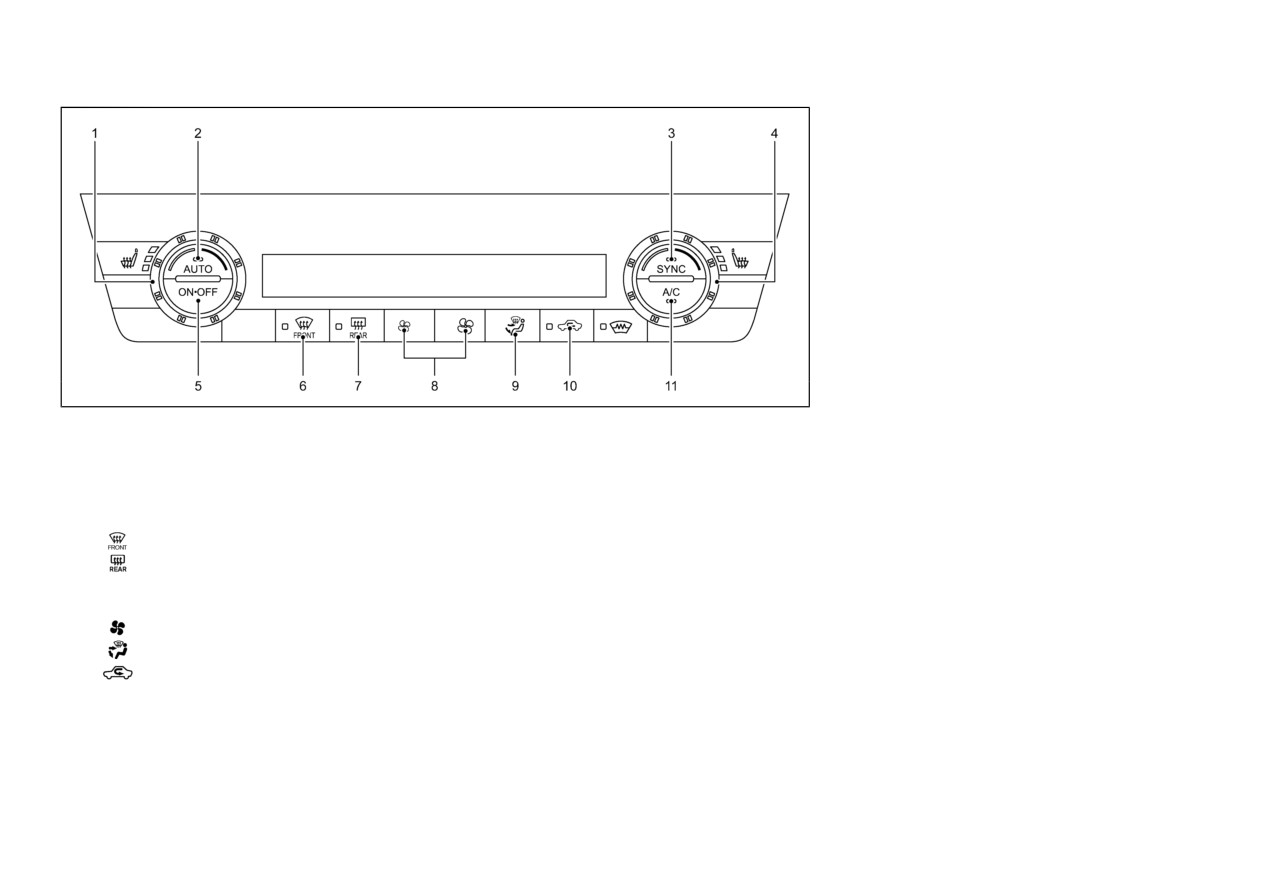
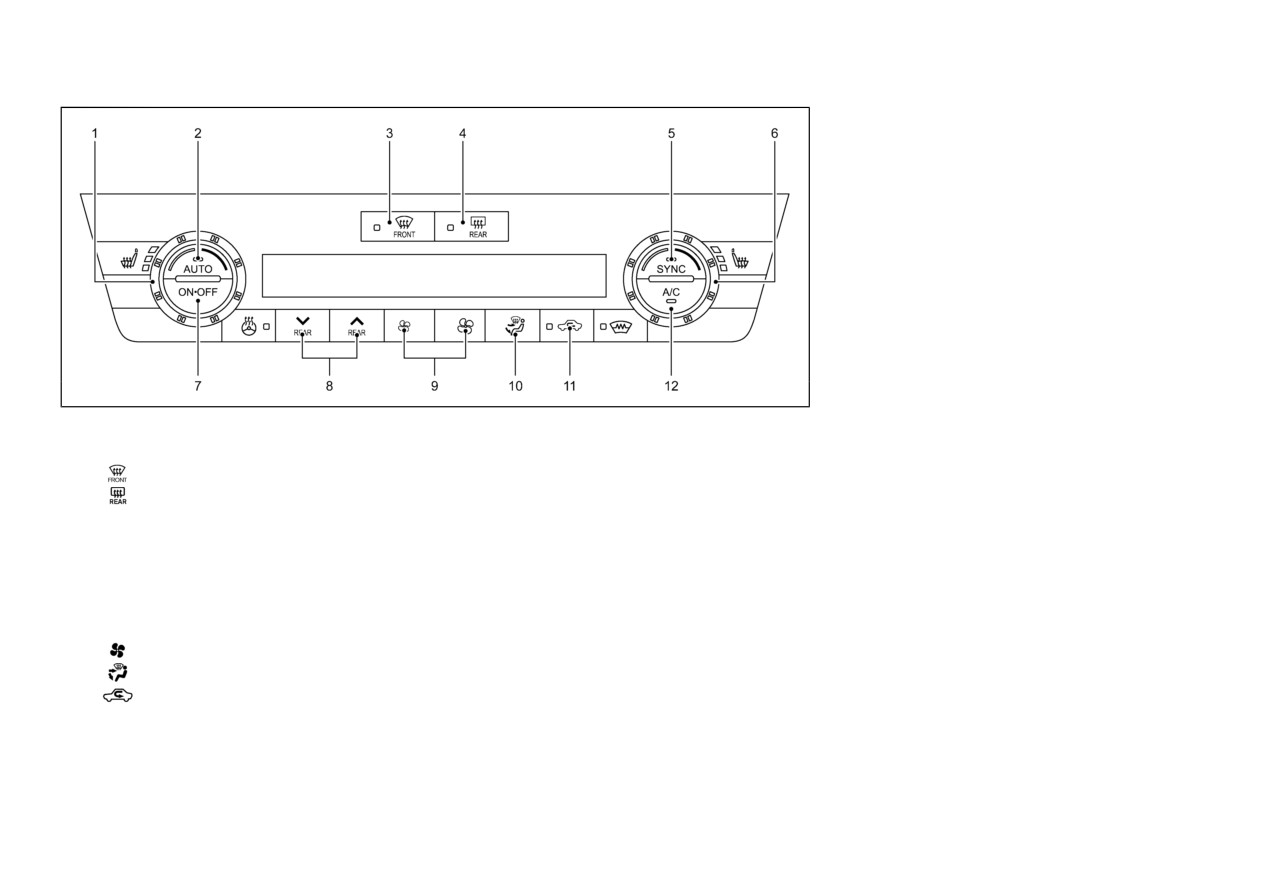
1.
Push the AUTO button on. (The indicator
1.
Temperature control dial (driver’s side)
DUAL-ZONE AUTOMATIC
on the button will illuminate.)
2.
AUTO (automatic) button
CLIMATE CONTROL
2.
Push the A/C button. (The indicator light
3.
SYNC (synchronize) button
will turn off.)
4.
Temperature control dial (passenger’s side)
Automatic operation
3.
Turn the temperature control dial on the
5.
ON·OFF button
Cooling and/or dehumidified heating
corresponding side to set the desired
6.
(front defroster) button
(AUTO):
temperature.
7.
(electric rear window defroster) button
. You can individually set temperatures for
(See “Electric rear window and door mirror
This mode may be used all year round as the
the driver’s side and front passenger’s
defroster switch” (P.2-52).)
system automatically works to keep a constant
side when the indicator light on the
8.
(fan speed control) buttons
temperature. Air flow distribution and fan speed
SYNC button is not illuminated.
9.
(air flow control) button
are also controlled automatically.
. The temperature of the passenger com-
10.
(air recirculation) button
1. Push the AUTO button on. (The indicator
partment will be maintained automati-
11.
A/C (air conditioner) button
on the button will illuminate.)
cally. Air flow distribution and fan speed
2. Turn the temperature control dial on the
are also controlled automatically.
corresponding side to set the desired
Monitor, heater, air conditioner, audio and phone systems
4-29
NOTE:
— Air flows mainly from center and side
. Do not set the temperature lower than
Manual operation
ventilators.
the outside air temperature or the system
Fan speed control:
— Air flows mainly from center and side
may not work properly.
Push the
buttons to manually control the
ventilators and foot outlets.
. Not recommended if windows fog up.
fan speed.
— Air flows mainly from the foot outlet
Dehumidified defrosting or defogging:
Air intake control:
and partly from the defroster.
1.
Push the
button on. (The indicator light
— Air flows mainly from the defroster
The air intake control mode will change each
on the button will come on.)
and foot outlets.
time the
button is pushed.
2.
Turn the temperature control dial on the
— Air flows mainly from the defroster.
. When the indicator light is turned on, the air
corresponding side to set the desired
recirculates inside the vehicle.
temperature.
Synchronize temperature settings:
. When the indicator light is turned off, the
. As soon as possible after the windshield
Push the SYNC button to synchronize the
air flow is drawn from outside the vehicle.
is clean, push the AUTO button to return
driver’s and passenger’s side temperature set-
to the automatic mode.
. To switch to automatic control mode, push
tings. The sync indicator light will turn on.
and hold the
button for approximately
. When the
button is pushed, the air
2 seconds. The indicator light will flash
When the SYNC mode is active, the driver’s
conditioner will automatically be turned
twice, and then the air intake will be
side temperature control dial will control the
on at outside temperatures above 35°F
controlled automatically.
driver’s and front passenger’s side tempera-
(2°C). The air recirculation mode auto-
tures.
matically turns off, allowing outside air
Air flow control:
to be drawn into the passenger compart-
To exit the SYNC mode, push the SYNC button
Pushing the
button manually controls air
again or turn the passenger’s side temperature
ment to further improve the defogging
flow and selects the air outlet:
control dial.
performance.
To turn the system off
Push the ON·OFF button.
4-30
Monitor, heater, air conditioner, audio and phone systems
temperature.
. You can individually set temperatures for
the driver’s side and front passenger’s
side when the indicator light on the
SYNC button is not illuminated.
A visible mist may be seen coming from the
ventilators in hot, humid conditions as the air is
cooled rapidly. This does not indicate a
malfunction.
Heating (A/C OFF):
The air conditioner does not activate in this
mode. Use this mode when you only need to
WAE0448X
heat.
1.
Push the AUTO button on. (The indicator
1.
Temperature control dial (driver’s side)
3-ZONE AUTOMATIC CLI-
on the button will illuminate.)
2.
AUTO (automatic) button
MATE CONTROL
2.
Push the A/C button. (The indicator light
3.
(front defroster) button
will turn off.)
4.
(electric rear window defroster) button
Automatic operation
3.
Turn the temperature control dial on the
(See “Electric rear window and door mirror
defroster switch” (P.2-52).)
Cooling and/or dehumidified heating
corresponding side to set the desired
5.
SYNC (synchronize) button
(AUTO):
temperature.
. You can individually set temperatures for
6.
Temperature control dial (passenger’s side)
This mode may be used all year round as the
the driver’s side and front passenger’s
7.
ON·OFF button
system automatically works to keep a constant
side when the indicator light on the
8.
Rear temperature control buttons
temperature. Air flow distribution and fan speed
SYNC button is not illuminated.
9.
(fan speed control) buttons
are also controlled automatically.
. The temperature of the passenger com-
10.
(air flow control) button
1. Push the AUTO button on. (The indicator
partment will be maintained automati-
11.
(air recirculation) button
on the button will illuminate.)
cally. Air flow distribution and fan speed
12.
A/C (air conditioner) button
2. Turn the temperature control dial on the
are also controlled automatically.
corresponding side to set the desired
Monitor, heater, air conditioner, audio and phone systems
4-31

NOTE:
— Air flows mainly from center and side
. Do not set the temperature lower than
Manual operation
ventilators.
the outside air temperature or the system
Fan speed control:
— Air flows mainly from center and side
may not work properly.
Push the
buttons to manually control the
ventilators and foot outlets.
. Not recommended if windows fog up.
fan speed.
— Air flows mainly from the foot outlet
Dehumidified defrosting or defogging:
Air intake control:
and partly from the defroster.
1.
Push the
button on. (The indicator light
— Air flows mainly from the defroster
The air intake control mode will change each
on the button will come on.)
and foot outlets.
time the
button is pushed.
2.
Turn the temperature control dial on the
— Air flows mainly from the defroster.
. When the indicator light is turned on, the air
corresponding side to set the desired
recirculates inside the vehicle.
temperature.
Synchronize temperature settings:
. When the indicator light is turned off, the
. As soon as possible after the windshield
Push the SYNC button to synchronize the
air flow is drawn from outside the vehicle.
is clean, push the AUTO button to return
driver’s side, passenger’s side and rear tem-
to the automatic mode.
. To switch to automatic control mode, push
perature settings. The indicator light on the
and hold the
button for approximately
. When the
button is pushed, the air
SYNC button will turn on.
2 seconds. The indicator light will flash
conditioner will automatically be turned
twice, and then the air intake will be
When the SYNC mode is active, the driver’s
on at outside temperatures above 35°F
controlled automatically.
side temperature control dial will control the
(2°C). The air recirculation mode auto-
driver’s side, front passenger’s side and rear
matically turns off, allowing outside air
Air flow control:
temperatures.
to be drawn into the passenger compart-
Pushing the
button manually controls air
To exit the SYNC mode, push the SYNC button
ment to further improve the defogging
flow and selects the air outlet:
again or turn the passenger’s side temperature
performance.
control dial.
To turn the system off
Push the ON·OFF button.
4-32
Monitor, heater, air conditioner, audio and phone systems
OPERATING TIPS
When the engine coolant temperature and
outside air temperature are low, the air flow
from the foot outlets may not operate. However,
this is not a malfunction. After the coolant
temperature warms up, air flow from the foot
outlets will operate normally.
The sensors and
, located on the instrument
panel, help maintain a constant temperature. Do
not put anything on or around the sensors.
SERVICING AIR CONDI-
TIONER
JVH1847X
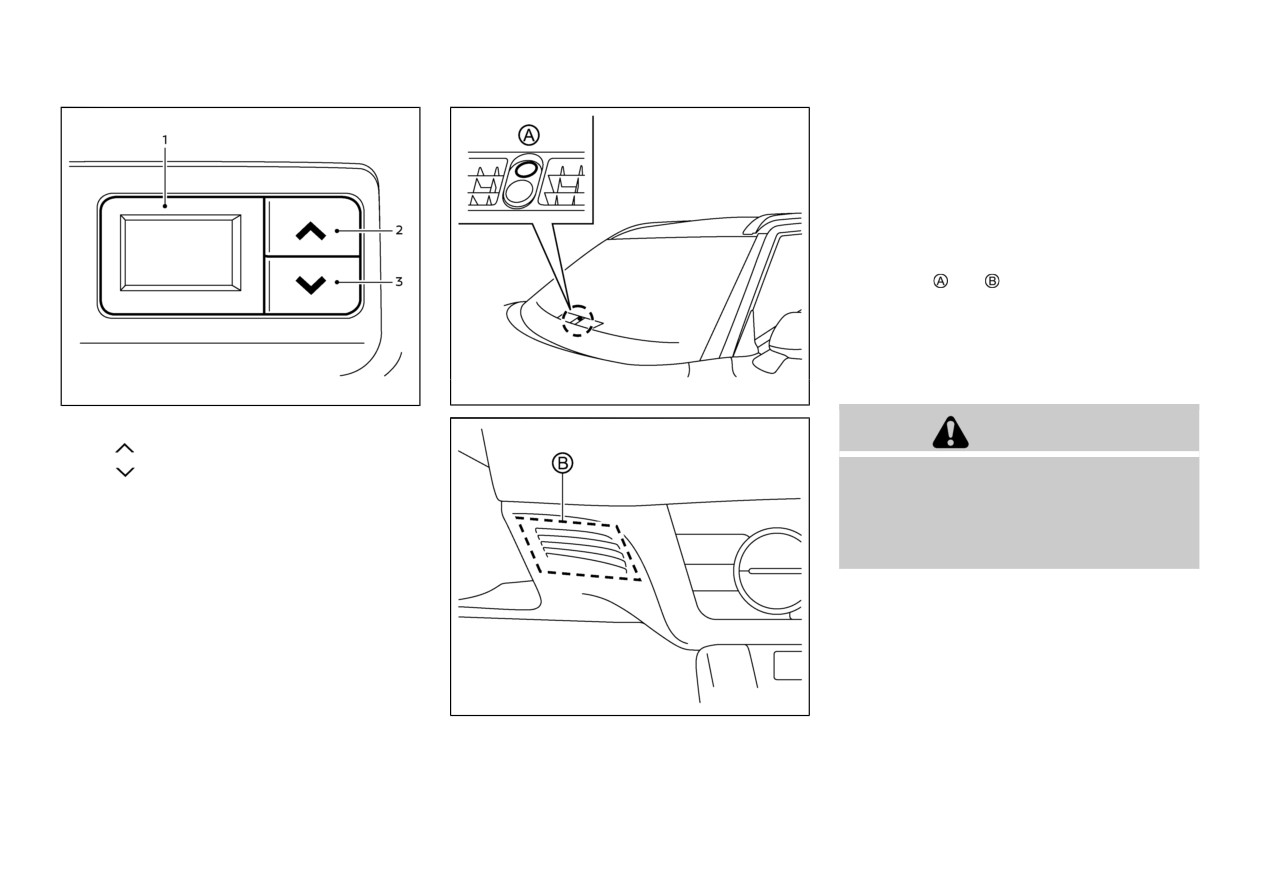
WAE0608X
1.
Rear temperature display
WARNING
2.
“
” Rear temperature increase button
3.
“
” Rear temperature decrease button
The air conditioner system contains refrigerant
under high pressure. To avoid personal injury,
Rear temperature control
any air conditioner service should be done only
You can adjust the temperature for rear seat
by an experienced technician with the proper
passengers using the buttons located on the rear
equipment.
console.
The air conditioner system in your vehicle is
charged with a refrigerant designed with the
environment in mind.
This refrigerant will not harm the earth’s
ozone layer. However, it may contribute in a
WAE0449X
small part to global warming.
Special charging equipment and lubricant are
Monitor, heater, air conditioner, audio and phone systems
4-33
ANTENNA
CAR PHONE OR CB RADIO
required when servicing your vehicle’s air
When installing a car phone or a CB radio in
SHARK FIN ANTENNA
conditioner. Using improper refrigerants or
your vehicle, be sure to observe the following
The shark fin antenna is located on the rear part
lubricants will cause severe damage to the air
precautions, otherwise the new equipment may
of the vehicle roof.
conditioner system.
(See
“Air conditioning
adversely affect the electronic control modules
system refrigerant and lubricant recommenda-
and electronic control system harness.
tions” (P.10-6).)
A authorized Mitsubishi Motors dealer will be
WARNING
able to service your environmentally friendly air
conditioner system.
A cellular phone should not be used for
any purpose while driving so full attention
Micron air filtration
may be given to vehicle operation. Some
The air conditioner system is equipped with a
jurisdictions prohibit the use of cellular
Micron air filtration. To make sure the air
phones while driving.
conditioner heats, defogs, and ventilates effi-
If you must make a call while your vehicle
ciently, replace the filter according the specified
is in motion, the hands-free cellular phone
maintenance intervals. It is recommended to
operational mode (if so equipped) is highly
visit an authorized Mitsubishi Motors dealer to
recommended. Exercise extreme caution at
all times so full attention may be given to
replace the filter.
vehicle operation.
The filter should be replaced if the air flow
If a conversation in a moving vehicle
decreases significantly or if windows fog up
requires you to take notes, pull off the
easily when operating the heater or air condi-
road to a safe location and stop your
tioner.
vehicle before doing so.
CAUTION
. Keep the antenna as far away as possible
from the electronic control modules.
4-34
Monitor, heater, air conditioner, audio and phone systems
. Keep the antenna wire more than 8 in (20
cm) away from the electronic control
system harness. Do not route the antenna
wire next to any harness.
. Adjust the antenna standing-wave ratio as
recommended by the manufacturer.
. Connect the ground wire from the CB
radio chassis to the body.
. For details, it is recommended you visit an
authorized Mitsubishi Motors dealer.
Monitor, heater, air conditioner, audio and phone systems
4-35
5 Starting and driving
Precautions when starting and driving
5-5
Brake Auto Hold
5-25
Exhaust gas (carbon monoxide)
5-5
How to activate/deactivate the Brake Auto
Three-way catalyst
5-5
Hold function
5-26
Tire Pressure Monitoring System (TPMS)
5-6
How to use the Brake Auto Hold function
5-27
Avoiding collision and rollover
5-9
Drive Mode Selector
5-28
On-pavement and off-road driving precautions
5-10
NORMAL mode
5-29
Off-road recovery
5-10
ECO mode
5-29
Rapid air pressure loss
5-10
TARMAC mode
5-30
Drinking alcohol/drugs and driving
5-11
GRAVEL mode
5-30
Driving safety precautions
5-11
SNOW mode
5-30
Push-button ignition switch
5-13
MUD mode (AWC model)
5-30
Operating range for engine start function
5-13
Traffic Sign Recognition (TSR) (if so equipped)
5-30
Push-button ignition switch operation
5-14
System operation
5-31
Push-button ignition switch positions
5-14
How to enable/disable the TSR system
5-32
Emergency engine shut off
5-15
System temporarily unavailable
5-32
F.A.S.T.-key battery discharge
5-15
System malfunction
5-32
Before starting the engine
5-16
System maintenance
5-33
Starting the engine
5-16
Lane Departure Warning (LDW)
5-33
Driving the vehicle
5-17
LDW system operation
5-34
Continuously Variable Transmission (CVT)
5-17
How to enable/disable the LDW system
5-35
Parking brake
5-23
LDW system limitations
5-35
Automatic operation
5-24
System temporarily unavailable
5-36
Manual operation
5-24
System malfunction
5-37
System maintenance
5-37
Lane Departure Prevention (LDP) (if so equipped)
5-38
System temporarily unavailable
5-67
LDP system operation
5-39
System malfunction
5-68
How to enable/disable the LDP system
5-40
System maintenance
5-68
LDP system limitations
5-40
Cruise control (if so equipped)
5-69
System temporarily unavailable
5-42
Precautions on cruise control
5-69
System malfunction
5-42
Cruise control operations
5-70
System maintenance
5-43
Adaptive Cruise Control System (ACC) (if
Blind Spot Warning (BSW)
5-43
so equipped)
5-71
BSW system operation
5-45
How to select the cruise control mode
5-73
How to enable/disable the BSW system
5-46
Vehicle-to-vehicle distance control mode
5-73
BSW system limitations
5-46
Conventional (fixed speed) cruise
control mode
5-87
BSW driving situations
5-47
MI-PILOT Assist (if so equipped)
5-90
System temporarily unavailable
5-50
MI-PILOT Assist system operation
5-92
System malfunction
5-50
System maintenance
5-50
MI-PILOT Assist switches
5-94
MI-PILOT Assist system display
Active Blind Spot Assist (ABSA) (if so equipped)
5-51
and indicators
5-95
ABSA system operation
5-53
Turning the conventional (fixed speed) cruise
How to enable/disable the ABSA system
5-54
control mode ON
5-97
ABSA system limitations
5-55
Operating MI-PILOT Assist
5-98
ABSA driving situations
5-56
How to enable/disable the Lane Keep
System temporarily unavailable
5-60
Assist (LKA)
5-102
System malfunction
5-60
How to cancel the MI-PILOT Assist system
5-103
System maintenance
5-61
Adaptive Cruise Control System (ACC) with
Rear Cross Traffic Alert (RCTA)
5-62
Stop & Go
5-103
RCTA system operation
5-63
Lane Keep Assist (LKA)
5-117
How to enable/disable the RCTA system
5-65
Conventional (fixed speed) cruise
RCTA system limitations
5-66
control mode
5-122
Forward Collision Mitigation System (FCM)
5-126
S-AWC (Super-All Wheel Control) (if
FCM system operation
5-127
so equipped)
5-153
Turning the FCM system ON/OFF
5-128
Electronically Controlled AWC
5-153
FCM system limitations
5-129
Active Yaw Control (AYC)
5-153
System temporarily unavailable
5-132
S-AWC operation display
5-153
System malfunction
5-133
Parking/parking on hills
5-155
System maintenance
5-133
Electric power steering
5-156
Predictive Forward Collision Warning (PFCW)
5-135
Brake system
5-156
PFCW system operation
5-137
Braking precautions
5-156
Turning the PFCW system ON/OFF
5-138
Brake assist
5-157
PFCW system limitations
5-140
Brake assist
5-157
System temporarily unavailable
5-141
Anti-lock Braking System (ABS)
5-157
System malfunction
5-142
Active stability control (ASC)
5-159
System maintenance
5-142
How to turn off the ASC
5-160
Driver Attention Alert (DAA)
5-143
Chassis control
5-160
DAA system operation
5-144
Active Yaw Control (AYC)
5-160
How to enable/disable the DAA system
5-145
Active Ride Control
5-161
DAA system limitations
5-145
Hill Start Assist (HSA)
5-161
Rear Automatic Emergency Braking (Rear AEB)
5-146
Hill Descent Control (HDC)
5-162
Rear AEB system operation
5-147
To operate
5-163
Turning the Rear AEB system ON/OFF
5-148
To deactivate
5-163
Rear AEB system limitations
5-148
Parking sensor system (if so equipped)
5-164
System malfunction
5-150
System operation
5-165
System maintenance
5-151
How to enable/disable the parking
sensor system
5-166
Break-in schedule
5-151
Fuel Efficient Driving Tips
5-152
Parking sensor system limitations
5-167
System temporarily unavailable
5-167
Increasing fuel economy
5-153
System maintenance
5-168
Rear parking sensor system (if so equipped)
5-169
Cold weather driving
5-173
System operation
5-170
Freeing a frozen door lock
5-173
How to enable/disable the rear parking sensor
5-171
Anti-freeze
5-173
Rear parking sensor limitations
5-172
Battery
5-173
System temporarily unavailable
5-172
Draining of coolant water
5-173
System maintenance
5-173
Tire equipment
5-174
Special winter equipment
5-174
Driving on snow or ice
5-174
PRECAUTIONS WHEN
STARTING AND DRIVING
If you suspect that exhaust fumes are
— Your vehicle is raised while being
WARNING
entering the vehicle, drive with all win-
serviced.
dows fully open, and have the vehicle
inspected immediately.
— You suspect that exhaust fumes
Do not leave children or adults who would
are entering into the passenger
normally require the support of others
Do not run the engine in closed spaces such
compartment.
as a garage.
alone in your vehicle. Pets should not be
left alone either. They could accidentally
Do not park the vehicle with the engine
— You notice a change in the sound
injure themselves or others through inad-
running for an extended period of time.
of the exhaust system.
vertent operation of the vehicle. Also, on
Keep the liftgate closed while driving,
— You have had an accident invol-
hot, sunny days, temperatures in a closed
otherwise exhaust gas could be drawn into
ving damage to the exhaust sys-
vehicle could quickly become high enough
to cause severe or possibly fatal injuries to
the passenger compartment. If you must
tem, underbody, or rear of the
drive with the liftgate open, follow these
people or animals.
vehicle.
precautions:
Properly secure all cargo with ropes or
— Open all the windows.
straps to help prevent it from sliding or
THREE-WAY CATALYST
shifting. Do not place cargo higher than
— Turn the air recirculation mode
the seatbacks. In a sudden stop or collision,
The three-way catalyst is an emission control
off and set the fan speed control to
unsecured cargo could cause personal
device installed in the exhaust system. Exhaust
the highest level to circulate the
injury.
gases in the three-way catalyst are burned at
air.
high temperatures to help reduce pollutants.
If a special body or other equipment is
EXHAUST GAS (carbon monox-
added for recreational or other usage,
ide)
follow the manufacturer’s recommenda-
WARNING
tion to prevent carbon monoxide entry into
the vehicle.
(Some recreational vehicle
. The exhaust gas and the exhaust system
WARNING
appliances such as stoves, refrigerators,
are very hot. Keep people, animals and
heaters, etc. may also generate carbon
flammable materials away from the ex-
. Do not breathe exhaust gas; it contains
monoxide.)
haust system components.
colorless and odorless carbon monoxide.
The exhaust system and body should be
. Do not stop or park the vehicle over
Carbon monoxide is dangerous. It can
inspected by a qualified mechanic when-
flammable materials such as dry grass,
cause unconsciousness or death.
ever:
wastepaper or rags. They may ignite and
cause a fire.
Starting and driving
5-5
even if under-inflation has not reached the level
TIRE PRESSURE MONITOR-
CAUTION
to trigger illumination of the TPMS low tire
ING SYSTEM (TPMS)
pressure telltale.
Do not use leaded gasoline. Deposits from
Your vehicle has also been equipped with a
Low tire pressure warning light
leaded gasoline will seriously reduce the
TPMS malfunction indicator to indicate when
three-way catalyst’s ability to help reduce
the system is not operating properly. The TPMS
Each tire, including the spare
(if provided),
exhaust pollutants.
malfunction indicator is combined with the low
should be checked monthly when cold and
Keep your engine tuned up. Malfunctions
tire pressure telltale. When the system detects a
inflated to the inflation pressure recommended
in the ignition, fuel injection, or electrical
malfunction, the telltale will flash for approxi-
by the vehicle manufacturer on the vehicle
systems can cause overrich fuel flow into
mately one minute and then remain continu-
placard or tire inflation pressure label. (If your
the three-way catalyst, causing it to over-
ously illuminated. This sequence will continue
heat. Do not keep driving if the engine
vehicle has tires of a different size than the size
upon subsequent vehicle start-ups as long as the
misfires, or if noticeable loss of perfor-
indicated on the vehicle placard or tire inflation
malfunction exists. When the malfunction
mance or other unusual operating condi-
pressure label, you should determine the proper
tions are detected. Have the vehicle
tire inflation pressure for those tires.)
indicator is illuminated, the system may not
inspected. It is recommended you visit an
be able to detect or signal low tire pressure as
As an added safety feature, your vehicle has
authorized Mitsubishi Motors dealer for
intended. TPMS malfunctions may occur for a
this service.
been equipped with a tire pressure monitoring
variety of reasons, including the installation of
system
(TPMS) that illuminates a low tire
Avoid driving with an extremely low fuel
replacement or alternate tires or wheels on the
pressure telltale when one or more of your tires
level. Running out of fuel could cause the
vehicle that prevent the TPMS from functioning
is significantly under-inflated. Accordingly,
engine to misfire, damaging the three-way
properly. Always check the TPMS malfunction
catalyst.
when the low tire pressure telltale illuminates,
telltale after replacing one or more tires or
you should stop and check your tires as soon as
Do not race the engine while warming it
wheels on your vehicle to ensure that the
possible, and inflate them to the proper
up.
replacement or alternate tires and wheels allow
pressure. Driving on a significantly under-
Do not push or tow your vehicle to start
the TPMS to continue to function properly.
inflated tire causes the tire to overheat and can
the engine.
lead to tire failure. Under-inflation also reduces
fuel efficiency and tire tread life, and may affect
the vehicle’s handling and stopping ability.
Please note that the TPMS is not a substitute for
proper tire maintenance, and it is the driver’s
responsibility to maintain correct tire pressure,
5-6
Starting and driving
when the low tire pressure warning light is
Whenever the tires and wheels are
illuminated and low tire pressure is de-
WARNING
replaced with new ones
tected. The “Tire Pressure Low - Add Air”/
If new wheels with new tire inflation pressure
“Tire Pressure Low
- Check Cold Tire”
If the low tire pressure warning light
sensors are installed, their ID codes must be
warning turns off when the low tire pressure
illuminates while driving, avoid sudden
programmed into the tire pressure monitoring
warning light turns off.
steering maneuvers or abrupt braking,
system. Have tire and wheel replacement
reduce vehicle speed, pull off the road to
The “Tire Pressure Low - Add Air”/“Tire
performed by an authorized Mitsubishi Motors
a safe location and stop the vehicle as soon
Pressure Low - Check Cold Tire” warning
dealer to avoid the risk of damaging the tire
as possible. Driving with under-inflated
does not appear if the low tire pressure
inflation pressure sensors. If the wheel replace-
tires may permanently damage the tires
warning light illuminates to indicate a
ment is not done by an authorized Mitsubishi
and increase the likelihood of tire failure.
TPMS malfunction.
Serious vehicle damage could occur and
Motors dealer, it is not covered by your
Tire pressure rises and falls depending on
may lead to an accident and could result in
warranty.
the heat caused by the vehicle’s operation
serious personal injury. Check the tire
pressure for all four tires. Adjust the tire
Additional information
and the outside temperature. Do not reduce
pressure to the recommended COLD tire
the tire pressure after driving because the
. The TPMS will activate only when the
pressure shown on the Tire and Loading
tire pressure rises after driving. Low outside
vehicle is driven at speeds above 16 MPH
Information placard to turn the low tire
temperature can lower the temperature of
(25 km/h). Also, this system may not detect
pressure warning light OFF. If you have a
the air inside the tire which can cause a
flat tire, repair it with the tire repair kit as
a sudden drop in tire pressure (for example
lower tire inflation pressure. This may cause
soon as possible. (See “Flat tire” (P.6-3) for
a flat tire while driving).
the low tire pressure warning light to
repairing a tire.)
. The low tire pressure warning light does not
illuminate. If the warning light illuminates
automatically turn off when the tire pressure
If no tire is flat and all tires are properly
in low ambient temperature, check the tire
inflated, it is recommended you consult an
is adjusted. After the tire is inflated to the
pressure for all four tires.
authorized Mitsubishi Motors dealer.
recommended pressure, the vehicle must be
You can also check the tire pressure of all
When replacing a wheel without the
driven at speeds above 16 MPH (25 km/h)
tires in the multi-information display. (See
TPMS, the TPMS will not function and
to activate the TPMS and turn off the low
“Trip computer” (P.2-41).)
the low tire pressure warning light will
tire pressure warning light. Use a tire
For additional information, see
“Low tire
flash for approximately 1 minute. The light
pressure gauge to check the tire pressure.
will remain on after 1 minute. Have your
pressure warning light”
(P.2-17) and
“Tire
. The “Tire Pressure Low - Add Air”/“Tire
tires replaced and/or TPMS system reset
Pressure Monitoring System (TPMS)” (P.6-3).
Pressure Low - Check Cold Tire” warning
as soon as possible. It is recommended you
appears in the multi-information display
visit an authorized Mitsubishi Motors
Starting and driving
5-7
. If the TPMS has been replaced and the ID
For Canada:
dealer for these services.
has not been registered.
Tire Pressure Monitoring System (TPMS)
. If the wheel is not originally specified by
transmitter
Mitsubishi Motors.
CAUTION
Continental
FCC Notice:
Model: TIS-10DL
For USA:
. The TPMS may not function properly
IC: 7812D-TIS10DL
when the wheels are equipped with tire
Tire Pressure Monitoring System (TPMS)
chains or the wheels are buried in snow.
transmitter
. Do not place metalized film or any metal
Body Control Module (BCM)
FCC ID: KR5TIS-10DL
parts (antenna, etc.) on the windows. This
Model: 40406556
may cause poor reception of the signals
from the tire pressure sensors, and the
IC: 7812D-5235RXDP
Body Control Module (BCM)
TPMS will not function properly.
Continental
This device complies with Industry Canada
Some devices and transmitters may temporarily
40406556
licence-exempt RSS standard(s). Operation
interfere with the operation of the TPMS and
Continental
is subject to the following two conditions: (1)
cause the low tire pressure warning light to
This device complies with Part 15 of the FCC
this device may not cause interference, and
illuminate. Some examples are:
Rules. Operation is subject to the following
(2) this device must accept any interference,
. Facilities or electric devices using similar
including interference that may cause un-
two conditions: (1) This device may not cause
radio frequencies are near the vehicle.
desired operation of the device.
harmful interference, and
(2) this device
. If a transmitter set to similar frequencies is
must accept any interference received, in-
Le présent appareil est conforme aux CNR
being used in or near the vehicle.
cluding interference that may cause unde-
d’Industrie Canada applicables aux appa-
. If a computer (or similar equipment) or a
sired operation.
reils radio exempts de licence. L’exploitation
DC/AC converter is being used in or near
est autorisée aux deux conditions suivantes :
Note: Changes or modifications not expressly
the vehicle.
(1) l’appareil ne doit pas produire de
approved by the party responsible for
Low tire pressure warning light may illuminate
compliance could void the user’s authority
brouillage, et
(2) l’utilisateur de l’appareil
in the following cases.
to operate the equipment.
doit accepter tout brouillage radioélectrique
subi, même si le brouillage est susceptible
. If the vehicle is equipped with a wheel and
d’en compromettre le fonctionnement.
tire without TPMS.
5-8
Starting and driving
TPMS with Tire fill notification
4.
Perform the above steps for each tire.
If the TPMS with Tire fill notification is not
working, use a tire pressure gauge.
If the tire is over-inflated more than
approximately
4
psi
(30
kPa), the horn
WARNING
AVOIDING COLLISION AND
beeps and the hazard indicators flash
3
ROLLOVER
times. To correct the pressure, push the core
After rotating the tires, do not use the Tire fill
of the valve stem on the tire briefly to
notification to adjust the tire pressure. Instead
use a gauge to adjust the tires to the correct
release pressure. When the pressure reaches
WARNING
the designated pressure, the horn beeps
pressure in accordance with Tire ad Loading
Information placard.
once.
Failure to operate this vehicle in a safe and
If the hazard indicator does not flash within
prudent manner may result in loss of control or
approximately 15 seconds after starting to
an accident.
When adding air to an under-inflated tire, the
TPMS with Tire fill notification provides visual
inflate the tire, it indicates that the TPMS
and audible signals outside the vehicle to help
with Tire fill notification is not operating.
Be alert and drive defensively at all times. Obey
you inflate the tires to the recommended COLD
The TPMS will not activate the Tire fill
all traffic regulations. Avoid excessive speed,
tire pressure.
notification under the following conditions:
high speed cornering, or sudden steering
maneuvers, because these driving practices
— If there is interference from an external
Vehicle set-up:
device or transmitter
could cause you to lose control of your vehicle.
1. Park the vehicle in a safe and level place.
As with any vehicle, a loss of control could
— The air pressure from the inflation
2. Apply the parking brake and push the park
result in a collision with other vehicles or
device such as those using a power
button to shift to the P (Park) position.
socket is not sufficient to inflate the tire
objects, or cause the vehicle to rollover,
particularly if the loss of control causes the
3. Place the ignition switch in the ON position.
— If an electrical equipment is being used
vehicle to slide sideways. Be attentive at all
Do not start the engine.
in or near the vehicle
times, and avoid driving when tired. Never
— There is a malfunction in the TPMS
Operation:
drive when under the influence of alcohol or
system
drugs (including prescription or over-the-coun-
1. Add air to the tire.
— There is a malfunction in the horn or
ter drugs which may cause drowsiness). Always
2. After a few seconds, the hazard indicators
hazard indicators
wear your seat belt as outlined in “Seat belts”
will start flashing.
If the TPMS with Tire fill notification does
(P.1-16) of this manual, and also instruct your
3. When the designated pressure is reached,
not operate due to TPMS interference, move
passengers to do so.
the horn beeps once and the hazard
the vehicle about 3 ft (1m) backward or
Seat belts help reduce the risk of injury in
indicators stop flashing.
forward and try again.
Starting and driving
5-9
collisions and rollovers. In a rollover crash, an
(P.5-11).
dually slow the vehicle to a stop in a safe
unbelted person is significantly more likely to
place off the road.
OFF-ROAD RECOVERY
die than a person wearing a seat belt.
RAPID AIR PRESSURE LOSS
If the right side or left side wheels leave the
ON-PAVEMENT AND OFF-
road surface, maintain control of the vehicle by
Rapid air pressure loss or a
“blow-out” can
ROAD DRIVING PRECAU-
following the procedure below. Please note that
occur if the tire is punctured or is damaged due
this procedure is only a general guide. The
to hitting a curb or pothole. Rapid air pressure
TIONS
vehicle must be driven as appropriate based on
loss can also be caused by driving on under-
Utility vehicles have a significantly higher
the conditions of the vehicle, road and traffic.
inflated tires.
rollover rate than other types of vehicles.
1.
Remain calm and do not overreact.
Rapid air pressure loss can affect the handling
They have higher ground clearance than
and stability of the vehicle, especially at
2.
Do not apply the brakes.
passenger cars to make them capable of
highway speeds.
performing in a variety of on-pavement and
3.
Maintain a firm grip on the steering wheel
Help prevent rapid air pressure loss by main-
off-road applications. This gives them a higher
with both hands and try to hold a straight
taining the correct air pressure and visually
center of gravity than ordinary cars. An
course.
inspect the tires for wear and damage. See
advantage of higher ground clearance is a better
4.
When appropriate, slowly release the accel-
“Tires” (P.8-24) of this manual.
view of the road, allowing you to anticipate
erator pedal to gradually slow the vehicle.
problems. However, they are not designed for
If a tire rapidly loses air pressure or “blows-out”
5.
If there is nothing in the way, steer the
cornering at the same speeds as conventional
while driving, maintain control of the vehicle by
vehicle to follow the road while the vehicle
passenger cars any more than low-slung sports
following the procedure below. Please note that
speed is reduced. Do not attempt to drive
cars are designed to perform satisfactorily under
this procedure is only a general guide. The
the vehicle back onto the road surface until
off-road conditions. If at all possible, avoid
vehicle must be driven as appropriate based on
vehicle speed is reduced.
sharp turns or abrupt maneuvers, particularly at
the conditions of the vehicle, road and traffic.
high speeds. As with other vehicles of this type,
6.
When it is safe to do so, gradually turn the
failure to operate this vehicle correctly may
steering wheel until both tires return to the
WARNING
result in loss of control or vehicle rollover. Seat
road surface. When all tires are on the road
belts help reduce the risk of injury in collisions
surface, steer the vehicle to stay in the
appropriate driving lane.
The following actions can increase the chance
and rollovers. In a rollover crash, an unbelted
of losing control of the vehicle if there is a
person is significantly more likely to die than a
. If you decide that it is not safe to return
sudden loss of tire air pressure. Losing control
person wearing a seat belt.
the vehicle to the road surface based on
of the vehicle may cause a collision and result
vehicle, road or traffic conditions, gra-
in personal injury.
Be sure to read “Driving safety precautions”
5-10
Starting and driving
. The vehicle generally moves or pulls in the
DRINKING ALCOHOL/DRUGS
DRIVING SAFETY PRECAU-
direction of the flat tire.
AND DRIVING
TIONS
. Do not rapidly apply the brakes.
Your vehicle has been designed for both normal
. Do not rapidly release the accelerator
and occasional off-road use. However, avoid
WARNING
pedal.
driving the vehicle through areas where the tires
. Do not rapidly turn the steering wheel.
may get stuck in deep sand or mud as your
Never drive under the influence of alcohol or
vehicle is designed primarily for use on
drugs. Alcohol in the bloodstream reduces
1.
Remain calm and do not overreact.
coordination, delays reaction time and impairs
pavement, unlike a conventional off-road ve-
judgment. Driving after drinking alcohol
hicle.
2.
Maintain a firm grip on the steering wheel
increases the likelihood of being involved in
with both hands and try to hold a straight
Keep in mind that 2-wheel drive vehicles are
an accident injuring yourself and others.
course.
less capable than
4-wheel drive vehicles for
Additionally, if you are injured in an accident,
driving on muddy, slippery, wet or snow-
3.
When appropriate, slowly release the accel-
alcohol can increase the severity of the injury.
covered roads.
erator pedal to gradually slow the vehicle.
4.
Gradually steer the vehicle to a safe location
Mitsubishi Motors is committed to safe driving.
Please observe the following precautions:
off the road and away from traffic if
However, you must choose not to drive under
possible.
the influence of alcohol. Every year thousands
WARNING
of people are injured or killed in alcohol-related
5.
Lightly apply the brake pedal to gradually
accidents. Although the local laws vary on what
stop the vehicle.
. Drive carefully when off the road and
is considered to be legally intoxicated, the fact
6.
Turn on the hazard warning flashers and
avoid dangerous areas. Every person who
is that alcohol affects all people differently and
drives or rides in this vehicle should be
either contact a roadside emergency service
most people underestimate the effects of
seated with their seat belt fastened. This
to change the tire or see “Tire repair kit”
alcohol.
will keep you and your passengers in
Remember, drinking and driving don’t mix!
position when driving over rough terrain.
And that is true for drugs, too (over-the-counter,
. Do not drive across steep slopes. Instead
prescription, and illegal drugs). Don’t drive if
drive either straight up or straight down
your ability to operate your vehicle is impaired
the slopes. Off-road vehicles can tip over
sideways much more easily than they can
by alcohol, drugs, or some other physical
forward or backward.
condition.
Starting and driving
5-11