Mitsubishi Outlander (2022 year). Manual in english - page 13
Many hills are too steep for any vehicle. If
loads in the cargo area as far forward and
Do not attempt to test an AWC equipped
you drive up them, you may stall. If you
as low as possible. Do not equip the vehicle
vehicle on a 2-wheel dynamometer (such as
drive down them, you may not be able to
with tires larger than specified in this
the dynamometers used by some states for
control your speed. If you drive across
manual. This could cause your vehicle to
emissions testing), or similar equipment
them, you may roll over.
roll over.
even if the other two wheels are raised off
Do not shift ranges while driving on
Do not grip the inside or spokes of the
the ground. Make sure you inform test
downhill grades as this could cause loss
steering wheel when driving off-road. The
facility personnel that your vehicle is
equipped with AWC before it is placed on
of control of the vehicle.
steering wheel could move suddenly and
a dynamometer. Using the wrong test
injure your hands. Instead drive with your
Stay alert when driving to the top of a hill.
equipment may result in drivetrain da-
fingers and thumbs on the outside of the
At the top there could be a drop-off or
mage or unexpected vehicle movement
rim.
other hazard that could cause an accident.
which could result in serious vehicle
Before operating the vehicle, ensure that
damage or personal injury.
If your engine stalls or you cannot make it
the driver and all passengers have their
to the top of a steep hill, never attempt to
When a wheel is off the ground due to an
seat belts fastened.
turn around. Your vehicle could tip or roll
unlevel surface, do not spin the wheel
over. Always back straight down in R
Always drive with the floor mats in place
excessively (AWC model).
(Reverse) range. Never back down in N
as the floor may became hot.
Accelerating quickly, sharp steering man-
(Neutral), using only the brake, as this
Lower your speed when encountering
euvers or sudden braking may cause loss
could cause loss of control.
strong crosswinds. With a higher center
of control.
Heavy braking going down a hill could
of gravity, your vehicle is more affected by
If at all possible, avoid sharp turning
cause your brakes to overheat and fade,
strong side winds. Slower speeds ensure
maneuvers, particularly at high speeds.
resulting in loss of control and an accident.
better vehicle control.
Your vehicle has a higher center of gravity
Apply brakes lightly and use a low range
Do not drive beyond the performance
than a conventional passenger car. The
to control your speed.
capability of the tires, even with AWC
vehicle is not designed for cornering at the
Unsecured cargo can be thrown around
engaged.
same speeds as conventional passenger
when driving over rough terrain. Properly
For AWC equipped vehicles, do not
cars. Failure to operate this vehicle cor-
secure all cargo so it will not be thrown
attempt to raise two wheels off the ground
rectly could result in loss of control and/or
forward and cause injury to you or your
and shift the transmission to any drive or
a rollover accident.
passengers.
reverse position with the engine running.
Always use tires of the same type, size,
To avoid raising the center of gravity
Doing so may result in drivetrain damage
brand, construction (bias, bias-belted or
excessively, do not exceed the rated capa-
or unexpected vehicle movement which
radial), and tread pattern on all four
city of the roof rail (if so equipped) and
could result in serious vehicle damage or
wheels. Install traction devices on the front
evenly distribute the load. Secure heavy
personal injury.
wheels when driving on slippery roads and
5-12
Starting and driving

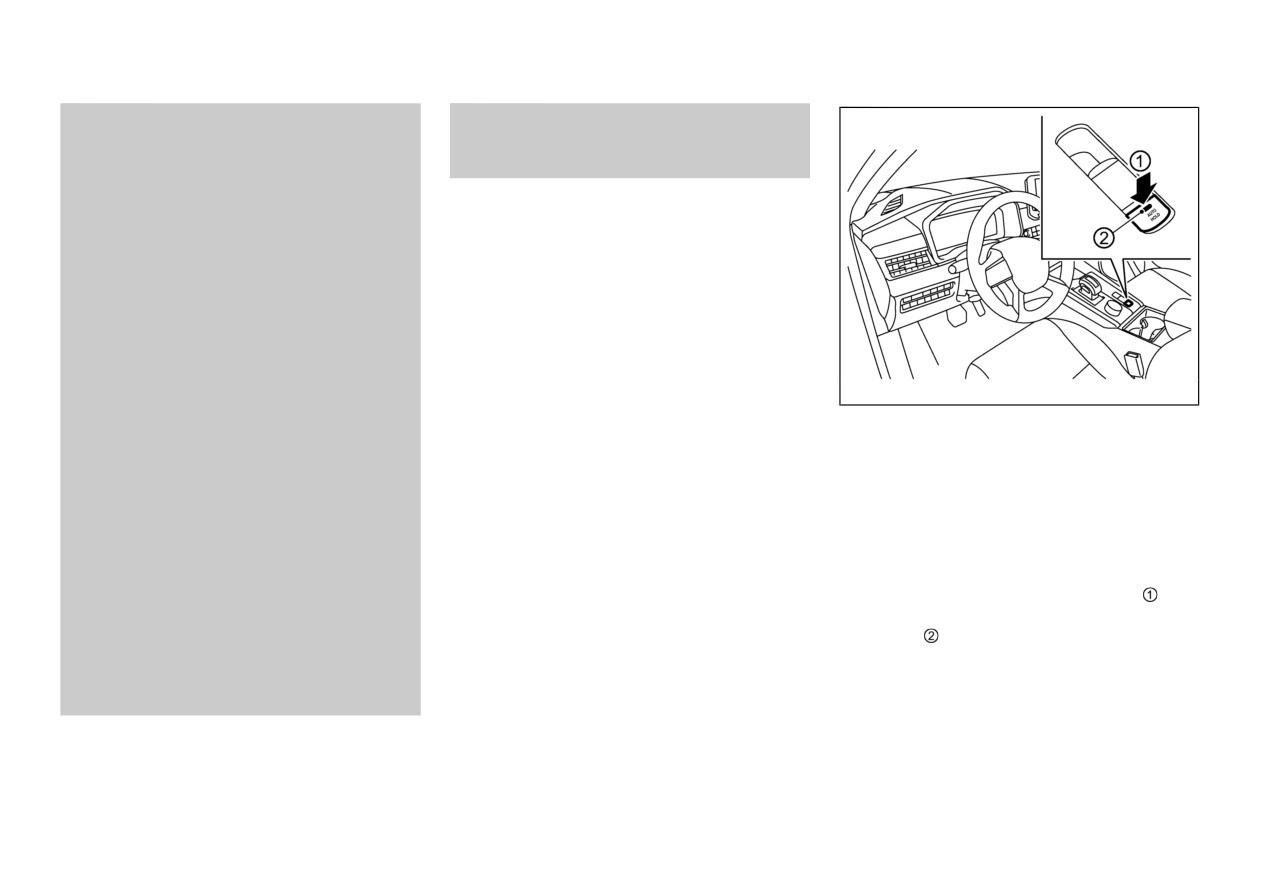
PUSH-BUTTON IGNITION SWITCH
drive carefully.
WARNING
Be sure to check the brakes immediately
after driving in mud or water. See “Brake
system” (P.5-156) for wet brakes.
Do not operate the push-button ignition switch
while driving the vehicle except in an emer-
Avoid parking your vehicle on steep hills.
gency. (The engine will stop when the ignition
If you get out of the vehicle and it rolls
switch is pushed 3 consecutive times or the
forward, backward or sideways, you could
ignition switch is pushed and held for more
be injured.
than 2 seconds.) If the engine stops while the
Whenever you drive off-road through
vehicle is being driven, this could lead to a
sand, mud or water as deep as the wheel
crash and serious injury.
hub, more frequent maintenance may be
required.
Before operating the push-button ignition
Spinning the front wheels on slippery
switch, be sure to push the park button to shift
surfaces may cause the AWC warning
WAF0653X
to the P (Park) position.
message to display and the AWC system
to automatically switch from the AWC
OPERATING RANGE FOR EN-
mode to the FWD mode. This could reduce
traction. (AWC models)
GINE START FUNCTION
The Free-hand Advanced Security Transmitter
(F.A.S.T.-key) can only be used for starting the
engine when the F.A.S.T.-key is within the
specified operating range
When the F.A.S.T.-key battery is almost
discharged or strong radio waves are present
near the operating location, the operating range
becomes narrower and may not function
properly.
If the F.A.S.T.-key is within the operating
range, it is possible for anyone, even someone
who does not carry the F.A.S.T.-key, to push the
ignition switch to start the engine.
Starting and driving
5-13

. If the F.A.S.T.-key is placed on the instru-
1. Push the park button to shift to the P (Park)
ment panel, inside the glove box or door
position.
pocket, the F.A.S.T.-key may not function.
2. Push the ignition switch. The ignition
. If the F.A.S.T.-key is placed near the door
switch position will change to the ON
or window outside the vehicle, the F.A.S.T.-
position.
key may function.
3. Push the ignition switch again to the OFF
PUSH-BUTTON IGNITION
position.
SWITCH OPERATION
The shift lever can be moved from the P
(Park) position if the ignition switch is in the
ON position and the brake pedal is de-
CAUTION
pressed.
PUSH-BUTTON IGNITION
Do not leave the vehicle for extended
periods of time when the ignition switch
WAF0389X
SWITCH POSITIONS
is in the ON position and the engine is not
When the ignition switch
is pushed without
running. This can discharge the battery.
LOCK (Normal parking position)
depressing the brake pedal, the ignition switch
Use electrical accessories with the engine
The ignition switch can only be locked at this
will illuminate.
running to avoid discharging the vehicle
position.
battery. If you must use accessories while
Push the ignition switch center:
The ignition switch will lock when any door is
the engine is not running, do not use them
. once to change to ON.
for extended periods of time and do not use
opened or closed with the ignition switched off.
. two times to change to OFF.
multiple electrical accessories at the same
time.
The ignition switch will automatically return to
ON (Normal operating position)
the LOCK position when any door is either
The ignition system and the electrical accessory
opened or closed with the switch in the OFF
power activate at this position without the
position.
engine turned on.
The ignition lock is designed so that the ignition
The ON position has a battery saver feature that
switch position cannot be switched to OFF until
will place the ignition switch in the OFF
the shift lever is moved to the P (Park) position.
position, if the vehicle is not running, after
When the ignition switch cannot be pushed
some time under the following conditions:
toward the OFF position, proceed as follows:
5-14
Starting and driving

. all doors are closed.
EMERGENCY ENGINE SHUT
. vehicle is in P (Park) position.
OFF
To shut off the engine in an emergency situation
The battery saver feature will be cancelled if
while driving, perform the following procedure:
any of the following occur:
. Rapidly push the push-button ignition
. any door is opened.
switch 3 consecutive times in less than 1.5
. shift lever is moved out of the P (Park)
seconds, or
position.
. Push and hold the push-button ignition
. ignition switch changes position.
switch for more than 2 seconds.
OFF position
The engine is turned off in this position.
WAF0448X
Auto ACC position
F.A.S.T.-KEY BATTERY DIS-
With the vehicle in the P (Park) position, the F.
CHARGE
A.S.T.-key with you and the ignition placed
If the battery of the F.A.S.T.-key is discharged,
from ON to OFF, the radio can still be used for
or environmental conditions interfere with the
a period of time, or until the driver’s door is
opened. After a period of time, functions such
F.A.S.T.-key operation, start the engine accord-
as radio, navigation
(if so equipped), and
ing to the following procedure:
Bluetooth® Hands-Free Phone System may be
1. Push the park button to shift to the P (Park)
restarted by turning on the audio system (see the
position.
separate Smartphone-link Display Audio (SDA)
2. Firmly apply the foot brake.
3. Touch the ignition switch with the F.A.S.T.-
button on the F.A.S.T.-key for up to a total of 30
key as illustrated. (A chime will sound.)
minutes.
4. Push the ignition switch while depressing
the brake pedal within 10 seconds after the
chime sounds. The engine will start.
Starting and driving
5-15
BEFORE STARTING THE ENGINE
STARTING THE ENGINE
After step 3 is performed, when the ignition
Make sure the area around the vehicle is
1.
Apply the parking brake.
switch is pushed without depressing the brake
clear.
2.
Confirm that the vehicle is in the P (Park)
pedal, the ignition switch position will change
Check fluid levels such as engine oil,
position.
to ACC.
coolant, brake fluid, and window washer
The F.A.S.T.-key must be carried when
fluid as frequently as possible, or at least
NOTE:
operating the ignition switch.
whenever you refuel.
When the ignition switch is pushed to the
3.
Push the ignition switch to the ON position.
ON position or the engine is started by
Check that all windows and lights are clean.
Depress the brake pedal and push the
the above procedures, the “Key Battery
Visually inspect tires for their appearance
ignition switch to start the engine.
Low” warning appears (on the multi-
and condition. Also check tires for proper
information display) even if the F.A.S.T.-
inflation.
To start the engine immediately, push and
release the ignition switch while depressing
key is inside the vehicle. This is not a
Lock all doors.
the brake pedal with the ignition switch in
malfunction. To turn off the warning,
Position seat and adjust head restraints.
any position.
touch the ignition switch with the F.A.S.
Adjust inside and door mirrors.
T.-key again.
If the engine is very hard to start in
Fasten seat belts and ask all passengers to
extremely cold weather or when restart-
If the
“Key Battery Low” warning
do likewise.
ing, depress the accelerator pedal a little
appears (on the multi-information dis-
Check the operation of warning lights when
(approximately
1/3
to the floor) and
play), replace the battery as soon as
the ignition switch is placed in the ON
while holding, crank the engine. Release
possible.
(See
“F.A.S.T.-key battery re-
position.
(See
“Warning lights, indicator
the accelerator pedal when the engine
placement” (P.8-20).)
lights and audible reminders” (P.2-12).)
starts.
If the engine is very hard to start because
it is flooded, depress the accelerator
pedal all the way to the floor and hold it.
Push the ignition switch to the ON
position to start cranking the engine.
After 5 or 6 seconds, stop cranking by
pushing the ignition switch to OFF. After
cranking the engine, release the accel-
erator pedal. Crank the engine with your
foot off the accelerator pedal by
depressing the brake pedal and pushing
5-16
Starting and driving
DRIVING THE VEHICLE
the push-button ignition switch to start
NOTE:
CONTINUOUSLY VARIABLE
the engine. If the engine starts, but fails
Care should be taken to avoid situations that
to run, repeat the above procedure.
can lead to potential battery discharge and
TRANSMISSION (CVT)
potential no-start conditions such as:
The CVT in your vehicle is electronically
1. Installation or extended use of electronic
controlled to produce maximum power and
CAUTION
accessories that consume battery power
smooth operation.
when the engine is not running (Phone
The recommended operating procedures for this
Do not operate the starter for more than 15
chargers, GPS, DVD players, etc.)
seconds at a time. If the engine does not start,
transmission are shown on the following pages.
push the ignition switch to OFF and wait 10
2. Vehicle is not driven regularly and/or
Follow these procedures for maximum vehicle
seconds before cranking again, otherwise the
only driven short distances.
performance and driving enjoyment.
starter could be damaged.
Engine power may be automatically reduced
In these cases, the battery may need to
be
to protect the CVT if the engine speed
charged to maintain battery health.
4.
Warm-up
increases quickly when driving on slippery
Allow the engine to idle for at least
30
roads or while being tested on some dynam-
seconds after starting. Do not race the
ometers.
engine while warming it up. Drive at
moderate speed for a short distance first,
WARNING
especially in cold weather. In cold weather,
keep the engine running for a minimum of 2
. Do not depress the accelerator pedal while
- 3 minutes before shutting it off. Starting
shifting from “P” (Park) or “N” (Neutral)
and stopping the engine over a short period
to “R” (Reverse),
“D” (Drive), or
“M”
of time may make the vehicle more difficult
(Manual shift mode). Always depress the
to start.
brake pedal until shifting is completed.
When the engine is racing with no load and
Failure to do so could cause you to lose
control and have an accident.
cold, the engine speed is limited to about
4,500 rpm.
. Cold engine idle speed is high, so use
caution when shifting into a forward or
5.
To stop the engine, push the park button to
reverse gear before the engine has warmed
shift to the P (Park) position, and push the
up.
ignition switch to the OFF position.
Starting and driving
5-17
Do not downshift abruptly on slippery
Starting the vehicle
MAKE SURE OF THE SHIFT LEVER
roads. This may cause a loss of control.
1.
After starting the engine, fully depress the
POSITION - Make sure the shift lever is in
the desired position. “D” and manual shift
Never shift to either the “P” (Park) or “R”
foot brake pedal before attempting to move
mode are used to move forward and “R” to
(Reverse) position while the vehicle is
the shift lever out of the “P” (Park) position.
back up.
moving forward and “P” (Park) or “D”
This CVT is designed so that the foot
(Drive) position while the vehicle is rever-
WARM UP THE ENGINE - Due to the
brake pedal must be depressed before
sing. This could cause an accident or
higher idle speeds when the engine is cold,
shifting from “P” (Park) to any driving
damage the transmission.
extra caution must be exercised when
position while the ignition switch is in the
shifting
the shift lever into the driving
Except in an emergency, do not shift to the
“ON” position. The shift lever cannot be
position
immediately
after
starting
the
“N”
(Neutral) position while driving.
moved out of the “P” (Park) position and
engine.
Coasting with the transmission in the “N”
into any of the other positions if the
(Neutral) position may cause serious da-
mage to the transmission.
ignition switch is placed in the “OFF”
position.
2.
Keep the foot brake pedal depressed and
move the shift lever into a driving position.
CAUTION
3.
Release the parking brake, the foot brake
To avoid possible damage to your vehicle,
pedal, and then gradually start the vehicle in
when stopping the vehicle on an uphill
motion.
grade, do not hold the vehicle by depres-
sing the accelerator pedal. The foot brake
should be used for this purpose.
CAUTION
Do not hang, attach or place any object,
pouch or bag around the selector lever.
. DEPRESS THE FOOT BRAKE PEDAL -
The selector lever may unintentionally
Shifting the shift lever to “D” (Drive), “R”
move resulting in an accident.
(Reverse) or
“M” (Manual shift mode)
without depressing the foot brake pedal
causes the vehicle to move slowly when the
engine is running. Make sure the foot
brake pedal is depressed fully and the
vehicle is stopped before shifting the shift
lever.
5-18
Starting and driving

on the shift lever or on the multi-information
. The following operations are not allowed
display.
because excessive force would be applied to
the transmission and this may result in
damage to the vehicle:
WARNING
— Moving the shift lever to the R
(Reverse) position when driving
Apply the electric parking brake if the shift
forward
lever is in any position while the engine is not
running. Failure to do so could cause the
— Moving the shift lever to the D
vehicle to move unexpectedly or roll away and
(Drive) position when reversing
result in serious personal injury or property
If these operations are attempted, a chime
damage.
sounds and the vehicle shifts to the N
(Neutral) position.
WAF0449X
CAUTION
P (Park):
Home position (central position)
Use the P (Park), R (Reverse) or D (Drive)
Shifting
position only when the vehicle is comple-
CAUTION
tely stopped.
To move the shift lever,
When switching to the desired shift posi-
. To prevent transmission damage, use the P
:
Push the button to shift.
tion by operating the shift lever, check that
(Park) position only when the vehicle is
:
Shift without pushing the button
the shift lever returns to the central
completely stopped.
position by releasing your hand from the
. Do not slide the shift lever while pushing
Push the park button to shift to the P (Park)
lever. Holding the shift lever in a mid-way
the park button. This may damage the
position.
position may also damage the shift control
shift control system.
system.
After starting the engine, fully depress the brake
pedal, push the shift lever button
and move
Do not operate the shift lever while the
NOTE:
the shift lever from the P (Park) position
to
accelerator pedal is depressed. This may
When the shift is in the P position, an
cause a sudden start which could result in
any of the desired shift positions.
operational noise may be heard from the
an accident.
Confirm that the vehicle is in the desired shift
lower part of the vehicle due to the evacua-
position by checking the shift indicator located
tion operation of the vehicle. This is not a
Starting and driving
5-19

malfunction.
forward gears are available. If the vehicle is
R (Reverse):
placed in the D (Drive) position while the
Use this position when the vehicle is parked or
vehicle is reversing, the chime will sound and
starting the engine. Always make sure that the
CAUTION
the vehicle will switch into the N (Neutral)
vehicle is completely stopped before pressing
position.
the park button
to engage the P
(Park)
To prevent transmission damage, use the R
position. For maximum safety, the brake pedal
(Reverse) position only when the vehicle is
Neutral hold mode function
must be depressed before engaging the P (Park)
completely stopped.
position. Use this position together with the
This function enables you to turn off the engine
parking brake. When parking on a hill, first
with the vehicle in the N (Neutral) position.
Use the R (Reverse) position to back up. Make
While this function is activated, the vehicle can
depress the brake pedal, apply the parking brake
sure the vehicle is completely stopped before
be moved by pushing with hand (when car
and then engage the P (Park) position. The
selecting the R (Reverse) position. The brake
washing) even if the ignition switch is in the
parking lock should not be used as a brake when
pedal must be depressed and the shift lever
OFF position.
parking. In order to secure the vehicle, always
button pressed to move the shift lever from
apply the electric parking brake in addition to
the idle position to R (Reverse). If the vehicle
the parking lock.
is placed in the R (Reverse) position while the
WARNING
In the event of a malfunction of the vehicle’s
vehicle is moving forward, the chime will
electronics, the transmission may lock in the P
sound and the vehicle will switch into the N
Use this function on a level surface only.
(Park) position. Have the vehicle’s electronics
Failure to do so may cause the vehicle to
(Neutral) position.
checked immediately. It is recommended that
move accidentally and could result in a
you visit an authorized Mitsubishi Motors
N (Neutral):
collision or serious personal injury.
dealer for this service.
Neither the forward nor reverse gear is engaged.
Do not use this function for a purpose
The P (Park) position is automatically engaged
The engine can be started in this position. You
other than car washing.
if:
may shift to the N (Neutral) position and restart
When the ignition switch is placed in the
a stalled engine while the vehicle is moving.
ON position after activated this function,
. You switch off the ignition switch.
depress the brake pedal to stop the vehicle
You can select this position by holding the shift
. You unfasten the driver’s seat belt and open
because the shift position is in the N
lever at this position for 0.5 seconds.
the driver side door when the vehicle is
(Neutral) position.
stationary or driving at very low speed and
D (Drive):
The shift lever cannot be moved from N
the transmission is in the D (Drive) position
(Neutral) position into R (Reverse) posi-
Use this position for all normal forward driving.
or the R (Reverse) position.
tion. In order to shift to R
(Reverse)
The CVT changes gears automatically. All
position, the shift lever must shift to the
5-20
Starting and driving

in other than N (Neutral) position.
P (Park) position or the D (Drive) position
once.
NOTE:
. If this function is not activated regardless
It is necessary to perform the steps
4
of proper operation, transmission may be a
through 6 within approximately 5 sec-
malfunction. It is recommended that you
onds to prevent incorrect operation.
visit an authorized Mitsubishi Motors
When the ignition switch is placed in the
dealer for this service or a repair facility
OFF position while the shift lever is in the
of your choice immediately.
N (Neutral) position, a message will
appear in the multi-information display.
To activate the Neutral hold mode, perform the
(See
“50. Neutral hold mode guidance
following operations.
indicator” (P.2-39).)
1.
Push the ignition switch to start the engine.
If the Neutral hold mode is unavailable, a
2.
Release the electronic parking brake.
message will appear in the multi-infor-
mation display. (See “52. Neutral hold
WAF0450X
3.
Depress and hold the brake pedal.
mode was not activated indicator” (P.2-
4.
Push the P position switch.
39).) To activate the Neutral hold mode,
Steering wheel paddle shifter
5.
Slide the shift lever to the N
(Neutral)
wait for a while without shifting opera-
When the shift lever is moved to the D (Drive)
position, and hold it for 0.5 second until
tion and then perform the operations
position again with the vehicle in the D (Drive)
“N” appears in the multi-information dis-
again.
position while driving, the transmission enters
play.
the M (Manual) shift mode. Shift range can be
6.
Slide the shift lever to the N
(Neutral)
selected manually.
position again, and hold it for 0.5 second,
When shifting up, pull the right-side paddle
until a message “Neutral Hold Mode has
shifter
(+)
. The transmission shifts to the
been activated” appears in the multi-infor-
higher range.
mation display.
(See
“51. Neutral hold
When shifting down, pull the left-side paddle
mode activated indicator” (P.2-39).)
shifter
(−)
. The transmission shifts to the
7.
Place the ignition switch in the OFF
lower range.
position. The engine will turn off with
holding the N (Neutral) position.
When canceling the manual shift mode, move
the shift lever to the D (Drive) position again.
To exit the Neutral hold mode, place the vehicle
Starting and driving
5-21
The transmission returns to the normal driving
grades.
. When the CVT fluid temperature is high,
mode.
the shift range may upshift in lower rpm
Remember not to drive at high speeds for
than usual. This is not a malfunction.
When you pull the paddle shifter while in the D
extended periods of time in lower than 8th
(Drive) position, the transmission will shift to
gear. This reduces fuel economy.
Accelerator downshift - in D (Drive)
the upper or lower range temporarily. The
Pulling the same paddle shifter twice will
position -
transmission will automatically return to the D
shift the ranges in succession. However, if
(Drive) position after a short period of time. If
this motion is rapidly done, the second
For passing or climbing hills, depress the
you want to return to the D (Drive) position
shifting may not be completed properly.
accelerator pedal to the floor. This shifts the
manually, pull and hold the right-side paddle
transmission down into a lower gear, depending
In the manual shift mode, the transmis-
shifter (+)
for approximately 1.5 seconds.
on the vehicle speed.
sion may not shift to the selected gear.
In the manual shift mode, the shift range is
This helps maintain driving performance
High fluid temperature protection
displayed in the multi-information display.
and reduces the chance of vehicle damage
mode
Shift ranges up or down one by one (1M to
or loss of control.
This transmission has a high fluid temperature
8M).
When this situation occurs, the Continu-
protection mode. If the fluid temperature
ously Variable Transmission (CVT) posi-
8M (8th):
becomes too high, (for example, when climbing
tion indicator will blink and the chime
Use this position for all normal forward driving
will sound.
steep grades in high temperatures with heavy
at highway speeds.
loads), engine power and, under some condi-
In the manual shift mode, the transmis-
7M (7th), 6M (6th) and 5M (5th):
tions, vehicle speed will be decreased auto-
sion may shift up automatically to a
matically to reduce the chance of transmission
Use these positions when driving up long
higher range than selected if the engine
damage. Vehicle speed can be controlled with
slopes, or for engine braking when driving
speed is too high. When the vehicle speed
the accelerator pedal, but the engine and vehicle
down long slopes.
decreases, the transmission automatically
speed may be limited.
shifts down and shifts to 1st gear before
4M (4th), 3M (3rd) and 2M (2nd):
the vehicle comes to a stop.
Fail-safe
Use these positions for hill climbing or engine
CVT operation is limited to automatic drive
braking on downhill grades.
When the fail-safe operation occurs, the Con-
mode when CVT fluid temperature is
tinuously Variable Transmission will not be
1M (1st):
extremely low even if manual shift mode
shifted into the selected driving position.
Use this position when climbing steep hills
is selected. This is not a malfunction. When
If the vehicle is driven under extreme
slowly or driving slowly through deep snow, or
CVT fluid warms up, manual shift mode
can be selected.
conditions, such as excessive wheel spinning
for maximum engine braking on steep downhill
5-22
Starting and driving
PARKING BRAKE
and subsequent hard braking, the fail-safe
operation, or have it repaired if necessary.
system may be activated. The Malfunction
WARNING
Indicator Light
(MIL) may come on to
indicate the fail-safe mode is activated. For
Never drive the vehicle with the parking
additional information, refer to
“Malfunc-
brake applied. The brake will overheat
tion Indicator Light (MIL)” (P.2-18). This
and fail to operate and will lead to an
will occur even if all electrical circuits are
accident.
functioning properly. In this case, place the
Never release the parking brake from
ignition switch in the “OFF” position and
outside the vehicle. If the vehicle moves,
wait for 10 seconds. Then place the ignition
it will be impossible to push the foot brake
switch back in the
“ON” position. The
pedal and will lead to an accident.
vehicle should return to its normal operating
Never use the shift lever in place of the
condition.
(The MIL may be illuminated
parking brake. When parking, be sure the
even when the vehicle has returned to its
parking brake is fully applied.
normal operating condition.) If it does not
To help avoid risk of injury or death
return to its normal operating condition,
through unintended operation of the vehi-
have the transmission checked and repaired,
cle and/or its systems, do not leave
if necessary, by an authorized Mitsubishi
children, people who require the assistance
Motors dealer or a repair facility of your
of others or pets unattended in your
vehicle. Additionally, the temperature in-
choice immediately.
side a closed vehicle on a warm day can
quickly become high enough to cause a
significant risk of injury or death to people
WARNING
and pets.
When the high fluid temperature protection
mode or fail-safe operation occurs, vehicle
speed may be gradually reduced. The reduced
speed may be lower than other traffic, which
could increase the chance of a collision. Be
especially careful when driving. If necessary,
pull to the side of the road at a safe place and
allow the transmission to return to normal
Starting and driving
5-23

the electric parking brake will apply
WARNING
automatically.
. If the driver’s seat belt is unfastened
Before leaving the vehicle, move the shift lever
when the brake force is maintained by
to the P (Park) position and check that the
the Brake Auto Hold function, the
electric parking brake warning light is illumi-
electric parking brake will apply auto-
nated to confirm that the electric parking
matically.
brake is applied. The electric parking brake
. If the ignition switch is placed in the OFF
warning light will remain on for a period of
time after the driver’s door is locked.
position when the brake force is main-
tained by the Brake Auto Hold function,
the electric parking brake will apply
automatically.
CAUTION
. Before driving, make sure that the
WAF0390X
electric parking brake warning light
. When parking in an area where the outside
(yellow) is OFF.
The electric
parking brake
can be released
temperature is below 32°F (0°C), do not
automatically or by operating the parking brake
apply the parking brake to prevent it from
MANUAL OPERATION
switch.
freezing.
To apply: When the vehicle is stopped, pull the
For safe parking, place the shift lever in
AUTOMATIC OPERATION
switch up
(The electric parking brake will
the P (Park) position and securely block
apply even if the ignition switch is placed in the
The electric parking brake is automatically
the wheels.
“OFF” position.) The indicator light and the
released as soon as the vehicle starts while the
electric parking brake warning light (red) will
accelerator pedal is depressed under the follow-
NOTE:
illuminate.
ing conditions.
. If a malfunction occurs in the electric
. while the engine is running.
parking brake system (for example, due
To release: With the ignition switch in the ON
to battery discharge), it is recommended
position, depress the brake pedal and push the
. when the shift lever is in the D (Drive) or R
switch down
. The indicator light
and the
(Reverse) position.
to contact an authorized Mitsubishi
electric parking brake warning light (red) will
Motors dealer.
. when the driver’s door is closed.
turn off.
. If the shift lever is moved to the P (Park)
position when the brake force is main-
Before driving, check that the electric parking
tained by the Brake Auto Hold function,
brake warning light (red) goes out. For addi-
5-24
Starting and driving
BRAKE AUTO HOLD
tional information, see “Warning lights, indica-
the meter and in the parking brake
The Brake Auto Hold function maintains the
tor lights and audible reminders” (P.2-12).
switch illuminate. This does not indicate
braking force without the driver having to
a malfunction. The electric parking
depress the brake pedal when the vehicle is
NOTE:
brake warning light in the meter and in
stopped at a traffic light or intersection. As soon
A chime will sound if the vehicle is driven
the parking brake switch turn off when
as the driver depresses the accelerator pedal
without releasing the parking brake. See
the parking brake is released.
again, the Brake Auto Hold function is
“Audible reminders” (P.2-20).
deactivated and the braking force is released.
. When pulling the electric parking brake
While the electric parking brake is
The operating status of the Brake Auto Hold
switch up with the ignition switch in the
applied or released, an operating sound
can be displayed on the multi-information
OFF or ACC position, the parking brake
is heard from the lower side of the rear
display.
switch indicator light will continue to
seat. This is normal and does not indicate
a malfunction.
illuminate for a short period of time.
When the electric parking brake is
Depending on the weight of the vehicle and
WARNING
frequently applied and released in a short
trailer and the steepness of the slope, there may
period of time, the electric parking brake
be a tendency for the vehicle to move back-
The Brake Auto Hold function is not
warning light (yellow) may blink and the
wards when starting from a standstill. When this
designed to hold the vehicle on a steep hill
parking brake may not operate in order
or slippery road. Never use the Brake Auto
occurs, you can use the parking brake switch in
Hold when the vehicle is stopped on a steep
to prevent the parking brake system
the same way as a conventional lever type
hill or slippery road. Failure to do so may
from overheating. If this occurs, operate
parking brake.
cause the vehicle to move.
the electric parking brake switch again
Before starting on sloping roads when towing a
When the Brake Auto Hold function is
after waiting approximately 1 minute.
trailer, be sure to read the following to prevent
activated but fails to maintain the vehicle
If the electric parking brake must be
the vehicle from moving backward unintention-
at a standstill, depress the brake pedal to
applied while driving in an emergency,
ally.
stop the vehicle. If the vehicle unexpectedly
pull up and hold the parking brake
moves due to outside conditions, the chime
. Push the switch down to release the parking
switch. When you release the parking
may sound and Brake Auto Hold warning
brake switch as soon as the engine is
brake switch, the parking brake will be
may illuminate in the multi-information
delivering enough torque to the wheels.
released.
display.
While pulling up the electric parking
Be sure to deactivate the Brake Auto Hold
brake switch during driving, the parking
function when using a car wash or towing
your vehicle.
brake is applied and a chime sounds. The
electric parking brake warning light in
Starting and driving
5-25
Make sure to push the park button to shift
To maintain the braking force to keep the
to the P
(Park) position and apply the
vehicle to a standstill, a noise
may
be
parking brake when parking your vehicle,
heard. This is not a malfunction.
riding on or off the vehicle, or loading
luggage. Failure to do so could cause the
vehicle to move or roll away unexpectedly
and result in serious personal injury or
property damage.
If any of the following conditions occur, the
Brake Auto Hold function may not func-
tion. Have the system checked promptly. It
is recommended that you visit an author-
ized Mitsubishi Motors dealer for this
service. Failure to operate the vehicle in
accordance with these conditions could
WAF0391X
cause the vehicle to move or roll away
unexpectedly and result in serious personal
HOW TO ACTIVATE/DEACTI-
injury or property damage.
VATE THE BRAKE AUTO
— Awarning message appears in the
multi-information display.
HOLD FUNCTION
— The indicator light on the Brake
How to activate the Brake Auto Hold
Auto Hold switch does not illumi-
function
nate when the switch is pushed.
1. With the ignition switch in the ON position,
The Brake Auto Hold function will not be
push the Brake Auto Hold switch
. The
activated if the Active stability control
indicator light on the Brake Auto Hold
(ASC) warning light, electric parking
switch illuminates.
brake warning light or master warning
light illuminate and the Chassis Control
2. When the Brake Auto Hold function goes
System Error message appears in the
into standby, the Brake Auto Hold indicator
multi-information display.
light (white) illuminates.
To use the Brake Auto Hold function, the
5-26
Starting and driving
following conditions need to be met.
Failure to prevent the vehicle from rolling may
Parking
. The driver’s seat belt is fastened.
result in serious personal injury or property
When the park button is pushed to shift to the P
damage.
. The electric parking brake is released.
(Park) position with the brake force maintained
. The vehicle is not in the P (Park) position.
by the Brake Auto Hold function, the parking
HOW TO USE THE BRAKE
brake will automatically be applied and the
. The vehicle is not parked on a steep hill.
brake force of the Brake Auto Hold will be
NOTE:
AUTO HOLD FUNCTION
released. The Brake Auto Hold indicator light
The Brake Auto Hold function resets to OFF
For additional information on using the Brake
turns off. When the parking brake is applied
every time the ignition switch is switched
Auto Hold function, refer to the instructions
with the brake force maintained by the Brake
from the OFF position to the ON position.
outlined in this section.
Auto Hold function, the brake force of the
Brake Auto Hold will be released. The Brake
How to deactivate the Brake Auto
To maintain braking force automa-
Auto Hold indicator light turns off.
Hold function
tically
NOTE:
While the Brake Auto Hold function is
With the Brake Auto Hold function activated
Under the following conditions, the park-
activated, push the Brake Auto Hold switch to
and the Brake Auto Hold indicator light (white)
ing brake will automatically be applied
turn off the Brake Auto Hold indicator light and
illuminated on the meter, depress the braking
and the brake force of the Brake Auto
deactivate the Brake Auto Hold function. To
pedal to stop the vehicle. The brake pressure
Hold will be released:
deactivate the Brake Auto Hold function while
that driver depressed will be maintained. While
— The braking force is applied by the
the brake force has been maintained by the
the brake hold is maintained, the Brake Auto
Brake Auto Hold function for
3
Brake Auto Hold function, depress the brake
Hold indicator light (green) illuminates on the
minutes or longer.
pedal and push the Brake Auto Hold switch.
meter.
— The driver’s seat belt is unfastened.
To start the vehicle from a standstill
— The ignition switch is placed in the
WARNING
With the vehicle not in the P (Park) or the shift
OFF position.
lever not in the N (Neutral) position, depress the
— If a malfunction occurs in the Brake
Make sure to firmly depress and hold the
accelerator pedal while the brake force is
Auto Hold function.
brake pedal when turning off the Brake Auto
Hold function while the brake force is applied.
maintained. The brake force will automatically
When the vehicle stops, but the brake
When the Brake Auto Hold function is
be released to restart the vehicle. The Brake
force is not maintained, depress the
deactivated, the brake force will be released.
Auto Hold indicator light (white) on the meter
brake pedal firmly until the Brake Auto
This could cause the vehicle to move or roll
illuminates and the Brake Auto Hold returns to
Hold indicator light (green) illuminates.
away unexpectedly.
standby.
Starting and driving
5-27

DRIVE MODE SELECTOR
To change the mode, turn the Drive Mode
Selector right or left. The mode list will appear
in the multi-information display and you can
select a mode.
NOTE:
. The mode list will be turned off in
approximately 5 seconds after a mode is
selected.
. The drive mode will be automatically
turned to the NORMAL mode when the
ignition switch is turned to off and on
again.
If the driving mode cannot be switched using
WAF0451X
WAF0452X
the Drive Mode Selector when the ignition
Drive Mode Selector (Example)
Display (Example)
switch is in the ON position, have the system
1.
ECO mode
Drive mode Selector is able to select character-
checked. It is recommended you visit an
2.
NORMAL mode
istics of an integrated vehicle dynamics control
authorized Mitsubishi Motors dealer for this
3.
TARMAC mode
system that helps to enhance driving perfor-
service.
4.
GRAVEL mode
mance, and vehicle stability over a wide range
5.
SNOW mode
of the driving style of driving condition through
integrated management of the engine, the
WARNING
6.
MUD mode (AWC model)
transmission, the EPS, the AWC
(if so
equipped), AYC
(Active Yaw Control), the
Do not stare at the Drive Mode Selector or the
ABS and the ASC .
display while driving so that full attention may
be given to vehicle operation.
Select a drive mode from following types to suit
the driving style or the driving condition:
NORMAL, GRAVEL, ECO, SNOW, TAR-
MAC, MUD (for AWC model only).
The current mode is displayed in the multi-
information display.
5-28
Starting and driving

. When the cruise control (if so equipped) or
NORMAL MODE
the Adaptive Cruise Control System (ACC)
This mode offers well-balanced driving perfor-
system (if so equipped) is operated.
mance with efficiency for SUV in various road
conditions.
Tire Pres ECO advice
ECO MODE
The “Tire Pres ECO advice” is a function to
show an ECO advice information in the multi-
This mode supports ecological and economical
information display when low tire pressure is
driving by optimized powertrain characteristic.
detected. To activate or deactivate this function,
NOTE:
see “ECO Mode Setting” (P.2-25).
Selecting the ECO mode will not necessarily
When the setting is ON, the ECO Drive Report
improve fuel economy as many driving
display shows "See
Tire Pressures". You can
factors influence its effectiveness.
switch the display to the Tire Pressures display
Operation
by pushing the
button on the steering
WAF0719X
wheel.
Select the ECO mode using theDrive Mode
ECO Pedal Guide function
Selector. The ECO drive indicator light on the
instrument panel illuminates.
The ECO Pedal Guide display can be selected
in the multi-information display in the ECO
When the accelerator pedal is depressed within
mode. Use the ECO Pedal Guide function for
the range of economy drive, the ECO drive
improving fuel economy.
indicator light illuminates in green. When the
accelerator pedal is depressed above the range
When the ECO Pedal Guide bar is in the green
of economy drive, the ECO drive indicator light
range
, it indicates that the vehicle is being
turns off.
driven within range of the super economy drive.
The ECO drive indicator light will not illumi-
When the ECO Pedal Guide bar is in the light
nate in the following cases:
green range
, it indicates that the vehicle is
being driven within range of the economy drive.
. When the shift lever is in the R (Reverse), P
(Park) or N (Neutral) position.
If the ECO Pedal Guide bar is out of the green
. When the vehicle speed is below 6 MPH
range ( and
), it indicates that the accelerator
(10 km/h) or over 75 MPH (120 km/h).
pedal is depressed over the range of economy
Starting and driving
5-29
TRAFFIC SIGN RECOGNITION
(TSR) (if so equipped)
drive.
SNOW MODE
The ECO Pedal Guide bar is not displayed
This mode is for driving on slippery road
when:
surfaces, such as snow-covered roads and offers
. The vehicle speed is less than approxi-
good initial steering response and high corner-
mately 2 MPH (4 km/h).
ing stability on a slippery road.
. The shift lever is in the P
(Park), N
NOTE:
(Neutral) or R (Reverse) position.
When the SNOW mode is selected, the
TARMAC MODE
Adaptive Cruise Control
(ACC) and MI-
This mode offers the pleasure of driving with
PILOT Assist functions cannot be activated.
agile dynamics on dry paved road, such as
MUD MODE (AWC model)
responsive and powerful acceleration, respon-
This mode is for driving on slippery road where
sive and linear steering feel, stability and
maximum traction is required, such as muddy
traceability on cornering.
WAF0589X
roads and deep snow roads and improves
GRAVEL MODE
traction performance.
The Traffic
Sign Recognition
(TSR) system
provides the driver with information about the
This mode is for driving on rough road surfaces
NOTE:
most recently detected speed limit. The system
such as flat unpaved roads or wet paved roads
When the MUD mode is selected, the
and improves straightablity on rough road and
captures the road sign information with the
Adaptive Cruise Control
(ACC) and MI-
powerful launching acceleration.
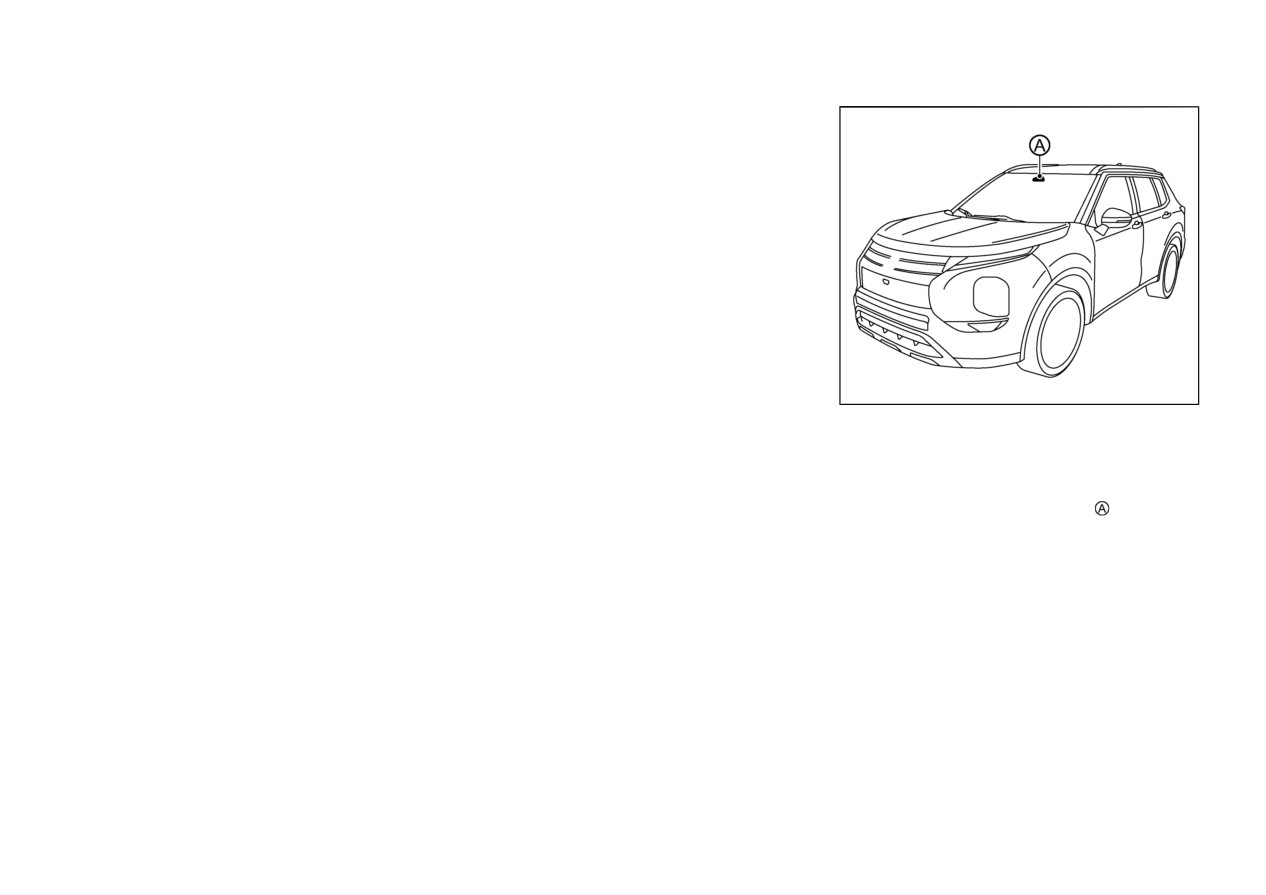
multi-sensing front camera unit
located on
PILOT Assist functions cannot be activated.
the windshield in front of the inside rearview
NOTE:
mirror and displays the detected signs in the
When the GRAVEL mode is selected, the
multi-information display. For vehicles
Adaptive Cruise Control
(ACC) and MI-
equipped with Navigation System, the speed
PILOT Assist functions cannot be activated.
limit displayed is based on a combination of
Navigation System data and live camera
recognition. TSR information is shown in the
multi-information display and in the Head-Up
Display (if so equipped). (See “Head-Up Dis-
play (HUD)” (P.2-43).)
5-30
Starting and driving

The TSR system may not function prop-
WARNING
erly under the following conditions:
— When the road sign is not clearly
The TSR system is only intended to be a
visible, for example, due to da-
support device to help provide the driver with
mage or weather conditions.
information. It is not a replacement for the
driver’s attention to traffic conditions or
— When rain, snow or dirt adheres
responsibility to drive safely. It cannot prevent
to the windshield in front of the
accidents due to carelessness. Depending on the
multi-sensing front camera unit.
situation, the system may not be able to
recognise traffic signs or the displayed traffic
— When the headlights are not
sign information may be different from the
bright due to dirt on the lens or
actual information. It is the driver’s responsi-
if the aiming is not adjusted
bility to stay alert and drive safely at all times.
properly.
WAF0782X
— When strong light enters the
SYSTEM OPERATION
Example
camera unit.
(For example, the
The Traffic Sign Recognition
(TSR) system
“DO NOT PASS”
light directly shines on the front of
displays the following types of road sign
— indicates that the vehicle
is
in a no-
the vehicle at sunrise or sunset.)
(example):
overtaking zone.
— When a sudden change in bright-
“SPEED LIMIT”
ness occurs. (For example, when
— indicates the latest detected speed limit.
the vehicle enters or exits a tunnel
or under a bridge.)
CAUTION
— In areas not covered by the
navigation system.
. The TSR system is intended as an aid to
— If there are deviations in relation
careful driving. It is the driver’s responsi-
to the navigation, for example due
bility to stay alert, drive safely, and
to changes in the road routing.
observe all road regulations that currently
apply, including looking out for road signs.
— When overtaking buses or trucks
with speed stickers.
Starting and driving
5-31

— When the data from the naviga-
SYSTEM TEMPORARILY UN-
tion system is not up-to-date or is
AVAILABLE
unavailable.
If the vehicle is parked in direct sunlight under
The TSR system may display a traffic sign,
high temperature conditions
(over approxi-
though there is no traffic sign in front of
mately
104°F
(40°C) and then started, the
the vehicle. It may display a different
TSR system may be deactivated automatically.
speed limit from that for a passenger
The “Unavailable High Cabin Temperature”
vehicle.
(The maximum speed limit sign
warning message will appear in the multi-
may show a higher or lower number than
the actual maximum speed, for example,
information display.
when detecting a speed limit sign for truck,
Action to take:
advisory sign, different speed limit sign
When the interior temperature is reduced, the
between daytime and nighttime, or speed
limit sign written in different unit near the
TSR system will resume operating automati-
border, etc.)
WAF0530X
cally.
Depending on the condition, the TSR may
SYSTEM MALFUNCTION
HOW TO ENABLE/DISABLE
display traffic signs that different from
that in the Navigation
- turn by turn
THE TSR SYSTEM
If the TSR system malfunctions it will be turned
display in the Multi-information display,
off automatically and the TSR “Malfunction”
Perform the following steps to enable or disable
and that in the navigation system display.
warning message will appear in the multi-
the TSR system:
information display.
1. Press the
button until “Settings”
Action to take
appears in the multi-information display
and then press the scroll dial. Rotate the
If the TSR
“Malfunction” warning message
scroll dial to select
“Driver Assistance”.
appears, pull off the road at a safe location and
Then press the scroll dial.
stop the vehicle. Turn the engine off and restart
the engine. If the TSR “Malfunction” message
2. Select “Traffic Sign” and press the scroll
continues to appear, have the system checked
dial to turn the system on or off.
by an authorized Mitsubishi Motors dealer.
5-32
Starting and driving