Mitsubishi Mirage G4 (2022 year). Manual in english - page 8
Combination headlights and dimmer switch
z Your vehicle speed does not exceed
NOTE
NOTE
approximately 28 mph (45 km/h).
• A vehicle in front or oncoming vehicle is a
• A reflective object such as a noticeboard or
z It is bright ahead of your vehicle.
motorcycle.
a mirror reflects a light ahead of your vehi-
z An exterior light of a vehicle in front or
• Road conditions (gradient, bends and road
cle.
oncoming vehicle is illuminating.
surface).
• When lights of the vehicle in front or head-
• The number of occupants and luggage load.
lights of an oncoming vehicle blend into the
NOTE
z
The AHB recognises environmental condi-
other lights.
tions by sensing a light source ahead of your
• The rear end of a vehicle in front (such as a
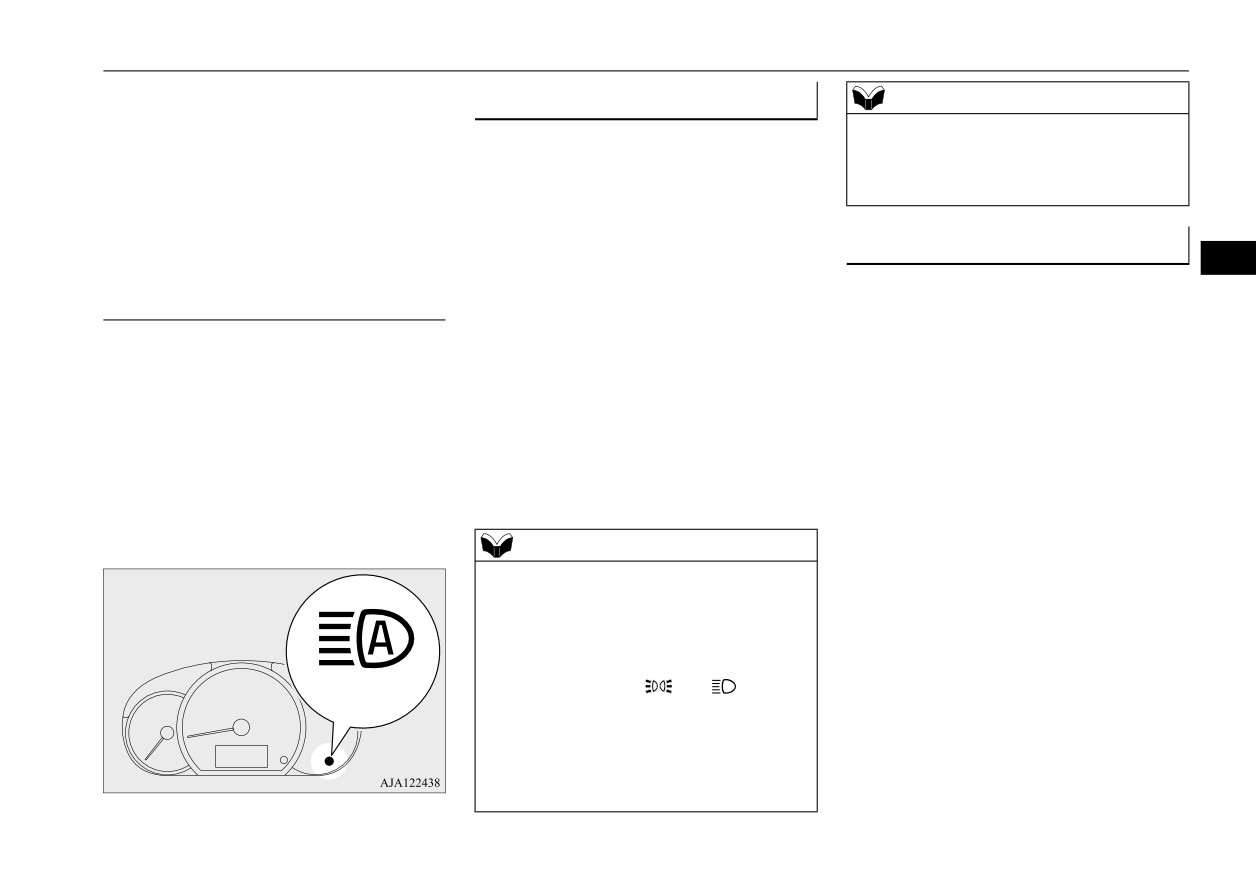
5
z
The headlights may not be switched from
vehicle. Therefore, you may feel like some-
container truck) reflect a strong light.
high beam to low beam under the following
circumstances.
thing is not quite right when the headlight
• Your vehicle’s headlight is broken or dirty.
beams are switched automatically.
• Your vehicle is inclined due to a flat tire or
• A vehicle in front or oncoming vehicle is
hindered by any object such as continuous
z
The system may not detect a light vehicle
towing.
bends, elevated median/island, traffic signs,
such as a bicycle.
• The AHB warning light (yellow) illumi-
roadside trees.
z
The system may not detect an ambient
nates.
• Your vehicle passes an oncoming vehicle
brightness precisely. This causes the traffic
(Refer to
“System problem warning” on
suddenly on a bend with poor visibility.
to be dazzled by high beam or the low beam
page 5-97.)
to be maintained. In such cases, you should
z
Observe the precautions below to maintain
• Another vehicle crosses ahead of your vehi-
switch the headlight beams manually.
good usage conditions:
cle.
• In bad weather (heavy rain, fog, snow or
• Do not attempt to disassemble the sensor.
z
The headlights may remain at low beam (or
be switched from high beam to low beam)
sandstorm).
• Do not affix a sticker or label on the wind-
when a reflective object
(e.g. street light,
• The windshield is dirty or fogged up.
shield near the sensor.
traffic signal, noticeboard and signboard)
• The windshield is cracked or broken.
• Avoid overload.
reflects light.
• The sensor is deformed or dirty.
• Do not modify your vehicle.
z
Any of the following factors may influence
• A light, which is similar to the headlights or
• When the windshield is replaced, use the
the headlight beam switching timing:
tail lights, is shining around your vehicle.
Mitsubishi Motors genuine parts.
• How brightly the exterior lights of a vehicle
• A vehicle in front or oncoming vehicle is
in front or oncoming vehicle illuminate.
driven without lights, the exterior lights are
To adjust the sensitivity of the sensor
• Movement or direction of a vehicle in front
dirty or discoloured, or the direction of the
or oncoming vehicle.
headlight beams is adjusted improperly.
The sensitivity of the sensor can be temporar-
• Only right or left exterior light of a vehicle
• It becomes dark and bright suddenly and
ily lowering in the following ways.
in front or oncoming vehicle is illuminat-
continuously around your vehicle.
ing.
• Your vehicle is driven on uneven surfaces.
• Your vehicle is driven on a winding road.
5-96
Features and controls
Combination headlights and dimmer switch
1. Park your vehicle in a safe place and the
Welcome light (if so equipped)
NOTE
ignition switch is turned to the
“OFF”
N00563201335
• The welcome light function can be deacti-
position or the operation mode is put in
vated.
OFF.
This function turns on the front side-marker
For details, consult an authorized Mitsubishi
2. Press the AHB switch more than 15 times
and parking lights for approximately 30 sec-
Motors dealer.
within 5 seconds after the ignition switch
onds after the UNLOCK button on the key is
is turned back to the “ON” position or the
pressed when the combination headlights and
operation mode is turned back to ON.
Coming home light (if so equipped)
dimmer switch is in the “OFF” or “AUTO”
5
N00547301266
position*. On vehicles equipped with the
System problem warning
automatic light control, the welcome light
This function turns on the headlights in the
N00593800098
function will operate only when it is dark out-
low beam setting for approximately 30 sec-
If a failure is detected in the system, the AHB
side the vehicle.
onds after the ignition switch is turned to the
warning light (yellow) will illuminate and the
“OFF” position or the operation mode is put
AHB will automatically be turned off.
*:
Whether or not your vehicle is equipped
in OFF.
If the warning light remains even after the
with “OFF” or “AUTO” position on the
ignition switch is turned to the “OFF” posi-
combination headlights and dimmer
1. Turn the combination headlights and dim-
tion and then turned back to the “ON” posi-
switch depends on the vehicle specifica-
mer switch to the
“OFF” or “AUTO”
tion or the operation mode is put in OFF and
tions.
position*.
then turned back to ON, please contact an
*: Whether or not your vehicle is equipped
authorized Mitsubishi Motors dealer.
NOTE
with “OFF” or “AUTO” position on the
z
While the welcome light function is operat-
combination headlights and dimmer
ing, perform one of the following operations
switch depends on the vehicle specifica-
to cancel the function.
tions.
• Press the LOCK button on the key.
• Turn the combination headlights and dim-
2. Turn the ignition switch to the
“OFF”
Yellow
mer switch to the “
” or “
” position.
position or put the operation mode in
• Turn the ignition switch to the “ON” posi-
OFF. Also, if a key was used to start the
tion or put the operation mode in ON.
engine, remove the key from the ignition
z
It is possible to modify functions as follows:
switch.
• The headlights can be set to come on in the
low beam setting.
Features and controls
5-97
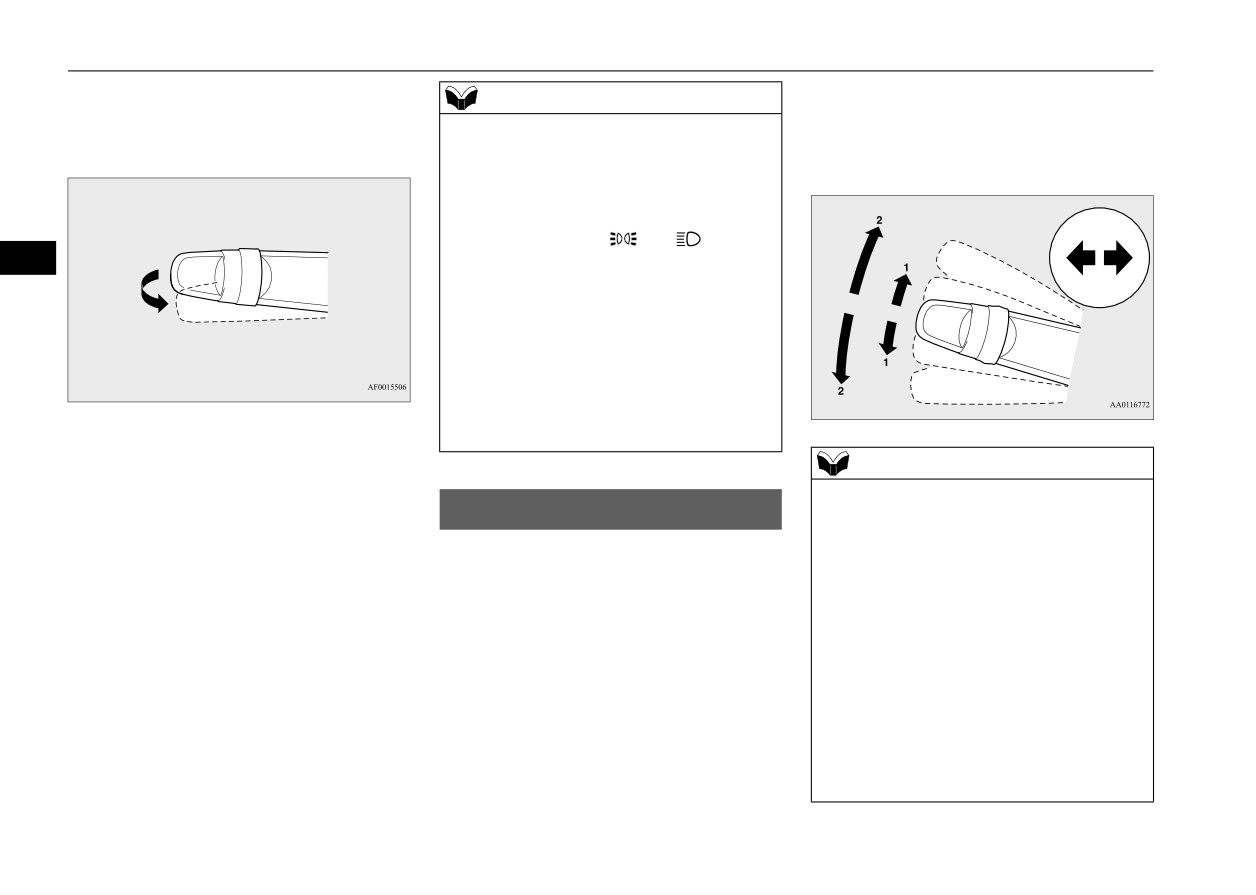
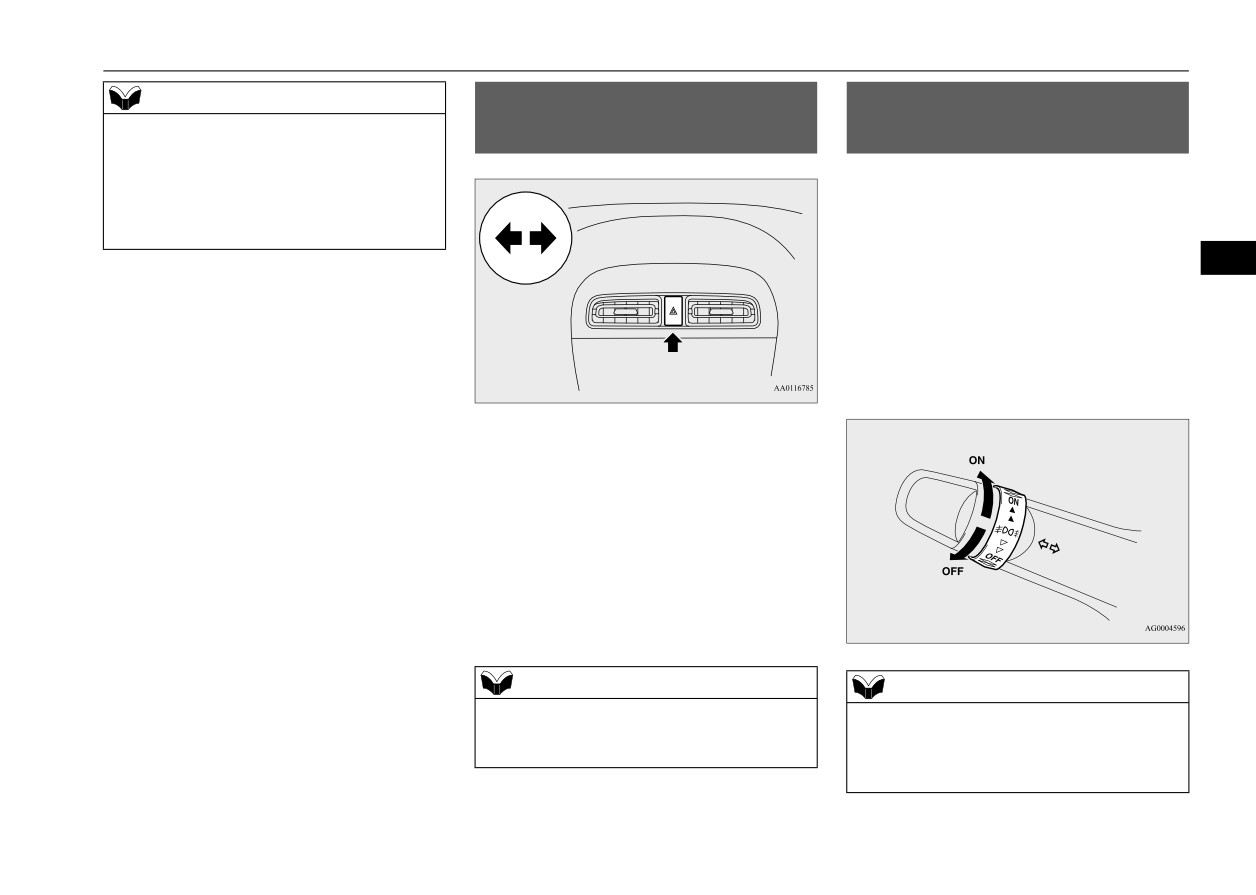
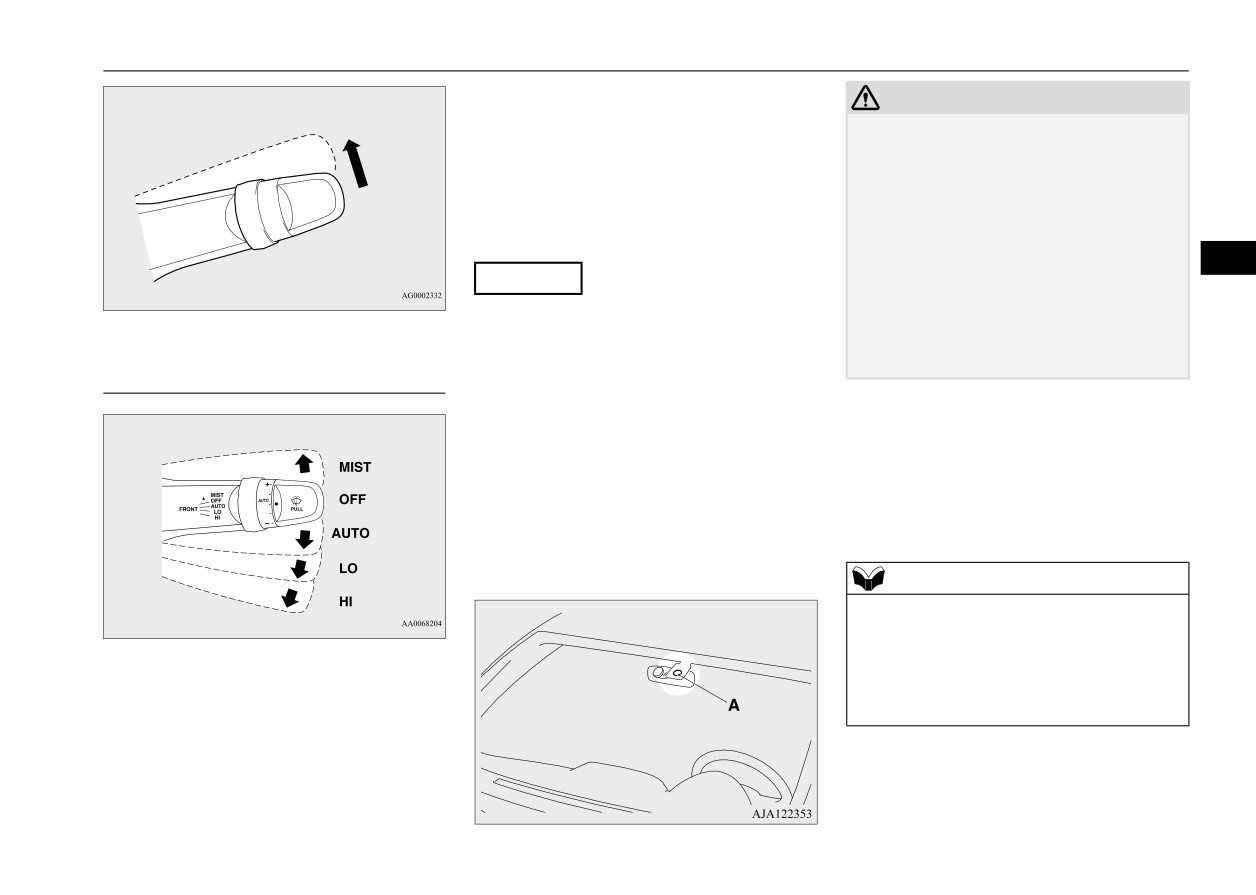
Turn signal lever
3. Within 60 seconds of turning the ignition
Also, when you move the lever to (1) slightly
NOTE
switch to the “OFF” position or putting
then release it, the turn signal lights and the
z
While the coming home light function is
the operation mode in OFF, pull the turn
indicator light in the instrument cluster will
operating, perform one of the following
signal lever toward you.
flash three times.
operations to cancel the function.
• Pull the turn signal lever toward you.
• Turn the combination headlights and dim-
mer switch to the “
” or “
” position.
5
• Turn the ignition switch to the “ON” posi-
tion or put the operation mode in ON.
z
It is possible to modify functions as follows:
• The time that the headlights remain on can
be changed.
• The coming home light function can be
deactivated.
For details, consult an authorized Mitsubishi
4. The headlights will come on in the low
Motors dealer.
beam setting for approximately 30 sec-
NOTE
onds. After the headlights go off, the
headlights can be turned on again in the
z
A light in the instrument panel flashes to
Turn signal lever
show when the turn signal lights are working
low beam setting for approximately
N00522601662
properly.
30 seconds by pulling the turn signal lever
If this light flashes faster than usual, check
toward you within 60 seconds of turning
When changing lanes, or to making a gradual
for a burned out turn signal light bulb or mal-
the ignition switch to the “OFF” position
turn, hold the lever in the “lane change” posi-
functioning connection in the signal.
or putting the operation mode in OFF.
tion (1). It will return to the neutral position
If the panel light does not come on when the
To turn on the headlights again after 60
when you let go. Use the full position (2)
lever is moved, check for a blown fuse or a
seconds of turning the ignition switch to
when making a normal turn. The lever will
burned out bulb in the panel.
the “OFF” position or putting the opera-
return to the neutral position when the turn is
Have the system inspected by your autho-
tion mode in OFF, repeat the process from
complete. There may be times when the lever
rized Mitsubishi Motors dealer or a repair
step 1.
does not return to the neutral position. This
facility of your choice.
usually happens when the steering wheel is
z
It is possible to modify functions as follows:
turned only slightly. You can easily return the
• Deactivate the turn signal light
3-flash
function for lane changes.
lever by hand.
5-98
Features and controls
Hazard warning flasher switch
NOTE
Hazard warning flasher
Front fog light switch (if so
• Adjust the time required to operate the
switch
equipped)
lever for the 3-flash function.
N00522701399
N00522801547
• Changing of the tone of a sounding buzzer
as the turn signal lights flash.
The front fog lights illuminate only when the
See your authorized
Mitsubishi
Motors
headlights are on low beam.
dealer for details.
Turning the knob in the direction of the “ON”
5
position turns on the front fog lights as well
as the indicator in the instrument cluster. To
turn them off, turn the knob in the direction of
the “OFF” position.
The knob will return to the neutral position
when it is released.
If you press the flasher switch, the turn sig-
nals will flash intermittently, and so will the
hazard warning lights. This is an emergency
warning system and should not be used when
the vehicle is in motion, except for emergen-
cies.
If you need to leave your vehicle, the flashers
will keep working after the key is removed
from the ignition switch or the operation
mode is put in OFF.
NOTE
NOTE
z If the flashers are used for several hours, the
z If the headlights are switched to high beam,
battery will run down. This could make it
the front fog lights will go out; they will illu-
difficult or impossible to restart your vehicle.
minate again when the headlights are
switched back to low beam.
Features and controls
5-99
Wiper and washer switch
and the blades are freed, otherwise the wiper
NOTE
motor may be damaged.
z If the light switch is rotated to the “OFF” (if
A
so equipped) or “
” position while the
Except for vehicles with rain sen-
front fog lights are illuminated, they will
automatically turn off. They can be turned
sor
back on again by rotating the combination
headlights and dimmer switch back to “
”
5
position, and turning the knob in the direc-
tion of the “ON” position.
z Do not use fog lights except in conditions of
fog, otherwise excessive light glare may
1- Fast
temporarily blind oncoming vehicle drivers.
2- Slow
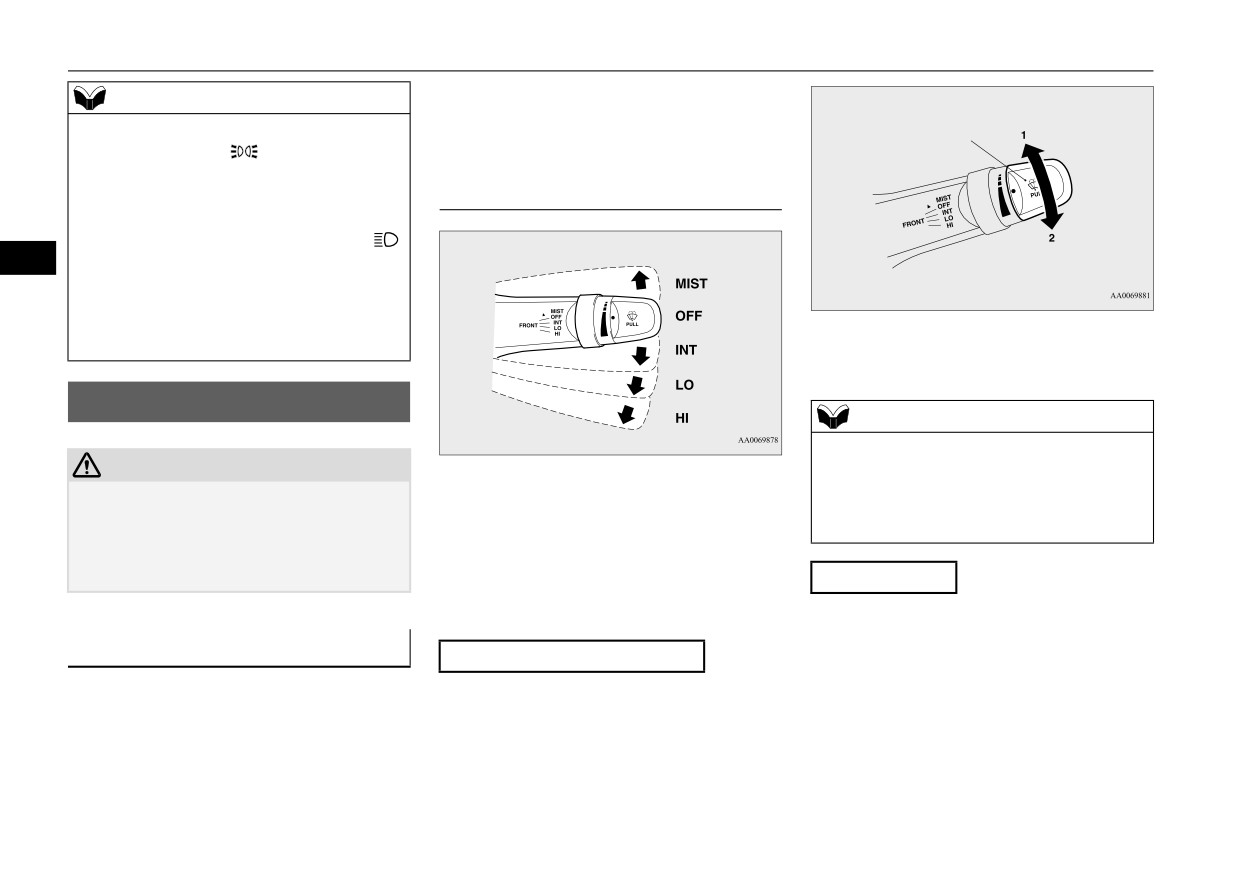
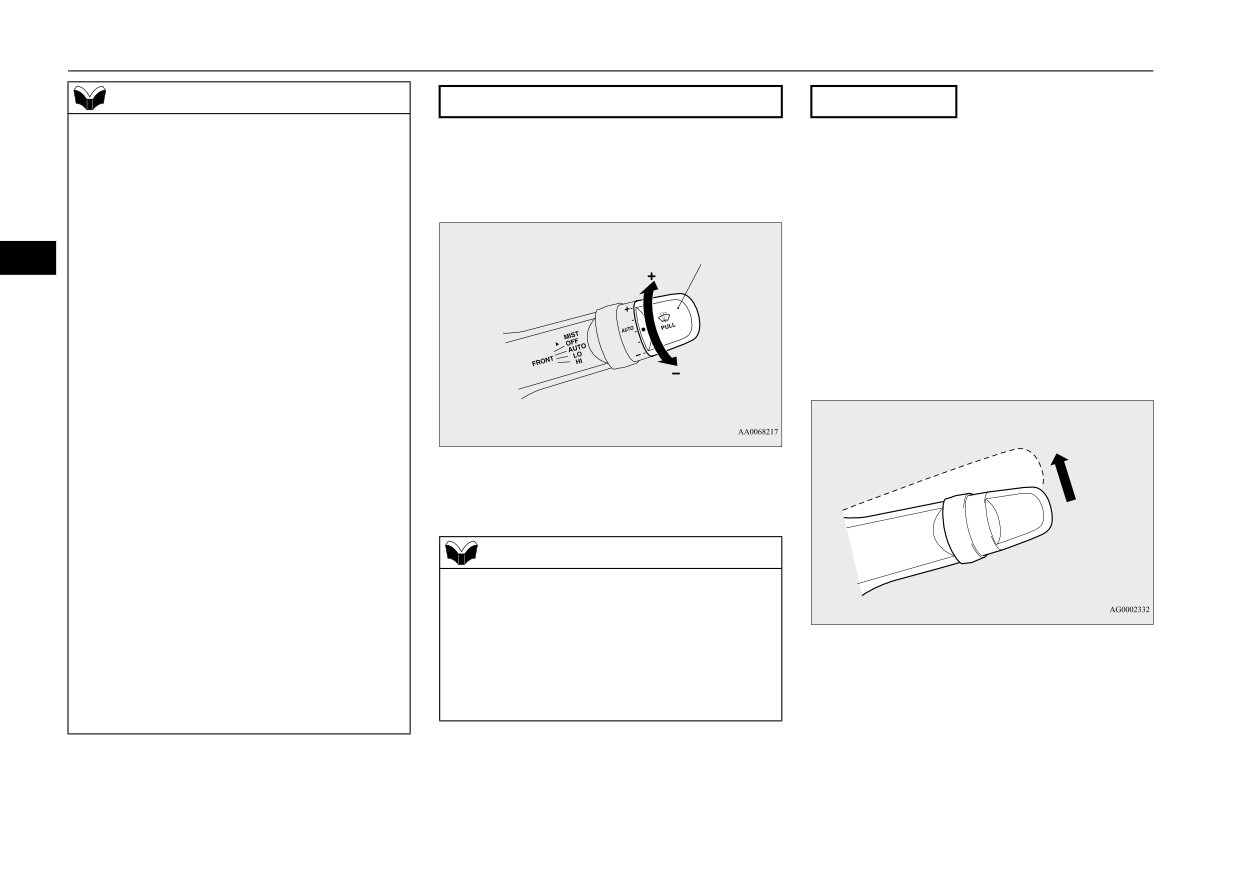
Wiper and washer switch
NOTE
N00523001865
z The speed-sensitive-operation function of
CAUTION
the windshield wipers can be deactivated.
MIST- Misting function
For further information, please contact your
z If the washer is used in cold weather, the
The wipers will operate once.
authorized Mitsubishi Motors dealer or a
washer fluid sprayed against the glass may
OFF- Off
repair facility of your choice.
freeze, which may hinder visibility. Warm
INT- Intermittent (Speed sensitive)
the glass with the defroster before using the
LO- Slow
washer.
Misting function
HI- Fast
The misting function can be used when the
ignition switch or the operation mode is in
Windshield wipers
To adjust intermittent intervals
ON or ACC.
The wipers will operate once if the wiper
With the lever in the “INT” (speed sensitive
The windshield wiper can be operated with
lever is raised to the “MIST” position and
intermittent operation) position, the intermit-
the ignition switch or the operation mode is in
released. This operation is useful when it is
tent intervals can be adjusted by turning the
ON or ACC.
drizzling, etc. The wipers will continue to
knob (A).
If the blades are frozen to the windshield, do
operate while the lever is held in the “MIST”
not operate the wipers until the ice has melted
position.
5-100
Features and controls
Wiper and washer switch
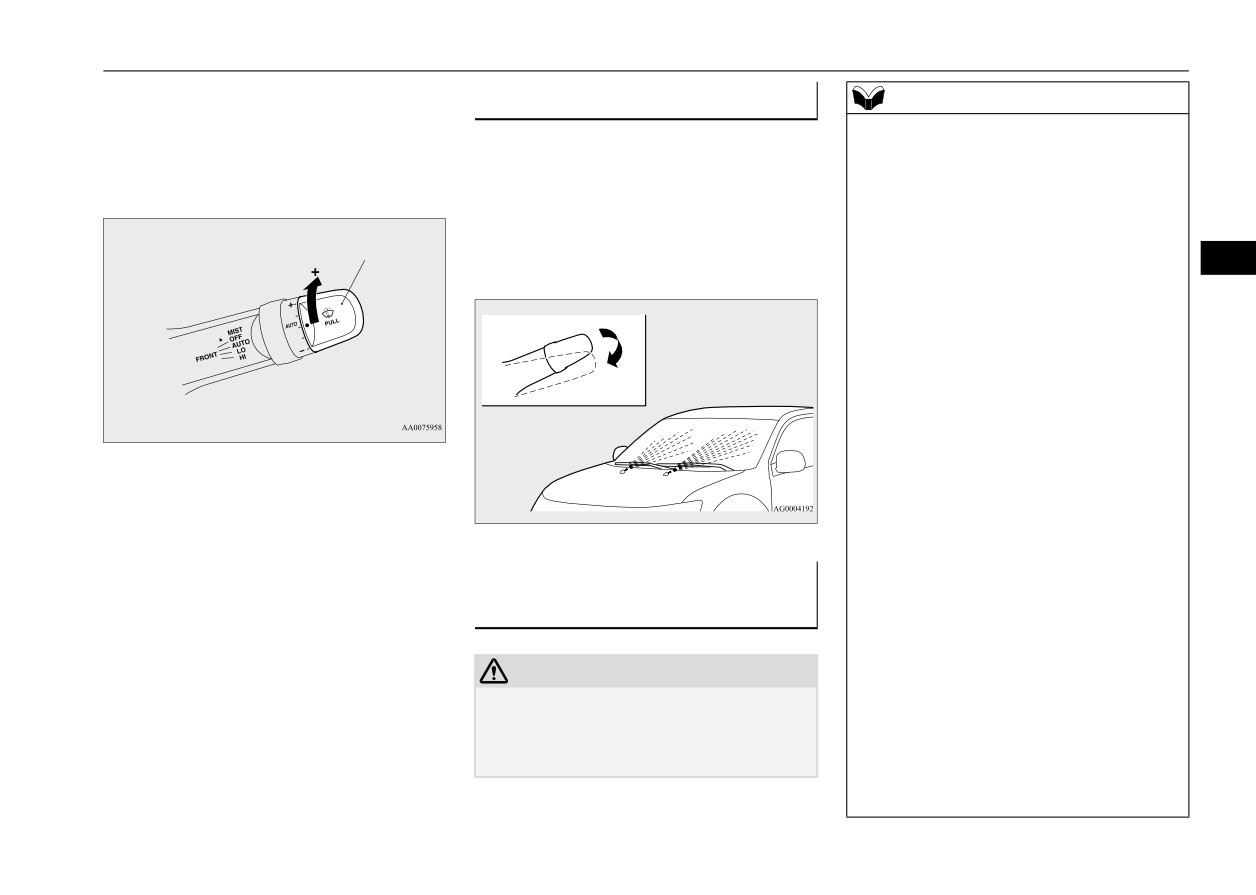
AUTO- Auto-wiper control
CAUTION
Rain sensor
z
With the ignition switch or the operation
The wipers will automatically
mode in ON and the lever in the “AUTO”
operate depending on the degree of
position, the wipers may automatically oper-
wetness on the windshield.
ate in the situations described below.
LO-
Slow
• When cleaning the outside surface of the
HI-
Fast
windshield, if you touch the rain sensor.
• When cleaning the outside surface of the
5
Rain sensor
windshield, if you wipe with a cloth the rain
sensor.
Can only be used when the ignition switch or
• When using an automatic car wash.
the operation mode is in ON.
• A physical shock is applied to the wind-
shield or the rain sensor.
Vehicles with rain sensor
If the lever is put in the “AUTO” position, the
rain sensor (A) will detect the extent of rain
If your hands get trapped, you could suffer
(or snow, other moisture, dust, etc.) and the
injuries or the wipers could malfunction. Be
wipers will operate automatically.
sure to turn the ignition switch to the “OFF”
Keep the lever in the “OFF” position if the
position or put the operation mode in OFF, or
windshield is dirty and the weather is dry.
move the lever to the “OFF” position to deac-
Wiper operation under these conditions can
tivate the rain sensor.
scratch the windshield and damage the wip-
ers.
NOTE
z To protect the rubber parts of the wipers, this
operation of the wipers does not take place
even if the lever is put in the “AUTO” posi-
MIST-
Misting function
tion when the vehicle is stationary and the
The wipers will operate once.
ambient temperature is approximately 32 °F
OFF-
Off
(0 °C) or lower.
Features and controls
5-101
Wiper and washer switch
NOTE
To adjust the sensitivity of the rain sensor
Misting function
z
Do not cover the sensor by affixing a sticker
With the lever in the “AUTO” position, it is
Move the lever in the direction of the arrow
or label to the windshield. Also, do not put
possible to adjust the sensitivity of the rain
and release, to operate the wipers once.
any water-repellent coating on the wind-
shield. The rain sensor would not be able to
sensor by turning the knob (B).
Use this function when you are driving in
detect the extent of rain, and the wipers
might stop working normally.
mist or drizzle.
z
In the following cases, the rain sensor may
B
The wipers will operate once if the lever is
5
be malfunctioning. Have the vehicle checked
raised to the “MIST” position and released
at an authorized Mitsubishi Motors dealer or
when the ignition switch or the operation
a repair facility of your choice.
mode is in ON or ACC. The wipers will con-
• When the wipers operate at a constant inter-
tinue to operate while the lever is held in the
val despite changes in the extent of rain.
“MIST” position.
• When the wipers do not operate even
though it is raining.
z
The wipers may automatically operate when
things such as insects or foreign objects are
affixed to the windshield on top of the rain
“+”- Higher sensitivity to rain
sensor or when the windshield is frozen.
“-”-
Lower sensitivity to rain
Objects affixed to the windshield will stop
the wipers when the wipers cannot remove
them. To operate the wipers again, move the
NOTE
lever to the “LO” or “HI” position.
z Automatic wiper operation (rain sensitive)
Also, the wipers may operate automatically
can be changed to intermittent operation,
due to strong direct sunlight or electromag-
either vehicle speed sensitive or not vehicle
netic wave. To stop the wipers, move the
speed sensitive.
lever to the “OFF” position.
For further information, please contact your
z
Contact an authorized Mitsubishi Motors
authorized Mitsubishi Motors dealer or a
dealer or a repair facility of your choice
repair facility of your choice.
when replacing the windshield glass.
5-102
Features and controls
Wiper and washer switch
The wipers will operate once if the lever is
Windshield washer
NOTE
moved to the “AUTO” position and the knob
N00504600298
z
Do not use the wipers when the windshield is
(C) is turned in the “+” direction when the
To turn on the windshield washer, pull the
dry. This could scratch the glass and wear the
ignition switch or the operation mode is in
lever toward you with the ignition switch or
wiper blades prematurely.
ON.
the operation mode is in ON or ACC.
z
Before using the wipers in cold weather,
The wipers will wipe automatically several
check to be sure that the wiper blades are not
frozen to the windshield. Using the wipers
times when the washer fluid is sprayed.
C
while the blades are frozen could cause the
To turn off the spray, release the lever.
5
wiper motor to burn out.
z
If the moving wipers become blocked part-
way through a sweep by ice or other deposits
on the glass, the wipers may temporarily stop
operating to prevent the motor from over-
heating. In this case, park the vehicle in a
safe place, turn the ignition switch to the
“OFF” position or put the operation mode in
OFF, and then remove the ice or other depos-
its.
Because the wipers will start operating again
after the wiper motor cools down, check that
the wipers operate before using them.
z
Avoid using the washer for more than 20 sec-
onds at a time. Do not operate the washer
Precautions to observe when
when the washer fluid reservoir is empty or
using wipers and washers
the pump may fail.
N00523501349
z
During cold weather, add a recommended
washer solution that will not freeze in the
CAUTION
washer fluid reservoir. Otherwise the washer
z If the washer is used in cold weather, washer
may not work or may be damaged.
fluid sprayed onto the glass might freeze,
z
Replace the wiper blades when they are
blocking your view. Heat the glass with the
worn. Use the proper size replacement
defroster before using the washer.
blades. For further information, please con-
tact your authorized Mitsubishi Motors
dealer.
Features and controls
5-103
Electric rear window defogger switch
Electric rear window defog-
CAUTION
Link System
z The rear window defogger is not designed to
N00563701239
ger switch
melt snow. Remove any snow manually
N00523701572
The Link System takes control of the devices
before using the rear window defogger.
connected via the USB input terminal or the
The rear window defogger can be used when
z Use the rear window defogger only after the
the engine is running.
engine has started and is running. Be sure to
Bluetooth®; the system allows the connected
The indicator light (A) will come on when
turn the defogger switch off immediately
devices to be operated by using the switches
you press the electric rear window defogger
after the window is clear to save on battery
in the vehicle or voice commands
(if so
5
power.
equipped).
switch. Electric current will flow through the
z Do not place stickers, tape, or other items
For details on how to operate, refer to “USB
heating wires on the rear window to help
that are attached with adhesive over the grid
input terminal” on page 5-104 and the sepa-
clear away moisture or frost.
wires on the rear window.
rate owner’s manual.
z When cleaning the inside rear window, use a
soft cloth and wipe lightly over the grid
Bluetooth® is a registered trademark of
wires.
BLUETOOTH SIG, INC.
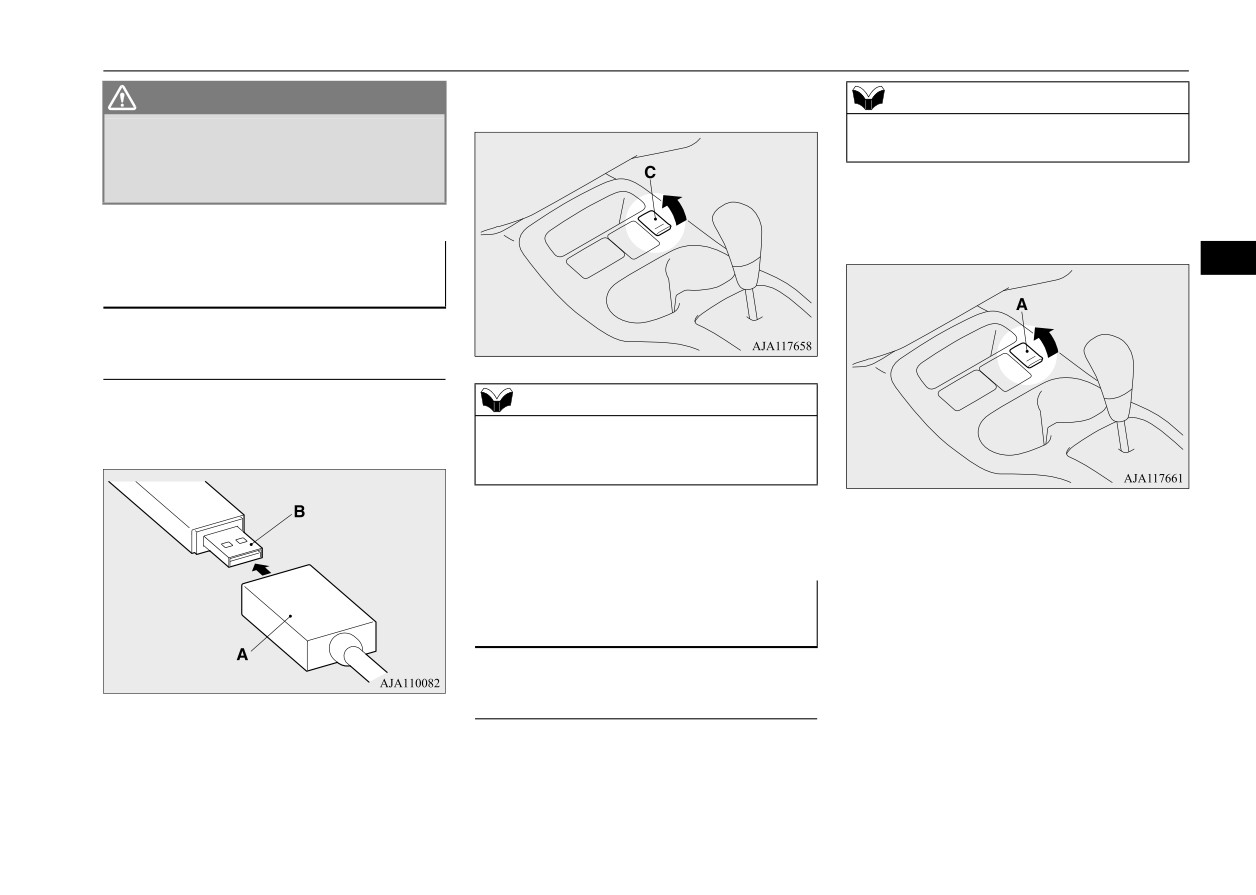
USB input terminal
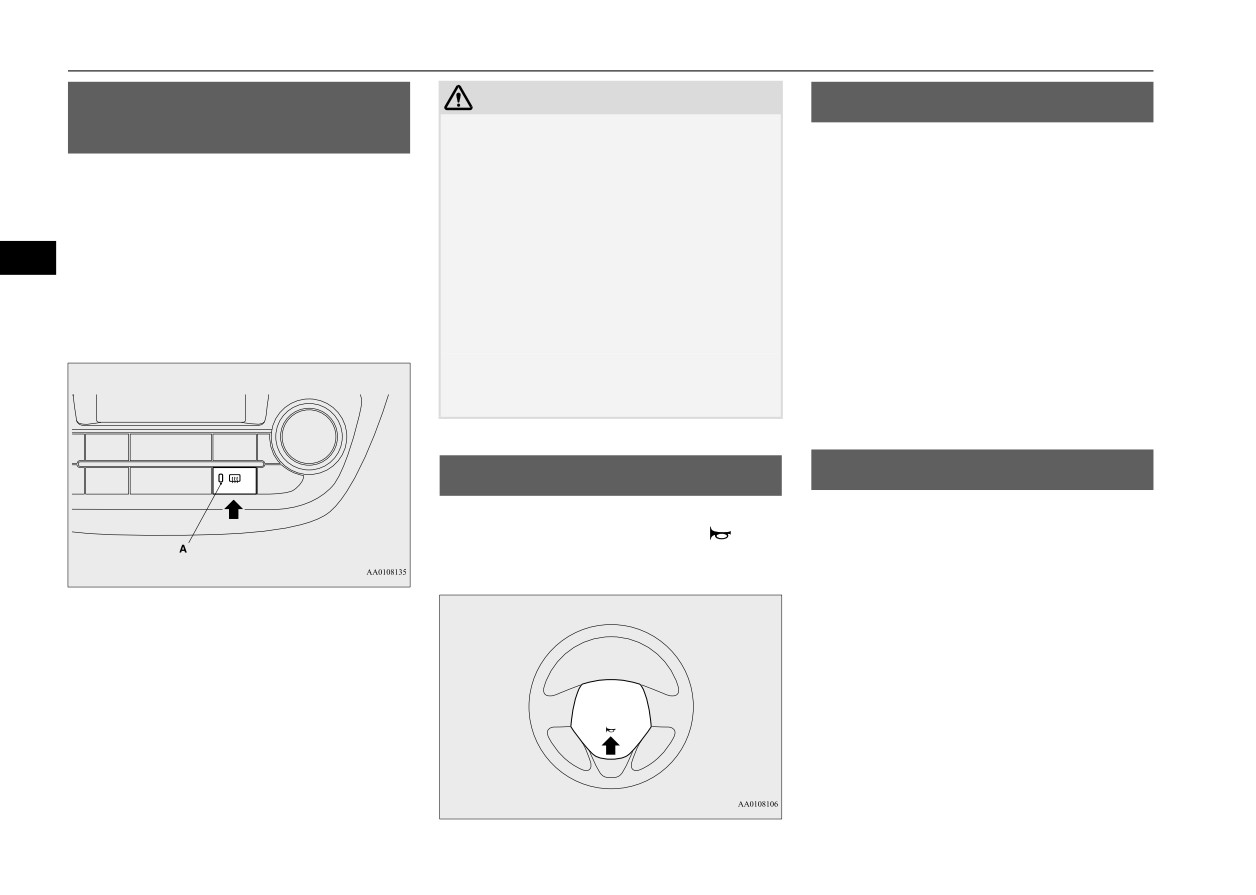
Horn switch
N00566701331
N00523800185
You can connect your USB memory device,
To honk the horn, press around the “
” mark
iPod* or smartphone to play music files
on the steering wheel.
stored in the connected device.
*: “iPod” is a registered trademark of Apple
After about 20 minutes of operation, the sys-
Inc. in the United States and other countries.
tem will shut off automatically.
To switch the defogger OFF before 20 min-
This section explains how to connect and
utes have passed, press the switch again. The
remove a USB memory device, iPod or
indicator light will go out and the defogger
smartphone.
will turn off.
Refer to the separate owner’s manual for
If you need the defogger for more than 20
details on the types of connectable devices
minutes, press the switch again. This will add
and supported files, and how to play music
20 more minutes.
files.
5-104
Features and controls
USB input terminal
2. Open the cover (C) and connect the oppo-
WARNING
NOTE
site end of the USB connector cable.
z Do not connect/disconnect the USB mem-
z When you connect the iPod, use a genuine
ory device, iPod or smartphone while
connector cable from Apple Inc.
driving. This can be dangerous.
Be sure to do this before driving.
2. Open the cover (A) and connect the oppo-
site end of the connector cable or the USB
connector cable.
How to connect a USB memory
5
device
N00566801172
To connect
1. Connect a commercially available USB
NOTE
connector cable (A) to the USB memory
z Do not connect the USB memory device to
device (B).
the USB input terminal directly.
The USB memory device may be damaged.
3. To disconnect the connector cable or the
3. To disconnect the USB connector cable,
USB connector cable, perform the instal-
perform the installation steps in reverse.
lation steps in reverse.
How to connect an iPod or
smartphone
N00566901290
To connect
1. Connect the connector cable to the iPod or
the USB connector cable to the smart-
phone.
Features and controls
5-105
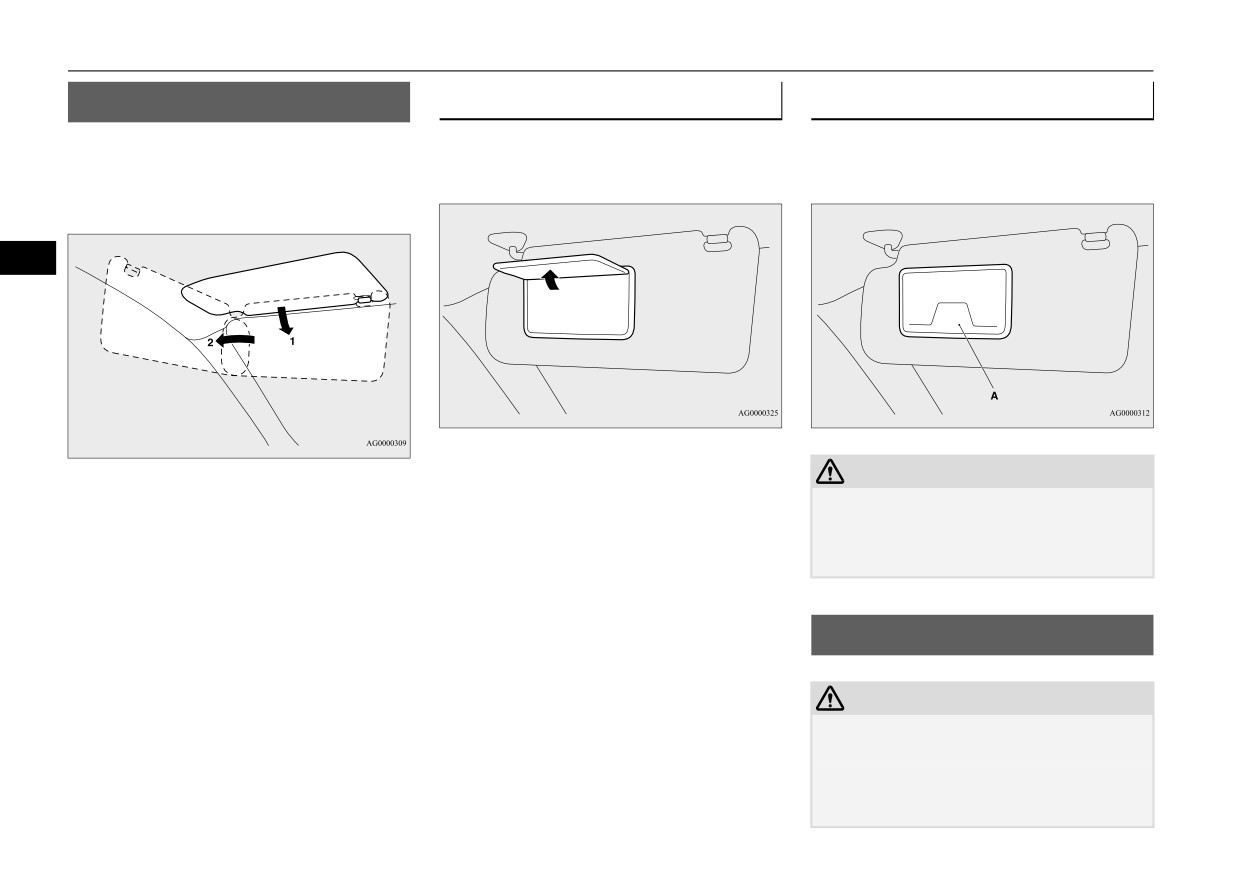
Sun visors
Sun visors
Vanity mirror
Ticket holder
N00524601435
A vanity mirror is fitted to the back of the sun
The holder (A) is located on the back of the
Pull the sun visor downward (1) to reduce
visor.
sun visor.
front glare while driving. To reduce side
glare, turn the visor to the side (2).
5
CAUTION
z Do not leave plastic cards in the ticket
holder. Because the inside of the vehicle will
become hot if the vehicle is parked in strong
sunlight, the cards could deform or crack.
12 V power outlets
N00525001670
CAUTION
z Be sure to use a “plug-in” type accessory
operating at 12 V and at 120 W or less.
z Also be aware that using electronic equip-
ment with the engine off may run the battery
down.
5-106
Features and controls
Interior lights
The light illuminates when a door is
CAUTION
Interior lights
opened. It goes off approximately 30 sec-
z When the power outlet is not in use, be sure
N00525301644
onds after the door is closed.
to close the power outlet cover. This will pre-
However, the light goes off immediately
vent the power outlet from becoming
NOTE
with all doors closed in the following
clogged and short circuiting.
z Be aware that leaving the light illuminated
cases:
with the engine off may run the battery
Accessories can be operated while the igni-
• When the ignition switch is turned to the
down.
tion switch or the operation mode is in ON or
“ON” position or the operation mode is
Never leave the vehicle without
checking
5
ACC.
put in ON.
that the light is off.
To use a “plug-in” type accessory, open the
• When the power door lock function is
cover, and insert the plug in the power outlet.
used to lock the vehicle.
• When the remote control transmitter of
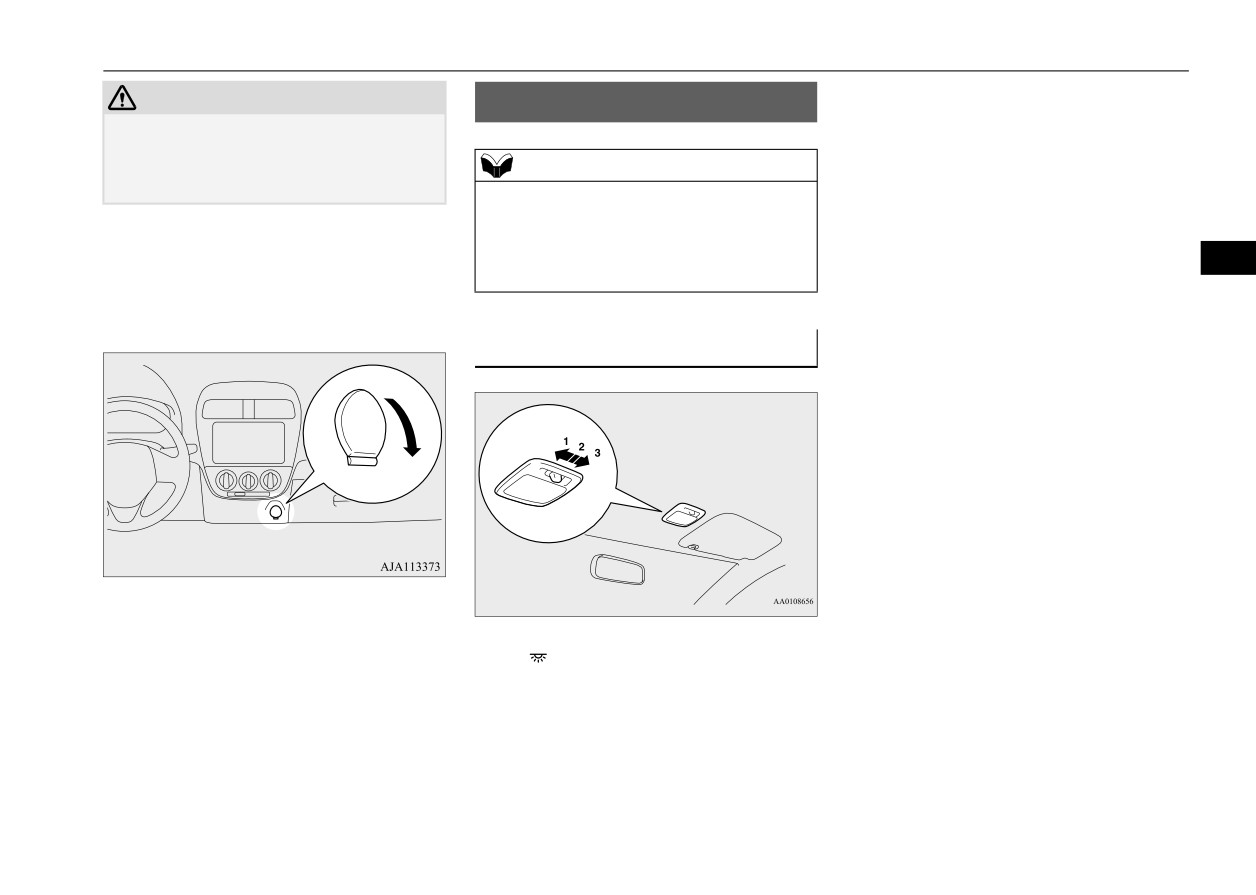
Dome light
the keyless entry system or the F.A.S.T.-
N00525801421
key is used to lock the vehicle.
• When the door lock/unlock switch is
pressed to lock the vehicle while carry-
ing the F.A.S.T.-key.
Auto cut-out function
If the light is left switched on with the
ignition switch in the “OFF” or “ACC”
position or the operation mode in OFF or
ACC, and a door is opened, it goes off
automatically after approximately 30 min-
utes.
The light will illuminate again after it
1- (
)
automatically goes off in the following
The
light illuminates
regardless
of
cases:
whether a door is open or closed.
• When the ignition switch is turned to the
2- (•)
“ON” position or the operation mode is
Delayed off function
put in ON.
• When the keyless entry system or the
F.A.S.T.-key is operated.
Features and controls
5-107
Storage spaces
• When all doors are closed.
Storage spaces
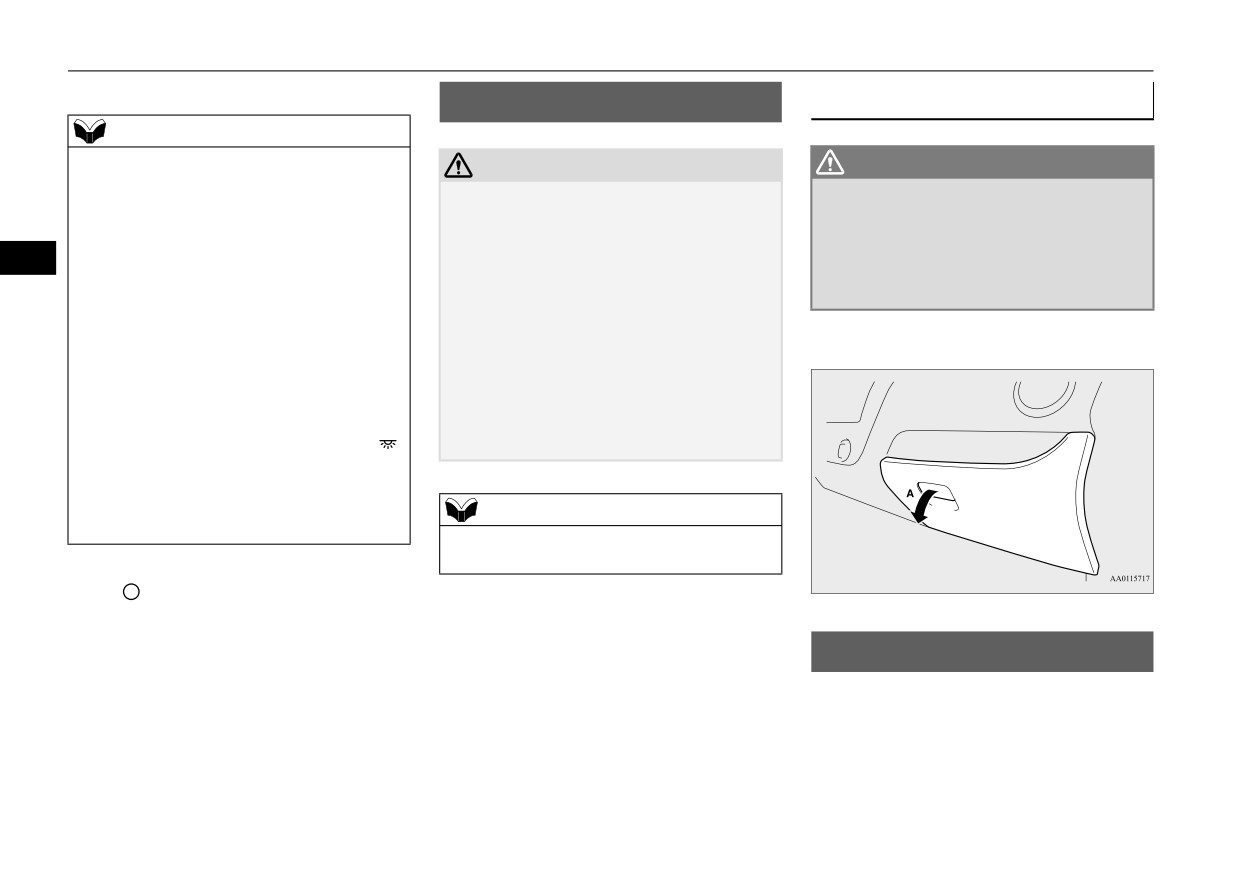
Glove compartment
N00526400528
N00551501331
NOTE
z
When the key was used to start the engine: if
CAUTION
WARNING
the key is removed while the doors are
z
Never leave lighters, carbonated drink cans,
z An open glove compartment door can
closed, the light is illuminated and after
or spectacles in the cabin when parking the
cause a serious injury or death to the front
approximately 30 seconds it goes off.
vehicle in hot sunshine. The cabin will
passenger in an accident, even if the pas-
z
When the F.A.S.T.-key was used to start the
become extremely hot, so lighters and other
senger is wearing his/her seat belt. Always
5
engine: if the operation mode is put in OFF
flammable items may catch fire and
keep the glove compartment door closed
while the doors are closed, the light illumi-
unopened drink cans (including beer cans)
when driving.
nates and after approximately 30 seconds it
may rupture. The heat may also deform or
goes off.
To open, pull the lever (A).
crack plastic spectacle lenses and other spec-
z
The time until the light goes off (delayed off)
tacle parts that are made of plastic.
can be adjusted. See your authorized
z
Keep the lids of storage spaces closed while
Mitsubishi Motors dealer for details.
driving the vehicle. A lid or the contents of a
z
The auto cut-out function cannot be operated
storage space could otherwise cause injuries
when the dome light switch is in the “
”
during a sudden stop.
position.
Also, this function can be deactivated. See
your authorized Mitsubishi Motors dealer for
NOTE
details.
z
Do not leave valuables in any storage space
when leaving the vehicle.
3- (
)
The light goes off regardless of whether a
door is open or closed.
Cup holders
N00527301518
The cup holder is designed for holding cups
or drink-cans securely in its holes.
5-108
Features and controls

Bottle holders
WARNING
CAUTION
z
Do not spray water or spill beverages
z Do not drink beverages while driving your
inside the vehicle. If switches, wires, or
vehicle.
electrical components become wet, they
This is distracting and could cause an acci-
could malfunction or cause a vehicle fire.
dent.
If you accidentally spill a beverage, wipe
up as much liquid as possible.
For the rear seat
5
N00537001215
NOTE
z
Plastic bottles may sometimes not fit
Type 1
securely depending on the shape of the bot-
tle. Plastic bottles could fall if driving is
done while a plastic bottle is not securely
The cup holder is located behind the parking
Bottle holders
placed, so check that plastic bottles are
brake lever.
N00502801105
placed securely or use the bottle holder.
WARNING
z Do not spray water
or
spill
beverages
inside the vehicle. If switches, wires, or
For the front seat
electrical components become wet, they
could malfunction or cause a vehicle fire.
The cup holder is located in front of the floor
If you accidentally spill a beverage, wipe
console.
up as much liquid as possible.
CAUTION
z Drinking beverages while driving your vehi-
cle is distracting and can cause an accident.
z Vibration and shaking while driving may
Type 2
cause beverages to spill. Be very careful, as
spilling hot beverages could cause burns.
In order to use cup holder, allow the arm rest
to drop down.
Features and controls
5-109
Convenience hook
There are bottle holders located on the front
doors.
5
NOTE
CAUTION
z To avoid damage to the convenience hook,
z Do not use the assist grips when getting into
do not hang objects that weight more than 9
or out of the vehicle. The assist grips could
NOTE
pounds (4 kg).
detach causing you to fall.
z Do not store cup or drink can in the bottle
holder.
z Make sure all lids are tightly closed when
Assist grips
storing beverages that are in plastic bottles,
N00559001101
etc.
z Some beverages may not be stored, depend-
These grips are to support the body by hand
ing on the size and shape of the plastic bot-
while seated in the vehicle.
tles, etc.
Convenience hook
N00574700014
Convenience hook is located on the seatback
of the passenger’s seat.
5-110
Features and controls
Driving safety
Fuel economy
6-2
Driving, alcohol and drugs
6-2
Floor mat
6-2
Vehicle preparation before driving
6-3
6
Safe driving techniques
6-4
Driving during cold weather
6-4
Braking
6-5
Parking
6-5
Loading information
6-6
Cargo loads
6-11
Trailer towing
6-12
Fuel economy
retaining clip on the driver’s floorboard to
Fuel economy
Driving, alcohol and drugs
secure the floor mat. When used, this clip will
N00628800178
N00628900049
help prevent the floor mat from moving for-
Fuel economy is dependent on many factors.
Drunk driving is one of the most frequent
ward and possibly interfering with the opera-
Your personal driving habits can have a sig-
causes of accidents.
tion of the pedals. To prevent the floor mat
nificant effect on your fuel consumption.
Your driving ability can be seriously impaired
from moving forward and possibly interfering
Several recommendations for achieving the
even with blood alcohol levels far below the
with the operation of the pedals, Mitsubishi
greatest fuel economy are listed below.
legal minimum. If you have been drinking,
Motors Genuine floor mats are recom-
don’t drive. Ride with a designated non-
mended.
z
Whenever accelerating from a stop,
drinking driver, call a cab or a friend, or use
6
always accelerate slowly and smoothly.
public transportation. Drinking coffee or tak-
To install the floor mat
z
When parked for even a short period, do
ing a cold shower will not make you sober.
not idle the engine. Shut it off.
N00628701099
Similarly, prescription and nonprescription
1. Place the floor mat to fit the shape of the
z
Plan your trips to avoid unnecessary
drugs affect your alertness, perception and
floorboard.
stops.
reaction time. Consult with your doctor or
2. Align the floor mat with the installation
z
Keep your tires inflated to the recom-
pharmacist before driving while under the
holes over the retaining clips.
mended pressures.
influence of any of these medications.
3. Secure the floor mat with retaining clips.
z
For freeway driving, maintain a speed of
approximately 50 mph (80 km/h) when
WARNING
traffic, roadway and weather conditions
z NEVER DRINK AND DRIVE.
safely permit.
Your perceptions are less accurate, your
z
Keep your air filter clean and your vehicle
reflexes are slower and your judgment is
lubricated according to the recommenda-
impaired.
tions in this manual.
z
Always keep your vehicle well main-
tained. A poorly maintained engine
Floor mat
wastes fuel and costs money.
N00628601069
z
Never overload your vehicle.
The original equipment floor mat provided
with your vehicle was specifically designed
for your vehicle. Always properly position
the floor mat and assure it does not interfere
with operation of the pedals. Always use the
6-2
Driving safety
Vehicle preparation before driving
NOTE
WARNING
Seat belts and seats
z
The shape of the mat and the number of
• While the vehicle is stopped with the
retaining clips may vary depending on the
engine off, check that the floor mat is not
z
Before starting the vehicle, make certain
vehicle model.
interfering with the pedals by depressing
that you and all passengers are seated and
the pedals fully.
wearing their seat belts properly
(with
children in the rear seat, in appropriate
WARNING
restraints), and that all the doors are
z
If a floor mat is the wrong size or is not
locked.
properly installed, it can interfere with the
z
Move the driver’s seat as far backward as
operation of the pedals. Interference with
possible, while keeping good visibility,
6
the pedals can cause unintended accelera-
and good control of the steering wheel,
tion and/or increased stopping distances
brakes, accelerator, and controls. Check
resulting in a crash and injury. Always
the instrument panel indicators and multi-
make sure the floor mat does not interfere
information display for any possible prob-
with the accelerator or brake pedal.
lem.
z
Always use the retaining clip on the
z
Similarly, the front passenger seat should
driver’s floorboard to secure the floor
also be moved as far back as possible.
mat.
z
Make sure that infants and small children
z
Always install the mat with the correct
are properly restrained in accordance with
side facing down.
Vehicle preparation before
all laws and regulations.
z
Never install a second mat over or under
driving
an existing floor mat.
N00629001868
z
Do not use a floor mat designed for
Defrosters
another model vehicle even if it is a
For a safer and more enjoyable trip, always
Mitsubishi Motors Genuine floor mat.
check for the following:
Check these by selecting the defroster mode,
z
Before driving, be sure to check the fol-
lowing:
and set the blower switch on high. You should
• Periodically check that the floor mat is
be able to feel the air blowing against the
properly secured with the retaining clips.
windshield.
If you remove the floor mat while clean-
Refer to “Defrosting or defogging (wind-
ing the inside of your vehicle or for any
shield, door windows)” on page 7-9.
other reason, always check the condition
of the floor mat after it has been rein-
stalled.
Driving safety
6-3
Safe driving techniques
to find out why immediately and have it
Tires
Driving during cold weather
fixed.
N00629400474
Check all the tires for heavy tread wear or
z
Check the battery. At the same time,
uneven wear patterns. Look for stones, nails,
Safe driving techniques
check the terminals and wiring. During
glass, or other objects stuck in the tread. Look
N00629200137
extremely cold weather, the battery will
for any tread cuts or sidewall cracks. Check
Even this vehicle’s safety equipment, and
not be as strong. Also, the battery power
the wheel nuts for tightness, and the tires
your safest driving, cannot guarantee that you
level may drop because more power is
(including spare tire) for proper pressure.
can avoid an accident or injury. However, if
used for cold starting and driving.
Replace your tires before they are heavily
you give extra attention to the following
Before driving the vehicle, check to see if
6
worn out.
areas, you can better protect yourself and
the engine runs at the proper speed and if
As your vehicle is equipped with a tire pres-
your passengers:
the headlights are as bright as normally.
sure monitoring system, there is a risk of
Charge or replace the battery if necessary.
damage to the tire inflation pressure sensors
z
Drive defensively. Be aware of traffic,
During extreme cold weather, it is possi-
when the tire is replaced on the rim. Tire
road and weather conditions. Leave plenty
ble that a very low battery could freeze.
replacement should, only be performed by an
of stopping distance between your vehicle
authorized Mitsubishi Motors dealer.
and the vehicle ahead.
WARNING
z
Before changing lanes, check your mir-
z The battery gives off explosive hydrogen
rors, your blind spots, and use your turn-
gas. Any spark or flame can cause the bat-
Lights
signal light.
tery to explode, which could cause serious
z
While driving, watch the behavior of
injury or death.
Have someone watch while you turn all the
other drivers, bicyclists, and pedestrians.
Always wear protective clothes and a face
exterior lights on and off. Also check the turn
z
Always obey applicable laws and regula-
mask when working with your battery, or
let a skilled mechanic do it.
signal indicators and high-beam indicators on
tions. Be a polite and alert driver. Always
the instrument panel.
leave room for unexpected events, such as
sudden braking.
z Warm the engine sufficiently. After start-
z
If you plan to drive in another country,
ing the engine, allow a short warm-up
Fluid leaks
obey their vehicle registration laws and
time to distribute oil to all cylinders. Then
make sure you will be able to get the right
drive your vehicle slowly.
Check the ground under the vehicle after
z Stay at low speeds at first so that the man-
fuel.
parking overnight, for fuel, water, oil, or
ual transaxle oil or the automatic transaxle
other leaks. Make sure all the fluid levels are
fluid has time to spread to all the lubrica-
correct. Also, if you can smell fuel, you need
tion points.
6-4
Driving safety
Braking
z Manual transaxle can be harder to shift in
cially when the brakes are wet, to confirm
Parking
cold weather conditions. This is normal
they work normally.
N00629601372
and shifting will get easier as the transaxle
A film of water can be formed on the brake
warms up.
discs or brake drums, and prevent normal
z Check the engine antifreeze.
braking after driving in heavy rain or through
Parking on a hill
If there is not enough coolant because of a
large puddles, or after the vehicle is washed.
leak or from engine overheating, add
If this occurs, dry the brakes out by driving
When parking on a hill, set the parking brake,
Mitsubishi Motors Genuine Super Long
slowly while lightly depressing the brake
and turn the front wheels toward the curb on a
Life Coolant Premium or equivalent.
pedal.
downhill, or away from the curb on an uphill.
Please read this section in conjunction
If necessary, apply chocks to the wheels.
6
with the “Engine coolant” on page 9-7.
When driving in cold weather
For vehicles equipped with man-
WARNING
On snowy roads, ice can form on the braking
ual transaxle
z Never open the radiator cap when the
system, making the brakes less effective.
radiator is hot. You could be seriously
burned.
While driving in such conditions, pay close
Place the gearshift lever into the
“R”
attention to surrounding vehicles and to the
(Reverse) position when parking on a down-
condition of the road surface. From time to
hill slope, into the 1st position when parking
time, lightly depress the brake pedal and
Braking
on an uphill slope.
check how effective the brakes are.
N00629500521
All parts of the brake system are critical to
For vehicles equipped with contin-
When driving downhill
safety. Have the vehicle serviced by an autho-
uously variable transmission
rized Mitsubishi Motors dealer or a repair
(CVT)
facility of your choice at regular intervals
It is important to take advantage of the engine
according to the
“WARRANTY AND
braking by downshifting while driving on
Be sure that the parking brake is firmly set
MAINTENANCE MANUAL”.
steep downhill roads in order to prevent the
when parked and that the selector lever is in
brakes from overheating.
the “P” (PARK) position.
When brakes are wet
When parking on a hill, it is important to set
the parking brake before moving the selector
Check the brake system while driving at a
lever to the “P” (PARK) position. This pre-
low speed immediately after starting, espe-
vents loading the parking brake against the
Driving safety
6-5
Loading information
transaxle. When this happens, it is difficult to
factory-installed options, if any,
WARNING
move the selector lever out of the
“P”
being towed. The tire and loading
z Do not park your vehicle in areas where
(PARK) position.
combustible materials such as dry grass or
information placard located on the
leaves can come in contact with a hot
driver’s door sill of your vehicle will
Parking with the engine run-
exhaust, since a fire could occur.
show how much weight it may prop-
ning
erly carry.
Do not keep the steering wheel
Never leave the engine running while you
WARNING
take a short nap or rest. Also, never leave the
fully turned for a long time
6
z Never overload your vehicle.
engine running in a closed or poorly venti-
lated place.
More effort could be required to turn the
Overloading can damage your
steering wheel.
vehicle, adversely affect vehi-
Refer to
“Electric power steering system
WARNING
cle performance, including
(EPS)” on page 5-52.
z Leaving the engine running risks injury or
handling and braking, cause
death from accidentally moving the gear-
tire failure, and result in an
shift lever (manual transaxle) or the selec-
When leaving the vehicle
accident.
tor lever (CVT) or from the accumulation
of toxic exhaust fumes in the passenger
compartment.
Always carry the key and lock all doors when
It is important to familiarize yourself
leaving the vehicle unattended.
with the following terms before load-
Always try to park your vehicle in a well lit
area.
ing your vehicle:
Where you park
z Vehicle maximum load on the tire:
Your front bumper can be damaged if you
Loading information
load on an individual tire that is
scrape it over curbs or parking stop blocks.
N00629901463
determined by distributing to each
Be careful when traveling up or down steep
It is very important to know how
axle its share of the maximum
slopes where your bumper can scrape the
much weight your vehicle can carry.
road.
loaded vehicle weight and divid-
This weight is called the vehicle
ing by two.
capacity weight and includes the
weight of all occupants, cargo, non-
6-6
Driving safety
Loading information
z
Vehicle normal load on the tire:
z
Accessory weight: the combined
z Normal occupant weight: 150 lbs
load on an individual tire that is
weight (in excess of those stan-
(68 kg)* times the number of
determined by distributing to each
dard items which may be
specified occupants.
(In your
axle its share of the curb weight,
replaced) of automatic transmis-
vehicle the number is 3)
accessory weight, and normal
sion, power steering, power
z Occupant distribution: Occupant
occupant weight and dividing by
brakes, power windows, power
distribution within the passenger
two.
seats, radio, and heater, to the
compartment (In your vehicle the
z
Maximum loaded vehicle weight:
extent that these items are avail-
distribution is 2 in front, 1 in sec-
6
the sum of -
able as factory- installed equip-
ond row seat)
(a) Curb weight;
ment (whether installed or not).
*:
150 lbs (68 kg) is the weight of
(b) Accessory weight;
z
Vehicle capacity weight: the rated
one person as defined by U.S.A.
(c) Vehicle capacity weight; and
cargo and luggage load plus 150
regulations.
(d) Production options weight.
lbs
(68 kg)* times the vehicle’s
z
Curb weight: the weight of a
designated seating capacity.
motor vehicle with standard
z
Production options weight: the
equipment including the maxi-
combined weight of those
mum capacity of fuel, oil, and
installed
regular
production
coolant.
options weighing over 5 lbs (2.3
kg) in excess of those standard
items which they replace, not pre-
viously considered in curb weight
or accessory weight, including
heavy duty brakes, ride levelers,
roof rack, heavy duty battery, and
special trim.
Driving safety
6-7