Mitsubishi L200 (2020 year). Manual in english - page 18

Engine overheating
Stop the engine immediately and contact
4. Check the coolant level in the reserve
WARNING
a MITSUBISHI MOTORS Authorized
tank (B).
z Do not attempt to remove the radiator cap
Service Point for assistance.
while the engine is hot.
FULL
LOW
8
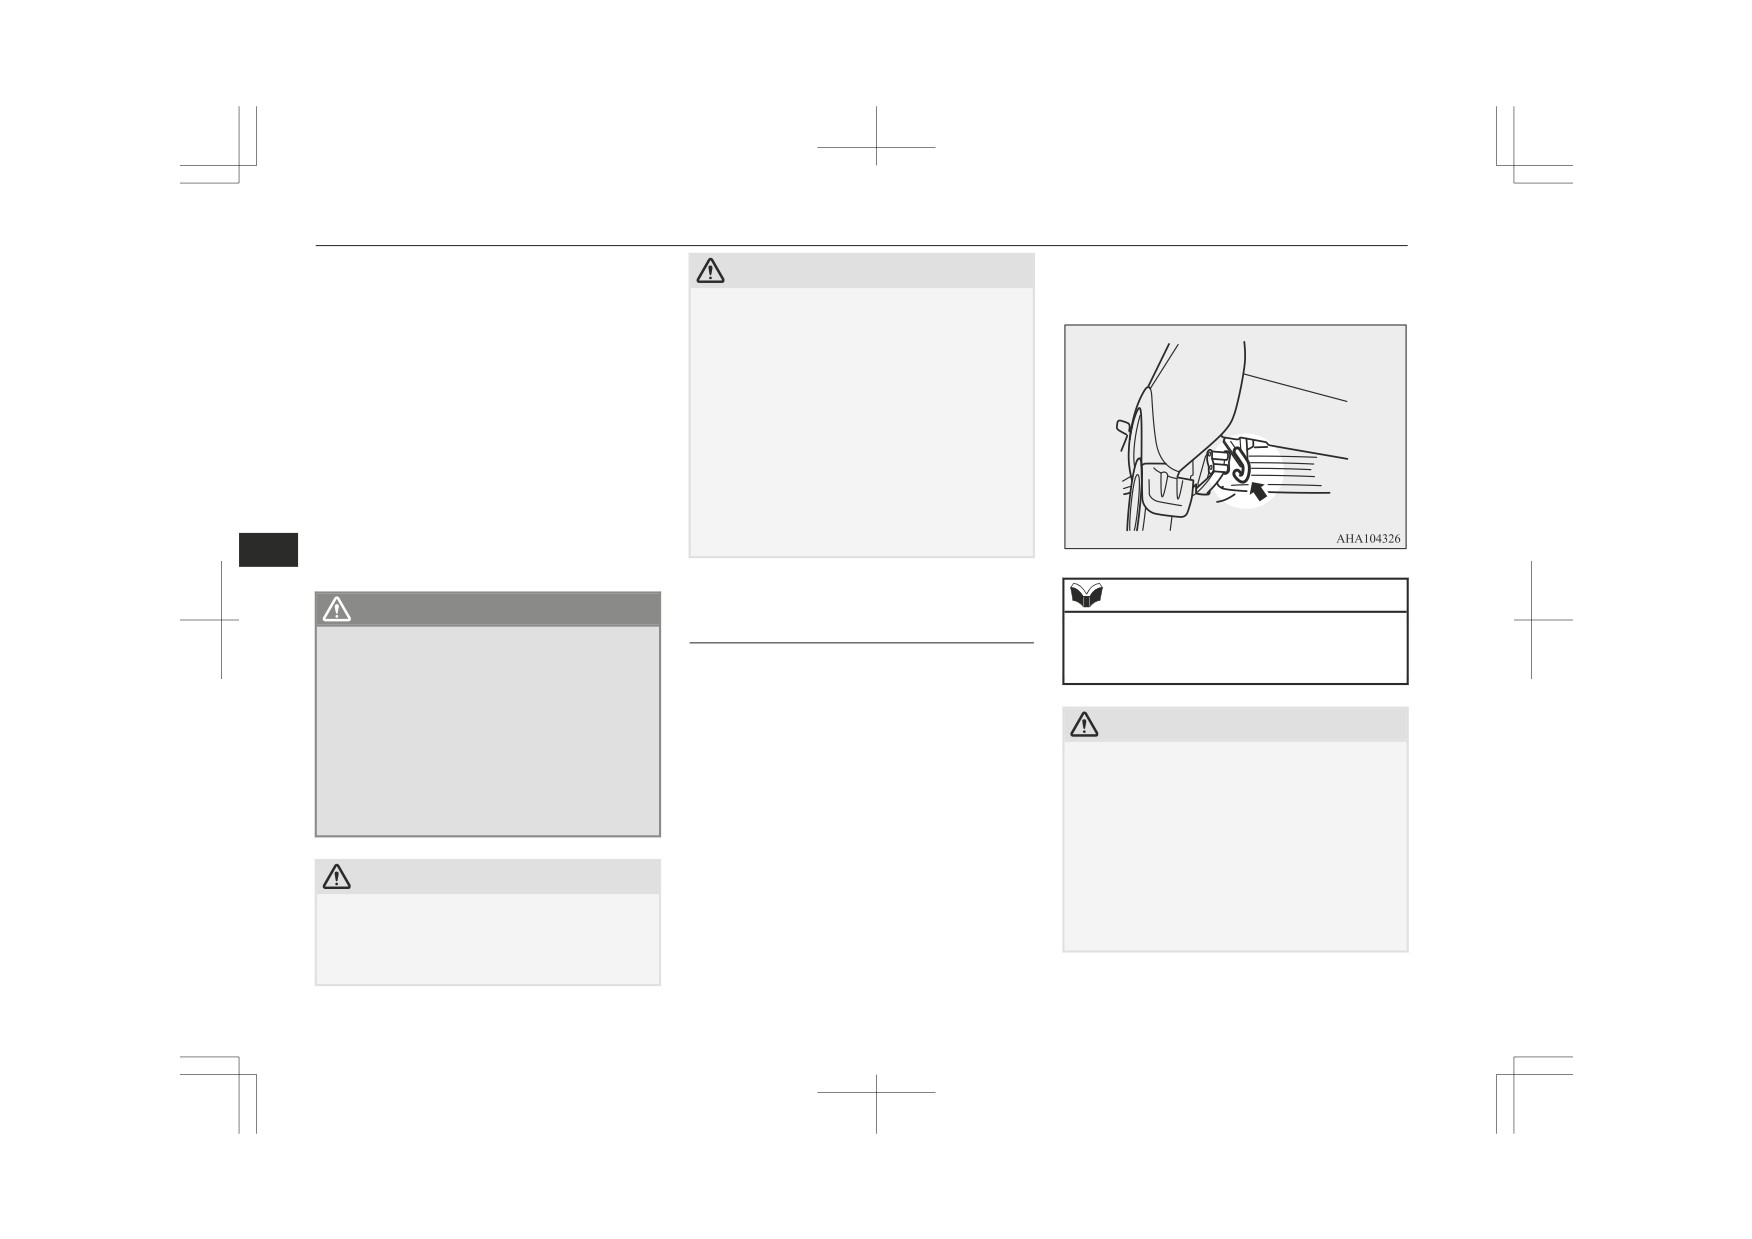
3. Confirm that the cooling fan (A) is turn-
5. Add coolant to the radiator and/or re-
ing.
A- Cooling fan
serve tank if necessary
(refer to the
[If the cooling fan is turning]
B- Reserve tank
“Maintenance” section).
After the high coolant temperature warn-
C- Radiator cap
ing has gone off, stop the engine.
WARNING
[If the cooling fan is not turning]
WARNING
z
Make sure that the engine has cooled
z
Be careful not to get your hands or clothes
down before removing the radiator cap
caught in the cooling fan.
(C), because hot steam or boiling water
otherwise will gush from the filler port
and may scald you.
CAUTION
z
Do not add coolant while the engine is hot.
Suddenly adding cold coolant could damage
the engine. Wait for the engine to cool down,
then add coolant a little at a time.
8-10
For emergencies

Bleeding the fuel system
6. Examine the radiator hoses for coolant
1. Loosen the drain plug (A) of the fuel fil-
CAUTION
leakage and the drive belt for looseness
ter.
or damage.
z Do not smoke or have any other open flame
near the vehicle while bleeding the fuel sys-
If there is anything wrong with the cool-
tem.
ing system or drive belt, we recommend
z Be sure to carefully clean away any spilt fuel
you to have it checked and repaired.
which could ignite and cause a fire.
Bleeding the fuel system
Removal of water from the
The fuel system should be bled to remove air
fuel filter
as described below if the fuel supply is ex-
hausted during travel.
If the fuel filter indication lamp in the instru-
ment panel illuminates or the fuel filter indi-
Pump the hand pump (A) at the top of the
8
cator display on the information screen in the
fuel filter until the hand pump becomes stiff.
multi information display appears during
Then try again to start the engine.
2. Operate the hand pump (B) slowly 6 or 7
If the engine does not start, repeat the process
driving, it indicates that water has accumula-
times in order to force the water out
above.
ted in the fuel filter. If this occurs, remove the
through the drain plug (A).
water as described below.
Indication lamp (mono-colour liquid crystal
display)
Indicator display (colour liquid crystal dis-
play)
3. Tighten the drain plug (A) when water
no longer comes out.
For emergencies
8-11

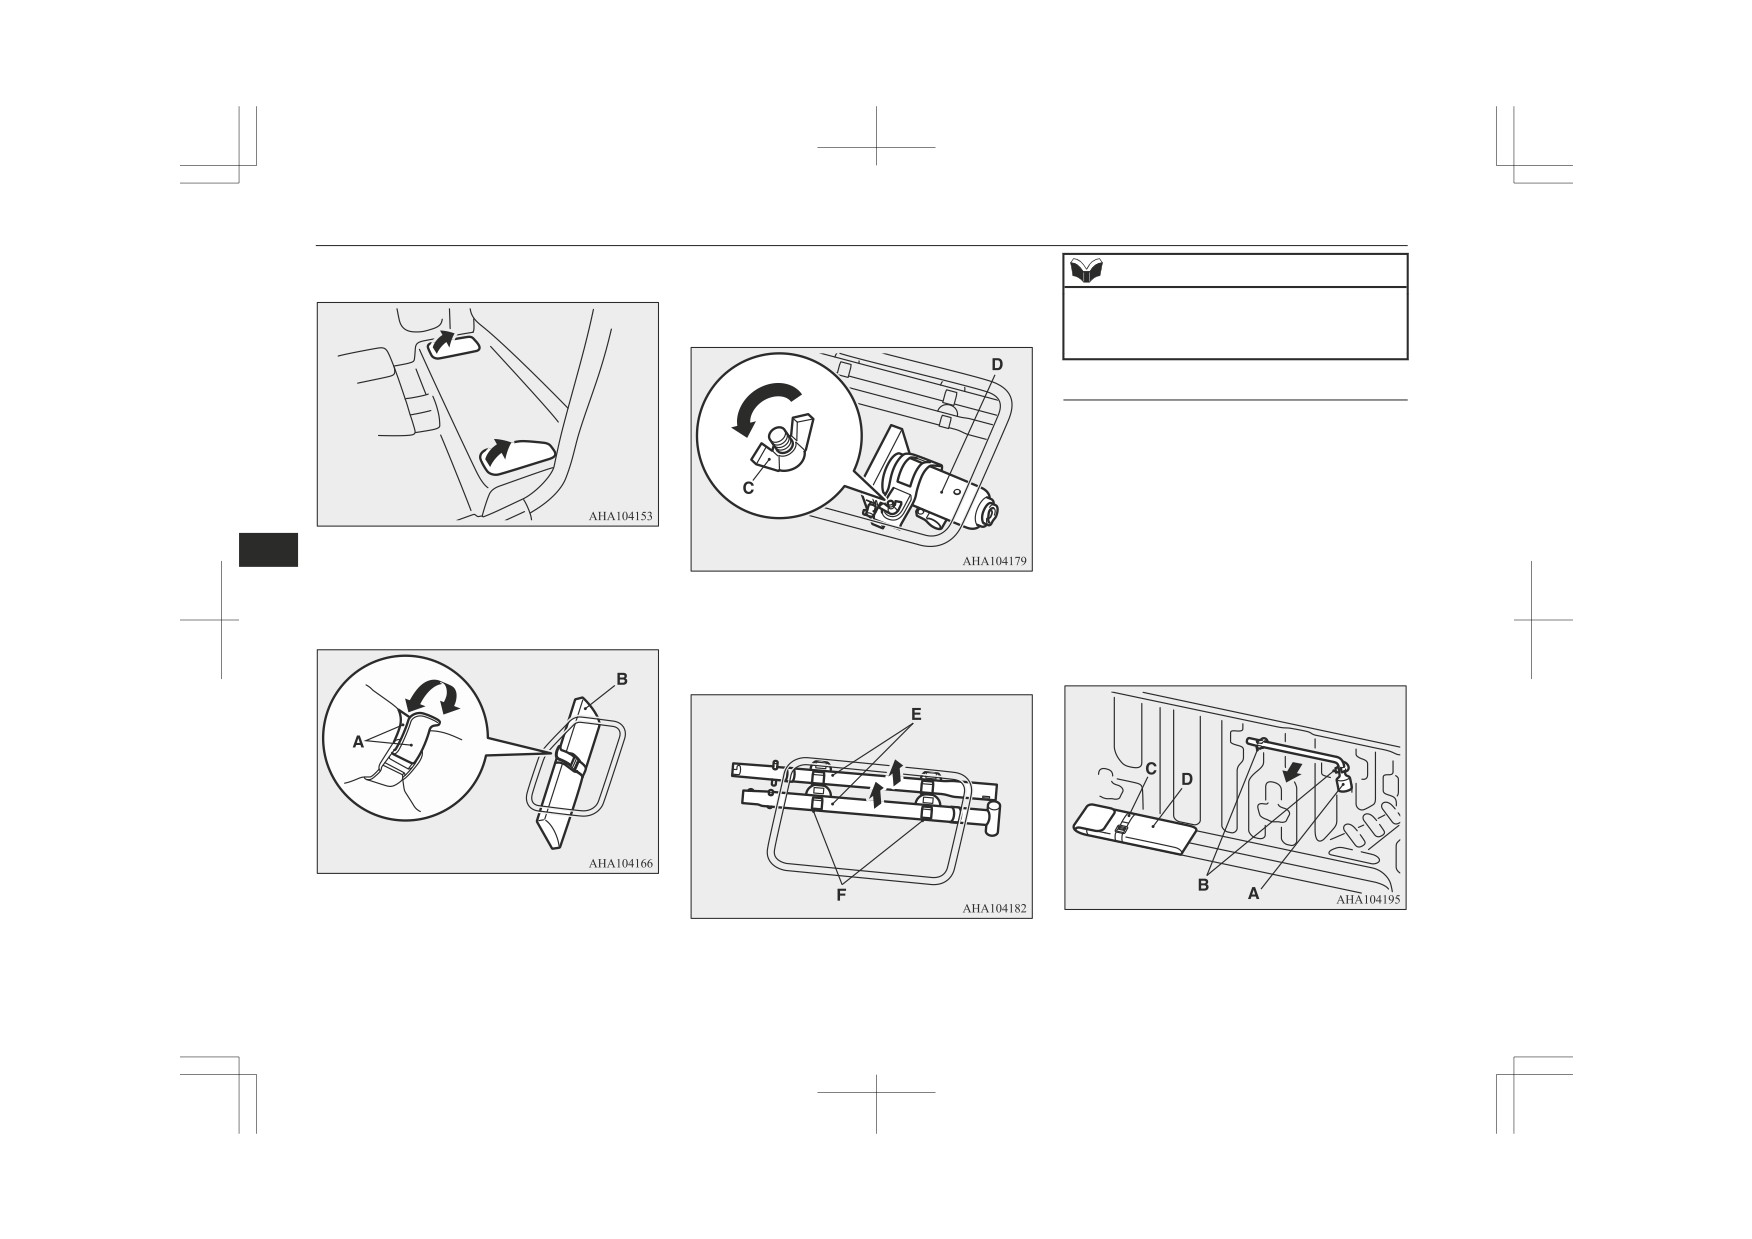
Tools, jack and jack handle
4. Bleed the air in the fuel system.
Double cab
Tools, jack and jack handle
(Refer to “Bleeding the fuel system” on
Type 1
page 8-11.)
5. [Vehicles equipped with the mono-col-
Storage
our liquid crystal display]
Check to be sure that the fuel filter indi-
The storage location of the tools, jack and
cation lamp illuminates when the igni-
jack handle should be remembered in case of
tion switch is turned to “ON” or the op-
an emergency.
eration mode is put in ON, and that it
goes off when the engine is started.
Club cab
[Vehicles equipped with the colour liq-
uid crystal display]
Check to be sure that the fuel filter indi-
8
cator display does not appear when the
A- Tool (wheel nut wrench)
ignition switch is turned to “ON” or the
B- Jack handle
operation mode is put in ON.
C- Jack
If in doubt, we recommend you to con-
sult a specialist for necessary informa-
Type 2
tion.
CAUTION
z
Do not smoke or have any other open flame
A- Tools
near the vehicle while bleeding the fuel sys-
B- Jack
tem.
C- Jack handle
z
Be sure to carefully clean away any water
drained out because any fuel mixed with the
water could ignite and cause a fire.
A- Tools
B- Jack handle
C- Jack
8-12
For emergencies

Tools, jack and jack handle
Tools
Type 2
NOTE
• The business name, full address of the
Type 1
manufacturer and of his authorized repre-
sentative and the designation of the jack
Double cab
Club cab
are described in the EC declaration of
conformity.
Removing and storing the
tools, jack and jack handle
Club cab
The tools are stored under the floor on the
8
1- Tool bag
left-hand side of the rear seat.
2- Wheel nut wrench
The jack, and jack handle are stored under
Double cab
3- Plier
the floor on the right-hand side of the rear
4- Driver
1- Wheel nut wrench
seat.
5- Spanner
1. Raise the seat cushion. Refer to “Folding
Club cab
up the seat cushion (Club cab)” on page
Jack
4-04.
1- Tool bag
The jack is used only
for
the
purpose
of
Open the rear door. Refer to “To open or
2- Wheel nut wrench
changing a tyre when a tyre is punctured.
close the rear door (Club cab)” on page
3-16.
NOTE
z The jack is maintenance-free.
z The jack is in conformity with EC law as ap-
proximated by the Machinery Directive
2006/42/EC.
z The EC declaration of conformity is attached
to the section “Declaration of Conformity”
in the end of this owner’s manual.
For emergencies
8-13
Tools, jack and jack handle
2. Open the lid.
4. Remove the securing nut (C), and then
NOTE
take out the jack (D) on the right-hand
side.
z When stowing the jack handle, align the col-
oured marking on the jack handle with that
on the holder, and fit the jack in the holder.
Double cab
The tools, jack, and jack handle are located
behind the rear seat.
1. Tip the seatback of the rear seat forward.
(Refer to “Folding the seatback forward”
on page 4-04.)
2. <Type 1>
8
Remove the wheel nut wrench (A) from
3. Remove the securing band (A), and then
the holder (B), and take out the wrench.
take out the tools (B) on the left-hand
<Type 2>
side.
5. Remove the jack handle (E) from the
Remove the securing band (C), and then
holder (F), and then take out the jack
take out the tools (D).
handle on the right-hand side.
6. Reverse the removing procedure when
storing the tools, jack and jack handle.
8-14
For emergencies

Tools, jack and jack handle
3. Remove the securing nut (E), and then
To use the jack handle (Club
NOTE
take out the jack (F).
cab)
z When stowing the jack handle, align the
black-marked part (I) of the jack handle with
1. While pressing the snap pin (A) on the
the holder (H).
handle that has a black marking, with-
draw and remove the inner handle (B).
8
4. Remove the jack handle (G) from the
holder (H), and take out the handle.
5. Reverse the removing procedure when
storing the tools, jack and jack handle.
For emergencies
8-15
How to change a tyre
2. Reverse the inner handle (B) then, while
How to change a tyre
pressing the snap pin (C), insert it into
the outer handle (D) until it is locked by
Before changing a tyre, first stop your vehi-
the snap pin as illustrated.
cle in a safe, flat location.
1. Park the vehicle on level and stable
ground, free of loose pebbles, etc.
2. Set the parking brake firmly.
3. On vehicles with manual transmission,
turn the ignition switch to the “LOCK”
position or put the operation mode in
OFF, and move the gearshift lever to the
“R” (Reverse) position.
WARNING
On vehicles with automatic transmis-
8
sion, move the selector lever to the “P”
z
Be sure to apply chocks or blocks to the
correct tyre when jacking up the vehicle.
(PARK) position, and turn the ignition
If the vehicle moves while jacked up, the
switch to the “LOCK” position or put
jack could slip out of position, leading to
3. While pressing the snap pin (F) on the
the operation mode in OFF.
an accident.
assembled handle (E), insert the white-
4. Turn on the hazard warning flashers and
marked handle (G) until it is locked by
set up a warning triangle, flashing signal
the snap pin as illustrated.
lamp, etc., at an adequate distance from
NOTE
the vehicle, and have all your passengers
The chocks shown in the illustration do not
z
leave the vehicle.
come with your vehicle. It is recommended
5. To prevent the vehicle from rolling when
that you keep one in the vehicle for use if
jacking up the vehicle, place chocks or
needed.
blocks (A) at the tyre that is diagonally
z
If chocks are not available, use stones or any
other objects that are large enough to hold
opposite from the tyre
(B) you are
the wheel in position.
changing.
6. Get the jack, jack handle and wheel nut
wrench ready.
Refer to “Tools, jack and jack handle”
on page 8-12.
8-16
For emergencies

How to change a tyre
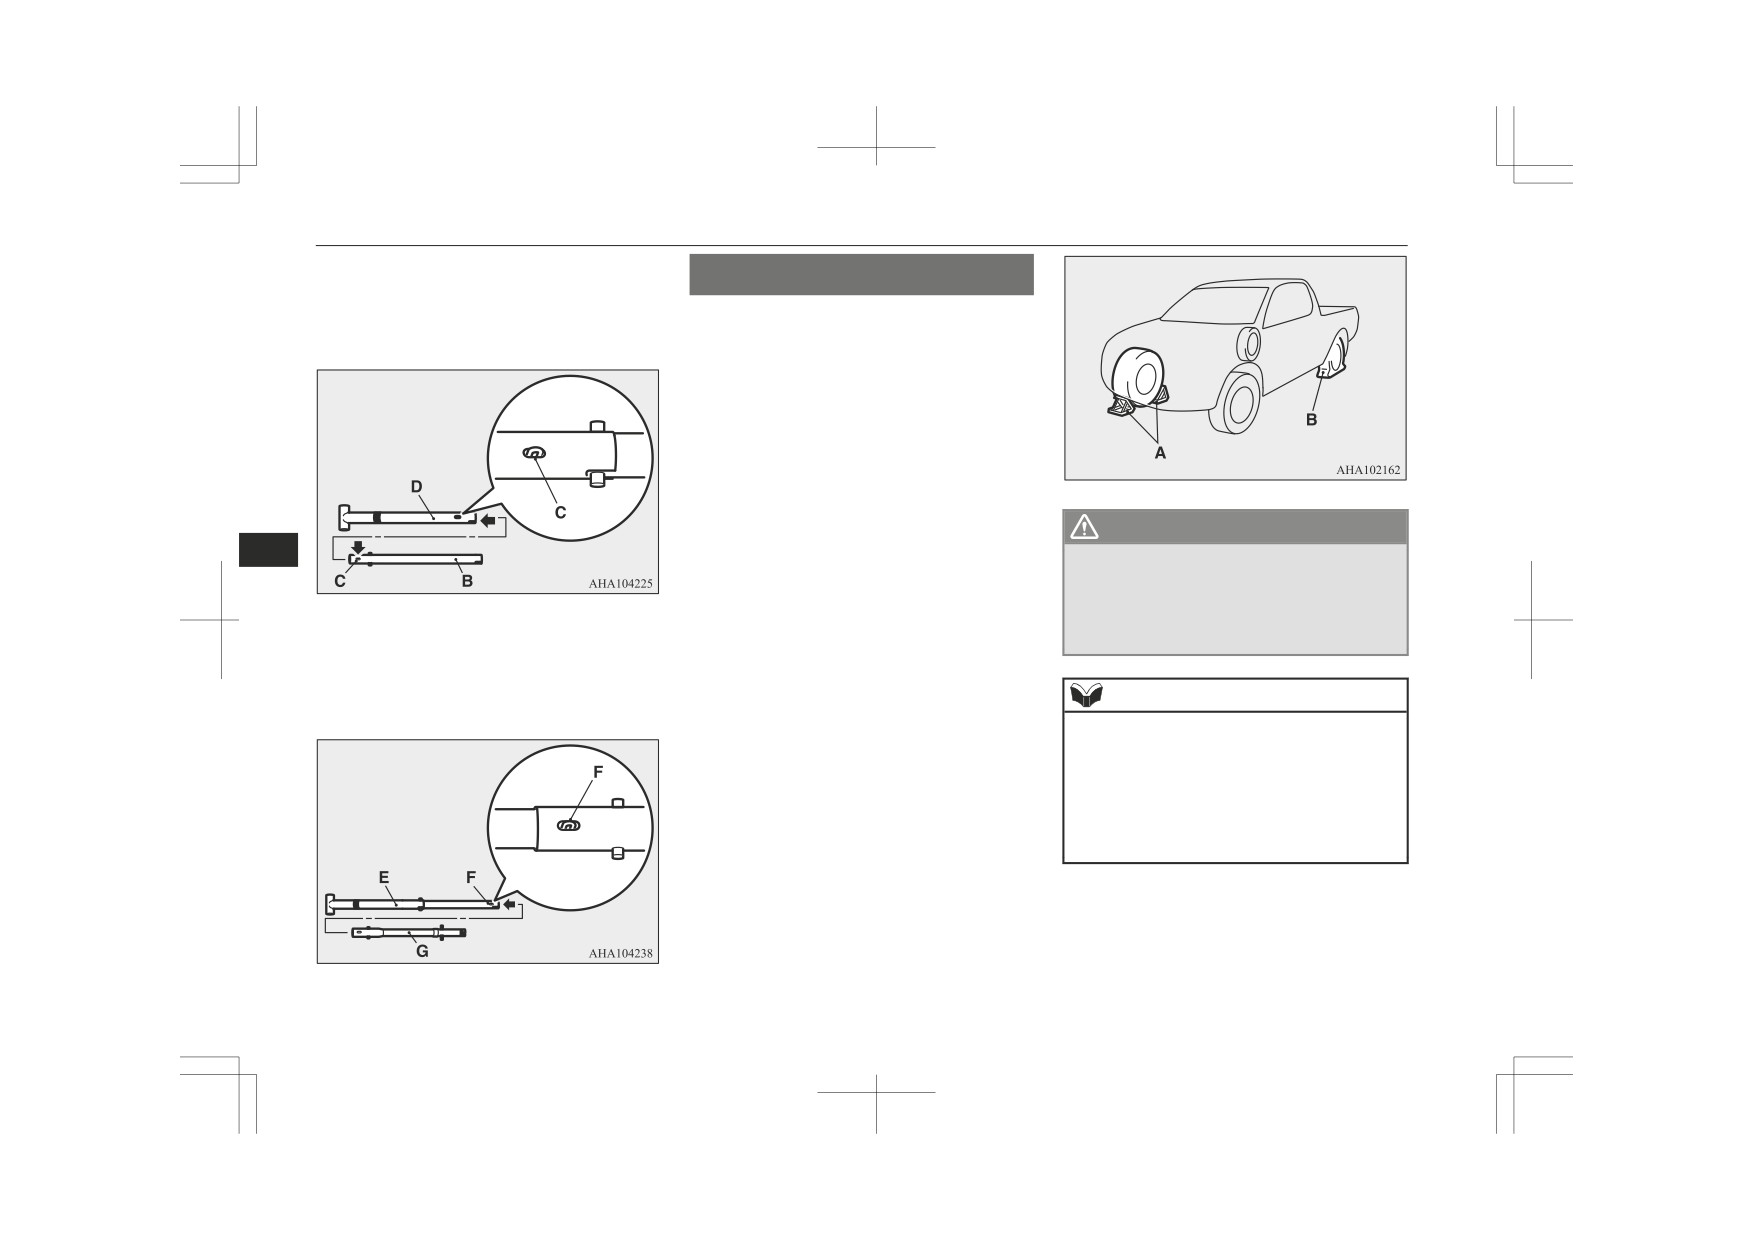
Spare wheel information
2. Insert the jack handle (A) in the hole (B)
spare wheel completely to the ground
below the rear gate.
and to slack the chain.
The spare wheel is stored under the floor of
the cargo bed.
Check the air pressure of the spare tyre fre-
quently and make sure it is ready for emer-
gency use at any time.
Maintaining the spare wheel at the highest
specified air pressure will ensure that it can
always be used under any conditions (city/
high-speed driving, varying load weight,
etc.).
8
CAUTION
3. Securely insert the pin (C) on the jack
CAUTION
z The pressure should be periodically checked
handle into the holder (D) of the spare
and maintained at the specified pressure
When removing the spare wheel, please ob-
wheel carrier.
z
while the tyre is stowed.
serve the followings.
Driving with an insufficient tyre pressure
If you do not follow them, it could result in
can lead to an accident. If you have no
break the spare wheel carrier.
choice but to drive with an insufficient tyre
• Do not use a power tool. Use the wheel
pressure, keep your speed down and inflate
nut wrench stowed on the vehicle.
the tyre to the correct pressure as soon as
• Do not apply a force of 400 N or more at
possible. (Refer to “Tyre inflation pressures”
the end of the wheel nut wrench.
on page 10-13.)
5. Remove the hanger disc (G) from the
To remove the spare wheel
spare wheel.
1. Set the jack handle. (Club cab)
(Refer to “To use the jack handle (Club
cab)” on page 8-15.)
4. Insert the wheel nut wrench (E) through
the end of the jack handle hole (F), and
then turn it anticlockwise to lower the
For emergencies
8-17

How to change a tyre
To change a tyre
A- Front jacking point
1. Loosen the wheel nuts a quarter turn
with the wheel nut wrench. Do not re-
move the wheel nuts yet.
NOTE
8
z Put the spare wheel under the vehicle body
B- Rear jacking point
near the flat tyre. This makes it safer if the
jack slips out of position.
WARNING
2. Place the jack under one of the jacking
z Set the jack only at the positions shown
points shown in the illustration. Use the
here. If the jack is set at a wrong position,
jacking point closest to the tyre you wish
it could dent your vehicle or the jack
to change.
might fall over and cause personal injury.
z Do not use the jack on a tilted or soft sur-
face. Otherwise, the jack might slip and
cause personal injury. Always use the jack
on a flat, hard surface. Before setting the
jack, make sure there are no sand or peb-
bles under the jack base.
8-18
For emergencies

How to change a tyre
4. Insert the jack handle in the bracket of
NOTE
WARNING
the jack and hook the notch (E) on the
z
When jacking up the rear of the vehicle, turn
z
Do not get under your vehicle while using
jack handle end to the claw (F) of the
the tip of the jack so that the grooved portion
the jack.
bracket.
(C) properly meets the designated point.
z
Do not bump the raised vehicle or leave it
5. Move the jack handle up and down to
sitting on the jack for a long time. Both
raise the ram until just before the jack
are very dangerous.
contacts the jacking point of the vehicle.
Do not use a jack except the one that
z
Ensure that the jack will properly con-
came with your vehicle.
tact the vehicle jacking point.
z
The jack should not be used for any pur-
pose other than to change a tyre.
Move the jack handle up and down to
z
No one should be in your vehicle when us-
raise the vehicle.
ing the jack.
z
Do not start or run the engine while your
vehicle is on the jack.
8
z
Do not turn the raised wheel. The tyres
still on the ground could turn and make
3. Using the jack handle, turn the release
your vehicle fall off the jack.
valve (D) clockwise until it stops.
6. Remove the wheel nuts with the wheel
nut wrench, then take the wheel off.
CAUTION
z
Handle the wheel carefully when changing
the tyre, to avoid scratching the wheel sur-
NOTE
face.
z
This jack is a 2 stage expansion type.
7. Clean out any mud, etc. on the hub sur-
face (G), hub bolts (H) or in the installa-
WARNING
tion holes
(I) in the wheel, and then
mount the spare wheel.
z
Stop jacking up the vehicle as soon as the
tyre is raised off the ground. It is danger-
ous to raise the vehicle any higher.
For emergencies
8-19

How to change a tyre
8. Turn the wheel nuts clockwise by hand
Type 2
to initially tighten them.
[Type 1: On vehicles with steel wheels]
Temporarily tighten the wheel nuts by
hand until the tapered parts of the wheel
nuts make light contact with the seats of
the wheel holes and the wheel is not
loose.
[Type 2: On vehicles with aluminium
wheels]
Temporarily tighten the wheel nuts by
hand until the flange parts of the wheel
WARNING
NOTE
nuts make light contact with the wheel
8
and the wheel is not loose.
z Mount the spare wheel with the valve
z Flange nuts can be temporarily used on the
stem (J) facing outboard. If you cannot
steel spare wheel as shown in the illustra-
see the valve stem (J), you have installed
tion, but return to the original wheel and tyre
Type 1
the wheel backwards.
as soon as possible.
Operating the vehicle with the spare
wheel installed backwards can cause vehi-
cle damage and result in an accident.
CAUTION
z Never apply oil to either the wheel bolts or
the nuts, or they will tighten too much.
8-20
For emergencies
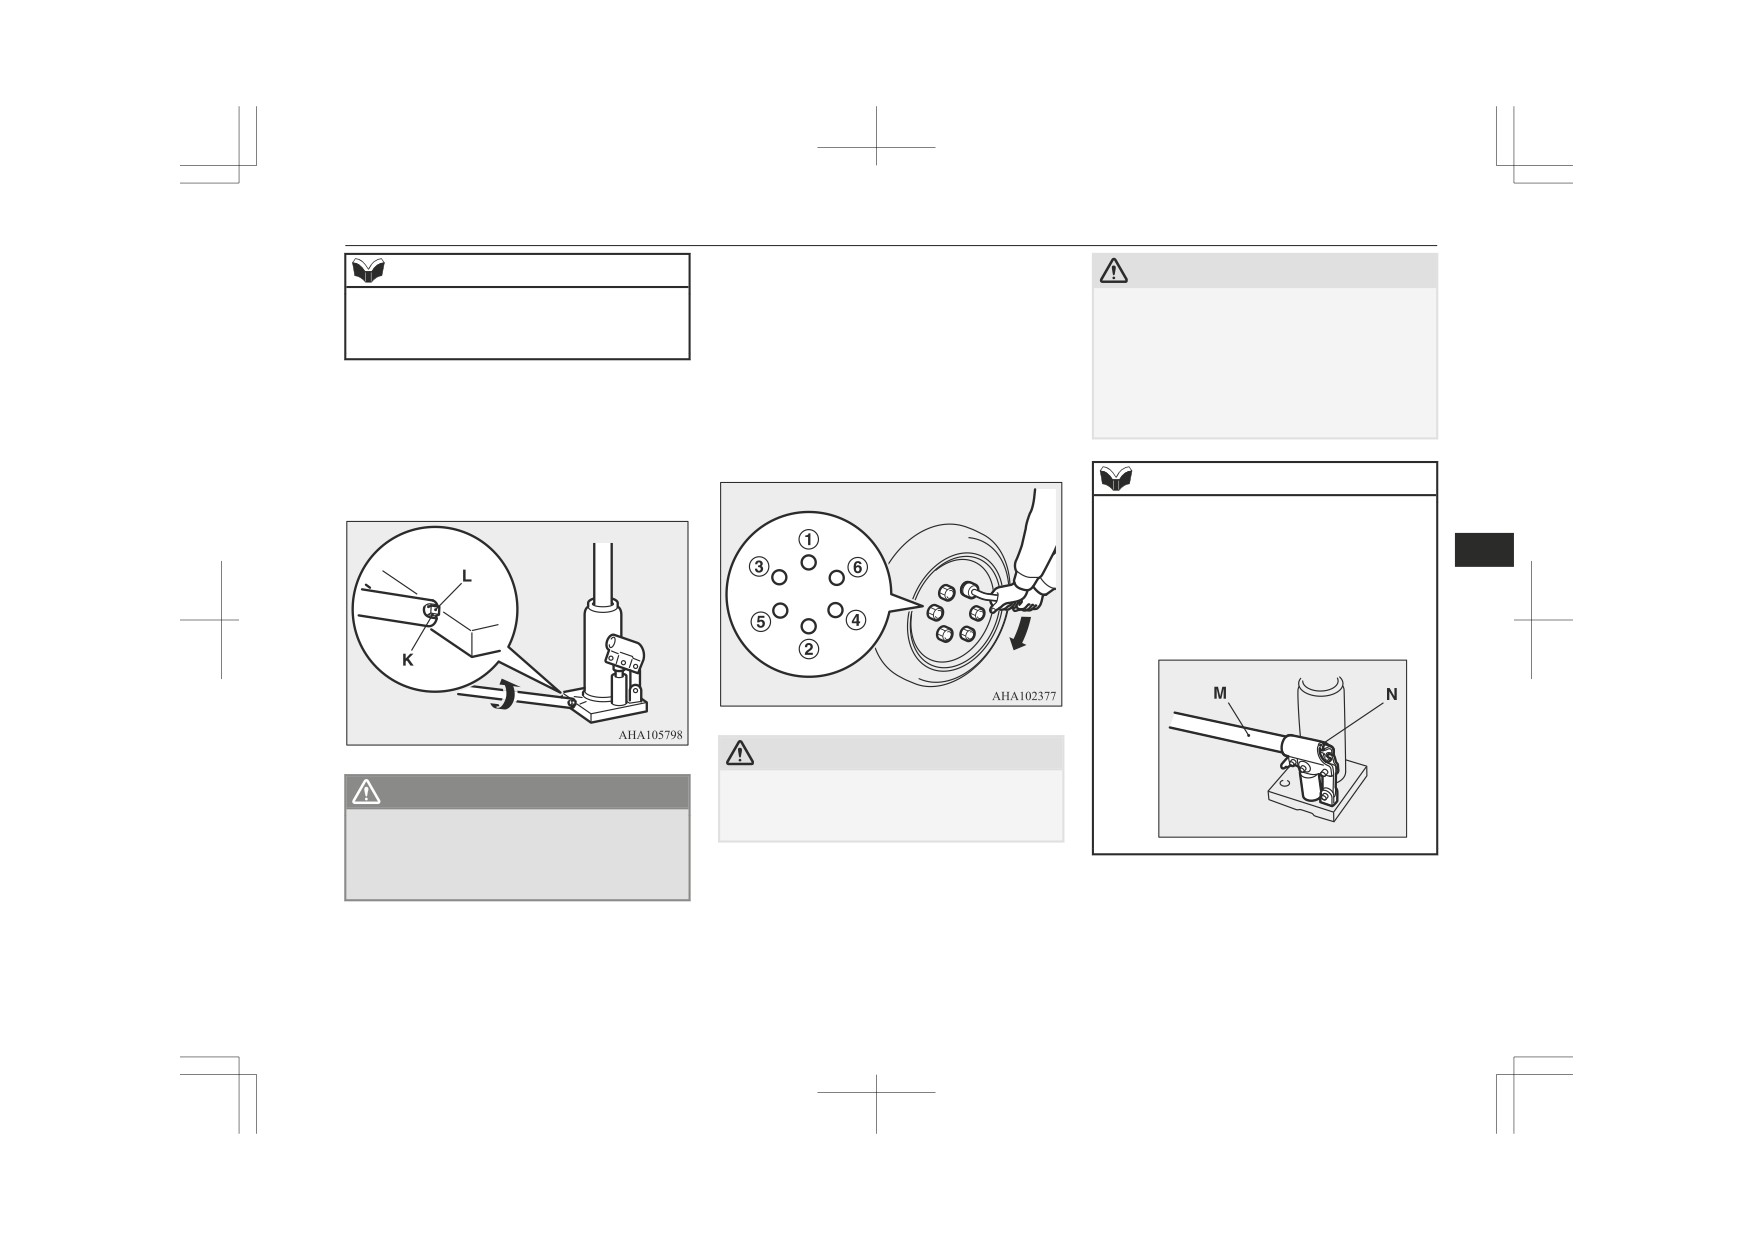
How to change a tyre
NOTE
CAUTION
Tightening torque
z If all 4 aluminium wheels are changed to
Steel wheel: 137 to 157 N•m
z If the release valve is loosened too much (2
steel wheels. e. g. when fitting winter tyres,
or more turns) in the anticlockwise direction,
Aluminium wheel: 118 to 137 N•m
use tapered nuts.
the jack’s oil will leak and the jack cannot be
(Achieved by applying a force at the
used.
end of the wheel nut wrench supplied
z Close the release valve slowly when lower-
9. Put the notch (K) provided on the jack
with the vehicle.
ing the vehicle, or the valve may be dam-
handle end on the valve (L) of the jack.
Steel wheel: 510 to 580 N
aged.
Using the jack handle, turn the release
Aluminium wheel: 440 to 500 N)
valve anticlockwise slowly to lower the
vehicle until the tyre touches the ground.
NOTE
z Occasionally when the vehicle is jacked up,
the grooved portion of the designated point
will not come off. When this happens, rock
8
the vehicle to lower the ram.
z If the jack is difficult to remove by hand, in-
sert the jack handle (M) into the bracket (N).
Then using the handle, remove the jack.
CAUTION
WARNING
z Never use your foot or a pipe extension for
extra force in the wheel nut wrench. If you
z Be sure to open the release valve slowly. If
do so, you will tighten the nut too much.
AHZ101131
it is opened quickly, the vehicle will drop
abruptly and the jack may come out of
11. Lower the jack all the way and remove
position, causing a serious accident.
12. Press the piston down all the way, and
it.
turn the release valve clockwise as far as
10. Tighten the nuts crisscross in 2 or 3 steps
possible.
until each nut has been tightened secure-
ly.
For emergencies
8-21

How to change a tyre
13. Check your tyre inflation pressure. The
To store the spare wheel
NOTE
correct pressures are shown on the door
1. Install the hanger disc (A) in the wheel
Confirm that the hanger disc is securely fit-
label. See the illustration.
z
disc hole.
ted in the wheel disc hole when the wheel is
just lifted off the ground.
3. After winding up the spare wheel suffi-
ciently, make sure it is not loose
(the
tightening torque should be approxi-
mately 40 N•m (achieved by applying a
force of 200 N at the end of the wheel
nut wrench.)) then withdraw the jack
handle, taking care not to turn it in the
8
reverse direction.
CAUTION
CAUTION
2. Turn the wheel nut wrench (B) clock-
z
The spare wheel should always be securely
The tyre pressure should be periodically
wise to wind up the chain.
z
in position.
checked and maintained at the specified
If a flat tyre is changed, put the flat tyre in
pressure while the tyre is stowed.
the spare wheel mounting position with the
z
After changing the tyre and driving the vehi-
wheel outer surface upward, and use the
cle about 1,000 km (620 miles), retighten the
wheel nut wrench to secure it firmly.
wheel nuts to make sure that they have not
z
When installing the spare wheel, please ob-
come loose.
serve the followings. If you do not follow
z
If the steering wheel vibrates when driving
them, it could result in break the spare wheel
after changing the tyre, we recommend you
carrier.
to have the tyres checked for balance.
• Do not use the power tool.
z
Do not mix one type of tyre with another or
Use the wheel nut wrench stowed on the
use a different size from the one listed. This
vehicle.
would cause early wear and poor handling.
• Do not apply a force of 400 N or more at
the end of the wheel nut wrench.
4. Have your damaged tyre repaired as
soon as possible.
8-22
For emergencies
Towing
To store the tools, jack and
The regulations concerning towing may dif-
Only when you cannot receive a towing serv-
fer from country to country. It is recommen-
jack handle
ice from a MITSUBISHI MOTORS Author-
ded that you obey the regulations of the area
Reverse the removing procedure when stor-
ized Service Point or commercial tow truck
where you are driving your vehicle.
ing the jack, jack handle and wheel nut
service, tow your vehicle carefully in accord-
wrench.
ance with the instructions given in “Emergen-
Refer to “Tools, jack and jack handle” on
cy towing” in this part.
page 8-12.
Towing
If your vehicle needs to be tow-
8
ed
If towing is necessary, we recommend you to
have it done by your MITSUBISHI
MOTORS Authorized Service Point or a
commercial tow truck service.
In the following cases, transport the vehicle
using a tow truck.
z The engine runs but the vehicle does not
move or abnormal noise is produced.
z Inspection of the vehicle’s underside re-
veals that oil or some other fluid is leak-
ing.
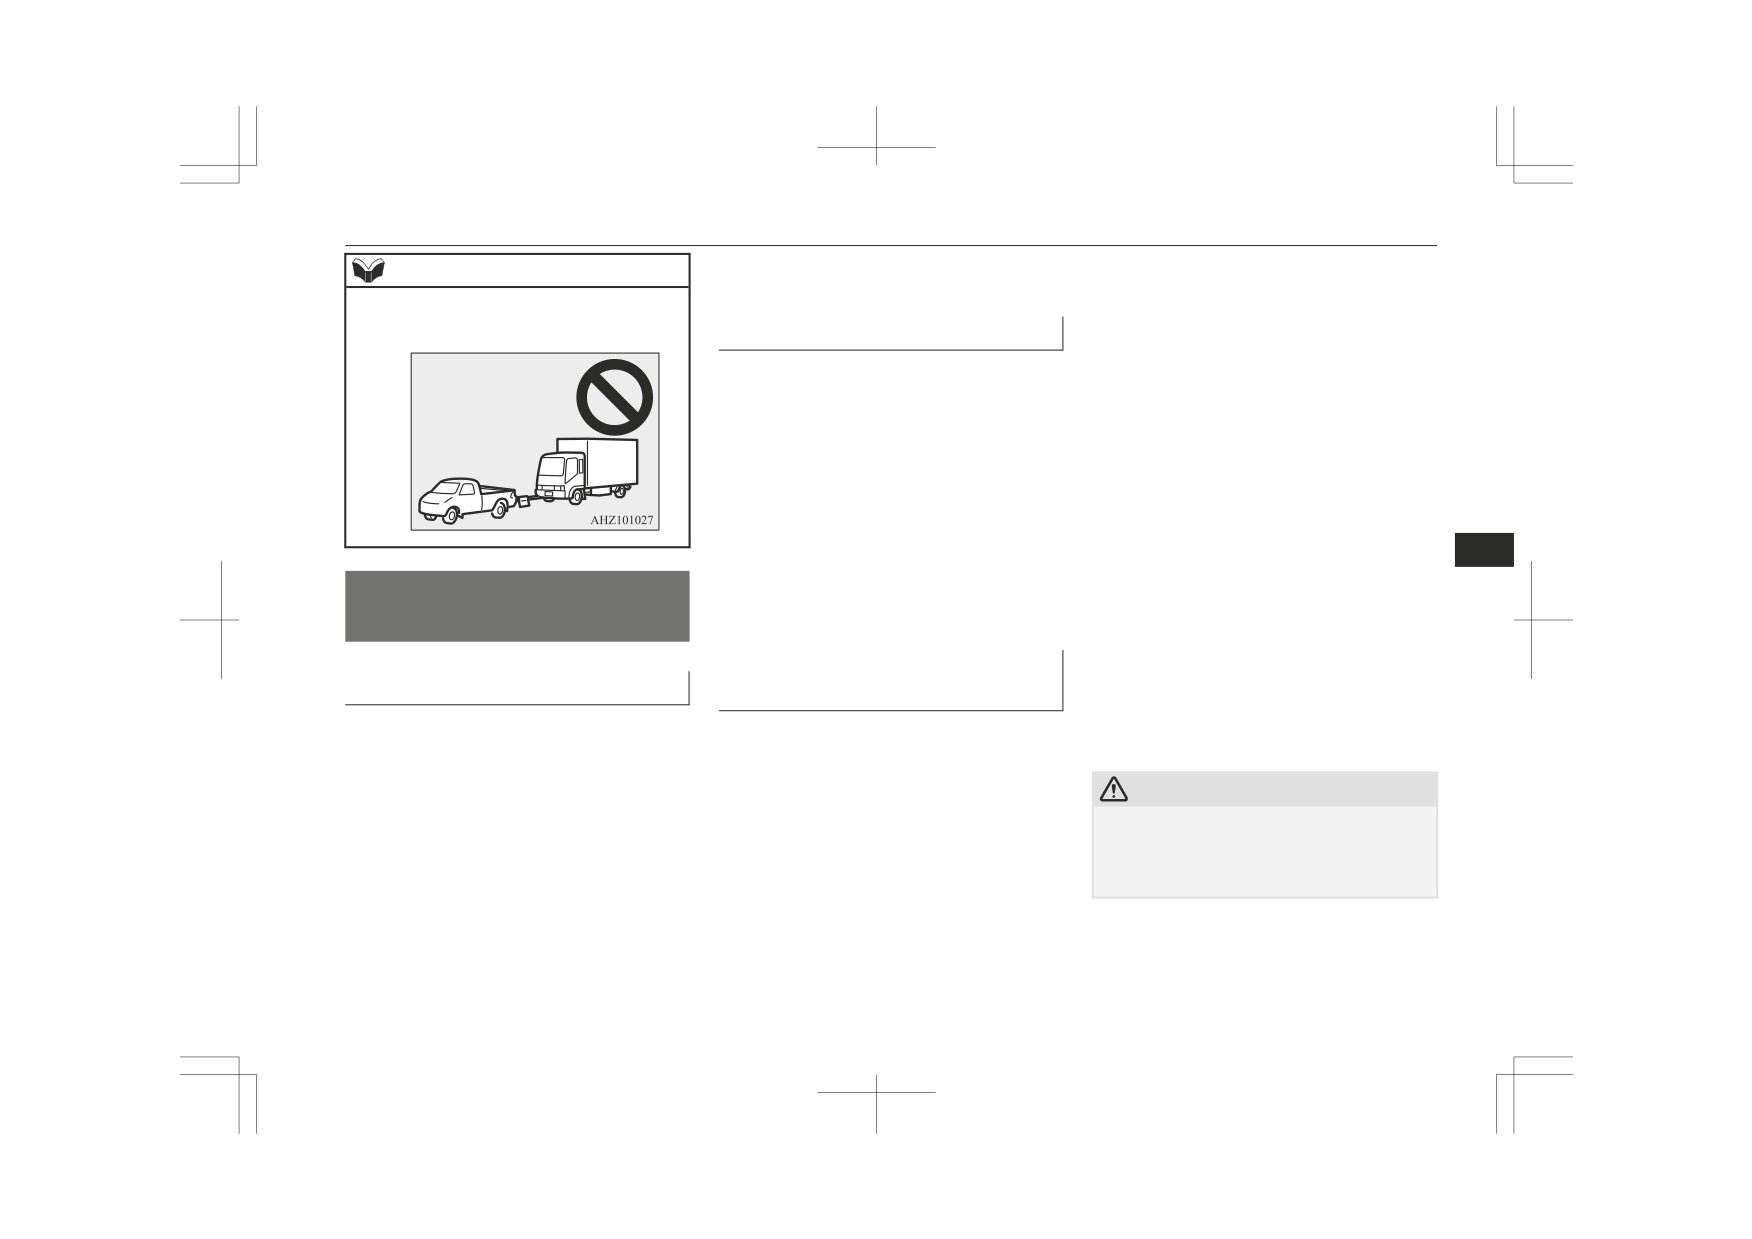
If a wheel gets stuck in a ditch, do not try to
tow the vehicle. Please contact your
MITSUBISHI MOTORS Authorized Service
Point or a commercial tow truck service for
assistance.
For emergencies
8-23
Towing
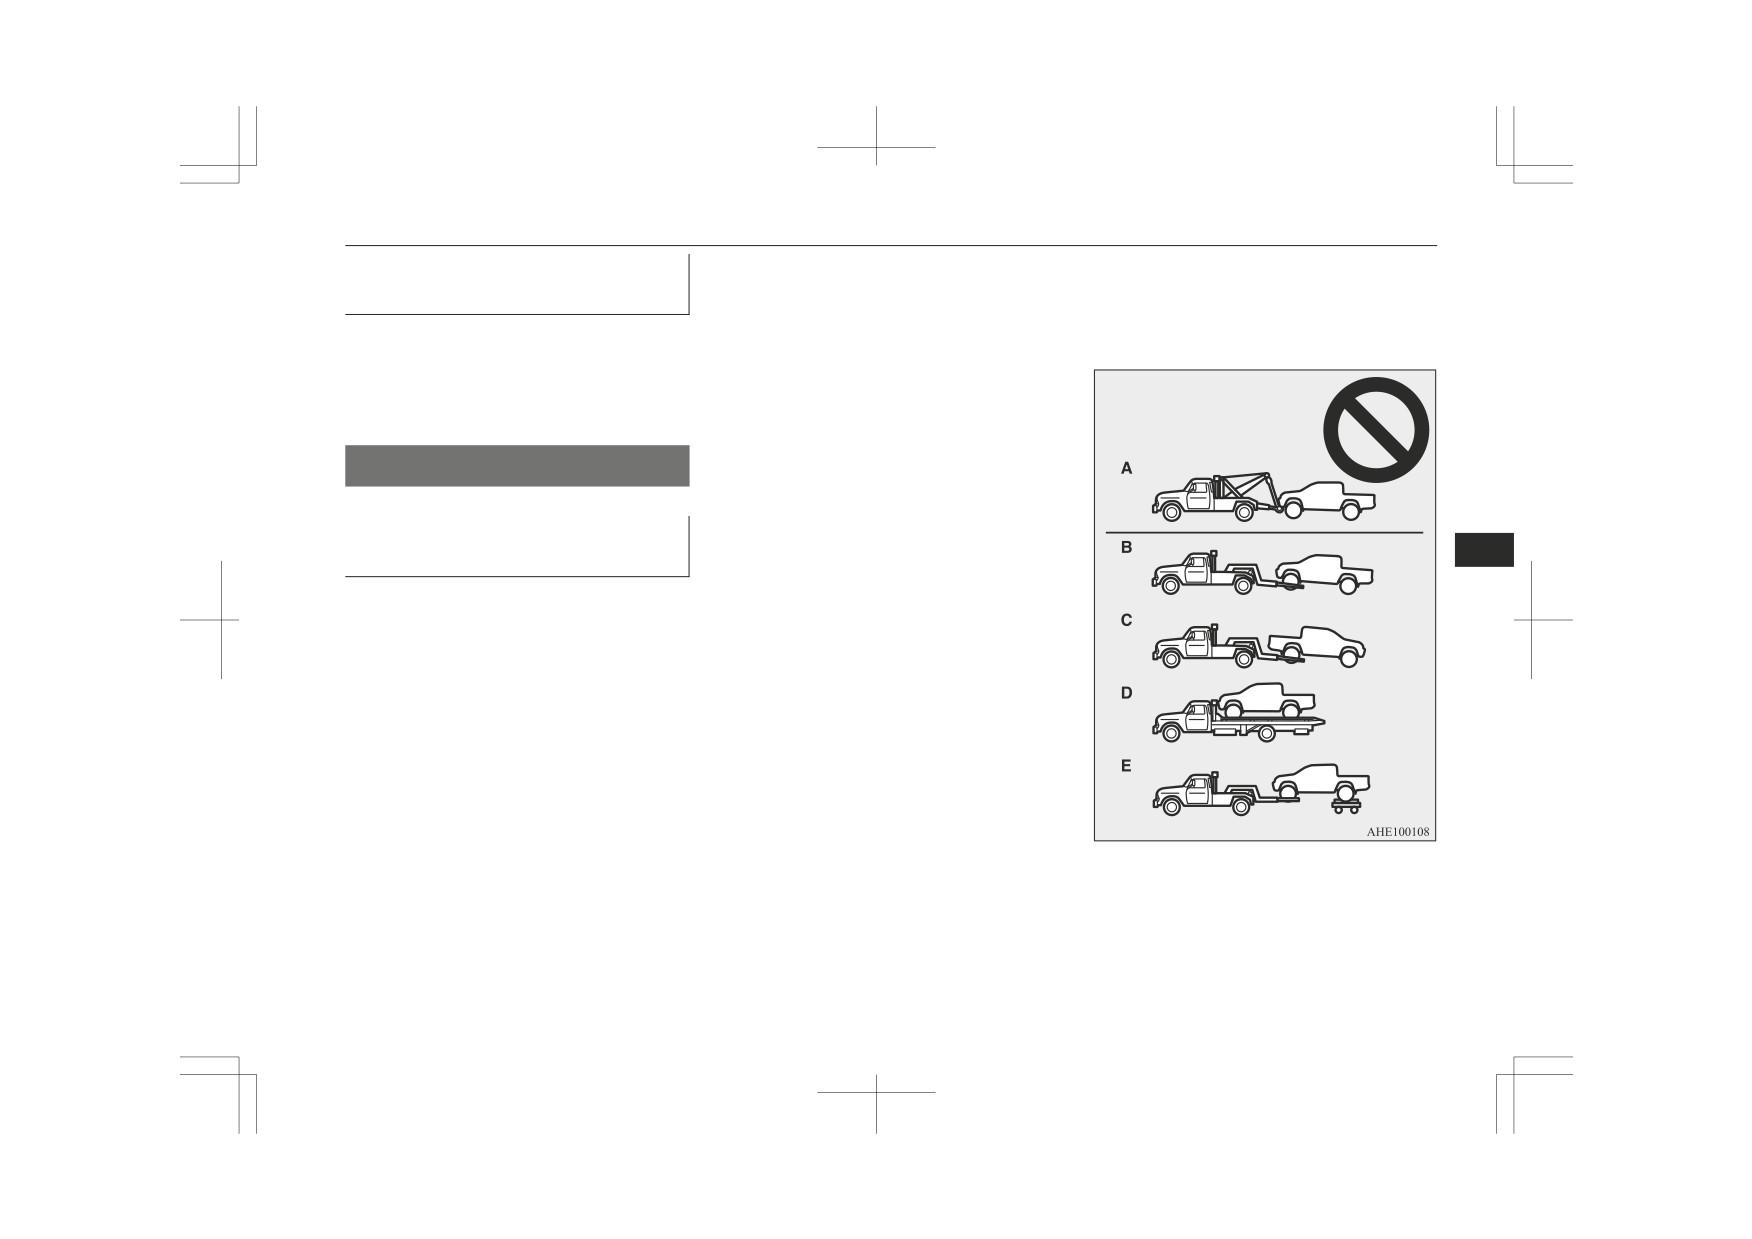
Towing the vehicle by a tow
CAUTION
CAUTION
truck
z
On 2WD vehicles, if the transmission is mal-
z Never tow an automatic transmission vehicle
functioning or damaged, transport the vehi-
with the front wheels up (and the rear wheels
CAUTION
cle with the driving wheels on a carriage
on the ground) (Type B) when the automatic
(Type C, D or E) as illustrated.
transmission fluid level is low. This may
z
This vehicle must not be towed by a tow
If you tow a vehicle with automatic trans-
cause serious and expensive damage to the
z
truck using sling lift type equipment (Type
mission with the driving wheels on the
transmission.
A) as illustrated. Using a sling lift will dam-
ground (Type B) as illustrated, make sure
age the bumper and front end.
that the towing speed and distance given be-
Towing with rear wheels off the
z
On 4WD vehicles, be sure to set the drive
low are never exceeded, causing damage to
mode-selector to “2H” position and transport
ground (Type C)
the transmission.
the vehicle with the driving wheels on a car-
Place the gearshift lever in the “N” (Neutral)
riage (Type D or E) as illustrated. Never try
Towing speed: 30 km/h (19 mph)
position (manual transmission) or the selector
to tow with the drive mode-selector in “4H”
Towing distance: 80 km (50 miles)
8
or “4L” positions (Easy Select 4WD), “4H”,
lever in the “N” (NEUTRAL) position (auto-
“4HLc” or “4LLc” positions (Super Select
matic transmission). Turn the ignition switch
For the towing speed and the towing dis-
4WD II) and with the front or rear wheels on
to the “ACC” position or put the operation
tance, follow the local driving laws and reg-
the ground (Type B or C) as illustrated. This
ulations.
mode in ACC and secure the steering wheel
could result in driving system damage or the
z
On vehicles with manual transmission, do
in a straight-ahead position with a rope or tie-
vehicle may jump at the carriage. If you can-
not tow the vehicle with the rear wheels on
down strap. Never place the ignition switch
not set the drive mode-selector to “2H” posi-
the ground (Type B) as illustrated.
in the “LOCK” position or put the operation
tion or the transmission is malfunctioning or
mode in OFF when towing.
damaged, transport the vehicle with the all
Towing with front wheels off the
wheels on a carriage (Type D or E) as illus-
trated.
ground (Type B)
Emergency towing
z
As your vehicle is equipped with the Active
On vehicles with automatic transmission,
Stability & Traction Control system
If towing service is not available in an emer-
place the selector lever in the
“N” (NEU-
(ASTC), if the vehicle is towed with the ig-
gency, your vehicle may be temporarily tow-
nition switch in the “ON” position or the op-
TRAL) position.
ed by a rope secured to the towing hook.
eration mode in ON and only the front
Release the parking brake.
If your vehicle is to be towed by another ve-
wheels or only the rear wheels are raised off
hicle or if your vehicle tows another vehicle,
the ground, the active Traction Control Sys-
tem may operate, resulting in an accident.
pay careful attention to the following points.
8-24
For emergencies

Towing
If your vehicle is to be towed by
NOTE
NOTE
another vehicle
z
Take care that the tow rope is kept as hori-
z
For vehicles equipped with the Auto Stop &
1. The front towing hook (A) is located as
zontal as possible. An angled tow rope can
Go (AS&G) system, press the “Auto Stop &
shown in the illustration. Secure the tow
damage the vehicle body.
Go (AS&G) OFF” switch to deactivate the
rope to the front towing hook.
z
Secure the tow rope to the same side towing
Auto Stop & Go (AS&G) system before
hook, to keep the tow rope as straight as pos-
stopping the vehicle.
sible.
Refer to “To deactivate” on page 6-28.
2. Keep the engine running.
WARNING
If the engine is not running, perform the
z
When the engine is not running, the brake
following operation to unlock the steer-
booster and power steering pump do not
ing wheel.
operate. This means higher brake depres-
[Except for vehicles with keyless opera-
sion force and higher steering effort are
8
tion system]
required. Therefore, vehicle operation is
On vehicles with manual transmission,
very difficult.
turn the ignition switch to the “ACC” or
“ON” position.
CAUTION
On vehicles with automatic transmis-
CAUTION
sion, turn the ignition switch to the
Do not leave the ignition switch in the
z
“ON” position.
“LOCK” position or the operation mode in
z
Using any part other than the designated
[For vehicles with the keyless operation
OFF. The steering wheel will lock, causing
towing hook (A) could result in damage to
loss of control.
the vehicle body.
system]
z
For vehicle equipped with the Forward Col-
z
Do not use the tie-down hook (B) for tow-
On vehicles with manual transmission,
lision Mitigation system
(FCM), stop the
ing. This hook is provided only for the pur-
put the operation mode in ACC or ON.
system to prevent an unexpected accident or
pose of transporting the vehicle itself.
On vehicles with automatic transmis-
unexpected operation during towing. Refer
sion, put the operation mode in ON.
to
“Forward Collision Mitigation system
(FCM)*” on page 6-89
NOTE
z
Using a wire rope or metal chain can result
in damage to the vehicle body. It is best to
use a non-metallic rope. If you use a wire
rope or metal chain, wrap it with cloth at any
point where it touches the vehicle body.
For emergencies
8-25
Towing
3. Place the gearshift lever in the
“N”
Otherwise, the instructions are the same as
CAUTION
(Neutral) position (manual transmission)
for “When being towed by another vehicle”.
or the selector lever in the “N” (NEU-
z When a vehicle with an automatic transmis-
sion is to be towed by another vehicle with
TRAL) position
(automatic transmis-
all the wheels on the ground, make sure that
sion).
the towing speed and distance given below
4. On 4WD vehicles, set the drive mode se-
are never exceeded, avoiding damage to the
lector to “2H” position.
transmission.
5. Turn on the hazard warning lamps if re-
quired by law. (Follow the local driving
Towing speed: 30 km/h (19 mph)
Towing distance: 80 km (50 miles)
laws and regulations.)
6. During towing make sure that close con-
For the towing speed and the towing dis-
tact is maintained between the drivers of
tance, follow the local driving laws and reg-
both vehicles, and that the vehicles trav-
ulations.
8
el at low speed.
If your vehicle tows another ve-
NOTE
WARNING
hicle (vehicles with rear towing
hook only)
z
Using any part other than the designated
z
Avoid sudden braking, acceleration and
towing hook could result in damage to the
steering wheel movements; such driving
The rear towing hook is located as shown in
vehicle body.
operation could cause damage to the tow-
the illustration. Secure the tow rope to the
ing hook or tow rope.
rear towing hook.
People in the vicinity could be injured as a
CAUTION
result.
When going down a long slope, the brakes
z
On vehicles with Super Select 4WD II, when
z
may overheat, reducing effectiveness.
you are going to tow another vehicle, set the
Have your vehicle transported by a tow
drive mode-selector to “4H” position.
truck.
Selecting “2H” drive may increase the dif-
ferential oil temperature, resulting in possi-
ble damage to the driving system.
CAUTION
Further, the drive train will be subjected to
excessive loading possibly leading to oil
z
The person in the vehicle being towed must
leakage, component seizure, or other serious
pay attention to the brake lamps of the tow-
faults.
ing vehicle and make sure the rope never be-
comes slack.
8-26
For emergencies
Operation under adverse driving conditions
take the necessary measures or make the
z
Depressing the brake pedal during travel
NOTE
necessary repairs.
on snowy or icy roads may cause tyre
z Do not tow a vehicle heavier than your own
slippage and skidding. When traction be-
vehicle.
On a wet road
tween the tyres and the road is reduced
the wheels may skid and the vehicle can-
z When driving in rain or on a road with
not readily be brought to a stop by con-
many puddles a layer of water may form
ventional braking techniques. Braking
between the tyres and the road surface.
will differ, depending upon whether you
This reduces a tyre’s frictional resistance
have anti-lock brake system (ABS). If
on the road, resulting in loss of steering
you do have ABS, brake by pressing the
stability and braking capability.
brake pedal hard, and keeping it pressed.
To cope with this, observe the following
If you do not have ABS, pump the brake
items:
pedal with short rapid jabs, each time
A- Drive your vehicle at slow speed.
fully applying and fully releasing for
8
B- Do not drive on worn tyres.
greatest effect.
Operation under adverse
C- Always maintain the specified tyre
z
Allow extra distance between your vehi-
driving conditions
inflation pressures.
cle and the vehicle in front of you, and
avoid sudden braking.
On a snow-covered or frozen
z
Accumulation of ice on the braking sys-
On a flooded road
road
tem can cause the wheels to lock. Pull
away from a standstill slowly after con-
z Avoid flooded roads. In the event driv-
z When driving on a snow-covered or fro-
firming safety around the vehicle.
ing flooded roads, doing so may cause
zen road, it is recommended that you use
the following serious damage to the ve-
snow tyres or snow traction device (tyre
hicle.
CAUTION
chains).
• Engine stalling
Do not press the accelerator pedal rapidly. If
Refer to the “Snow tyres” and “Snow
z
• Short in electrical components
the wheels break free of the ice, the vehicle
traction device (tyre chains)” sections.
• Engine damage caused by water im-
could suddenly start moving and possibly
z Avoid high-speed operation, sudden ac-
mersion
cause an accident.
celeration, abrupt brake application and
After driving on flooded roads, be sure
sharp cornering.
to have an inspection at a MITSUBISHI
MOTORS Authorized Service Point and
For emergencies
8-27
Operation under adverse driving conditions
On a bumpy or rutted road
Drive as slow as possible when driving on
bumpy or rutted roads.
CAUTION
z The impact on tyres and/or wheels when
driving on a bumpy or rutted road can dam-
age the tyre and/or wheel.
8
8-28
For emergencies
Vehicle care
Vehicle care precautions
9-02
Cleaning the interior of your vehicle
9-02
Cleaning the exterior of your vehicle
9-03
9

Vehicle care precautions
Vehicle care precautions
Cleaning the interior of your
NOTE
vehicle
z Do not use cleaners, conditioners, and pro-
In order to maintain the value of your vehi-
tectants containing silicons or wax.
cle, it is necessary to perform regular mainte-
Such products, when applied to the instru-
After cleaning the interior of your vehicle
nance using the proper procedures. Always
ment panels or other parts, may cause reflec-
with water, cleaner or similar, wipe and dry
maintain your vehicle in compliance with en-
tions on the windscreen and obscure vision.
in a shady, well-ventilated area.
Also, if such products get on the switches of
vironmental pollution control regulations.
the electrical accessories, it may lead to fail-
Carefully select the materials used for wash-
NOTE
ure of these accessories.
ing, etc., to be sure that they do not contain
corrosives. If in doubt, we recommend you to
z To clean the inside of the rear window, al-
consult a specialist for selection of these ma-
ways use a soft cloth and wipe the window
Upholstery
terials.
glass along the demister heater element so as
1. To maintain the value of your new vehi-
not to cause damage.
cle, handle the upholstery carefully and
CAUTION
keep the interior clean.
9
CAUTION
Use a vacuum cleaner and brush to clean
z Cleaning products can be dangerous. Always
the seats. If stained, synthetic leather
follow the instructions of the cleaning prod-
z Do not use organic substances
(solvents,
uct supplier.
benzine, kerosene, alcohol, petrol, etc.) or
should be cleaned with an appropriate
z To avoid damage, never use the following to
alkaline or acidic solutions.
cleaner. Cloth fabrics can be cleaned
clean your vehicle:
These chemicals can cause discolouring,
with either upholstery cleaner or a mild
• Petrol
staining or cracking of the surface.
soap and water solution.
• Paint Thinner
If you use cleaners or polishing agents, make
2. Clean the carpeting with a vacuum
sure their ingredients do not include the sub-
• Benzine
cleaner and remove any stains with car-
stances mentioned above.
• Kerosene
pet cleaner. Oil and grease can be re-
• Turpentine
moved by lightly dabbing with a clean
• Naphtha
Plastic, fabric and flocked
colourfast cloth and stain remover.
• Lacquer Thinner
parts
• Carbon Tetrachloride
Genuine leather*
1. Lightly wipe these off with a soft cloth
• Nail Polish Remover
soaked in a mild soap and water solu-
1. To clean, lightly wipe the leather with a
• Acetone
tion.
soft cloth soaked in a mild soap and wa-
2. Dip cloth in fresh water and wring it out
ter solution.
well. Using this cloth, wipe off the deter-
gent thoroughly.
9-02
Vehicle care
Cleaning the exterior of your vehicle
2. Dip cloth in fresh water and wring it out
z Soot and dust, iron powder from facto-
CAUTION
well. Using this cloth, wipe off the deter-
ries, chemical substance (acids, alkalis,
z
When washing the under side of your vehi-
gent thoroughly.
coaltar, etc.).
cle or wheel, be careful not to injure your
3. Apply leather protecting agent to the
z Droppings from birds, carcasses of in-
hands.
genuine leather surface.
sects, tree sap, etc.
z
If your vehicle has rain sensor wipers, place
the wiper switch lever in the “OFF” position
Washing
to deactivate the rain sensor before washing
NOTE
the vehicle. Otherwise, the wipers will oper-
z
If genuine leather is wet with water or is
Chemicals contained in the dirt and dust
ate in the presence of water spray on the
washed in water, wipe off water as quickly
picked up from the road surface can damage
windscreen and may get damaged as a result.
as possible with a dry, soft cloth.
the paint coat and body of your vehicle if left
Refrain from excessively using a car wash as
z
If left damp, mildew may grow.
in prolonged contact.
its brushes may scratch the paint surface,
z
Organic solvents such as benzine, kerosene,
causing it to lose its gloss.
Frequent washing and waxing is the best way
alcohol and petrol, acid or alkaline solvents
Scratches will be especially visible on darker
to protect your vehicle from this damage.
may discolour the genuine leather surface.
coloured vehicles.
This will also be effective in protecting it
Be sure to use neutral detergents.
Never spray or splash water on the electrical
z
from environmental elements such as rain,
9
z
Remove dirty patches or oil substances
components in the engine compartment. Do-
quickly as they can stain genuine leather.
snow, salt air, etc.
ing so could have an adverse effect on the
z
The genuine leather surface may harden and
Do not wash the vehicle in direct sunlight.
engine startability.
shrink if it is exposed to direct sun for long
Park the vehicle in the shade and spray it
Exercise caution also when washing the un-
hours. When your vehicle is parked, place it
with water to remove dust. Next, using an
derbody; be careful not to spray water into
in the shade as much as possible.
the engine compartment.
ample amount of clean water and a car wash-
z
When the temperature of the vehicle interior
Some types of hot water washing equipment
ing brush or sponge, wash the vehicle from
z
rises in summer, vinyl products left on the
apply high pressure and heat to the vehicle.
top to bottom.
genuine leather seat may deteriorate and
They may cause heat distortion and damage
stick to the seat.
Use a mild car washing soap if necessary.
to the vehicle resin parts and may result in
Rinse thoroughly and wipe dry with a soft
flooding of the vehicle interior. Therefore:
cloth. After washing the vehicle, carefully
• Maintain a distance of approx. 70 cm or
Cleaning the exterior of
clean the joints and flanges of the doors, bon-
more between the vehicle body and the
washing nozzle.
your vehicle
net and other sections where dirt is likely to
• When washing around the door glass,
remain.
hold the nozzle at a distance of more than
If the following is left on your vehicle, it may
70 cm and at right angles to the glass sur-
cause corrosion, discolouration and stains,
face.
wash the vehicle as soon as possible.
z Seawater, road deicing products.
Vehicle care
9-03
Cleaning the exterior of your vehicle
During cold weather
Polishing
CAUTION
After washing the vehicle, drive the vehicle
Salt and other chemicals spread on the roads
The vehicle should only be polished if the
z
slowly while lightly depressing the brake
in some areas in winter can have a harmful
paintwork has become stained or lost its lus-
pedal several times in order to dry out the
effect on the vehicle body. You should there-
tre. Do not polish parts with a mat coating
brakes.
fore wash the vehicle as often as possible in
and the plastic bumpers. Doing so could
Leaving the brakes wet could result in re-
accordance with our care-instructions. It is
cause stains or damage the finish.
duced braking performance. Also, there is a
recommended to have a preservative applied
possibility that they could freeze up or be-
Cleaning plastic parts
and the underfloor protection checked before
come inoperative due to rust, rendering the
vehicle unable to move.
and after the cold weather season.
Use a sponge or chamois leather.
When using an automatic car wash, pay at-
After washing your vehicle, wipe off all wa-
If a car wax adheres on a grey or black rough
z
tention to the following items, referring to
terdrops from the rubber parts around the
surface of the bumper, moulding or lamps,
the operation manual or consulting a car
doors to prevent the doors from freezing.
the surface becomes white. In such a case,
wash operator. If the following procedure is
wipe it off using lukewarm water and soft
not followed, it could result in damage to
Waxing
cloth or chamois leather.
your vehicle.
9
Waxing the vehicle will help prevent the ad-
• The outside mirrors are retracted.
herence of dust and road chemicals to the
• As your vehicle is equipped with the roof
CAUTION
antenna, it can be removed.
paintwork. Apply a wax solution after wash-
• The wiper arms are secured in place with
ing the vehicle, or at least once every three
z Do not use a scrubbing brush or other hard
tools as they may damage the plastic part
tape.
months to assist displacing of water.
surface.
• If your vehicle has rain sensor wipers,
Do not wax your vehicle in direct sunlight.
place the wiper switch lever in the “OFF”
z Do not bring the plastic parts into contact
You should wax after the surfaces have
with petrol, light oil, brake fluids, engine
position to deactivate the rain sensor.
cooled.
oils, greases, paint thinners and sulphuric
• If your vehicle is equipped with the Ultra-
For information on how to use wax refer to
acid (battery electrolyte) which may crack,
sonic misacceleration Mitigation System
the instruction manual of the wax.
stain or discolour the plastic parts.
(UMS), turn off the system. Refer to
If they touch the plastic parts, wipe them off
“FCM and UMS ON/OFF switch” on
with soft cloth, chamois or the like and an
page 6-94.
CAUTION
aqueous solution of neutral detergent then
immediately rinse the affected parts with
z Waxes containing high abrasive compounds
water.
should not be used.
9-04
Vehicle care