Mitsubishi L200 (2020 year). Manual in english - page 9
Super Select 4WD II*
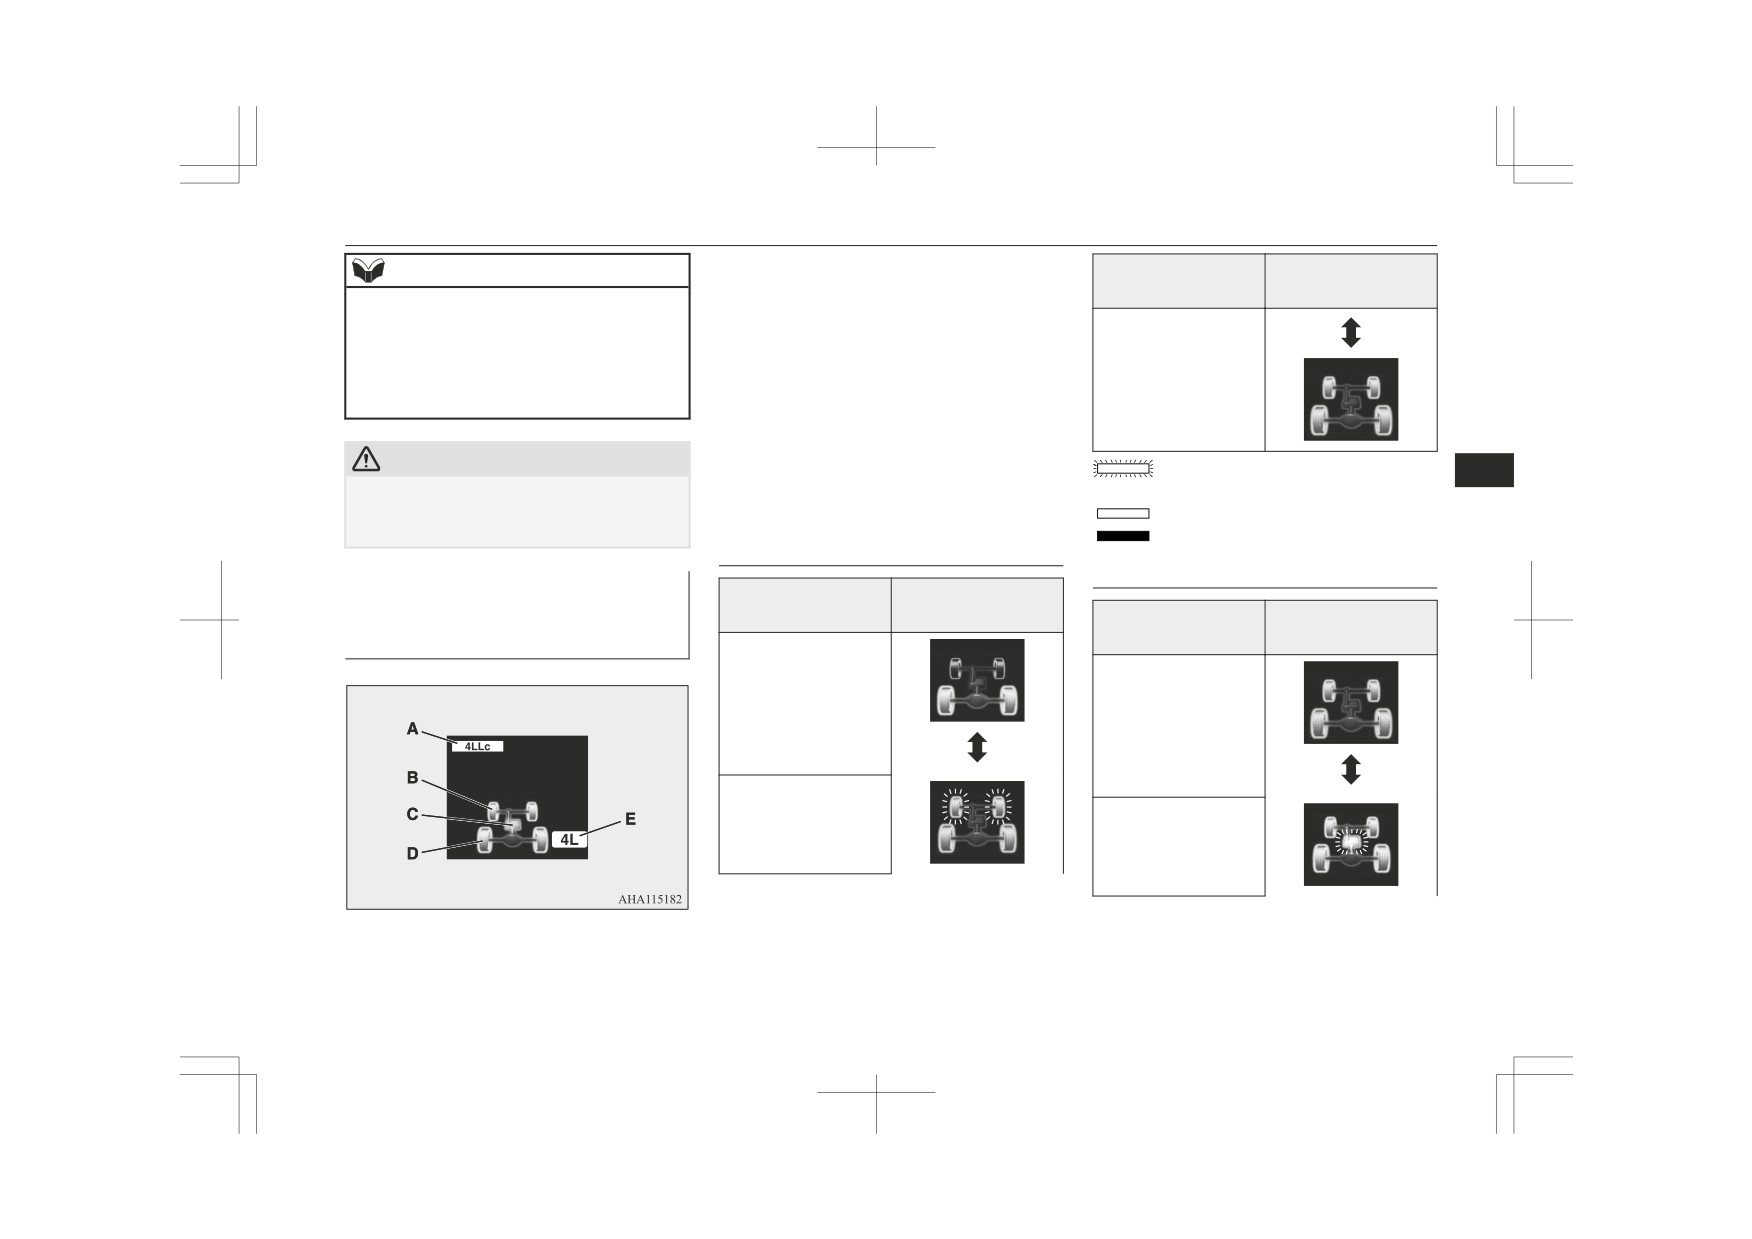
C- Centre differential lock indicator display
Drive mode-selector
NOTE
Indicator display
D- Rear wheel indicator display
position
z When the drive mode-selector is set be-
E- Low-range indicator display
tween“4HLc” ↔ “4LLc” in cold weather, its
selection may not complete. Return the drive
When the ignition switch is the “ON” posi-
mode-selector to its previous position. After
the engine is warmed up, make the range se-
tion or the operation mode is put in ON, drive
4H
lection again.
mode indicator display (A) and 2WD/4WD
operation indicator display
(B, C, D, E)
shows the shifting condition. The drive mode
CAUTION
indicator display and
2WD/4WD operation
: Blink (Drive mode indicator display
6
z Do not operate the drive mode-selector
indicator display comes on at each drive
also blinks)
while the rear wheels of the vehicle are slip-
mode-selector position as follows:
: Illuminate
ping on snow or ice.
: Remain off
“2H” ↔ “4H”
“4H” ↔ “4HLc”
Drive mode indicator display
Drive mode-selector
Indicator display
and 2WD/4WD operation indi-
position
Drive mode-selector
Indicator display
cator display
position
2H
4H
Drive mode switch-
ing in progress
Drive mode switch-
ing in progress
A- Drive mode indicator display
B- Front wheel indicator display
Starting and driving
6-49
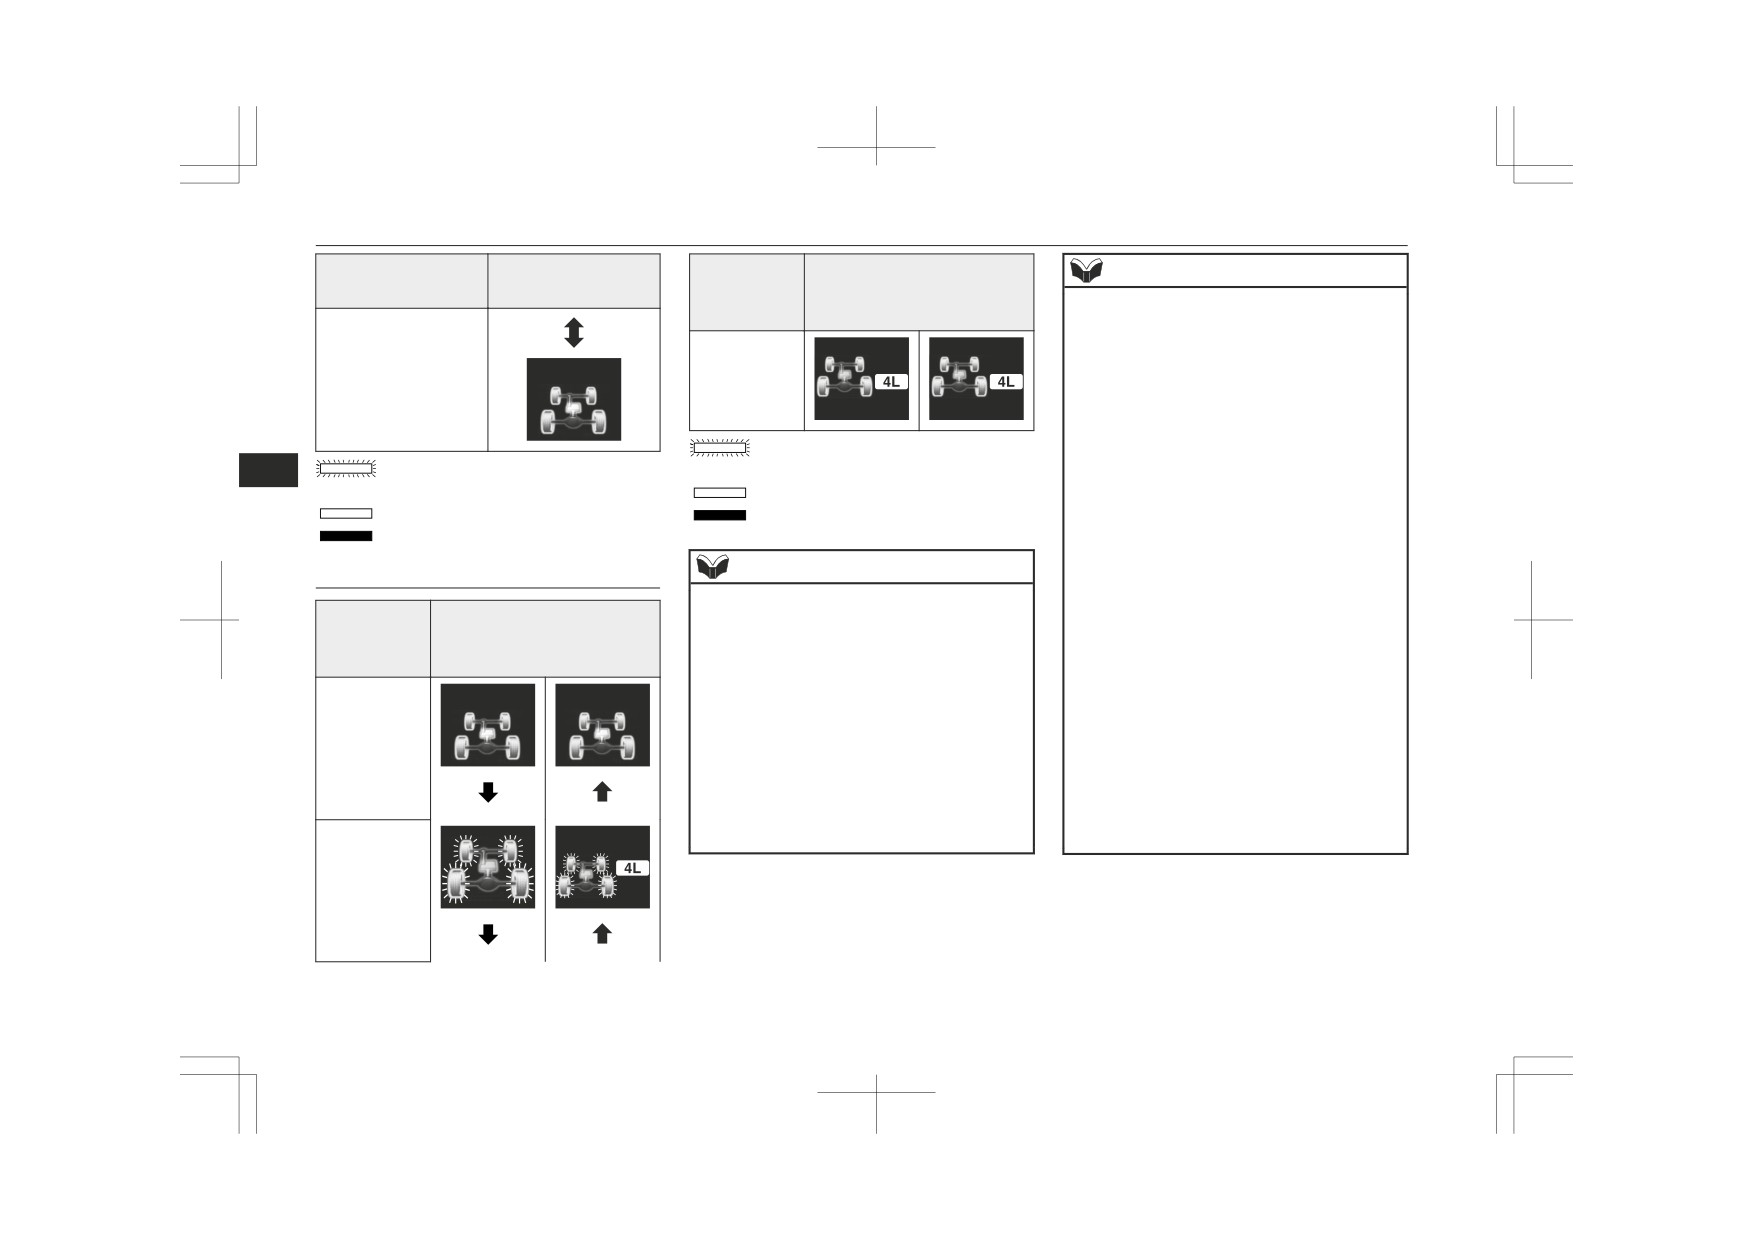
Super Select 4WD II*
Drive mode-selector
Drive mode-
NOTE
Indicator display
position
selector posi-
Indicator display
• When the drive mode-selector is set be-
tion
tween “2H”, “4H” and “4HLc”, while the
vehicle is stopped, the front wheel and/or
centre differential lock displays blink
4HLc
4LLc
while the selection is in process. Drive
slowly and normally after confirming that
the display is switched.
: Blink (Drive mode indicator display
• If the front wheel and/or centre differen-
tial lock displays blinking after a “2H” ↔
6
: Blink (Drive mode indicator display
also blinks)
“4H” ↔ “4HLc” selection has been made
also blinks)
: Illuminate
with the vehicle moving, hold the steering
: Illuminate
: Remain off
wheel in the straight ahead position and
: Remain off
slowly depress the accelerator pedal sev-
eral times.
NOTE
“4HLc” ↔ “4LLc”
The front and the rear wheel displays will
z
z
When the drive mode-selector is set between
blink during shifting process from “4HLc”
Drive mode-
“2H”, “4H” and “4HLc”, the front wheel
to “4LLc” or vice versa, as the transfer pass-
selector posi-
Indicator display
and/or centre differential lock displays blink
es through the neutral position. Be sure to
tion
while the selection is in process. Take the
operate the drive mode-selector until the
following precautions when the indicator
front and the rear wheel displays illuminate
display is blinking.
again.
• Keep the steering wheel in the straight
z
When parking, apply the parking brake be-
ahead position while making range selec-
fore stopping the engine and make sure that
4HLc
tions. If you attempt to drive forward with
the front and the rear wheel displays are not
the steering wheel turned, gear rattling or
blinking during shifting process between
shock may occur, cornering may not be
“4HLc” ↔ “4LLc”. Otherwise, the vehicle
smooth and the desired range may not ac-
could unexpectedly move even if the A/T is
tually be selected.
in the “P” (PARK) position.
Drive mode
switching in
progress
6-50
Starting and driving
Super Select 4WD II*
NOTE
NOTE
CAUTION
z
If, after a “4HLc” ↔ “4LLc” selection has
z
If the clutch pedal is released during shifting
z
If the warning display is displayed on the in-
been made, front and the rear wheel displays
process between “4HLc ↔ 4LLc”, the warn-
formation screen in the multi information
continue blinking and the desired range is
ing display will appear and the shifting proc-
display, a problem has occurred with the Su-
not actually selected, return the drive mode-
ess will be stopped (M/T).
per Select 4WD II and the safety device has
selector to its previous position. Place the
activated. Have an inspection made by a
steering wheel in the straight ahead position,
MITSUBISHI MOTORS Authorized Serv-
drive the vehicle forward, and release the ac-
ice Point as soon as possible.
celerator pedal. Next, hold down the clutch
pedal (with M/T) or place the selector lever
6
in the “N” (NEUTRAL) position (with A/T),
depress and hold the brake pedal and make
the range selection again.
z
The Active Stability Control function is sus-
z
If the front and the rear wheel displays blink
pended while “4LLc” is selected.
indica-
when you attempt to make a “4HLc” ↔
tion lamp is illuminated while these func-
“4LLc” selection, a “4HLc” ↔ “4LLc” se-
tions are suspended. It does not indicate a
lection cannot be made. Stop the vehicle and
problem. When “2H” or “4H” or “4HLc” is
release the accelerator pedal. Next, hold
selected, this lamp goes out and function
down the clutch pedal (with M/T) or place
again. Refer to “ASTC indication lamp or
the selector lever in the “N” (NEUTRAL)
ASTC OFF indication lamp” on page 6-78.
position
(with A/T), depress and hold the
z
For vehicles with 4N14 engine, when the ve-
brake pedal and make the range selection
hicle speeds near to
110 km/h (68 mph)
again.
while the drive mode-selector is set “4HLc”,
z
If the selector lever is shifted from the “N”
the warning display will appear. When you
(NEUTRAL) position to the other position
want the vehicle speeds to exceed speeds of
or release the brake pedal during shifting
110 km/h (68 mph), shift the drive mode-se-
process between “4HLc ↔ 4LLc”, the warn-
lector to “2H” or “4H”.
ing display will appear and the shifting proc-
ess will be stopped (A/T).
Starting and driving
6-51
Off Road mode*
Off Road mode*
The Off Road mode is the function that enhances driving smoothly on the off-road by selecting the most suitable engine, transmission, and brake
control according to the road surface conditions when the drive mode position is in “4HLc” or “4LLc”. Also refer to “Super Select 4WD II” on
page 6-46.
NOTE
z If the driver fails to select an appropriate mode in the Off Road mode, driving will be difficult.
6
z Depending on the mode selected, you may hear the operation noise or feel the vibration, or shock on the vehicle body.
Control mode
It is possible to select the control mode from the following according to the road surface conditions.
Drive mode-selector dial
Control mode
Functions
position
GRAVEL
Suitable to drive on unpaved road surfaces with gravel and soil.
4HLc or 4LLc
MUD/SNOW
Suitable to drive on muddy areas or deep snows.
4HLc or 4LLc
SAND
Suitable to drive on fine sand areas.
4HLc or 4LLc
Suitable to drive on the rough road surface such as rocky roads or with some wheels suspen-
ROCK
4LLc
ded in the air.
NOTE
z When stuck, use the rear differential lock (if so equipped). (Refer to page 6-54.)
6-52
Starting and driving

Off Road mode*
Off Road mode-selector opera-
NOTE
Off Road mode indicator dis-
tion
play
z
When changing the drive mode-selector to
1. Bring the vehicle to a complete stop.
“4HLc” while the Off Road mode is in
“ROCK” mode, the Off Road mode is
2. Set the drive mode-selector from “2H”
switched to “GRAVEL” automatically.
or “4H” to “4HLc” or “4LLc”. At this
z
When the Off Road mode-selector is held
time, the Off Road mode is switched to
down while the Off Road mode is activated,
“GRAVEL” automatically.
the mode set to “GRAVEL”. After the mode
3. The control mode is switched in the or-
is set, it cannot be changed even if the Off
der of GRAVEL
MUD/SNOW
Road mode-selector is pressed. To change
6
SAND
ROCK*
GRAVEL by
the control mode, restart the engine and
press the Off Road mode-selector again.
pressing the Off Road mode-selector.
z
The Off Road mode is not activated when
the drive mode is in “2H” or “4H”. If the Off
Road mode-selector is pressed when the
drive mode-selector is set to “2H” or “4H”,
the warning display will appear and the op-
Example: When “GRAVEL” mode is selec-
eration will be cancelled.
ted The selected control mode is displayed on
the Off Road mode indicator display (A).
In addition, the selected mode is displayed as
an interrupt display on the information screen
of the multi information display
(B) by
switching the control mode. The control
mode display on the information screen will
return to the previous display after a few sec-
onds.
NOTE
z
When the rear differential lock switch is
NOTE
turned on while the Off Road mode is acti-
vated, the Off Road mode is returned to
z The Off Road mode will not operate even if
“GRAVEL” automatically if the rear differ-
pressing the Off Road mode-selector in the
ential lock switch is turned off.
following conditions.
• Brake System: brake temperature high
*: Only in 4LLc
Starting and driving
6-53

Rear differential lock*
Type 2
4. To deactivate the rear differential lock,
NOTE
press the rear differential lock switch
• Rear Differential Lock (if so equipped):
(2).
activating
• ASTC warning lamp: illuminating or
blinking
Type 1
refer to “ASTC warning lamp/display” on
page 6-79
Rear differential lock*
6
If one wheel starts to spin freely and the vehi-
Operating the rear differential
cle becomes stuck and cannot be freed even
using 4-wheel drive, the rear differential lock
lock
switch (A) can be used to activate the rear
1. Bring the vehicle to a complete stop.
differential lock for extra traction.
2. Move the drive mode-selector to “4L” or
Type 2
“4H” position
(Easy Select
4WD),
Type 1
“4LLc” or “4HLc” position (Super Se-
lect 4WD II).
3. To activate the rear differential lock,
press the rear differential lock switch
(1).
6-54
Starting and driving

Rear differential lock*
[Vehicles equipped
with
the
colour
liquid
CAUTION
NOTE
crystal display]
z
Operate the rear differential switch after the
z Vehicles equipped with the mono-colour liq-
wheels are stopped. Operating the switch
uid crystal display, if the rear differential
with the wheels turning may cause the vehi-
lock switch is turned on while driving, the
Indicator lamp
cle to dart in unexpected directions.
buzzer will sound and the rear differential
lock will remain deactivated.
NOTE
The rear differential lock indi-
z
The rear differential lock does not operate
cation lamp/display
when the drive mode-selector is in “2H” po-
6
sition (Easy Select 4WD), “2H” or “4H” po-
When the ignition switch is turned to the
sition (Super Select 4WD II).
“ON” position or the operation mode is put in
z
When the rear differential is locked with the
ON, the rear differential lock indication
drive mode-selector in “4L” or “4H” posi-
lamp/display in the meter cluster illuminates
tion (Easy Select 4WD), “4LLc” or “4HLc”
for a few seconds then indicates the rear dif-
position (Super Select 4WD II) changing the
Indicator display
drive mode-selector to “2H” position (Easy
ferential lock’s operating status (activated or
Select 4WD), “2H” or “4H” position (Super
deactivated).
Select 4WD II) makes the rear differential
unlock automatically.
[Vehicles equipped with the mono-colour liq-
z
Vehicles equipped with the colour liquid
uid crystal display]
crystal display, if the rear differential lock
switch is turned on while driving, the warn-
ing display will appear, the buzzer will
sound and the rear differential lock will re-
main deactivated.
Starting and driving
6-55

Rear differential lock*
NOTE
The operation state
Rear differential
Rear differential lock
of rear differential
lock indication
The operation
indication lamp/
z The status of the rear differential lock (re-
lock
lamp
state of rear dif-
display
sulting from depression of the rear differen-
tial lock switch) is shown by blinking or
ferential lock
Indication
Indicator
steady illumination of the rear differential
lamp
display
lock indication lamp/display.
Rear differential lock
[Vehicles equipped with the
activated
mono-colour liquid crystal dis-
6
play]
Switching in pro-
gress
The operation state
Rear differential
: Blink
of rear differential
lock indication
: Illuminate (steady)
lock
lamp
: Remain off
[Vehicles equipped with the col-
our liquid crystal display]
Rear differential
Rear differential lock
lock activated
deactivated
Rear differential lock
indication lamp/
The operation
display
: Blink (Drive mode indicator display
state of rear dif-
also blinks)
ferential lock
Indication
Indicator
: Illuminate (steady)
lamp
display
Switching in pro-
: Remain off
gress
Rear differential
lock deactivated
6-56
Starting and driving

Rear differential lock*
NOTE
NOTE
CAUTION
z
The indication lamp/display and drive mode
• If the vehicle speed is 12 km/h or lower,
z
If a problem is detected in the rear differen-
indicator display (vehicles equipped with the
turn the steering wheel from side to side
tial lock system, a safety device will acti-
colour liquid crystal display) blink while the
until the indication lamp/display illumi-
vate. The rear differential lock indication
rear differential lock is being switched be-
nates steadily. If the vehicle is stuck in
lamp will blink rapidly (twice per second),
tween its activated and deactivated condi-
soft ground, make sure the area around
warning display will appear, and the rear dif-
tions. When the switching operation is com-
the vehicle is clear then repeatedly at-
ferential lock will deactivate. Park your ve-
plete, the indication lamp/display is either il-
tempt to drive forward and backward. The
hicle in a safe place, turn off the engine for a
luminated steadily or not illuminated.
indication lamp/display will illuminate
few moments. Restart the engine. It is safe to
z
The ASTC and ABS functions are suspen-
steadily and the rear differential lock will
continue driving if the lamps/display resume
6
ded while the rear differential lock is activa-
be activated.
normal operation. If the rear differential lock
ted. ASTC indication lamp, ASTC OFF indi-
indication lamp blinks and warning display
cation lamp and ABS warning lamp/display
appears when the rear differential lock is re-
are illuminated while these functions are
activated, have the vehicle checked by a
suspended.
MITSUBISHI MOTORS Authorized Serv-
It does not indicate a problem. When the
ice Point as soon as possible.
rear differential lock is disengaged, these
lamps go out and function again.
Warning display (colour liquid crystal dis-
Refer to
“ABS warning lamp/display” on
play)
page
6-74,
“ASTC indication lamp or
ASTC OFF indication lamp” on page 6-78.
z
If the indication lamp/display continues
blinking after the switch has been pressed to
deactivate the rear differential lock, hold the
steering wheel in the straight ahead position
then slowly depress and release the accelera-
tor pedal several times.
z
If the indication lamp/display continues
blinking after the switch has been pressed to
activate the rear differential lock, bear in
mind the following instructions:
• If the vehicle speed is 12 km/h or higher,
decelerate to a speed of 2.5 km/h or lower.
The indication lamp/display will illumi-
nate steadily and the rear differential lock
will be activated.
Starting and driving
6-57

Rear differential lock*
Examples of effective use of the
When driving on rocky roads
Examples of incorrect use of
rear differential lock
When the vehicle is unable to move because
the rear differential lock
one of the wheels is suspended in the air.
CAUTION
WARNING
z Use the rear differential lock only as an
z If the “4L” or “4H” position (Easy Select
emergency measure when the vehicle is
4WD), “4LLc” or “4HLc” position (Super
stuck and cannot be freed with the drive
Select 4WD II) is selected along with the
mode-selector in
“4L” or
“4H” position
rear differential lock, the following phe-
(Easy Select 4WD) or in “4LLc” or “4HLc”
nomena appear and it is very dangerous.
6
position (Super Select 4WD II). Deactivate
Please be sure to release the rear differen-
the rear differential lock immediately after
tial lock on normal roads.
using it.
• If the rear differential lock is used by
mistake when driving on a paved road:
With the rear differential lock on, the
When one of the wheels has fall-
power to drive the vehicle straight
en in a ditch
ahead becomes very strong, which may
When getting out of snow
make it difficult to turn the steering
wheel.
When the vehicle is unable to get going be-
cause one of the wheels is on the snow and
the other on a paved road.
6-58
Starting and driving

Rear differential lock*
WARNING
WARNING
z If the rear differential lock is used by mis-
z In the case where the condition of the
take when turning a curve or making a
road is different for the right tyre to drive
right or left turn at a crossing or the like:
from the left tyre (such as one tyre on a
The vehicle is unable to make a turn and
paved road and the other on ice), direc-
may go straight ahead.
tion of the vehicle may change abruptly
when engine braking or accelerating.
Do not use the rear differential lock ex-
cept when making an emergency escape
on a snow or frozen road, but drive with
6
4WD.
WARNING
z If the rear differential lock is used by mis-
take except when making an emergency
escape on snow or frozen road: It becomes
difficult to make a steady turn.
Starting and driving
6-59

4-wheel drive operation*
4-wheel drive operation*
By selecting 4-wheel drive, both axles of the vehicle are rigidly connected with each other. This improves the traction characteristics. When
turning sharp corners or moving forward and backward repeatedly, however, the drive line is stressed, which is felt as a braking effect. A 4-wheel
drive vehicle can accelerate more quickly and smoothly.
However, note that the braking distance is not shorter than that of a rear-wheel drive vehicle.
When using 4-wheel drive on rough roads (snow, mud, sand, etc.), it is important to operate the vehicle correctly.
WARNING
6
z Control the accelerator pedal, brake pedal, steering wheel, etc. according to the landform and nature of the soil. The driver should accurately grasp
the surrounding circumstances and drive carefully according to the respective circumstances. Especially, the off-road may lead to loss of control
and may cause the vehicle to roll on its side or roof, which may cause an accident resulting in serious personal injury or death in the worst case.
NOTE
z The driving posture should be more upright and closer to the wheel than usual; adjust the seat to a good position for easy steering and pedal operation. Be
sure to wear the seat belt.
z After driving on rough roads, check each part of the vehicle and wash it thoroughly with water. Refer to the “Vehicle care” section and “Inspection and
maintenance following rough road operation” on page 6-66.
Even a vehicle without the equipment for Off Road mode and rear differential lock (if so equipped) run each road condition.
The vehicle with each equipment set the recommended mode of the list shown below in each road condition, it may help you drive smoothly.
Road conditions
Driving mode
Dry paved road
Deep snow or
Packed snow road
Gravel road
Sandy road
Rocky road
and highway
muddy road
Easy Select 4WD
2H
4H
4H or 4L
4H or 4L
4H or 4L
4H or 4L
® p. 6-37
*1: The Off Road mode and the rear differential lock cannot be used at the same time. When the rear differential lock is set to ON, the Off Road
mode turns off. In addition, when the rear differential lock is ON, the Off Road mode will be deactivated even if the Off Road mode-selector is
operated.
6-60
Starting and driving

4-wheel drive operation*
Road conditions
Driving mode
Dry paved road
Deep snow or
Packed snow road
Gravel road
Sandy road
Rocky road
and highway
muddy road
Super Select 4WD
2H or 4H
4H
4HLc or 4LLc
4HLc or 4LLc
4HLc or 4LLc
4HLc or 4LLc
II ® p. 6-46
Off Road mode-se-
−
−
GRAVEL
MUD/SNOW
SAND
ROCK
lector ® p. 6-53
Rear differential
−
−
−
Active*1
Active*1
Active*1
6
lock ® p. 6-54
*1: The Off Road mode and the rear differential lock cannot be used at the same time. When the rear differential lock is set to ON, the Off Road
mode turns off. In addition, when the rear differential lock is ON, the Off Road mode will be deactivated even if the Off Road mode-selector is
operated.
CAUTION
z When driving off-road, confirm the conditions of the road surface and the landscape, and drive after confirming that the components of the suspension and
the bottom of the front and rear bumper do not make contact with the road surface. (Refer to “Vehicle dimensions” on page 11-04.)
Starting and driving
6-61

4-wheel drive operation*
Driving on dry paved road and
CAUTION
NOTE
highway
z Selecting “4H” or “4L” position (Easy Se-
z The use of snow tyres and/or tyre chains is
lect 4WD), “4HLc” or “4LLc” position (Su-
recommended.
per Select 4WD II) to drive on dry paved
z Maintain a safe distance between vehicles,
road will increase the fuel consumption with
avoid sudden braking, and use engine brak-
possible noise generation and early tyre
ing (downshifting).
wear.
It may also increase the differential oil tem-
perature, resulting in possible damage to the
CAUTION
driving system.
6
z Avoid sudden braking, sudden acceleration,
Further, the drive train will be subjected to
and sharp turning; such operations could
excessive loading, possibly leading to oil
cause skidding and spinouts.
leakage, component seizure, or other serious
faults.
Driving on unpaved roads
Driving on packed snow roads
Set the drive mode-selector to “2H” position
(Easy Select 4WD), “2H” or “4H” position
(Super Select 4WD II) to drive on the dry
paved road. Especially on dry highway, never
select
“4H” or “4L” position (Easy Select
4WD), “4HLc” or “4LLc” position (Super
Select 4WD II).
Check the road surface conditions and set the
drive mode-selector to “4H” or “4L” position
Set the drive mode-selector to “4H” position,
(Easy Select 4WD), “4HLc” or “4LLc” posi-
in accordance with the road conditions, and
tion (Super Select 4WD II). Setting the Off
then gradually depress the accelerator pedal
Road mode-selector
(if so equipped) to
for a smooth start.
“GRAVEL” may help you drive smoothly.
6-62
Starting and driving

4-wheel drive operation*
Driving through deep snow or
CAUTION
NOTE
on muddy roads
• The bar graph of the engine coolant tem-
z If it is necessary to drive in extremely mud-
Set the drive mode-selector to “4H” or “4L”
perature display approaches the overheat-
dy conditions, the use of tyre chains is rec-
ing zone.
ommended. Because the extent of muddy
position
(Easy Select
4WD),
“4HLc” or
Refer to “Engine overheating” on page
conditions is difficult to judge and the vehi-
“4LLc” position (Super Select 4WD II) and
8-09.
cle could become bogged down very deeply,
then gradually depress the accelerator pedal
• A/T fluid temperature warning display
operation should be at a low speed. If possi-
for a smooth start. Keep the pressure on the
comes on.
ble, get out of the vehicle and check the con-
accelerator pedal as constant as possible, and
Refer to “When a malfunction occurs in
ditions ahead before proceeding.
drive at low speed.
the A/T” on page 6-35.
z Driving over roads in coastal areas or roads
6
Set the Off Road mode-selector (if so equip-
on which anti-skid preparations have been
spread can cause rust on the vehicle; wash
ped) to “MUD/SNOW”, or set the rear differ-
NOTE
the vehicle thoroughly as soon as possible
ential lock (if so equipped) to ON if the vehi-
after such use.
cle is likely to get stuck. This may help you
z
Avoid sudden braking, acceleration, and
drive smoothly.
turning; such operations could result in the
vehicle becoming stuck.
Driving on sandy roads
z
If the vehicle becomes stuck in deep snow or
WARNING
on muddy roads, it can often be moved a
rocking motion. Move the selector lever
z When attempting to rock your vehicle out
rhythmically between the “D” (DRIVE) and
of a stuck position, be sure that the area
“R” (REVERSE) position (with M/T, be-
around the vehicle is clear of people and
tween
1st and Reverse), while applying
physical objects. The rocking motion may
slight pressure to the accelerator pedal.
cause the vehicle to suddenly launch for-
z
It is recommended to start the vehicle with
ward or backward, causing injury or
parking brake partially, but not completely,
damage to nearby people or objects.
applied by slightly pulling the parking brake
lever.
After the vehicle has become free, do not
CAUTION
forget to release the parking brake.
z If any of following conditions occur while
the vehicle is being driven, immediately
park your vehicle in a safe place and follow
these procedures:
Starting and driving
6-63

4-wheel drive operation*
Check the sandy road condition and set the
Driving on a rocky road
NOTE
drive mode-selector to “4H” or “4L” position
(Easy Select 4WD), “4HLc” or “4LLc” posi-
z Drive on a road surface where the tyre treads
contact with rocks as far as possible.
tion
(Super Select 4WD II). Gradually de-
press the accelerator pedal to start the vehicle
and drive at a possible constant low speed.
Descending steep grades
Either set the Off Road mode-selector (if so
equipped) to “SAND”, or set the rear differ-
ential lock (if so equipped) to ON if the vehi-
cle is likely to get stuck. This may help you
6
drive smoothly.
CAUTION
z Do not force the vehicle or drive recklessly
Set the drive mode-selector to “4H” or “4L”
on sandy surfaces. In comparison with nor-
position
(Easy Select
4WD),
“4HLc” or
mal road surfaces, the engine and other
“4LLc” position (Super Select 4WD II) and
drive-system components are put under ex-
drive at a low speed. Depending on the road
cessive strain when driving on such a sur-
face, and this could lead to accidents.
condition, either set the Off Road modeselec-
tor (if so equipped) to “ROCK”, or set the
Set the drive mode-selector to “4H” or “4L”
rear differential lock (if so equipped) to ON if
position
(Easy Select
4WD),
“4HLc” or
the vehicle is likely to get stuck. This may
“4LLc” position (Super Select 4WD II), use
help you drive smoothly.
the engine brake (downshifting) and descend
slowly.
If the vehicle cannot descend slowly even
CAUTION
while using the engine brake. The Hill De-
z Avoid driving alone on rocky roads. When
scent Control (if so equipped) may help drive
driving on rocky roads, follow an experi-
smoothly.
enced driver’s instruction for safe driving.
For details, refer to
“Hill Descent Control
(HDC)” on page 6-70.
6-64
Starting and driving

4-wheel drive operation*
WARNING
Climbing steep grades
NOTE
z
Avoid snaking down a sharp grade. De-
z Before attempting to drive up the slope,
scend the grade as straight as possible.
walk up it to confirm that the vehicle can
handle the grade.
NOTE
Turning sharp corners
z
When descending a sharp grade, if the
brakes are applied suddenly because of an
obstacle encountered, control of the vehicle
could be lost. Before descending the slope,
6
walk down it and confirm the path.
z
Before descending a grade, it is necessary to
choose the appropriate gear. Avoid changing
gears while descending the grade.
z
MITSUBISHI MOTORS is not responsible
Set the drive mode-selector to “4L” position
to the operator for any damage or injury
(Easy Select 4WD), “4LLc” position (Super
caused or liability incurred by improper and
negligent operation of a vehicle. All techni-
Select 4WD II) to maximize the engine tor-
ques of vehicle operation described herein
que.
depend on the skill and experience of the op-
erator and other participating parties and any
WARNING
deviation from the recommended operation
When turning a sharp corner in “4H” or “4L”
instructions above is at their own risk.
position
(Easy Select
4WD),
“4HLc” or
z Go straight up. Do not try to traverse
across a steep slope.
“4LLc” position (Super Select 4WD II) at
z If you begin to lose traction, ease off the
low speed, a slight difference in steering may
accelerator pedal and gently turn the
be experienced similar to as if the brakes
steering wheel alternatively left and right
were applied. This is called tight corner brak-
to regain adequate traction again.
ing and results from each of the 4 tyres being
at a different distance from the corner.
NOTE
The phenomenon is peculiar to 4-wheel drive
vehicles. If this occurs, either straighten the
z Choose as smooth a slope as possible with
steering wheel, or change to “2H” position
few stones or other obstacles.
(Easy Select 4WD), “2H” or “4H” position
(Super Select 4WD II).
Starting and driving
6-65
Inspection and maintenance following rough road operation
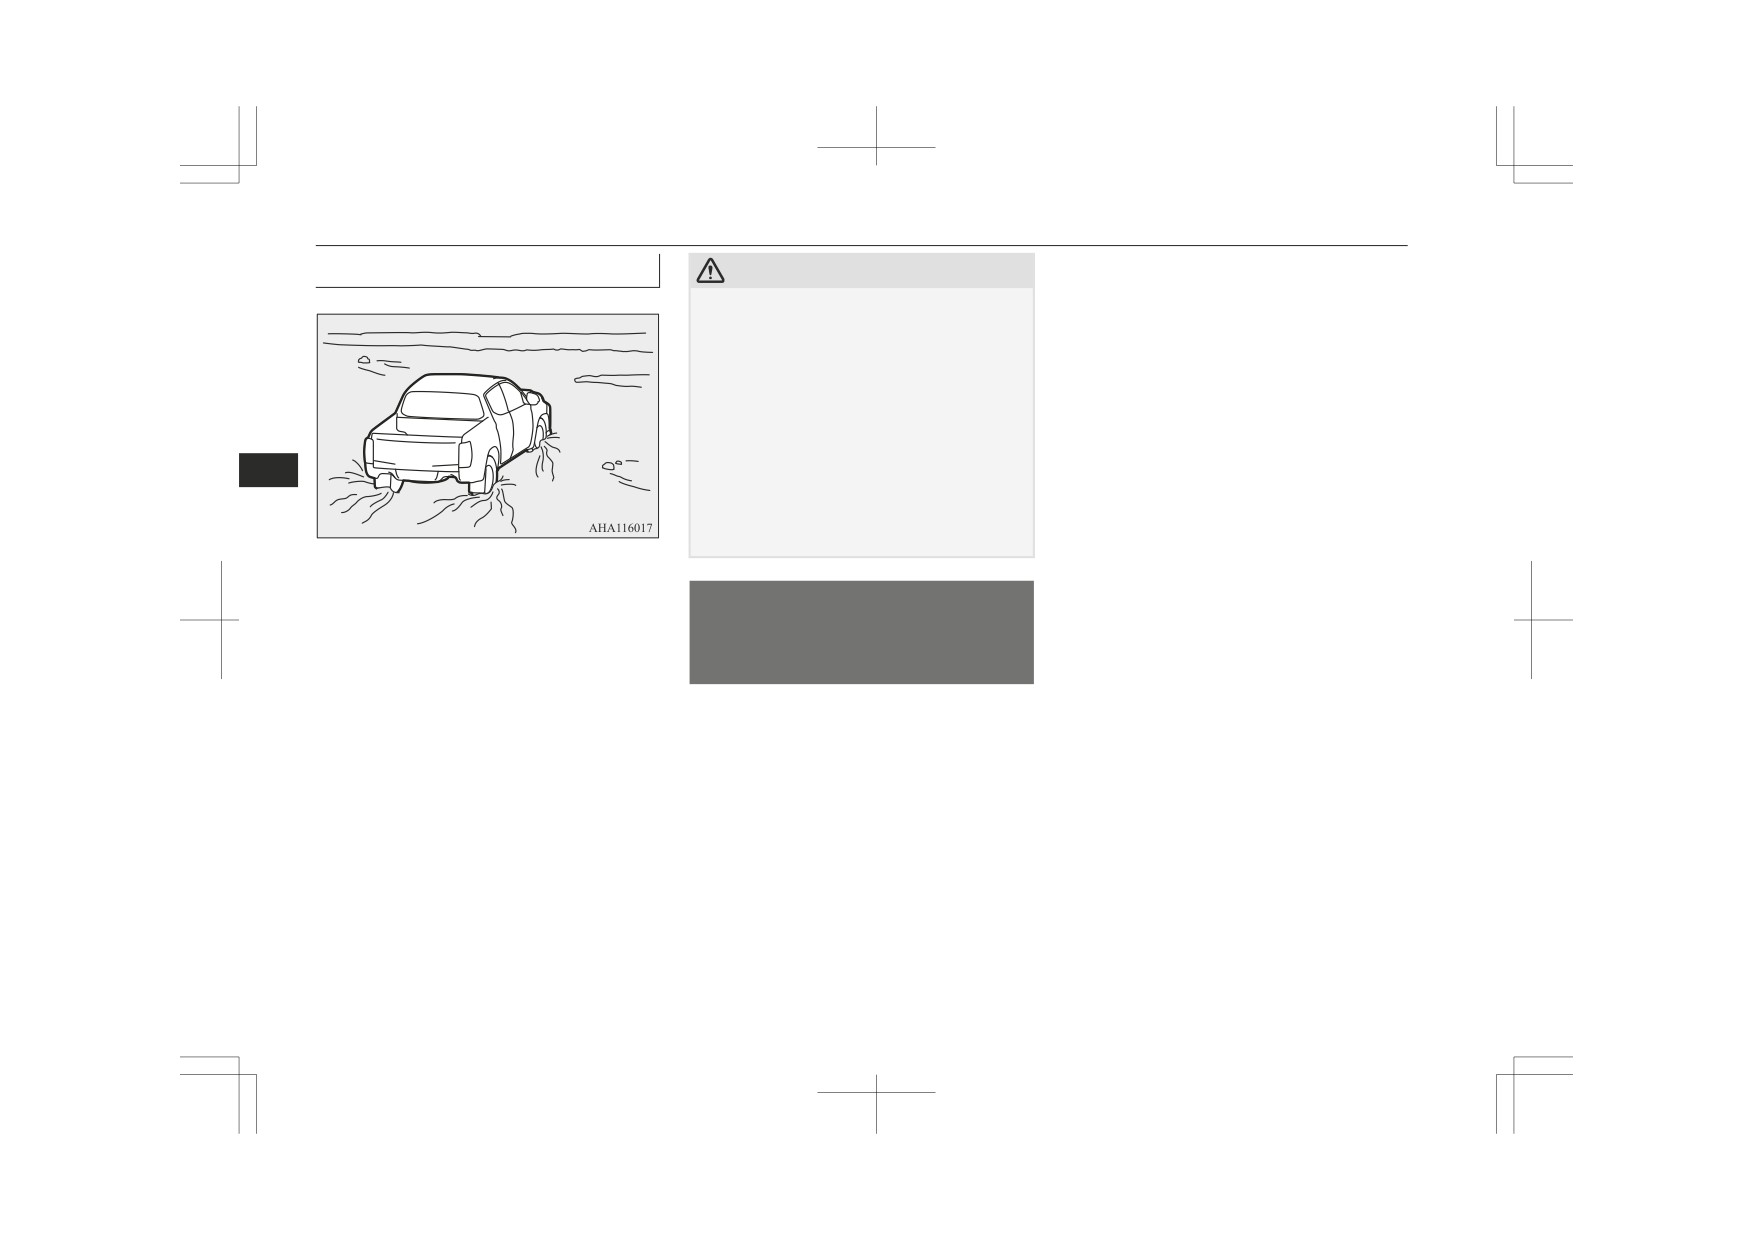
Crossing a stream
z
Remove the insects, dried grass, etc.
CAUTION
clogging the radiator core and A/T oil
z Never cross a stream where the water is
cooler.
deep.
z
After crossing a stream, be sure to have
Do not change gears while crossing the
the following items inspected at a
stream.
Frequent crossing of streams can adversely
MITSUBISHI MOTORS Authorized
affect the life span of the vehicle; we recom-
Service Point and take the necessary
mend you to take the necessary measures to
measures.
prepare, inspect, and repair the vehicle.
• Check the brake system and, if neces-
z After crossing a stream, apply the brakes to
sary, have it serviced.
6
be sure they are functioning properly. If the
• Check the engine, transmission, trans-
brakes are wet and not functioning properly,
fer, and differential oil or grease level
dry them out by driving slowly while lightly
depressing the brake pedal.
and turbidity. If the oil or grease is
milky, it indicates water contamina-
4-wheel drive vehicles are not necessarily
tion. Replace it with new oil or grease.
waterproof. If the electrical circuits become
Inspection and maintenance
• Grease the propeller shaft.
wet, further operation of the vehicle will be
• Check the inside of the vehicle. If in-
following rough road
impossible; therefore, avoid crossing streams
gress of water is found, dry the carpet
unless absolutely necessary. If crossing a
operation
etc.
stream is unavoidable, use the following pro-
• Inspect the headlamps. If the head-
After operating the vehicle in rough road
cedure:
lamp bulb is flooded with water, have
conditions, be sure to perform the following
1. Check depths of a stream and geographi-
the headlamp drained off.
inspection and maintenance procedures:
cal features before attempting to cross a
z Check that the vehicle has not been dam-
stream and ford the stream where the
aged by rocks, gravel, etc.
water is as shallow as practicable.
z Carefully wash the vehicle with water.
2. Set the drive mode-selector to “4L” po-
Drive the vehicle slowly while lightly
sition (Easy Select 4WD), “4LLc” posi-
depressing the brake pedal in order to
tion (Super Select 4WD II).
dry out the brakes. If the brakes still do
3. Drive slowly at a speed of approximate-
not function properly, we recommend
ly 5 km/h (3 mph) to avoid splashing too
you to have the brakes checked as soon
much water.
as possible.
6-66
Starting and driving

Cautions on handling of 4-wheel drive vehicles*
Only when you cannot receive a towing serv-
Cautions on handling of 4-
CAUTION
ice from a MITSUBISHI MOTORS Author-
wheel drive vehicles*
z Always use tyres of the same size, same
ized Service Point or commercial tow truck
type, and same brand, and which have no
service, tow your vehicle carefully in accord-
wear differences. Using the tyres which dif-
ance with the instructions given in “Towing”
fer in size, type, brands or the degree of
Tyres and wheels
wear or the inappropriate tyre inflation pres-
on page 8-23.
sure, will increase the differential oil temper-
Since the driving torque can be applied to the
ature and may be impossible to shift the
4 wheels, the performance of the vehicle
transfer, resulting in possible damage to the
when operating in 4-wheel drive is greatly af-
driving system. Further, the drive train will
6
fected by the condition of the tyres.
be subjected to excessive loading, possibly
Pay close attention to the tyres.
leading to oil leakage, component seizure, or
z Install specified tyres on all wheels. Re-
other serious faults.
fer to “Tyres and wheels” on page 11-13.
z Be sure to the appropriate tyre inflation
Towing
pressure according to no cargo or cargo.
Refer to “Tyre inflation pressures” on
If towing is necessary, we recommend you to
page 10-13.
have it done by your MITSUBISHI
z Be sure to fit all 4 tyres and wheels of
MOTORS Authorized Service Point or a
the same size and type.
commercial tow truck service.
When replacement of any of the tyres or
In the following cases, transport the vehicle
wheels is necessary, replace all of them.
using a tow truck.
z All tyres should be rotated whenever the
z The engine runs but the vehicle does not
wear difference between the front and
move or abnormal noise is produced.
rear tyres is recognizable.
z Inspection of the vehicle’s underside re-
veals that oil or some other fluid is leak-
Good vehicle performance cannot be expec-
ing.
ted if there is a difference in wear between
tyres. Refer to “Tyre rotation” on page 10-15.
z Check the tyre inflation pressure regular-
ly.
Starting and driving
6-67

Braking
CAUTION
CAUTION
Warning lamp/display
z Transport the vehicle with the driving
z Avoid driving habits that cause heavy brak-
The brake warning lamp illuminates to indi-
wheels on a carriage (Type C or D) as illus-
ing and never “ride” the brakes by resting
cate a fault in the braking system. A warning
trated.
your foot on the brake pedal while driving.
is also displayed on the multi information
Never try to tow with the front or rear
It causes brake overheating and fade.
wheels on the ground (Type A or B) as illus-
display. Refer to “Brake warning lamp” on
trated.
page 5-51 and “Brake warning display” on
Brake system
This could result in damage to the drivetrain,
page 5-53.
or unstable towing.
The service brake is divided into two brake
When brakes are wet
6
circuits. And your vehicle is equipped with
Jacking up a 4-wheel drive ve-
power brakes. If one brake circuit fails, the
Check the brake system while driving at a
hicle
other is available to stop the vehicle. If you
low speed immediately after starting, espe-
should lose the power assist for some reason,
cially when the brakes are wet, to confirm
WARNING
the brakes will still work. In these situations,
they work normally.
even if the brake pedal moves down to the
z Do not crank the engine while jacking up
A film of water can be formed on the brake
very end of its possible stroke or resists being
the vehicle.
discs or brake drums and prevent normal
The tyre on the ground may turn and the
depressed, keep depressing the brake pedal
braking after driving in heavy rain or through
vehicle may roll off the jack.
down harder and further than usual; stop
large puddles, or after the vehicle is washed.
driving as soon as possible and have the
If this occurs, dry the brakes out by driving
brake system repaired.
slowly while lightly depressing the brake
Braking
pedal.
WARNING
All the parts of the brake system are critical
to safety. We recommend you to have the ve-
When driving downhill
z Do not turn off the engine while your ve-
hicle checked at regular intervals according
hicle is in motion.
If you turn off the engine while driving,
It is important to take advantage of the en-
to the service booklet.
the power assistance for the braking sys-
gine braking by shifting to a lower shift posi-
tem will stop working and your brakes
tion while driving on steep downhill roads in
will not work effectively.
order to prevent the brakes from overheating.
z If the power assist is lost or if either brake
hydraulic system stops working properly,
have your vehicle checked immediately.
6-68
Starting and driving

Hill start assist
WARNING
Hill start assist
To operate
1. Stop the vehicle completely using the
z Do not leave any objects near the brake
pedal or let a floor mat slide under it; do-
The hill start assist makes it easy to start off
brake pedal.
ing so could prevent the full pedal stroke
on a steep uphill slope by preventing the ve-
2. On vehicles equipped with M/T, place
that would be necessary in an emergency.
hicle from moving backwards. It keeps the
the gearshift lever into the 1st position.
Make sure that the pedal can be operated
braking force for approximately 2 seconds
On vehicles equipped with A/T, place
freely at all times. Make sure the floor
when you move your foot from the brake
the selector lever into the “D” position.
mat is securely held in place.
pedal to the accelerator pedal.
Brake pads and linings
NOTE
6
CAUTION
z
When reversing on an uphill slope, place the
z
Avoid hard braking situations.
Do not overly rely on the hill start assist to
z
selector lever or gearshift lever into the “R”
New brakes need to be broken-in by
prevent backwards movement of the vehicle.
position.
moderate use for the first
200 km
Under certain circumstances, even when hill
start assist is activated, the vehicle may
(124 mph).
move backwards if the brake pedal is not
3. Release the brake pedal and the hill start
z
The disc brakes are provided with a
sufficiently depressed, if the vehicle is heav-
assist will maintain the braking force ap-
warning device which emits a shrieking
ily loaded, if the road is very steep or slip-
plied while stopping for approximately 2
metallic sound while braking if the brake
pery or if the vehicle tows a trailer, etc.
seconds.
pads have reached their wear limit. If
The hill start assist is not designed to keep
z
4. Depress the accelerator pedal and the
you hear this sound, have the brake pads
the vehicle stopped in place on uphill slopes
hill start assist gradually will decrease
replaced.
for more than 2 seconds.
the braking force as the vehicle starts
z
When facing uphill, do not rely on using the
moving.
hill start assist to maintain a stopped position
WARNING
as an alternative to depressing the brake ped-
al.
z
Driving with worn brake pads will make
NOTE
Doing so could result in an accident.
it harder to stop, and can cause an acci-
z
Do not turn the ignition switch to the
z
The hill start assist is activated when all of
dent.
“LOCK” or “ACC” position or the operation
the following conditions are met.
mode in ACC or OFF while the hill start as-
• The engine is running.
sist is operating. The hill start assist could
(The hill start assist will not be activated
stop operating, which could result in an acci-
while the engine is starting or immediate-
dent.
ly after the engine is started.)
Starting and driving
6-69

Hill Descent Control (HDC)*
NOTE
Warning lamp/display
Hill Descent Control
If an abnormal condition occurs in the sys-
• On vehicles equipped with M/T, the gear-
(HDC)*
shift lever is in the following position.
tem, the indication lamp/display will turn on.
[When starting an uphill slope forwards.]
The Hill Descent Control is the system that
The gearshift lever is in any position other
Warning lamp
assists the steady driving with the constant
than “R”.
speed when descending sharp grades where it
(The hill start assist will operate, even if
is impossible to decelerate the vehicle suffi-
the gearshift lever is in the “N” position.)
[When starting an uphill slope back-
Warning display
ciently by the engine brake only or rough
wards.]
roads.
6
The gearshift lever is in the “R” position.
(The hill start assist will not operate when
WARNING
the gearshift lever is in the “N” position.)
• On vehicles equipped with A/T, the selec-
z The driver has the responsibility to drive
tor lever is in any position other than “P”
safely. Make sure to drive safely accord-
or “N”.
ing to road conditions without relying too
• The vehicle is completely stationary, with
much on the Hill Descent Control.
the brake pedal depressed.
CAUTION
z When driving slippery roads such as
• The parking brake is released.
muddy, icy or unpaved roads, the vehicle
z
The hill start assist will not operate if the ac-
z If the warning is turn on, the hill start assist
will not allow you to stay at a certain low
will not operate. Start off carefully.
celerator pedal is depressed before the brake
speed, which may lead to a serious acci-
pedal is released.
z Park your vehicle in a safe place and stop
dent.
the engine.
z
The hill start assist also operates when re-
z On vehicles with M/T, set the drive mode-
Restart the engine and check whether the
versing on an uphill slope.
selector to “4LLc” position. If using the
warning indicator went out, in which case
z
When the hill start assist is activated, you
Hill Descent Control while driving except
the hill start assist is again working normal-
may feel the operating sound.
in “4LLc” position, the engine may stall.
ly. If the warning remains displayed or reap-
This is a normal result of the hill start assist
As a result, it could lose the brake effec-
pears frequently, it is not necessary to stop
operation, and does not indicate a problem.
tiveness or lock the tyres, which may lead
the vehicle immediately, but the vehicle
to a serious accident.
should be inspected by a MITSUBISHI
MOTORS Authorized Service Point.
6-70
Starting and driving

Hill Descent Control (HDC)*
4. Make sure that Hill Descent Control in-
CAUTION
NOTE
dication lamp comes on.
z When there is a malfunction in the Hill De-
• Brake system: brake temperature high
When the Hill Descent Control indica-
scent Control system, ASTC warning lamp
• ASTC warning lamp: illuminating or
tion lamp comes on, the Hill Descent
come on. When ASTC warning lamp come
blinking
Control set to ON (stand by).
on, have the vehicle inspected at a MITSU-
Refer to “ASTC warning lamp/display”
BISHI MOTORS Authorized Service Point.
on page 6-79
Indication lamp
(Refer to “ASTC warning lamp/display” on
page 6-79.)
In the following cases, the Hill Descent Con-
When the warning lamp comes on, the warn-
ing display may also appear.
trol brake control operates.
6
z Vehicle speed: 20 km/h (12 mph) or less
z The accelerator pedal or the brake pedal
To operate
is not operated.
NOTE
1. Bring the vehicle to a complete stop.
2. On vehicles with M/T, place the gear-
z
The indication lamp should illuminate when
When the control operates, the Hill Descent
the operation mode is put in ON and should
shift lever into the 1st position or the “R”
Control indication lamp blinks, and the brake
go off after a few seconds.
(Reverse) position.
lamps and the high-mounted stop lamp are il-
z
If pressing the Hill Descent Control switch
On vehicles with A/T, place the selector
continuously after setting the Hill Descent
luminated. It is possible to change the con-
lever into the “D” (DRIVE) position or
Control to ON (stand by), the Hill Descent
trolled vehicle speed by operating the accel-
the “R” (REVERSE) position.
Control will return to OFF as a protection
erator pedal or the brake pedal.
3. Press the Hill Descent Control switch.
function is operated. After returning to OFF,
When you lift your foot off the pedal, the Hill
the Hill Descent Control will not be switch-
Descent Control performs brake control so as
ed to ON (Stand by) even if the Hill Descent
to keep the vehicle speed at that time.
Control switch is pressed. To set the Hill De-
scent Control to ON, restart the engine and
press the Hill Descent Control switch again.
NOTE
z
It is impossible to set the Hill Descent Con-
trol to ON (stand by) in the following condi-
z The Hill Descent Control will not operate
tions.
even if the Hill Descent Control is in ON
(stand by), and the control will temporarily
• Vehicle speed: More than approximately
20 km/h (12 mph)
stop during the activation of it in the follow-
ing conditions.
• Rear differential lock (if so equipped): ac-
tivating
• Vehicle speed: More than approximately
20 km/h (12 mph)
Starting and driving
6-71