Mitsubishi ASX (2020 year). Manual in english - page 6

Multi-information display
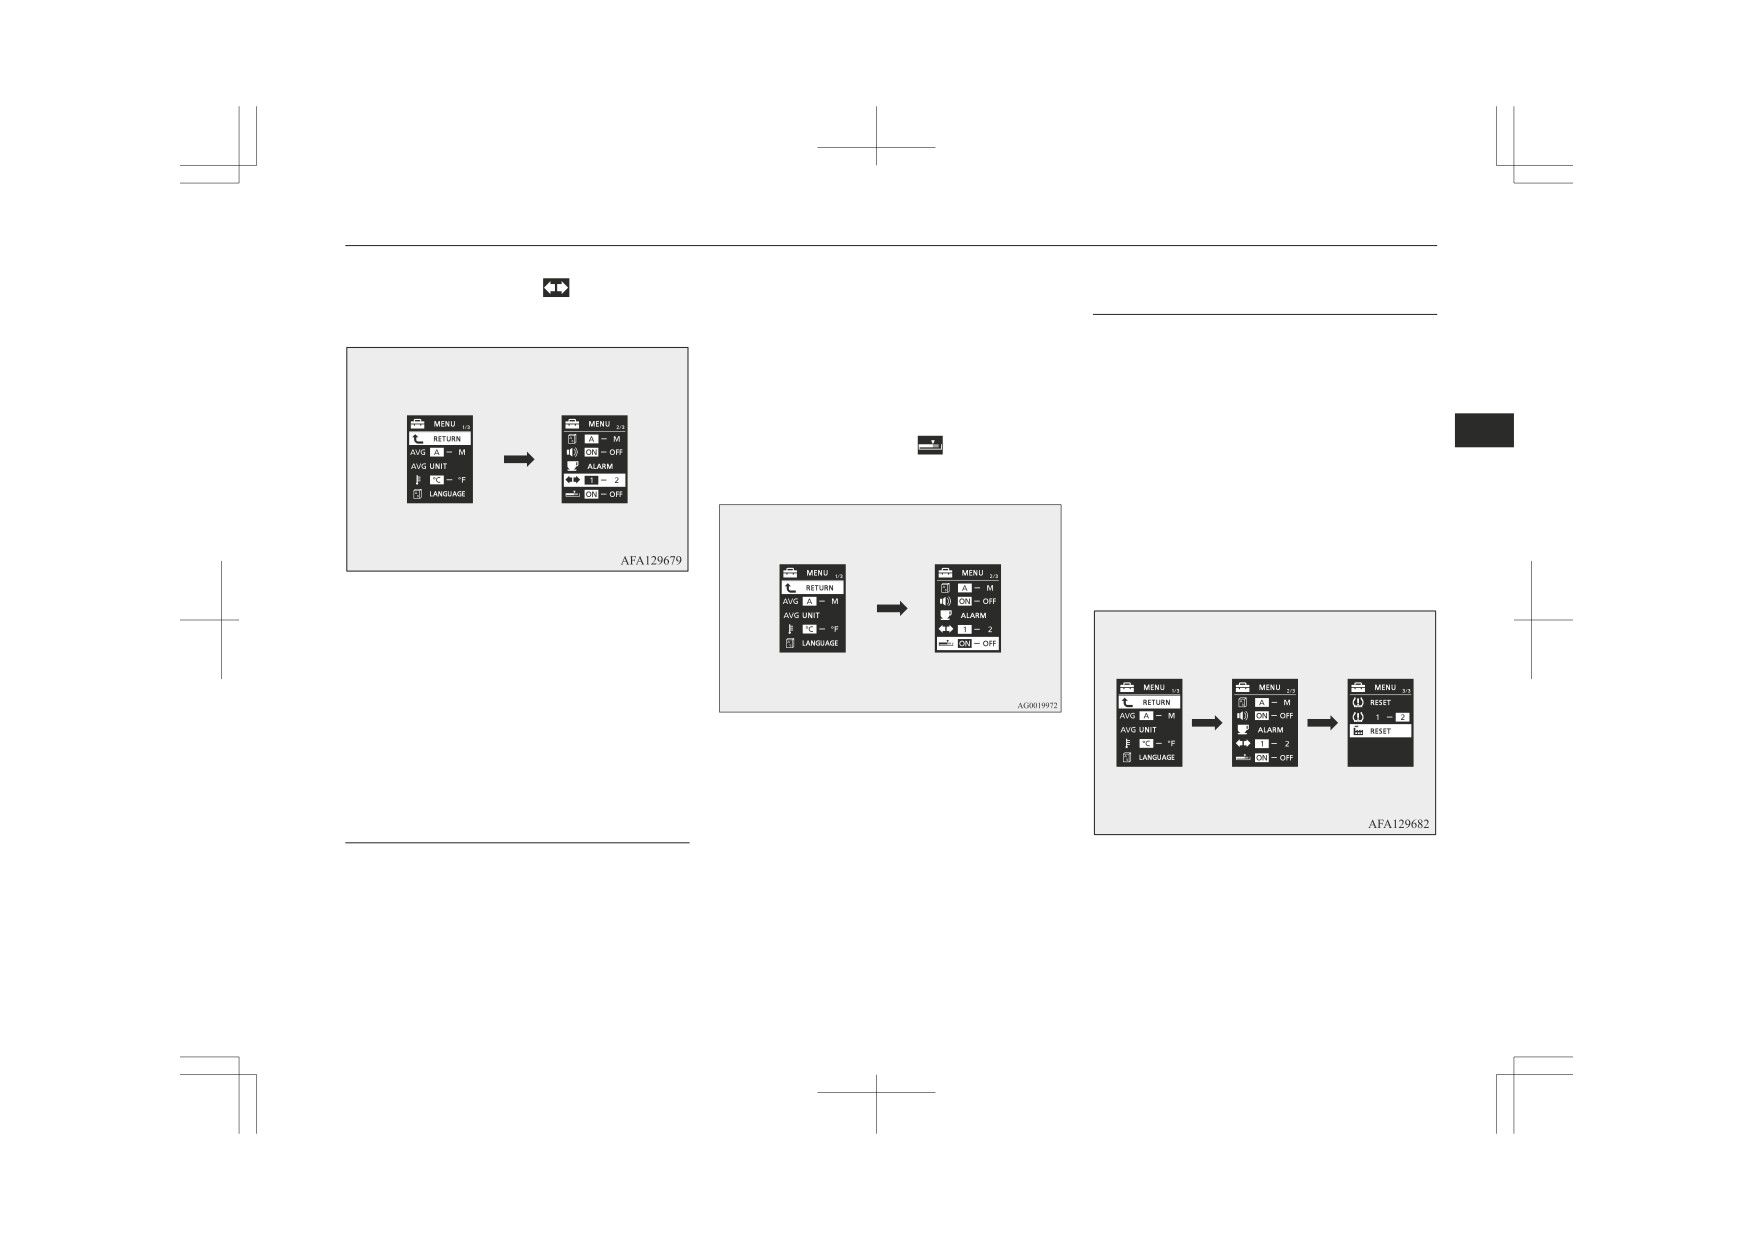
3. Press and hold the multi-information
Auto reset mode
NOTE
meter switch for approximately 2 sec-
z
When the average fuel consumption and
“Auto reset
onds or more to switch in sequence from
z The initial (default) setting is
average speed are being displayed, if
mode”.
A or 1 (Auto reset mode) → M, 2 or P
you hold down the multi-information
(Manual reset mode) → A or 1 (Auto re-
meter switch, the average fuel consump-
set mode).
Changing the fuel consumption
tion and average speed displayed at that
The setting is changed to the selected
time are reset.
display unit
mode condition.
z
When the engine switch or the operation
The display unit for fuel consumption can be
5
mode is in the following conditions, the
switched. The distance, speed, and amount
Manual reset mode
average fuel consumption display and
units are also switched to match the selected
z
When the average fuel consumption and
average speed display are automatically
fuel consumption unit.
average speed are being displayed, if
reset.
1. Press and hold the multi-information
you hold down the multi-information
[Except vehicles equipped with keyless
meter switch for approximately 2 sec-
meter switch, the average fuel consump-
operation system]
onds or more to switch from the setting
tion and average speed displayed at that
The ignition switch is in the “ACC” or
mode screen to the menu screen.
time are reset.
“LOCK” position for approximately 4
Refer to “Changing the function settings
z
When the following operation is per-
hours or longer.
(when the ignition switch or the opera-
formed, the mode setting is automatical-
[For vehicles equipped with keyless op-
tion mode is ON)” on page 5-17.
ly switched from manual to auto.
eration system]
2. Lightly press the multi-information me-
[Except vehicles equipped with keyless
The operation mode is in ACC or OFF
ter switch to select “AVG UNIT” (fuel
operation system]
for approximately 4 hours or longer.
consumption display setting).
Turn the ignition switch from the “ACC”
or “LOCK” position to the “ON” posi-
tion.
NOTE
[For vehicles equipped with keyless op-
The average fuel consumption display and
z
eration system]
average speed display can be reset individu-
Change the operation mode from ACC
ally for the auto reset mode and manual reset
or OFF to ON.
mode.
z
The memory of the auto reset mode or man-
ual reset mode for the average fuel con-
Switching to auto occurs automatically.
sumption display and average speed display
If switching to manual mode is done,
is erased if the battery is disconnected.
however, the data from the last reset is
displayed.
Instruments and controls
5-19

Multi-information display
3. Press and hold the multi-information
1. Press and hold the multi-information
NOTE
meter switch for approximately 2 sec-
meter switch for approximately 2 sec-
onds or more to display “AVG UNIT”
z The display units for the driving range, the
onds or more to switch from the setting
average fuel consumption, the average speed
(fuel consumption display unit setting).
mode screen to the menu screen.
and the momentary fuel consumption are
4. Lightly press the multi-information me-
Refer to “Changing the function settings
switched, but the units for the indicating
ter switch to switch in sequence from
needle (speedometer), the odometer and the
(when the ignition switch or the opera-
km/L → L/100 km → mpg (US) → mpg
tripmeter will remain unchanged.
tion mode is ON)” on page 5-17.
(UK) → RETURN → km/L.
z The memory of the unit setting is erased if
2. Lightly press the multi-information me-
5
the battery is disconnected, and it returns au-
ter switch to select
“
”
(temperature
tomatically to L/100 km.
unit setting).
The distance and speed units are also switch-
ed in the following combinations to match
the selected fuel consumption unit.
Distance
Speed
Fuel con-
(driving
(average
sumption
range)
speed)
L/100 km
km
km/h
mpg (US)
mile(s)
mph
5. Press and hold the multi-information
mpg (UK)
mile(s)
mph
meter switch for approximately 2 sec-
onds or more to change the setting to the
km/L
km
km/h
3. Press and hold the multi-information
selected unit.
meter switch for approximately 2 sec-
Changing the temperature unit
onds or more to switch in sequence from
The display unit for temperature can be
°C → °F → °C.
switched.
The setting is changed to the selected
temperature unit.
5-20
Instruments and controls

Multi-information display
3. Press and hold the multi-information
2. Lightly press the multi-information me-
NOTE
meter switch for approximately 2 sec-
ter switch to select “
” (operation sound
z If the battery is disconnected, the unit setting
onds or more to display “
” (language
setting).
is erased from memory and is automatically
setting).
set to °C.
4. Lightly press the multi-information me-
ter switch to select the desired language.
Changing the display language
5. If you hold down the multi-information
The language of the multi-information dis-
meter switch for approximately 2 sec-
5
play can be switched.
onds or more, the setting is changed to
1. Press and hold the multi-information
the selected language.
meter switch for approximately 2 sec-
onds or more to switch from the setting
NOTE
mode screen to the menu screen.
z
The memory of the language setting is
Refer to “Changing the function settings
erased if the battery is disconnected, and it
(when the ignition switch or the opera-
returns automatically to ENGLISH or RUS-
tion mode is ON)” on page 5-17.
SIAN.
3. Press and hold the multi-information
2. Lightly press the multi-information me-
z
If “---” is selected in the language setting, a
meter switch for approximately 2 sec-
ter switch to select “
” (language set-
warning message is not displayed when
onds or more to switch in sequence from
ting).
there is a warning display or interrupt dis-
ON (operation sound on) → OFF (oper-
play.
ation sound off) → ON (operation sound
on).
Operation sound setting
The setting is changed to the selected
You can turn off the operation sounds of the
condition.
multi-information meter switch and daytime
dipper button.
NOTE
1. Press and hold the multi-information
z
The memory of the operation sound setting
meter switch for approximately 2 sec-
is erased if the battery is disconnected, and it
onds or more to switch from the setting
returns automatically to ON
(operation
mode screen to the menu screen.
sound on).
Refer to “Changing the function settings
(when the ignition switch or the opera-
tion mode is ON)” on page 5-17.
Instruments and controls
5-21

Multi-information display
2. Lightly press the multi-information me-
4. Lightly press the multi-information me-
NOTE
ter switch to select “ALARM” (rest time
ter switch to select the time until the dis-
z The operation sound setting only deactivates
setting).
play.
the operation sound of the multi-information
5. Press and hold the multi-information
meter switch and daytime dipper button. The
meter switch for approximately 2 sec-
warning display and other sounds cannot be
deactivated.
onds or more, the setting is changed to
the selected time.
5
Changing the time until “REST
NOTE
REMINDER” is displayed
z If the battery is disconnected, the unit setting
The time until the display appears can be
is erased from memory and is automatically
changed.
set to OFF.
1. Press and hold the multi-information
z The drive time is reset when the ignition
meter switch for approximately 2 sec-
switch is turned off or the operation mode is
onds or more to switch from the setting
put in OFF.
mode screen to the menu screen.
3. Press and hold the multi-information
Refer to “Changing the function settings
meter switch for approximately 2 sec-
Changing the turn-signal sound
(when the ignition switch or the opera-
onds or more to display “ALARM” (rest
It is possible to change the turn-signal sound.
tion mode is ON)” on page 5-17.
time setting).
1. Press and hold the multi-information
meter switch for approximately 2 sec-
onds or more to switch from the setting
mode screen to the menu screen.
Refer to “Changing the function settings
(when the ignition switch or the opera-
tion mode is ON)” on page 5-17.
5-22
Instruments and controls
Multi-information display
2. Lightly press the multi-information me-
1. Press and hold the multi-information
Returning to the factory set-
ter switch to select “
” (changing the
meter switch for approximately 2 sec-
tings
turn-signal sound).
onds or more to switch from the setting
Many of the function settings can be returned
mode screen to the menu screen.
to their factory settings.
Refer to “Changing the function settings
1. Press and hold the multi-information
(when the ignition switch or the opera-
meter switch for approximately 2 sec-
tion mode is ON)” on page 5-17.
onds or more to switch from the setting
2. Lightly press the multi-information me-
mode screen to the menu screen.
5
ter switch to select “
” (changing the
Refer to “Changing the function settings
momentary fuel consumption display)
(when the ignition switch or the opera-
tion mode is ON)” on page 5-17.
2. Lightly press the multi-information me-
ter switch to select “RESET” (returning
to the factory settings).
3. Press and hold the multi-information
meter switch for approximately 2 sec-
onds or more to switch in sequence from
1 (turn-signal sound 1) → (turn-signal
sound 2) → 1 (turn-signal sound 1).
The setting changes to the selected turn-
signal sound.
3. Press and hold the multi-information
meter switch for approximately 2 sec-
Changing the momentary fuel
onds or more to switch in sequence from
ON (with the green bar graph) → OFF
consumption display
(without the green bar graph)
→ ON
It is possible to change the bar graph setting
(with the green bar graph).
of the momentary fuel consumption display.
3. When you press and hold the multi-in-
The setting changes to the selected bar
formation meter switch for approximate-
graph setting.
ly 5 seconds or more, the buzzer sounds
and all of the function settings are re-
turned to the factory settings.
Instruments and controls
5-23
Indication lamp, warning lamp, and information screen display list
NOTE
NOTE
NOTE
z The factory settings are as follows.
• Cooperative language setting: A
• Momentary fuel consumption with the
• Average fuel consumption and average
• Operation sounds: ON (Operation sounds
green bar graph: ON
speed reset mode: A (Auto reset)
on)
z The low tyre pressure warning threshold and
• Fuel consumption display unit: L/100 km
• “REST REMINDER” display: OFF
tyre ID set cannot be returned to their facto-
• Temperature unit: °C (Celsius)
ry settings.
• Turn-signal sound: Turn-signal sound 1
• Display language: ENGLISH or RUSSI-
AN
5
Indication lamp, warning lamp, and information screen display list
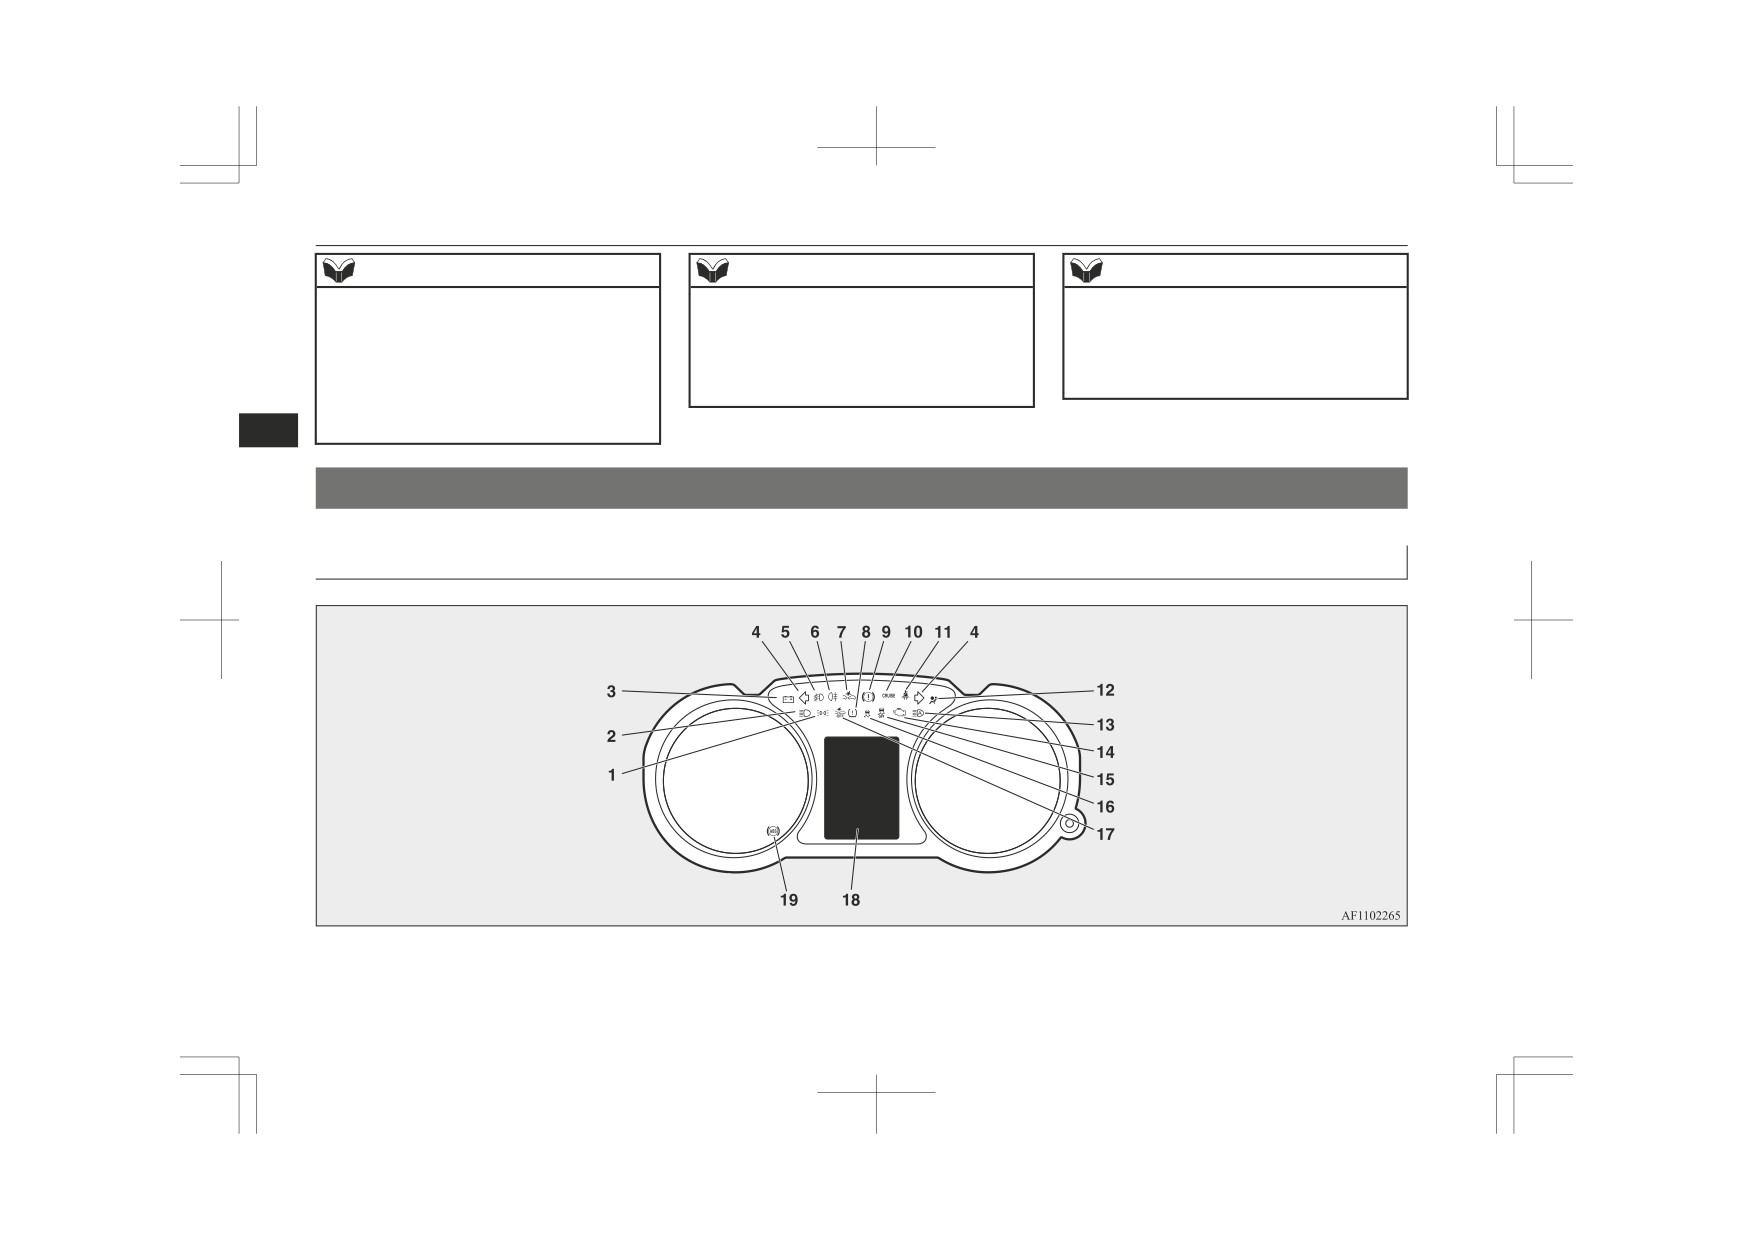
Indication and warning lamp list
1- Position lamp indication lamp
2- High-beam indication lamp ® p. 5-44
4- Turn-signal indication lamps/Hazard
® p. 5-44
3- Charge warning lamp ® p. 5-45
warning indication lamps ® p. 5-43
5-24
Instruments and controls
Indication lamp, warning lamp, and information screen display list
5- Front fog lamp indication lamp*
9- Brake warning lamp ® p. 5-44
16- Active Stability Control (ASC) indica-
® p. 5-44
10- Cruise control indication lamp*
tor* ® p. 6-43
6- Rear fog lamp indication lamp
® p. 6-45
17- Forward Collision Mitigation system
® p. 5-44
11- Seat belt warning lamp ® p. 4-11
(FCM) OFF indicator* ® p. 6-54
7- Forward Collision Mitigation system
12- Supplement Restraint System (SRS)
Radar sensing misacceleration Mitiga-
(FCM) indicator* ® p. 6-49
warning lamp ® p. 4-34
tion System (RMS) (Forward) OFF indi-
Radar sensing misacceleration Mitiga-
13- Automatic High-Beam (AHB) indicator*
cator* ® p. 6-63
tion System (RMS) (Forward) indicator*
® p. 5-50
18- Information screen display list
5
® p. 6-59
14- Check engine warning lamp ® p. 5-44
® p. 5-25
8- Tyre pressure monitoring system warn-
15- Active Stability Control (ASC) OFF in-
19- Anti-lock brake system (ABS) warning
ing lamp* ® p. 6-74
dicator* ® p. 6-43
lamp ® p. 6-40
Information screen display list
When there is information to be announced, such as lamp reminders, a sound is emitted and the screen switches to the displays shown below.
Refer to the appropriate page and take the necessary measures.
When the cause of the warning display is eliminated, the warning display goes out automatically.
Refer to “Warning display list (when the ignition switch or the operation mode is OFF)” on page 5-26.
Refer to “Warning display list (when the ignition switch or the operation mode is ON)” on page 5-29.
Refer to “Other interrupt displays” on page 5-40.
NOTE
z A warning may be displayed on the information screen and the buzzer may sound in the following rare cases.
This is caused by the system picking up interference such as noise or strong electromagnetic waves, and is not a functional problem.
• An extremely strong electromagnetic wave is received from a source such as an illegal radio set, a spark from a wire, or a radar station.
• Abnormal voltage or a static electricity discharge is generated by the operation of installed electrical equipment (including after-market parts).
If the warning display appears many times, we recommend you to consult a MITSUBISHI MOTORS Authorized Service Point.
Instruments and controls
5-25

Indication lamp, warning lamp, and information screen display list
Warning display list (when the ignition switch or the operation mode is OFF)
Screen
Cause
Solution (Reference)
z You have forgotten to turn off the lamps.
z Refer to “Lamps (headlamps, fog lamp,
etc.) auto-cutout function” on page 5-46.
5
z The security alarm system is operating.
z Refer to “Security alarm system” on page
3-33.
5-26
Instruments and controls

Indication lamp, warning lamp, and information screen display list
Screen
Cause
Solution (Reference)
z There is a fault in the keyless operation
z Refer to “Keyless operation system” on
system.
page 3-08.
5
z There is a fault in the electronic immobil-
z We recommend you to consult a
izer (Anti-theft starting system).
MITSUBISHI MOTORS Authorized
Service Point.
Instruments and controls
5-27
Indication lamp, warning lamp, and information screen display list
Screen
Cause
Solution (Reference)
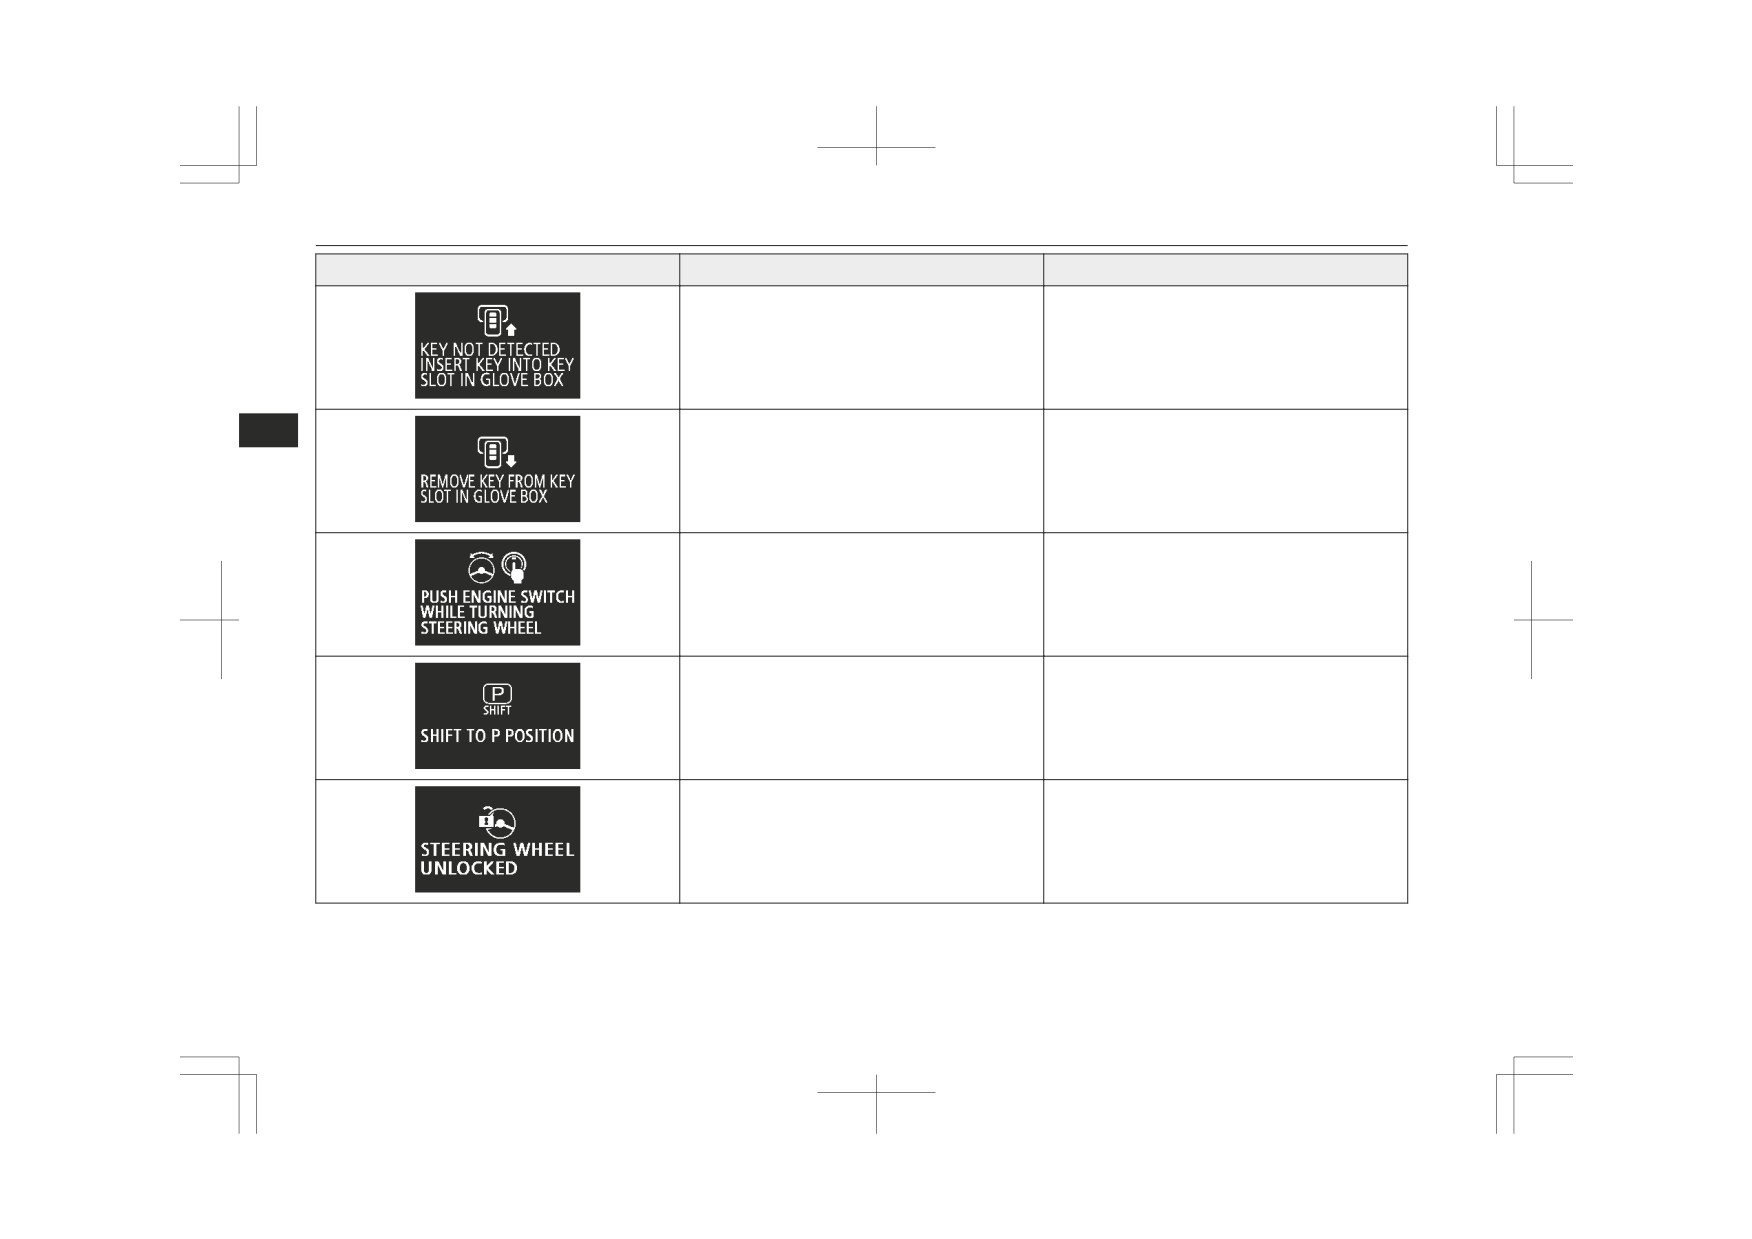
z The keyless operation key is not detected.
z Insert the keyless operation key into the
key slot in the glove box.
Refer to “If the keyless operation key is
not operating properly” on page 3-20.
z You have forgotten to remove the keyless
z Remove the keyless operation key from
5
operation key from the key slot in the
the key slot in the glove box.
glove box.
z The steering wheel is locked.
z Press the engine switch.
Refer to “Steering wheel lock” on page
3-17.
z The engine is stopped while the selector
z On vehicles with CVT, move the selector
lever is in a position other than the “P”
lever to the “P” (PARK) position to put
(PARK) position.
the operation mode in OFF.
z The driver’s door is opened with the steer-
z Refer to “Steering wheel lock” on page
ing wheel unlocked.
3-17.
5-28
Instruments and controls

Indication lamp, warning lamp, and information screen display list
Screen
Cause
Solution (Reference)
z There is a fault in the electrical system.
z Immediately stop the vehicle in a safe
place. We recommend you to consult a
MITSUBISHI MOTORS Authorized
Service Point.
5
Warning display list (when the ignition switch or the operation mode is ON)
Screen
Cause
Solution (Reference)
z The washer fluid is running low.
z Replenish the container with washer fluid.
Refer to “Washer fluid” on page 10-06
Refer to “Capacity” on page 11-11.
(if so equipped)
z There is a fault in the EPS.
z Have the vehicle inspected by a
MITSUBISHI MOTORS Authorized
Service Point as soon as possible.
Refer to “Electric power steering system
(EPS)” on page 6-26.
Instruments and controls
5-29

Indication lamp, warning lamp, and information screen display list
Screen
Cause
Solution (Reference)
z There is a fault in the keyless operation
z Refer to “Keyless operation system” on
system.
page 3-08.
5
5-30
Instruments and controls
Indication lamp, warning lamp, and information screen display list
Screen
Cause
Solution (Reference)
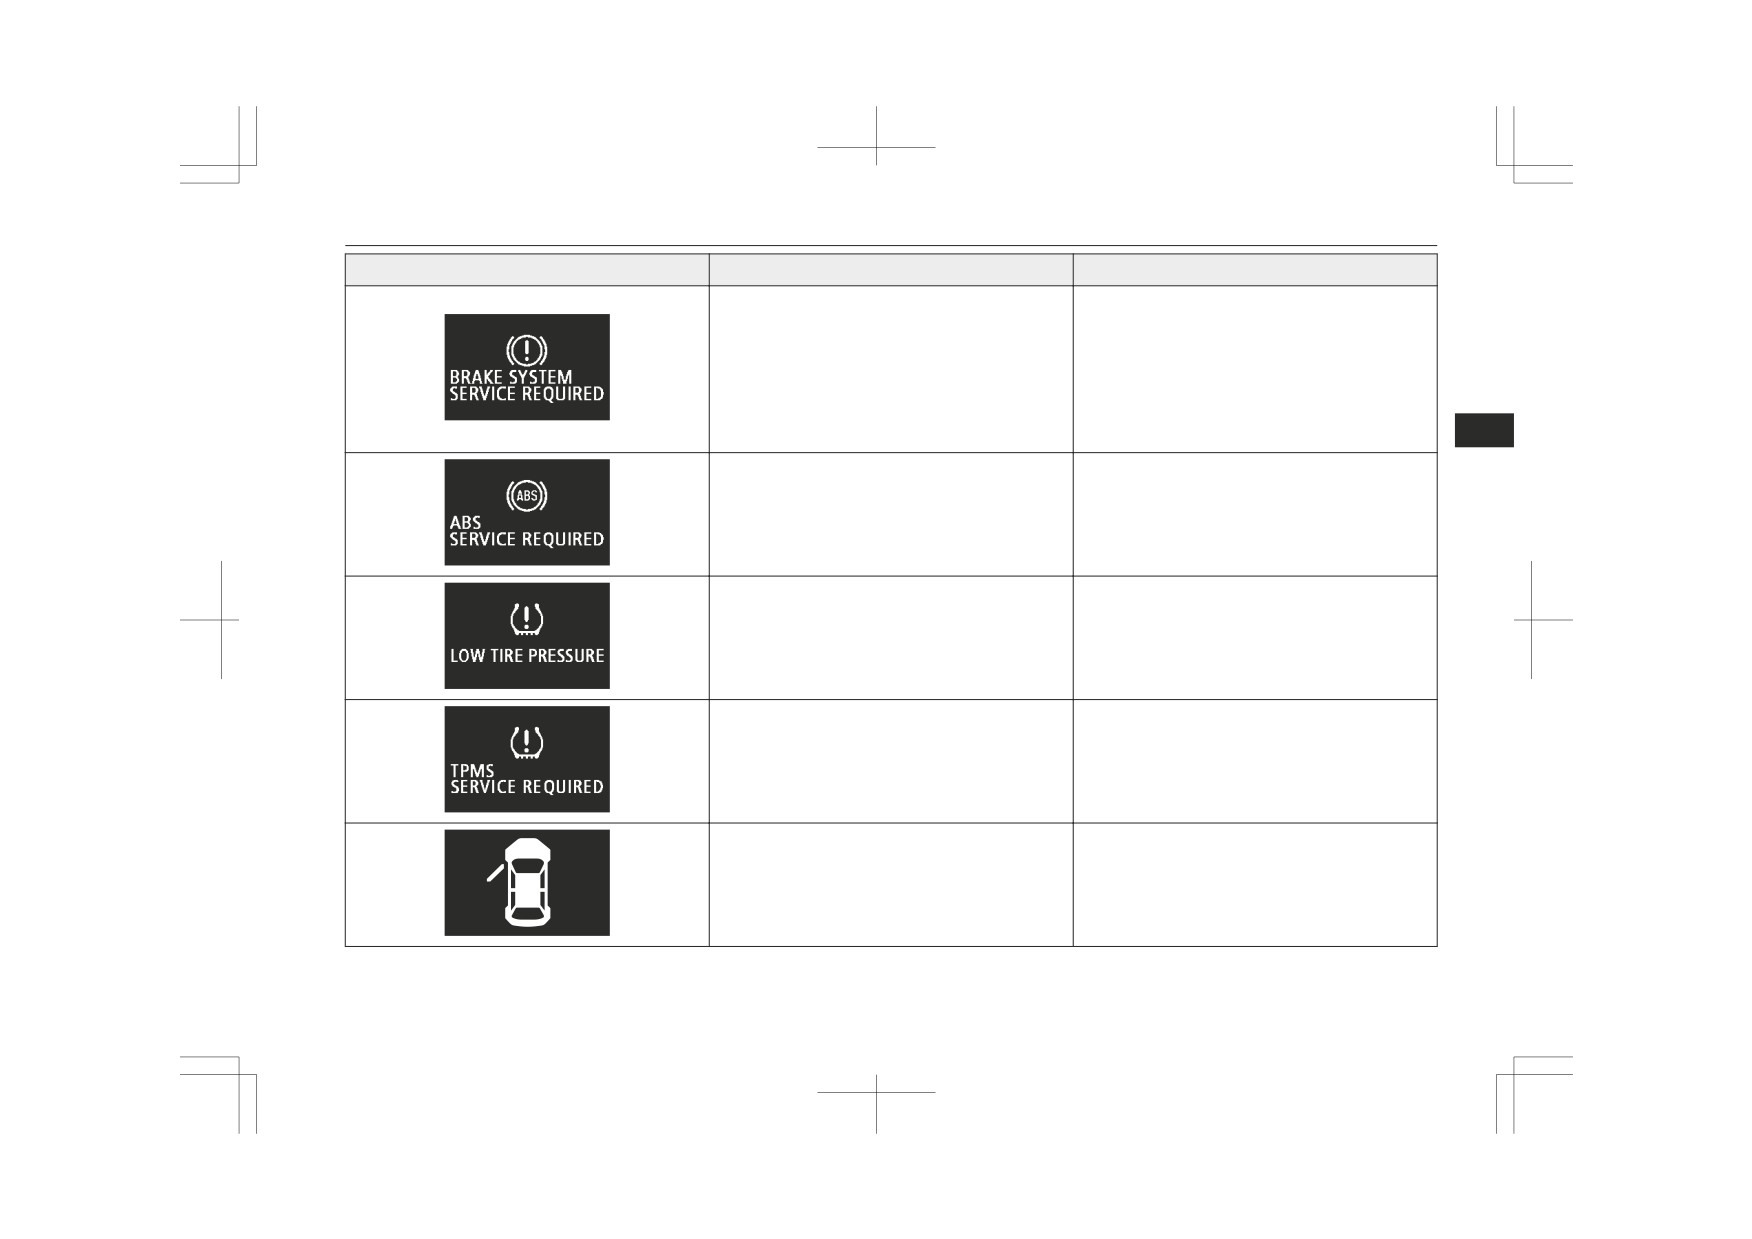
z The brake fluid level in the reservoir has
z Immediately stop the vehicle in a safe
fallen to a low level.
place.
z There is a fault in the brake system.
We recommend you to consult a
MITSUBISHI MOTORS Authorized
Service Point.
Refer to “Brake warning display” on page
5-45.
5
z There is a fault in the ABS.
z Avoid sudden braking and high-speed
driving, stop the vehicle in a safe place,
and take corrective measures. Refer to
“ABS warning” on page 6-40.
z The tyre pressure in one of the tyres is
z Refer to “Tyre pressure monitoring sys-
low.
tem (TPMS)” on page 6-73.
z There is a fault in the tyre pressure moni-
z Refer to “Tyre pressure monitoring sys-
toring system.
tem (TPMS)” on page 6-73.
z One of the doors or the tailgate is not
z Close the door or tailgate.
completely closed.
Refer to
“Door ajar warning display
The open door is displayed.
screen (when the ignition switch or the
operation mode is ON)” on page 5-17.
Instruments and controls
5-31
Indication lamp, warning lamp, and information screen display list
Screen
Cause
Solution (Reference)
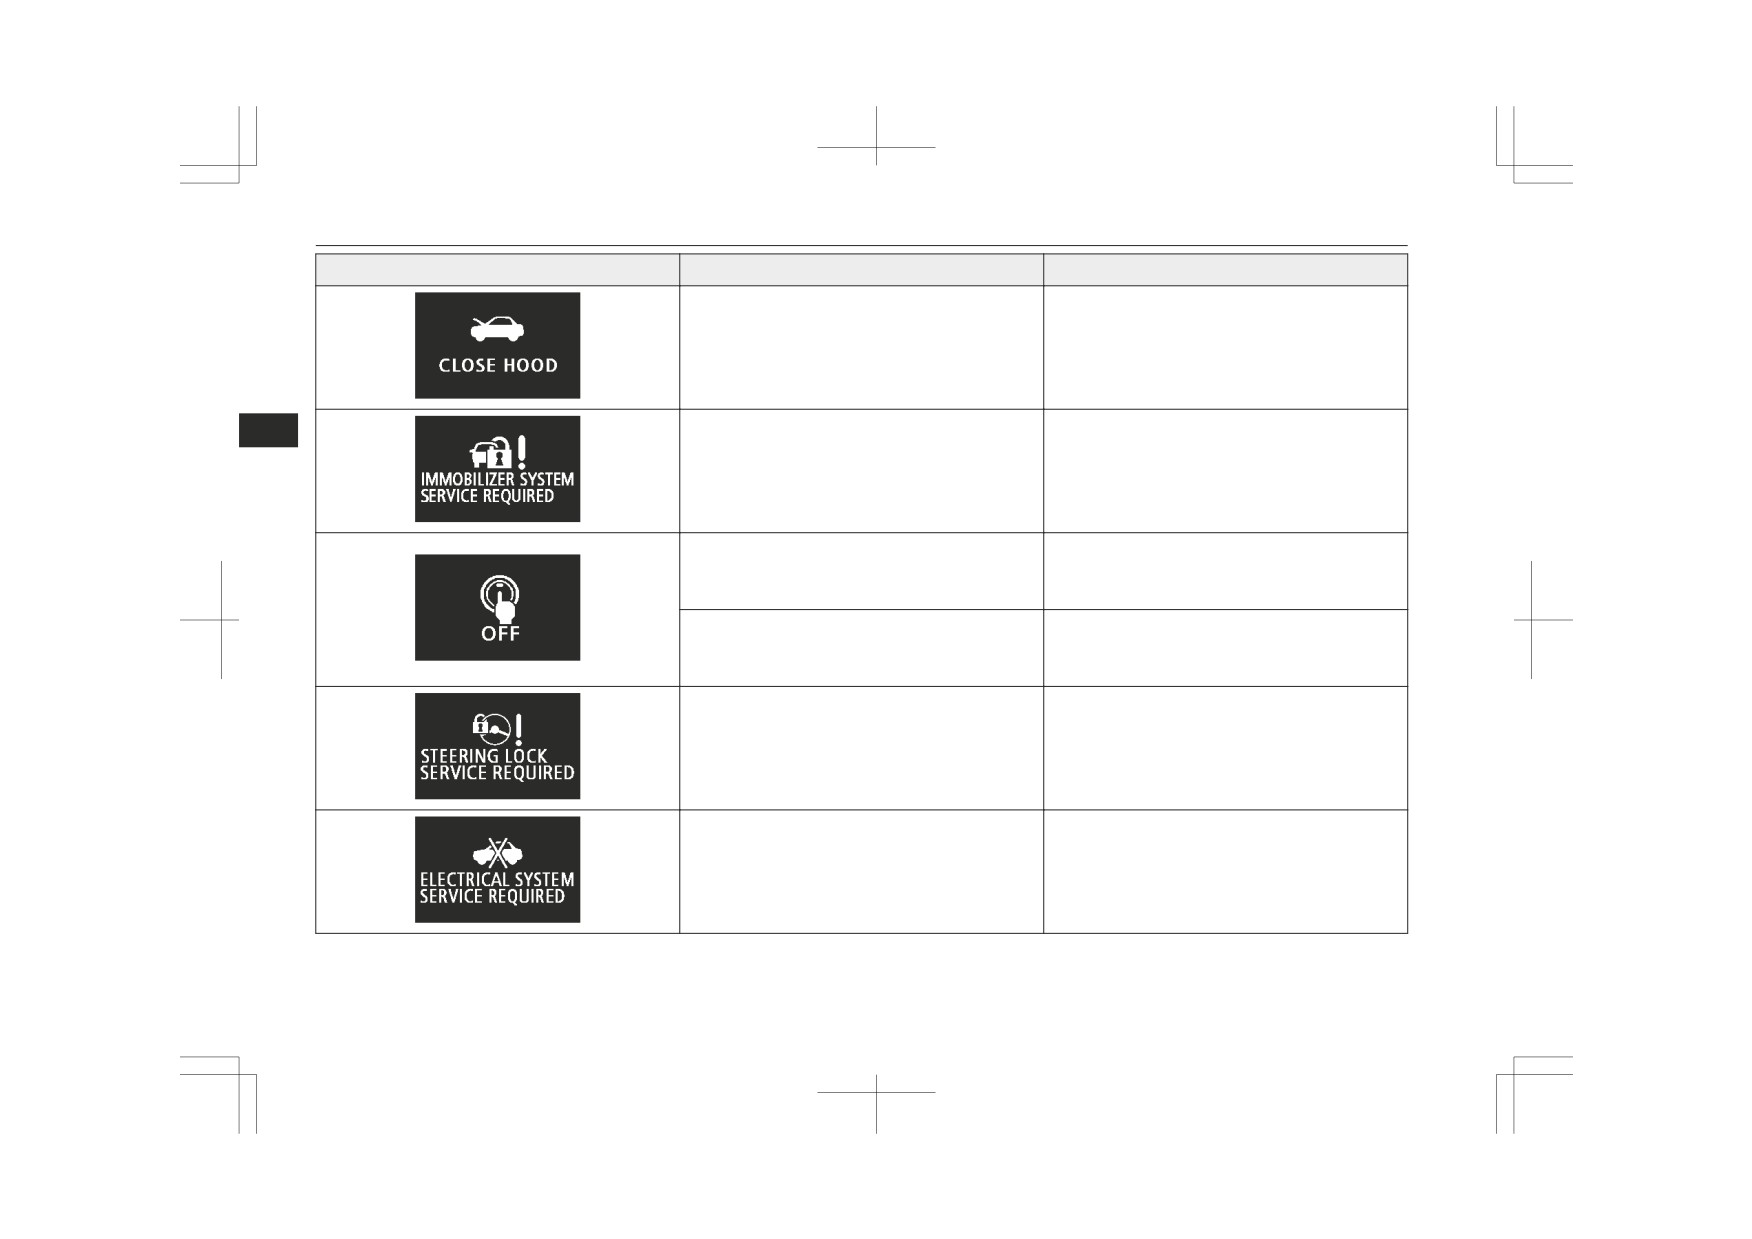
z The bonnet is open.
z Close the bonnet.
Refer to “Bonnet” on page 10-03.
z
There is a fault in the electronic immobil-
z
Put the operation mode in OFF, and then
5
izer (Anti-theft starting system).
start the engine again.
If the warning is not cancelled, please
contact a MITSUBISHI MOTORS Au-
thorized Service Point.
z
The driver’s door is open when the opera-
z
Put the operation mode in OFF.
tion mode is in any mode other than OFF.
Refer to “Operation mode ON reminder
system” on page 3-27.
z
An attempt was made to lock all the doors
z
Put the operation mode in OFF.
and the tailgate when the operation mode
Refer to “Operation mode OFF reminder
is in any mode other than OFF.
system” on page 3-17.
z
There is a fault in the steering wheel lock.
z
Immediately stop the vehicle in a safe
place.
We recommend you to consult a
MITSUBISHI MOTORS Authorized
Service Point.
z
There is a fault in the electrical system.
z
Immediately stop the vehicle in a safe
place.
We recommend you to consult a
MITSUBISHI MOTORS Authorized
Service Point.
5-32
Instruments and controls

Indication lamp, warning lamp, and information screen display list
Screen
Cause
Solution (Reference)
z The engine is overheated.
z Stop the vehicle in a safe place and take
corrective measures.
Refer to
“Engine overheating” on page
8-04.
z The automatic transmission (CVT) fluid
z Refer to
“Automatic transmission IN-
5
temperature is too high.
VECS-III Sports Mode 6CVT (Intelligent
& Innovative Vehicle Electronic Control
System III)” on page 6-22.
z You turned the ignition switch to the
z Fasten your seat belt properly. Refer to
“ON” position or put the operation mode
“Driver’s seat belt warning lamp and dis-
in ON without fastening your seat belt.
play” on page 4-11.
z There is a fault in the fuel system.
z We recommend you to consult a
MITSUBISHI MOTORS Authorized
Service Point.
z You are driving with the parking brake
z Release the parking brake. Refer to
still applied.
“Brake warning display” on page 5-45.
Instruments and controls
5-33

Indication lamp, warning lamp, and information screen display list
Screen
Cause
Solution (Reference)
z
There is a fault in the engine oil circula-
z
Immediately stop the vehicle in a safe
tion system.
place. We recommend you to have it
checked.
Refer to “Oil pressure warning display”
on page 5-46.
z
There is a fault in the charging system.
z
Immediately stop the vehicle in a safe
5
place. We recommend you to consult a
MITSUBISHI MOTORS Authorized
Service Point.
Refer to
“Charge warning display” on
page 5-46.
z
There is a fault in the SRS airbag or the
z
We recommend you to have it checked,
pretensioner system.
immediately.
Refer to “Supplemental restraint System
(SRS) warning lamp” on page 4-34.
z
There is an automatic headlamp levelling
z
We recommend you to have it checked.
fault.
Refer to “Automatic headlamp levelling”
on page 5-54.
z There is a fault in the Active Stability
z We recommend you to have it checked.
Control (ASC).
Refer to “Active Stability Control (ASC)”
on page 6-42.
z There is a fault in the hill start assist.
z Have the vehicle checked at a
MITSUBISHI MOTORS Authorized
Service Point.
Refer to “Hill start assist” on page 6-37.
5-34
Instruments and controls

Indication lamp, warning lamp, and information screen display list
Screen
Cause
Solution (Reference)
z There is a fault in the electronically con-
z We recommend you to have it checked.
trolled 4WD system.
Refer to “Electronically controlled 4WD
system” on page 6-30.
z There is a fault in the CVT.
z We recommend you to have it checked.
5
Refer to
“Automatic transmission IN-
VECS-III Sports Mode 6CVT (Intelligent
& Innovative Vehicle Electronic Control
System III)” on page 6-22.
z The electronically controlled 4WD system
z Refer to “Electronically controlled 4WD
is hot.
system” on page 6-30.
z The fuel is running low.
z Refuel as soon as possible. Refer to “Fuel
remaining warning display” on page 5-15.
z The outside temperature is 3 °C (37 °F) or
z Be careful of ice on the road.
less.
z The road can be icy even when this warn-
ing is not displayed, so drive carefully.
Instruments and controls
5-35

Indication lamp, warning lamp, and information screen display list
Screen
Cause
Solution (Reference)
z There is a fault in the Forward Collision
z We recommend you to have it checked.
Mitigation system (FCM).
Refer to “System problem warning” on
page 6-55.
z The FCM braking function of the Forward
z Refer to “FCM braking function” on page
5
Collision Mitigation system
(FCM) has
6-51.
been activated.
z The Forward Collision Mitigation system
z Refer to “System problem warning” on
(FCM) is temporarily unavailable for
page 6-55.
some reason. This is not a malfunction.
z The Lane Departure Warning (LDW) has
Refer to “Lane Departure Warning (LDW)” on
detected that your vehicle is about to
page 6-69.
leave or has left the lane.
(flashing in yellow)
5-36
Instruments and controls

Indication lamp, warning lamp, and information screen display list
Screen
Cause
Solution (Reference)
z There is a fault in the Lane Departure
z We recommend you to have it checked.
Warning (LDW).
Refer to “LDW deactivation due to fault”
on page 6-71.
z
The Blind Spot Warning (BSW) sensor is
z
When the warning display does not disap-
5
temporarily not available for some reason
pear after waiting for a while, contact a
such as the environmental condition or in-
MITSUBISHI MOTORS Authorized
crease of the sensor temperature.
Service Point.
Refer to “When the sensor is temporarily
not available” on page 6-66.
z
The Blind Spot Warning (BSW) does not
z
We recommend you to have it checked,
operate normally because there are some
immediately.
malfunctions in the system.
Refer to “When there is a malfunction in
the system or the sensor” on page 6-66.
z
Foreign objects, such as dirt, snow or ice,
z
Remove a foreign object on the bumper
adhere to the bumper surface around the
surface around the sensor.
sensor.
When the warning display does not disap-
pear after having cleaned the bumper sur-
face around the sensor, contact a
MITSUBISHI MOTORS Authorized
Service Point.
Refer to
“Blind Spot Warning
(BSW):
When there is a foreign object on the sen-
sor” on page 6-67.
Instruments and controls
5-37
Indication lamp, warning lamp, and information screen display list
Screen
Cause
Solution (Reference)
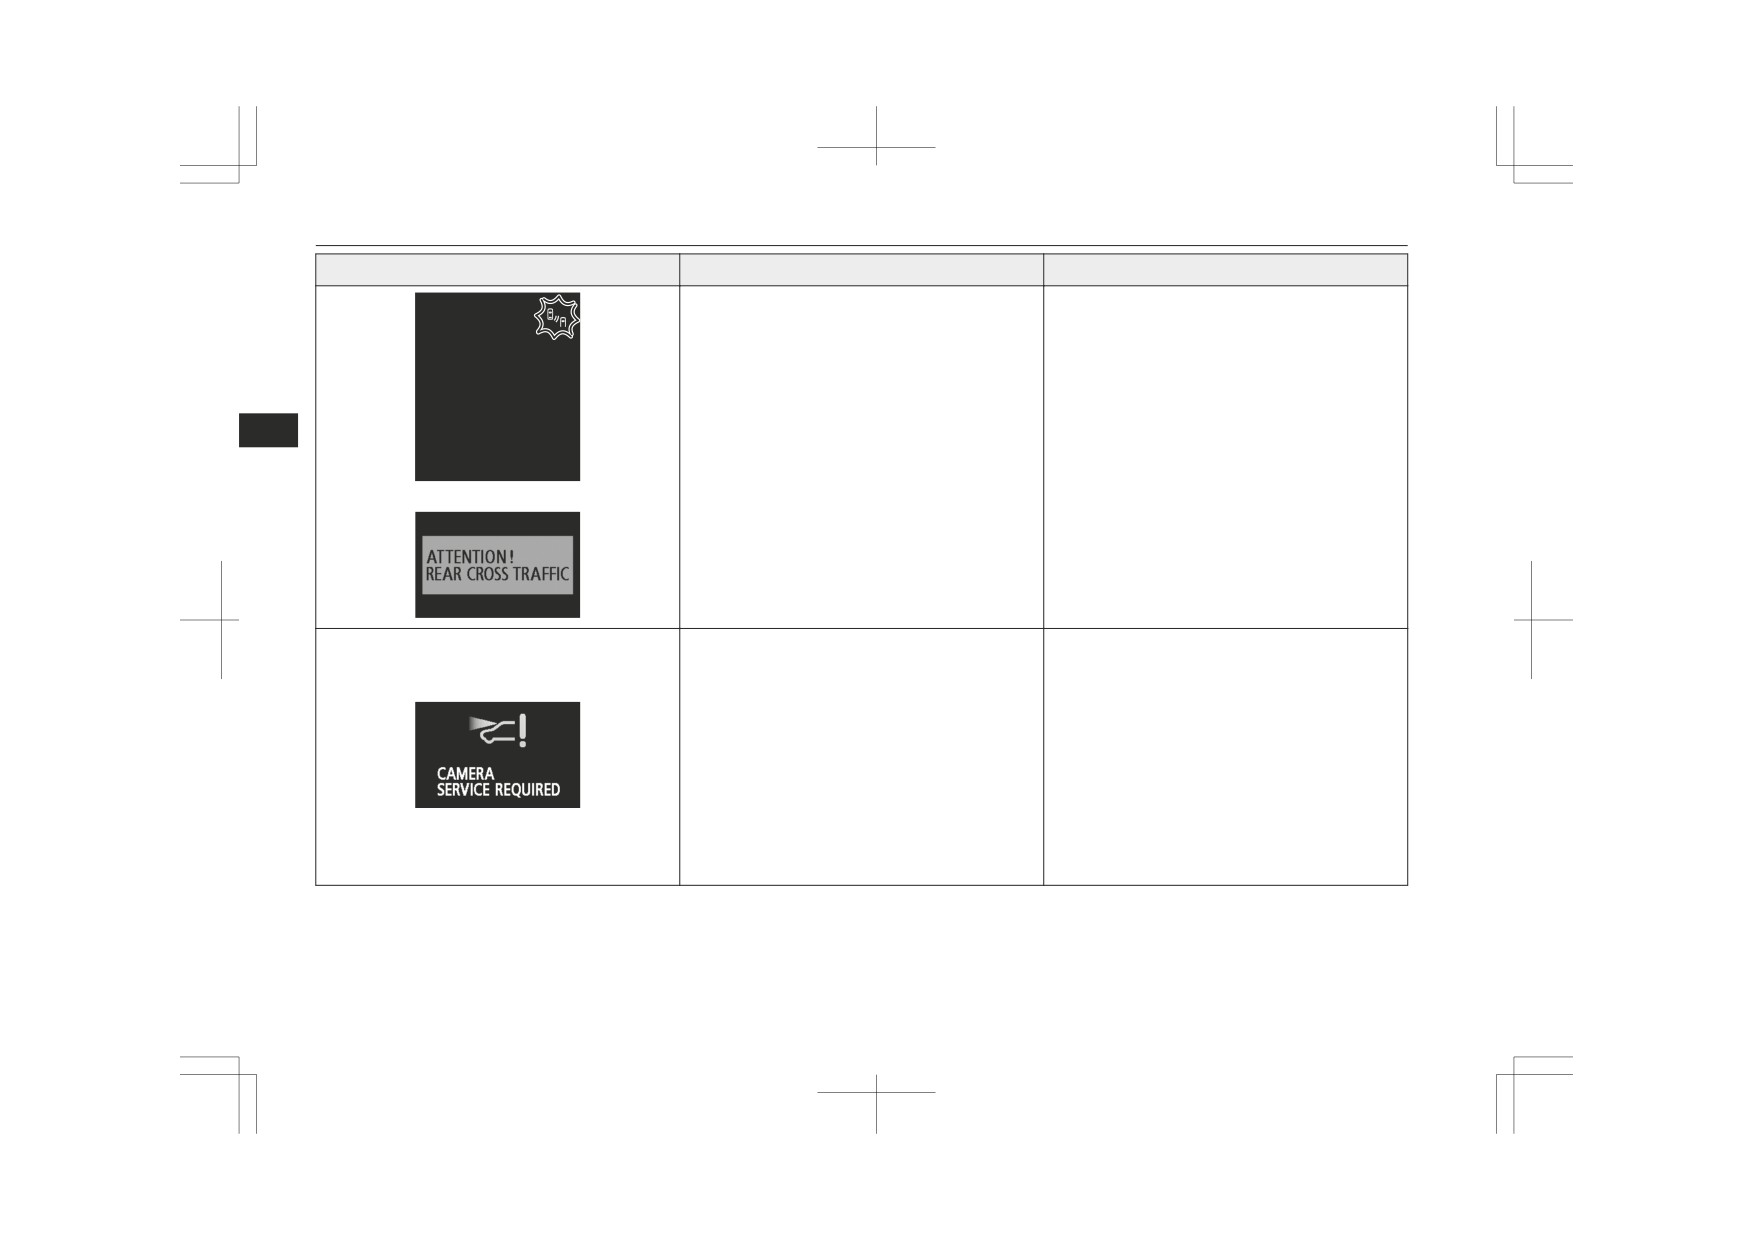
z The Rear Cross Traffic Alert (RCTA) has
z Pay special attention to the rear of your
detected a vehicle that is approaching
vehicle.
your vehicle.
Refer to
“Rear Cross Traffic Alert
(RCTA)*” on page 6-67.
5
(flashing in yellow)
z There is a fault in the sensor.
z We recommend you to consult a
MITSUBISHI MOTORS Authorized
Service Point.
Refer to
“Forward Collision Mitigation
system (FCM): System problem warning”
on page 6-55.
Refer to
“Lane Departure Warning
(LDW): System problem warning” on
page 6-71.
Refer to “Automatic High-Beam (AHB):
System problem warning” on page 5-51.
5-38
Instruments and controls
Indication lamp, warning lamp, and information screen display list
Screen
Cause
Solution (Reference)
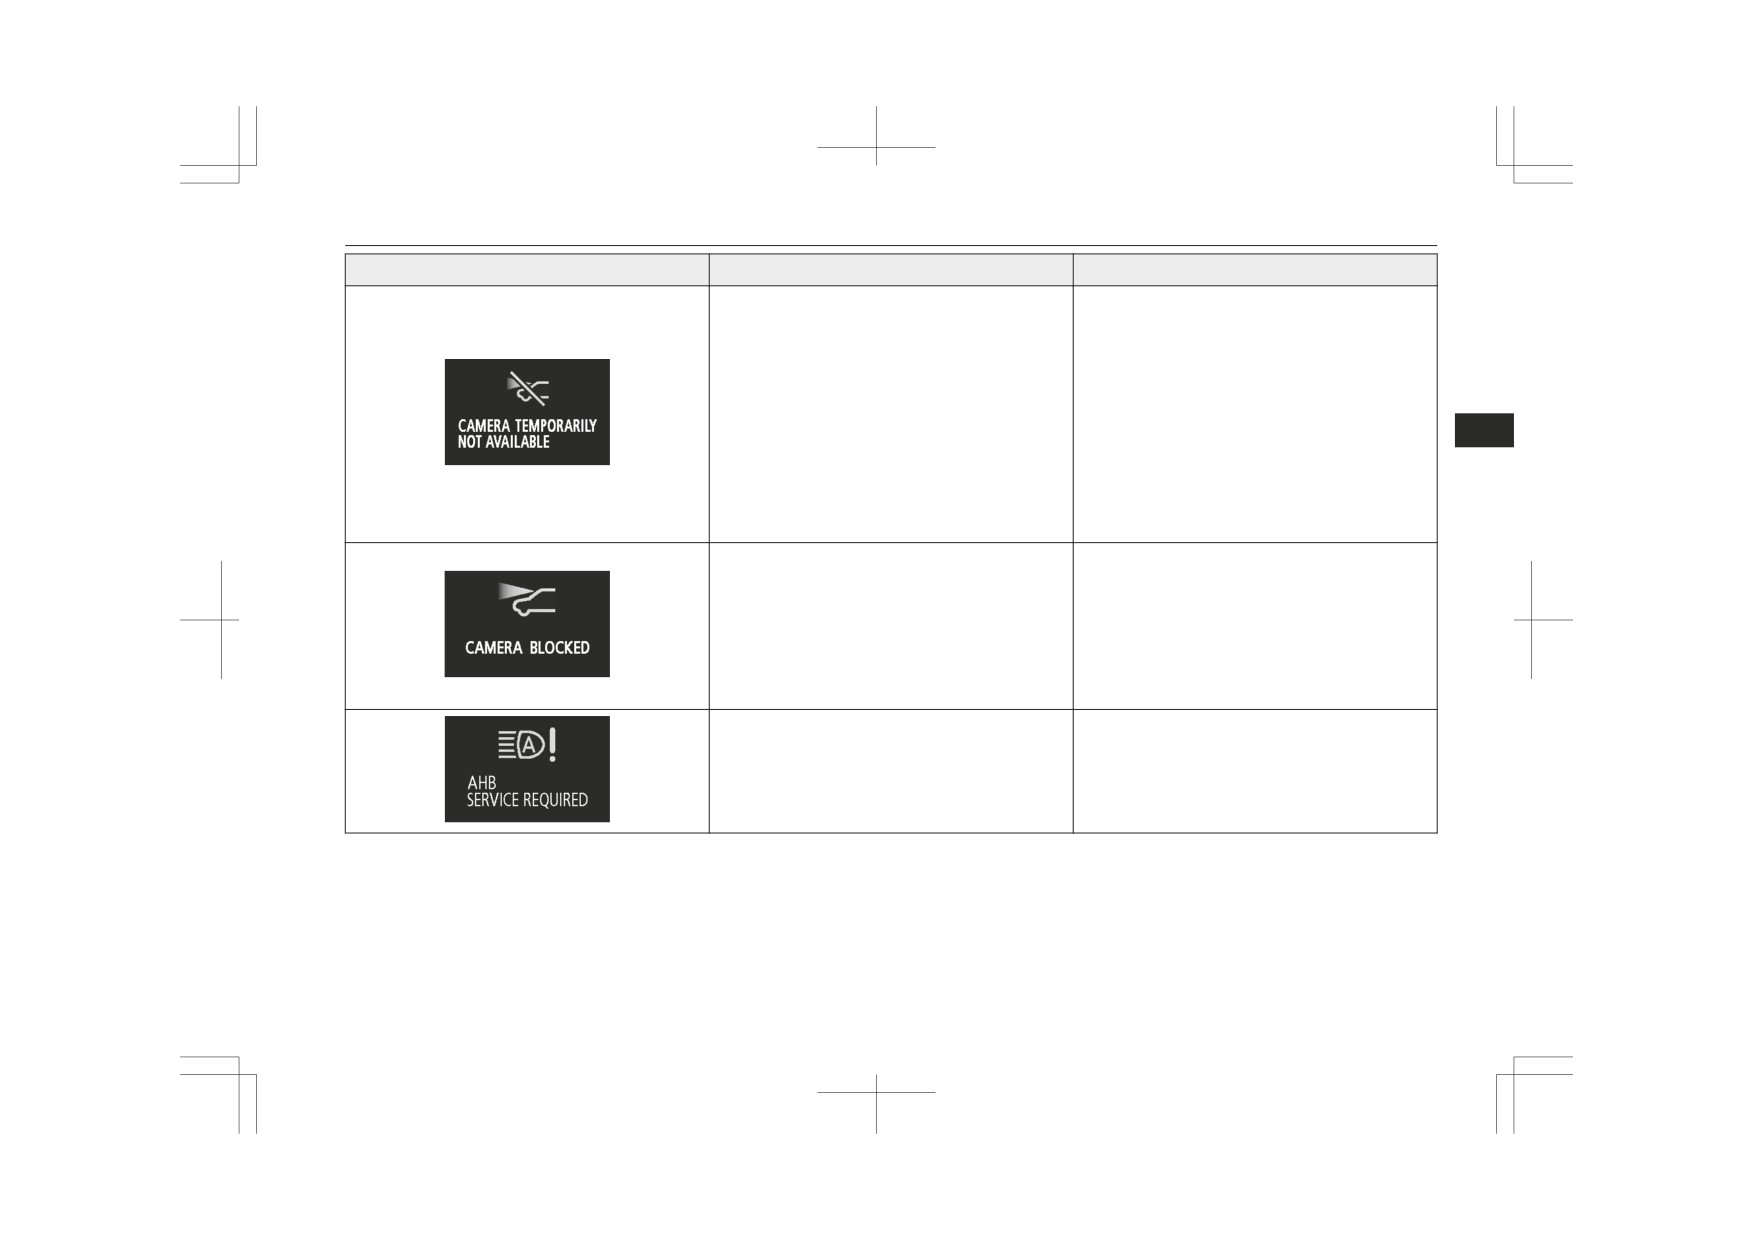
z
The Forward Collision Mitigation system
z After the temperature of the sensor has
(FCM), Lane Departure Warning (LDW)
been in range, the system will automati-
and Automatic High-Beam
(AHB) are
cally return to operation.
temporarily unavailable due to the high or
Refer to
“Forward Collision Mitigation
low temperature of the sensor.
system (FCM): System problem warning”
on page 6-55.
Refer to
“Lane Departure Warning
5
(LDW): System problem warning” on
page 6-71.
Refer to “Automatic High-Beam (AHB):
System problem warning” on page 5-51.
z
The sensor is temporarily unavailable due
Refer to “Forward Collision Mitigation system
to conditions such as the adhesion of con-
(FCM): System problem warning” on page
taminants to the sensor or windscreen.
6-55.
This is not a malfunction.
Refer to “Lane Departure Warning (LDW):
System problem warning” on page 6-71.
Refer to “Automatic High-Beam (AHB): Sys-
tem problem warning” on page 5-51.
z
There is a fault in the Automatic High-
z We recommend you to consult a
Beam (AHB) system.
MITSUBISHI MOTORS Authorized
Service Point.
Refer to “System problem warning” on
page 5-51.
Instruments and controls
5-39