Mitsubishi ASX (2020 year). Manual in english - page 7

Indication lamp, warning lamp, and information screen display list
Other interrupt displays
Screen
System operation status
Reference
z When starting the engine, you pressed the
z On vehicles with M/T, place the gearshift
engine switch without depressing the
lever in the “N” (Neutral) position, fully
clutch pedal (M/T).
depress the clutch pedal, depress the brake
pedal with the right foot. Then, press the
5
engine switch. Refer to
“Starting and
stopping the engine” on page 3-18.
z When starting the engine, the selector lev-
z On vehicles with CVT, place the selector
er is in a position other than the
“P”
lever in the “P” (PARK) position, depress
(Park) or the “N” (Neutral) position, or
the brake pedal with the right foot. Then,
you pressed the engine switch without de-
press the engine switch. Refer to “Starting
pressing the brake pedal (CVT).
and stopping the engine” on page 3-18.
The operation status of each system is displayed on the information screen. Refer to the appropriate page for the system for further details.
NOTE
z When operating each system, confirm that the operation status of the system has changed on the information screen. However, the operation status of the
system may not be displayed immediately after the warning display appears even if the system is operated.
Screen
System operation status
Reference
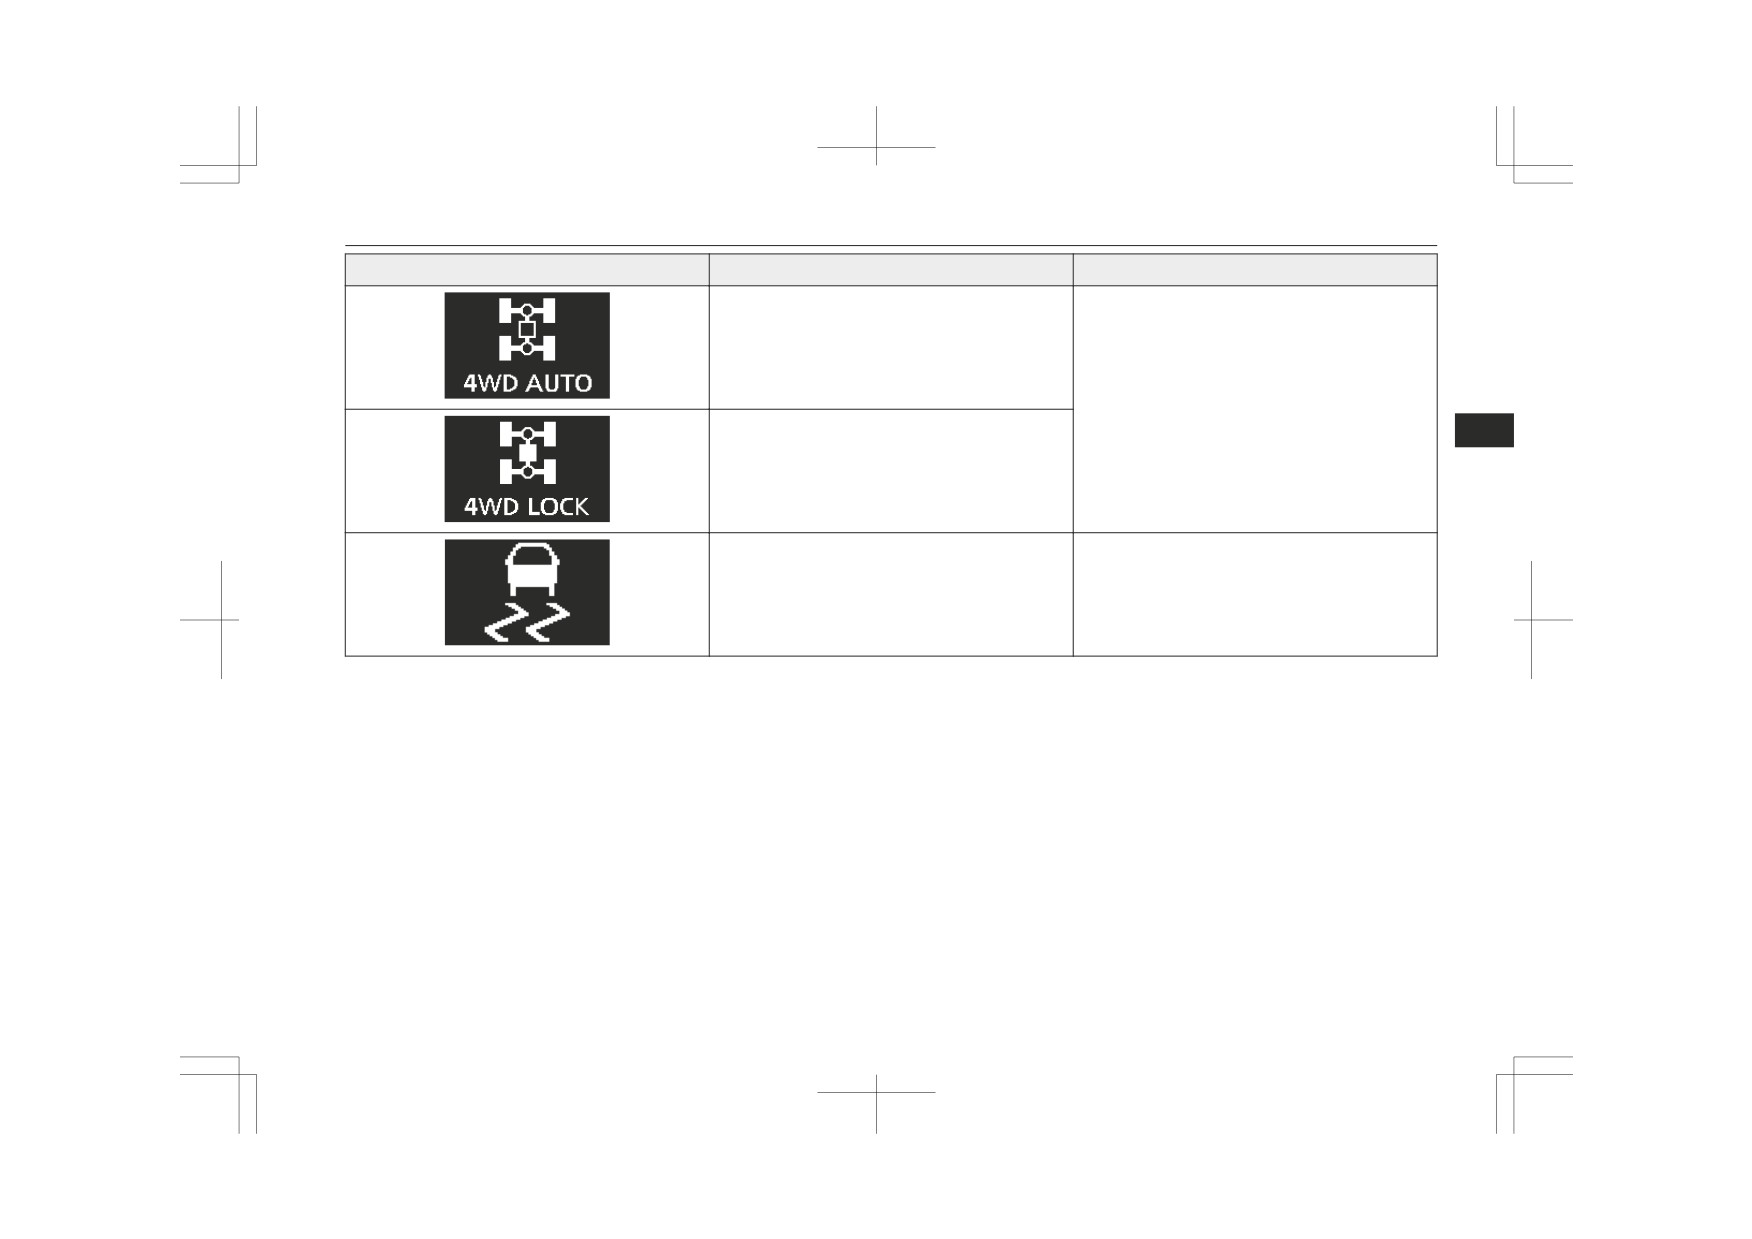
z Refer to “Electronically controlled
4WD
z When “2WD” mode is selected with the
drive mode selector
system” on page 6-30.
5-40
Instruments and controls
Indication lamp, warning lamp, and information screen display list
Screen
System operation status
Reference
z When “4WD AUTO” mode is selected
with the drive mode selector
z When “4WD LOCK” mode is selected
5
with the drive mode selector
z When the Active Stability Control (ASC)
z Refer to “Active Stability Control (ASC)”
is operating
on page 6-42.
Instruments and controls
5-41

Indication lamp, warning lamp, and information screen display list
Screen
System operation status
Reference
z When the Forward Collision Mitigation
Refer to “FCM and Radar sensing misacceler-
system (FCM) is activated or the timing
ation Mitigation System
(RMS)
(Forward)
of an alarm is changed.
ON/OFF switch” on page 6-54.
5
z When the Forward Collision Mitigation
Refer to “FCM and Radar sensing misacceler-
system (FCM) is deactivated.
ation Mitigation System
(RMS)
(Forward)
z When the Radar sensing misacceleration
ON/OFF switch” on page 6-54.
Mitigation System
(RMS) (Forward) is
Refer to “To turn on/off the RMS (Forward)”
deactivated.
on page 6-63.
This informs you that a periodic inspection is due.
Screen
Solution
z We recommend you to have it checked. Refer to “Service reminder” on page 5-15 for fur-
ther details.
5-42
Instruments and controls

Indication lamps
The setting for rest interval can be changed.
Screen
Solution
Stop the vehicle in a safe place, turn off the engine, and take a rest.
Use this display as rough guide for taking rests during a long drive.
The interval from the start of your trip until this message is displayed can be set.
Refer to “Changing the function settings (when the ignition switch or the operation mode is
5
ON)” on page 5-17.
The display and buzzer alert the driver when the set time is reached. If you continue to drive
without having a rest, the buzzer sounds approximately every 5 minutes to encourage you to
take a rest.
z In the following cases, the time driven is reset and the display returns to the previous dis-
play screen. After this, when the set time is reached again, the buzzer and display encour-
age you to take a rest.
• The buzzer sounds 3 times.
• Turn the ignition switch to the “LOCK” position or put the operation mode in OFF.
• The multi-information meter switch is held for approximately 2 seconds or more.
• When the turn-signal lever is moved
• When the hazard warning lamps auto-
Indication lamps
to activate a turn-signal lamp.
matically activate due to sudden brak-
Refer to “Turn-signal lever” on page
ing while driving.
Turn-signal indication lamps/
5-55.
Refer to “Emergency stop signal sys-
• When the hazard warning flasher
tem*” on page 6-39.
Hazard warning indication
switch is pressed to activate the haz-
lamps
ard warning lamps.
NOTE
These indication lamps blink
Refer to
“Hazard warning flasher
in the following situations.
switch” on page 5-56.
z If these indication lamps blink too fast due
to any operation other than sudden braking,
the cause may be a blown lamp bulb or a
faulty turn-signal connection.
Instruments and controls
5-43

Warning lamps
High-beam indication lamp
Warning lamps
CAUTION
This indication lamp illumi-
• The brake warning lamp does not illumi-
nates when the high-beam is
nate when the parking brake is applied or
Brake warning lamp
used.
does not turn off when the parking brake
This lamp illuminates when
is released.
the ignition switch is turned
• The ABS warning lamp and brake warn-
ing lamp illuminate at the same time
to the “ON” position or the
For details, refer to “ABS warning lamp”
5
Front fog lamp indication
operation mode is put in ON,
on page 6-40.
lamp*
and goes off after a few sec-
• The brake warning lamp remains illumi-
onds.
This lamp illuminates while
nated during driving.
Always make sure that the lamp goes off be-
The vehicle should be brought to a halt in
the front fog lamps are on.
z
fore driving.
the following manner when brake perform-
With the ignition switch or the operation
ance has deteriorated.
mode in ON, the brake warning lamp illumi-
• Depress the brake pedal harder than usual.
Even if the brake pedal moves down to
nates under the following conditions:
the very end of its possible stroke, keep it
Rear fog lamp indication lamp
z When the parking brake lever has been
pressed down hard.
engaged.
• Should the brakes fail, use engine braking
This lamp illuminates while
z When the brake fluid level in the reser-
to reduce your speed and pull the parking
the rear fog lamp is on.
voir falls to a low level.
brake lever.
z When the brake force distribution func-
Depress the brake pedal to operate the
tion is not operating correctly.
stop lamp to alert the vehicles behind you.
Check engine warning lamp
Position lamp indication lamp
CAUTION
This lamp is a part of an on-
This indication lamp illumi-
z In the situations listed below, brake perform-
board diagnostic system
nates while the position
ance may be compromised or the vehicle
which monitors the emis-
lamps are on.
may become unstable if brakes are applied
suddenly; consequently, avoid driving at
sions, engine control system
high speeds or applying the brakes suddenly.
or CVT control system.
Furthermore, the vehicle should be brought
If a problem is detected in
to a stop in a safe location and to have it
one of these systems, this lamp illuminates or
checked.
flashes.
5-44
Instruments and controls

Information screen display
Although your vehicle will usually be driva-
This warning is displayed if you drive with
NOTE
ble and not need towing, we recommend you
the parking brake still applied. The warning
to have the system checked as soon as possi-
z The engine electronic control module ac-
lamp in the instrument cluster only illumi-
commodating the onboard diagnostic system
ble.
nates when the parking brake is applied.
has various fault data (especially about the
This lamp will also illuminate when the igni-
exhaust emission) stored.
tion switch is turned “ON” or the operation
CAUTION
mode is put in ON, and goes off after the en-
gine has started. If it does not go off after the
Charge warning lamp
z If a vehicle is driven without releasing the
parking brake, the brake will be overheated,
5
engine has started, we recommend you to
This lamp illuminates when
resulting in ineffective braking and possible
have the vehicle checked.
the ignition switch is turned
brake failure.
“ON” or the operation mode
If this warning is displayed, release the park-
is put in ON, and goes off af-
ing brake.
CAUTION
ter the engine has started.
z Prolonged driving with this lamp on may
A warning is also displayed
cause further damage to the emission control
on the multi-information display.
system. It could also affect fuel economy
and drivability.
z If the lamp does not illuminate when the ig-
CAUTION
nition switch is turned to the “ON” position
or the operation mode is put in ON, we rec-
z If it illuminates while the engine is running,
ommend you to have the system checked.
there is a problem in the charging system.
When the ignition switch is turned to the
Immediately park your vehicle in a safe
z If the lamp illuminates while the engine is
“ON” position or the operation mode is put in
running, avoid driving at high speeds and
place and we recommend you to have it
checked.
ON, if the brake fluid is low, this warning is
have the system inspected by a
MITSUBISHI MOTORS Authorized Serv-
displayed.
ice Point as soon as possible.
The warning lamp in the instrument cluster
Information screen display
Accelerator pedal and brake pedal response
also illuminates.
may be negatively influenced under these
Brake warning display
conditions.
Instruments and controls
5-45
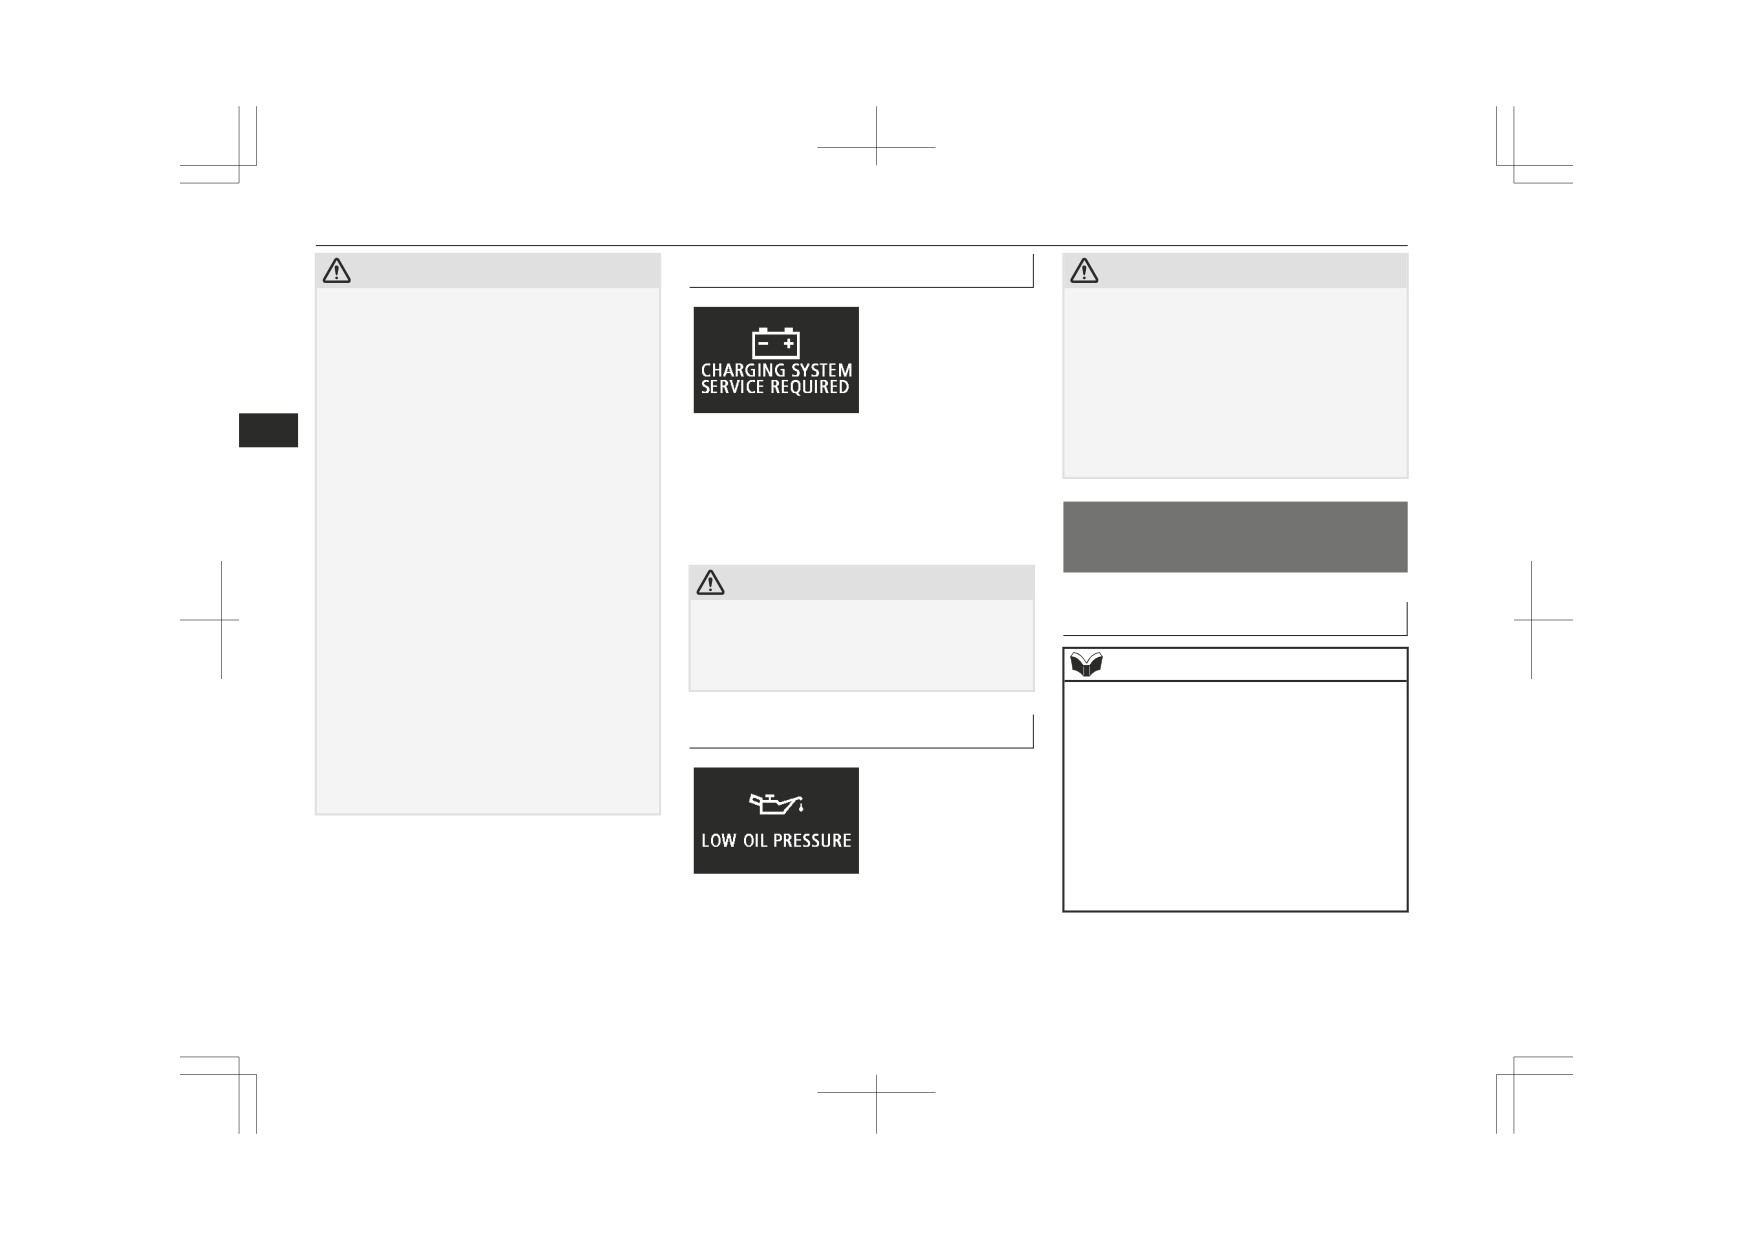
Combination headlamps and dipper switch
CAUTION
Charge warning display
CAUTION
z
If this warning stays illuminated and does
z If the vehicle is driven while the engine oil
not go out while driving, there is a danger of
is low, or the oil level is normal but the
ineffective braking. In this case, immediately
warning is displayed, the engine may burn
park your vehicle in a safe place and we rec-
out and be damaged.
ommend you to have it checked.
z If the warning is displayed while the engine
z
If the brake warning display is displayed and
is running, immediately park your vehicle in
the brake warning lamp and the ABS warn-
a safe place and check the engine oil level.
5
ing lamp are illuminated at the same time,
If there is a fault with the charging system,
z If the warning is displayed while the engine
the braking force distribution function will
the warning display is displayed on the infor-
oil level is normal, have it inspected.
not operate, so the vehicle may be destabi-
mation screen in the multi-information dis-
lised during sudden braking. Avoid sudden
play. The warning lamp in the instrument
braking and high-speed driving, stop the ve-
Combination headlamps
cluster also illuminates.
hicle in a safe place, and we recommend you
and dipper switch
to have it checked.
z
The vehicle should be brought to a halt in
CAUTION
the following manner when brake perform-
ance has deteriorated.
z If the warning is displayed while the engine
Headlamps
is running, immediately park your vehicle in
• Depress the brake pedal harder than usual.
Even if the brake pedal moves down to
a safe place and we recommend you to have
NOTE
it checked.
the very end of its possible stroke, keep it
pressed down hard.
z Do not leave the lights on for a long time
• Should the brakes fail, use engine braking
while the engine is stationary (not running).
Oil pressure warning display
to reduce your speed and pull the parking
A rundown battery could result.
brake lever.
z When it rains, or when the vehicle has been
Depress the brake pedal to operate the
washed, the inside of the lens sometimes be-
stop lamp to alert the vehicles behind you.
comes foggy, but this does not indicate a
functional problem.
When the lamp is switched on, the heat will
remove the fog. However, if water gathers
inside the lamp, we recommend you to have
it checked.
If the engine oil pressure drops while the en-
gine is running, the warning display is dis-
played on the information screen in the multi-
information display.
5-46
Instruments and controls

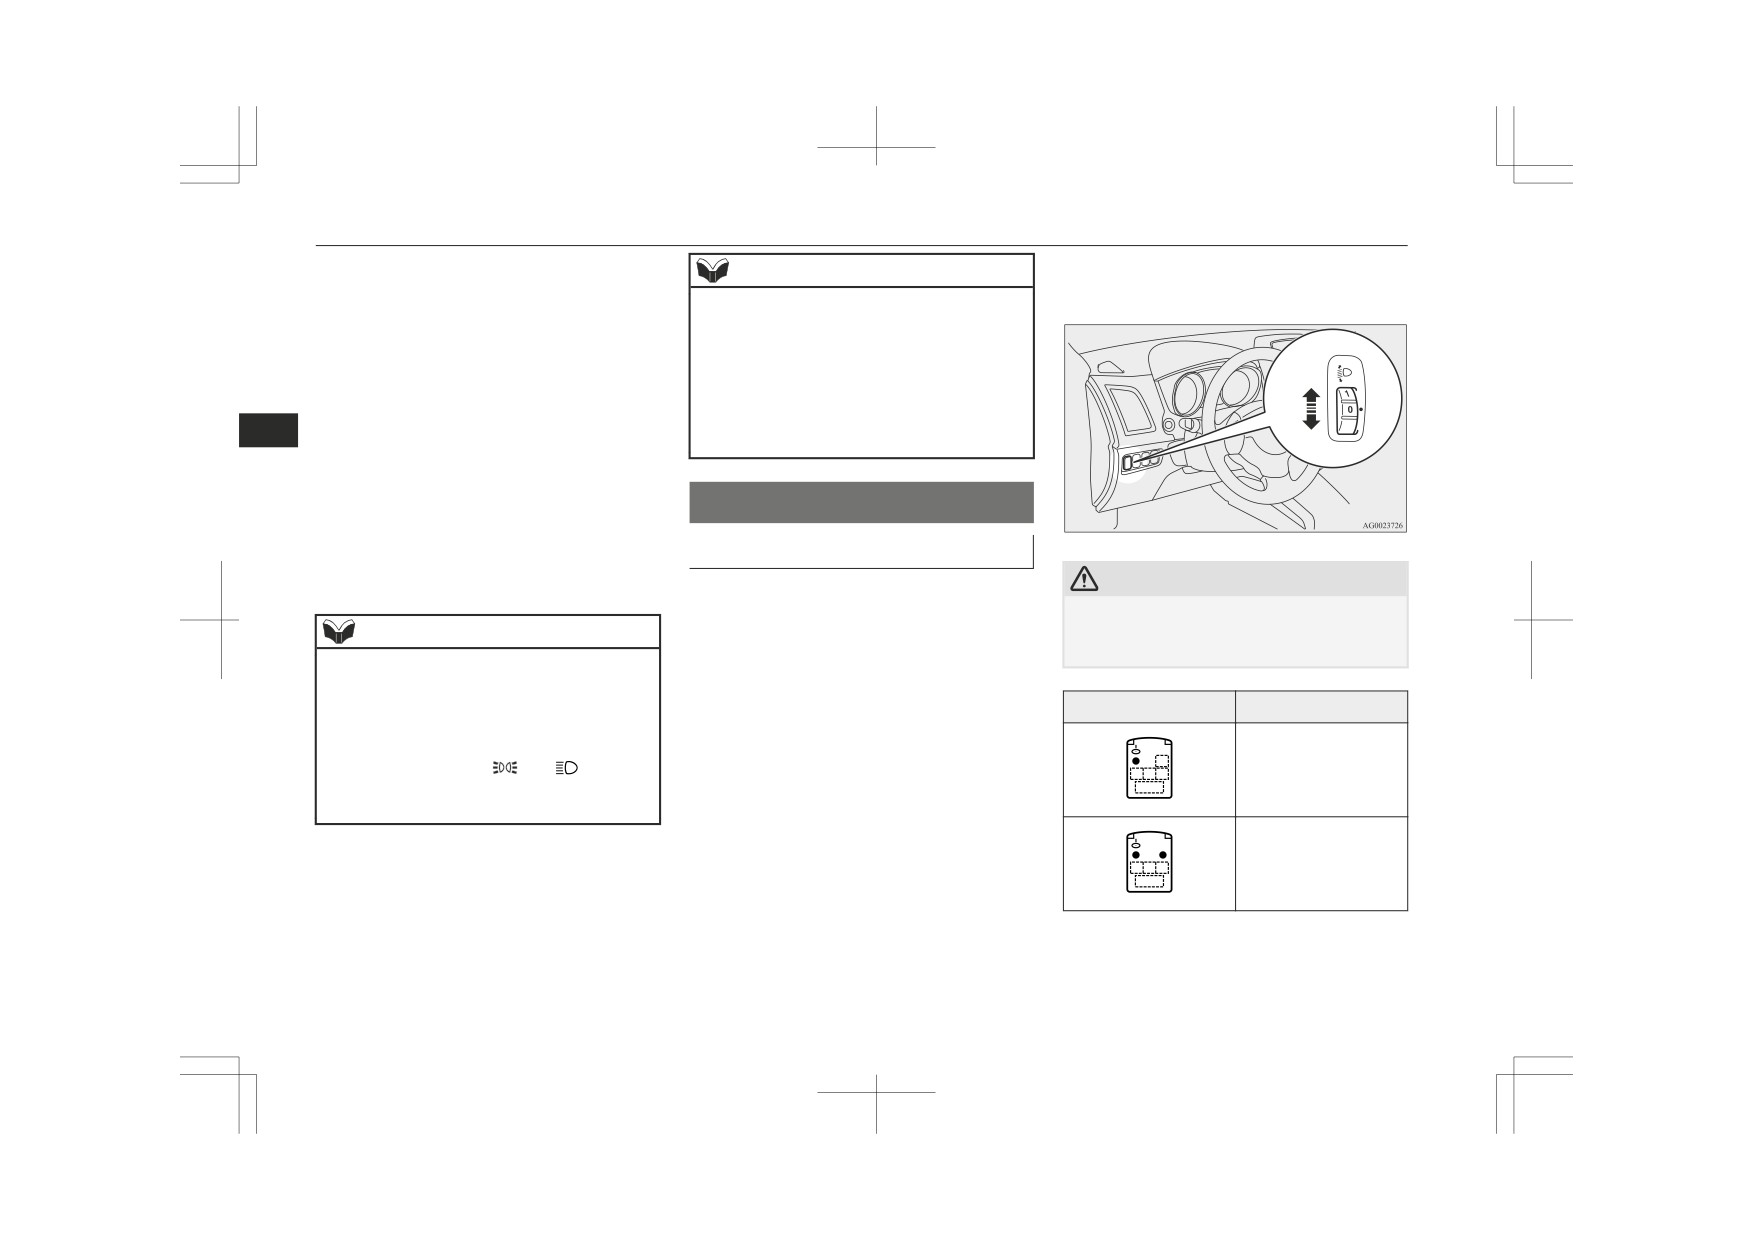
Combination headlamps and dipper switch
Rotate the switch to turn on the lamps.
For information regarding the lighting condi-
Lamps (headlamps, fog lamp,
tion of the daytime running lamps, refer to
etc.) auto-cutout function
“Daytime running lamps” on page 5-49.
z
If the following operation is performed
NOTE
while the lamp switch is in the “
” po-
sition, the lamps will automatically go
z
When the headlamps are turned off by the
out when the driver’s door is opened.
automatic on/off control with the ignition
[Except vehicles equipped with keyless
switch in the “ON” position, the front fog
5
lamps (if so equipped) and rear fog lamps al-
operation system]
so go off. When the headlamps are subse-
The ignition switch is turned to the
quently turned back on by the automatic
“LOCK” or “ACC” position, or the key
on/off control, the front fog lamps also come
is removed from the ignition switch.
on but the rear fog lamp stays off. If you
[For vehicles equipped with keyless op-
wish to turn the rear fog lamp back on, oper-
eration system]
With the ignition switch or
ate the switch again.
The operation mode is in OFF or ACC.
the operation mode is in
z
Do not place anything on the automatic light
sensor (A), and do not clean with a glass
ON, headlamps, position,
cleaner.
[When the engine was started using the
tail, licence plate, and in-
key]
strument panel lamps turn
• If the key is removed and the driver’s
on and off automatically in
AUTO
door is opened, a buzzer sounds at a
accordance with outside
high pitch intermittently to remind the
light level. All lamps turn
driver to turn off the lamps.
off automatically when the
ignition switch is turned to
[When the engine was started using the
“LOCK” position or the op-
keyless operation function]
eration mode is put in OFF.
• If the operation mode is put in OFF
Position, tail, licence plate
and the driver’s door is opened, a buz-
z
If the lamps do not turn on or off with the
and instrument panel lamps
switch in the “AUTO” position, manually
zer sounds at a high pitch intermittent-
on
operate the switch and we recommend you
ly to remind the driver to turn off the
to have your vehicle checked.
lamps.
Headlamps and other lamps
go on
Instruments and controls
5-47
Combination headlamps and dipper switch
z
If the following operation is performed
When you want to keep the
NOTE
while the lamp switch is in the “
” po-
lamps on:
(The warning is also displayed on the multi-
sition, the lamps will remain on for ap-
1. In the following cases, turn the lamp
information display.)
proximately 3 minutes while the driver’s
switch to the “AUTO” position.
The buzzer stops in the following manner.
door is shut and will then automatically
[Except vehicles equipped with keyless
• Turn the lamp switch to the “AUTO” po-
go out.
sition.
operation system]
[Except vehicles equipped with keyless
• Close the driver’s door.
The ignition switch is in the “LOCK” or
operation system]
5
“ACC” position.
The ignition switch is turned to the
[For vehicles equipped with keyless op-
Lamp monitor buzzer
“LOCK” or “ACC” position, or the key
eration system]
is removed from the ignition switch.
[When the engine was started using the key]
The operation mode is in OFF or ACC.
[For vehicles equipped with keyless op-
If the driver’s door is opened when the key is
2. Turn on the lamps with the switch in the
eration system]
in the
“LOCK” or “ACC” position or re-
“”
or “”
position again, then the
The operation mode is in OFF or ACC.
moved from the ignition switch while the
lamps will remain on.
lamps are on, a buzzer will sound to remind
the driver to turn off the lamps.
NOTE
NOTE
z
The lamp auto-cutout will not function when
[When the engine was started using the key-
z
When the engine was started using the key,
the lamp switch is in the “
” position.
if the driver’s door is opened and the key is
less operation function]
z
The lamp auto-cutout function can also be
removed, the lamp monitor buzzer sounds at
If the driver’s door is opened when the opera-
disabled.
a high pitch intermittently.
tion mode is in ACC or OFF with the lamps
For further information, we recommend you
(The warning is also displayed on the multi-
illuminated, a buzzer will sound to remind
to consult a MITSUBISHI MOTORS Au-
information display.)
thorized Service Point.
the driver to turn off the lamps.
The buzzer stops in the following manner.
• Turn the lamp switch to the “AUTO” po-
In both cases, the buzzer will automatically
sition.
stop if the auto-cutoff function is activated,
• Close the driver’s door.
When the engine was started using the key-
the lamp switch is turned off, or the door is
z
less operation function, if the driver’s door is
closed.
opened and the operation mode is put in
OFF, the lamp monitor buzzer sounds at a
high pitch intermittently.
5-48
Instruments and controls
Combination headlamps and dipper switch
Daytime running lamps
Dipper (High/Low beam
NOTE
The daytime running lamps come on when
change)
z If you turn the lamps off with the headlamps
the engine is running and the lamp switch is
When the lamp switch is in the “
” posi-
set to high-beam, the headlamps are auto-
in the “AUTO” position and the tail lamps
matically returned to their low-beam setting
tion, the beam changes from high to low (or
are off.
when the lamp switch is next turned to the
low to high) each time the lever is pulled
“
” position.
fully
(1). While the high-beam is on, the
high-beam indication lamp in the instrument
NOTE
cluster will also illuminate.
Automatic High-Beam (AHB)*
5
z If the lamp switch is in the “
” or “
”
position, or if the tail lamps are on when the
The system switches the headlamp beams
lamp switch is in the “AUTO” position, the
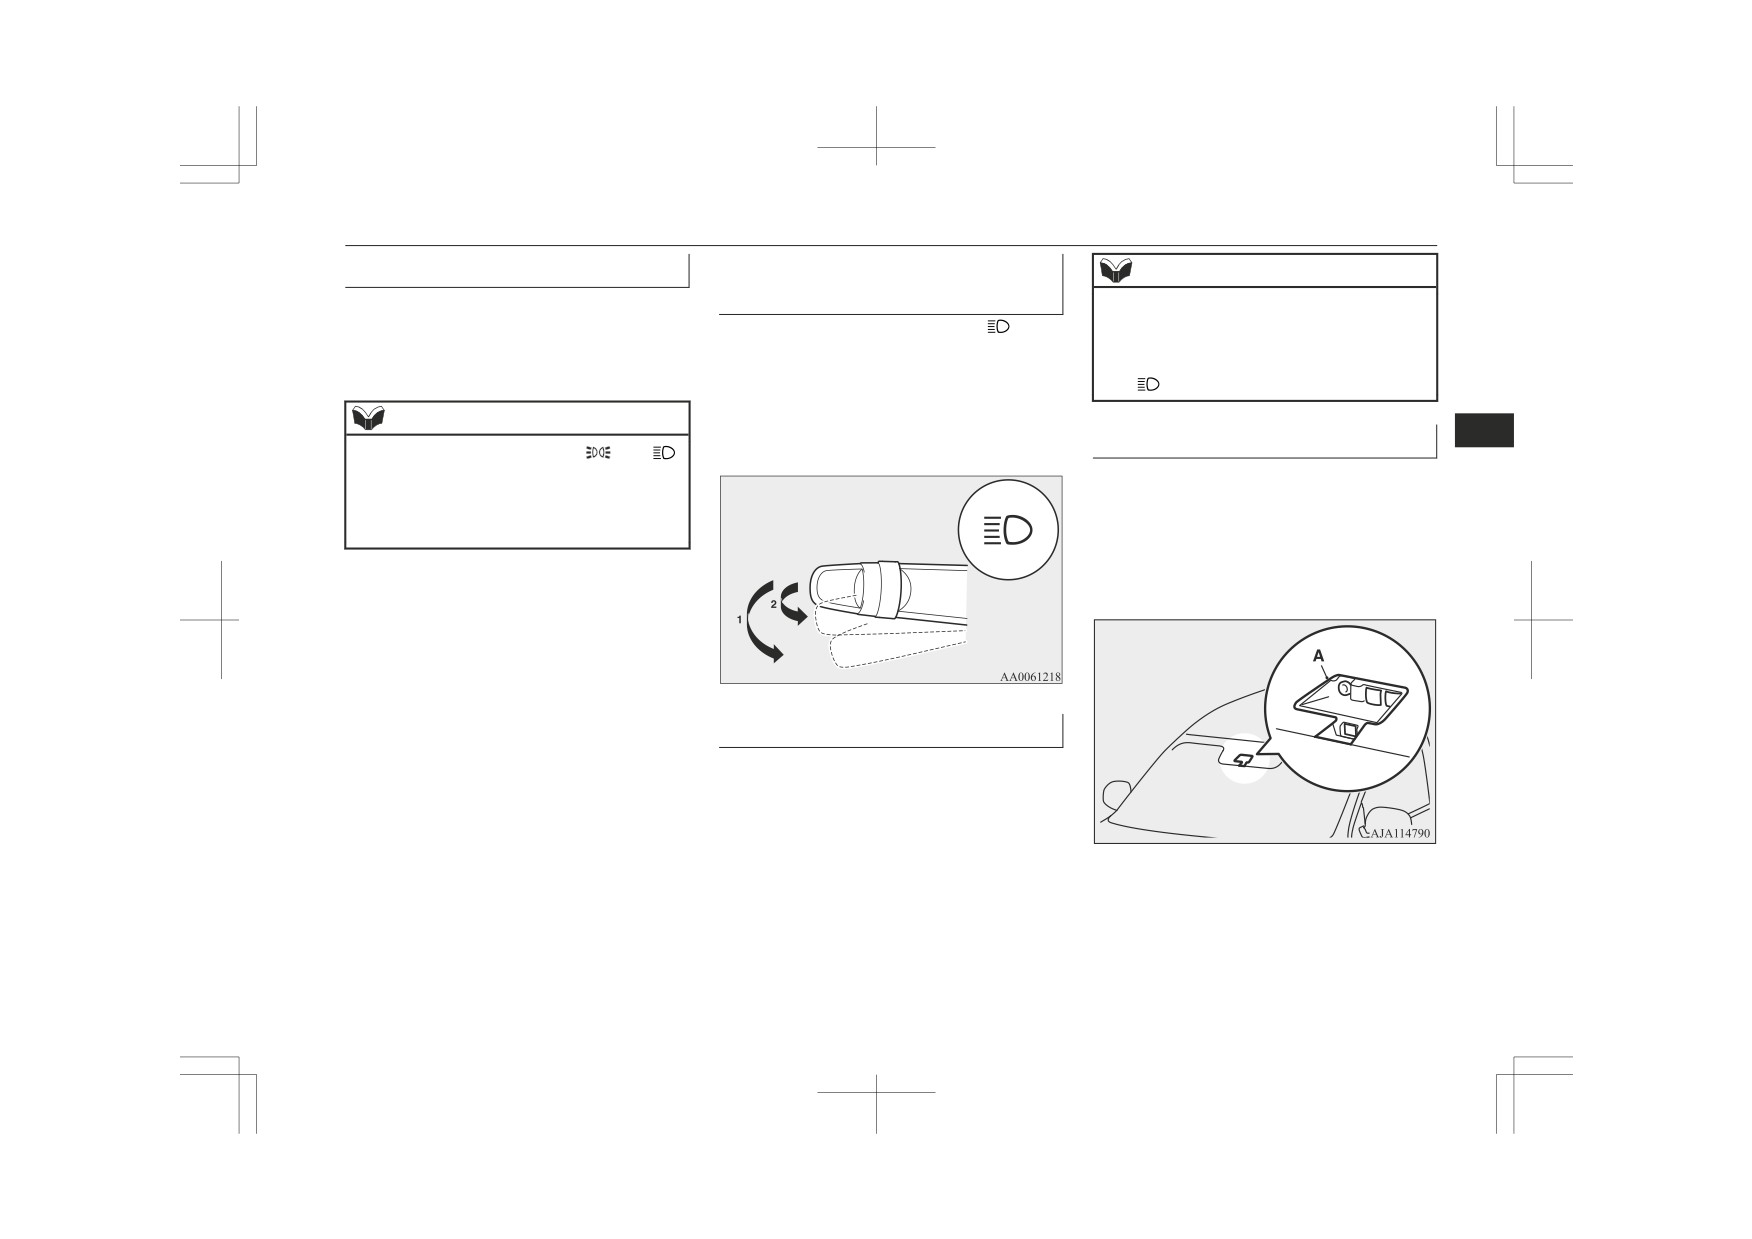
(high/low) when the sensor (A) senses an il-
daytime running lamps come on as position
luminant such as lights of a vehicle in front
lamps.
or oncoming vehicle or street lamp.
For details about handling the sensor, refer to
“Handling of the sensor” on page 6-56.
Headlamp flasher
The high-beams flash when the lever is
pulled slightly (2), and will go off when it is
released.
When the high-beam is on, the high-beam in-
dication lamp in the instrument cluster will il-
luminate.
Instruments and controls
5-49

Combination headlamps and dipper switch
If the AHB switch is pressed again, the
WARNING
Manual switching
AHB will be deactivated and AHB indi-
Switching to low beam
z The headlamp beams (high/low) may not
cator will go off.
be switched automatically under certain
1. Pull the lever towards you.
circumstances. Do not overestimate the
2. The AHB indicator will go off.
system. It is the responsibility of the driv-
3. The AHB switch is pressed again, the
er to switch the headlamp beams (high/
AHB will activated.
low) manually to suit each driving condi-
tion.
5
Switching to high-beam
Refer to
“Dipper
(High/Low beam
change)” on page 5-49.
1. Pull the lever towards you.
2. The AHB indicator will go off and the
high-beam indicator illuminates.
How to use the AHB
3. The AHB switch is pressed again, the
1. Rotate the lamp switch to “
” position
AHB will activated.
or “AUTO” position when the engine is
running.
Automatic switching conditions
2. Press the AHB switch.
NOTE
The high-beam headlamps illuminate when
z
If the headlamps are on when the lamp
all of the following conditions are met:
switch is in the “AUTO” position, the AHB
z Your vehicle speed exceeds approxi-
works.
mately 40 km/h (25 mph).
z
You can switch the headlamp beams (high/
z It is dark ahead of your vehicle.
low) manually by operating the lever even if
the AHB is working.
z There are no vehicles in front or oncom-
Refer to “Dipper (High/Low beam change)”
ing vehicles, or none of their exterior
on page 5-49.
lamps are illuminated.
If the lever is operated manually, the AHB
indicator will go off and the AHB will be de-
The low beam headlamps illuminate when
activated.
any of the following conditions occur:
Refer to “Manual switching” on page 5-50.
z Your vehicle speed does not exceed ap-
z
The AHB is not deactivated when you pull
proximately 30 km/h (19 mph).
the lever slightly (operation of the headlamp
The AHB is activated and the indicator
flasher).
z It is bright ahead of your vehicle.
will illuminate.
z An exterior lamp of a vehicle in front or
oncoming vehicle is illuminating.
5-50
Instruments and controls
Combination headlamps and dipper switch
NOTE
NOTE
NOTE
z
The headlamps may not be switched from
z
The AHB recognises environmental condi-
• When lamps of the vehicle in front or
high-beam to low beam under the following
tions by sensing a light source ahead of your
headlamps of an oncoming vehicle blend
circumstances.
vehicle. Therefore, you may feel like some-
into the other lamps.
• A vehicle in front or oncoming vehicle is
thing is not quite right when the headlamp
• The rear end of a vehicle in front (such as
hindered by any object such as continuous
beams are switched automatically.
a container truck) reflect a strong light.
bends, elevated median/island, traffic
z
The system may not detect a light vehicle
• Your vehicle’s headlamp is broken or
signs, roadside trees.
such as a bicycle.
dirty.
5
• Your vehicle passes an oncoming vehicle
z
The system may not detect an ambient
• Your vehicle is inclined due to a flat tyre
suddenly on a bend with poor visibility.
brightness precisely. This causes the traffic
or towing.
• Another vehicle crosses ahead of your ve-
to be dazzled by high-beam or the low beam
• The warning display appears.
hicle.
to be maintained. In such cases, you should
(Refer to “System problem warning” on
z
The headlamps may remain at low beam (or
switch the headlamp beams manually.
page 5-51.)
be switched from high-beam to low beam)
• In bad weather (heavy rain, fog, snow or
z
Observe the precautions below to maintain
when a reflective object (e.g. street lamp,
sandstorm).
good usage conditions:
traffic signal, noticeboard and signboard) re-
• The windscreen is dirty or fogged up.
• Do not attempt to disassemble the sensor.
flects light.
• The windscreen is cracked or broken.
• Do not affix a sticker or label on the
z
Any of the following factors may influence
windscreen near the sensor.
• The sensor is deformed or dirty.
the headlamp beam switching timing:
• Avoid overload.
• A light that is similar to the headlamps or
• How brightly the exterior lamps of a vehi-
tail lamps is shining around your vehicle.
• Do not modify your vehicle.
cle in front or oncoming vehicle illumi-
• A vehicle in front or oncoming vehicle is
• When the windscreen is replaced, use the
nate.
driven without lights, the exterior lamps
MITSUBISHI MOTORS GENUINE
• Movement or direction of a vehicle in
are dirty or discoloured, or the direction
parts.
front or oncoming vehicle.
of the headlamp beams is adjusted im-
• Only right or left exterior lamp of a vehi-
properly.
cle in front or oncoming vehicle is illumi-
• It becomes dark and bright suddenly and
System problem warning
nating.
continuously around your vehicle.
If a problem occurs with the system, the fol-
• A vehicle in front or oncoming vehicle is
• Your vehicle is driven on uneven surfaces.
lowing warning display will appear to the
a motorcycle.
• Your vehicle is driven on a winding road.
type of the problem.
• Road conditions (gradient, bends and road
surface).
• A reflective object such as a noticeboard
or a mirror reflects a light ahead of your
• The number of occupants and luggage
The AHB deactivation due to fault
vehicle.
load.
If a failure is detected in the system, the fol-
lowing warning display will appear and the
AHB will automatically be turned off.
Instruments and controls
5-51
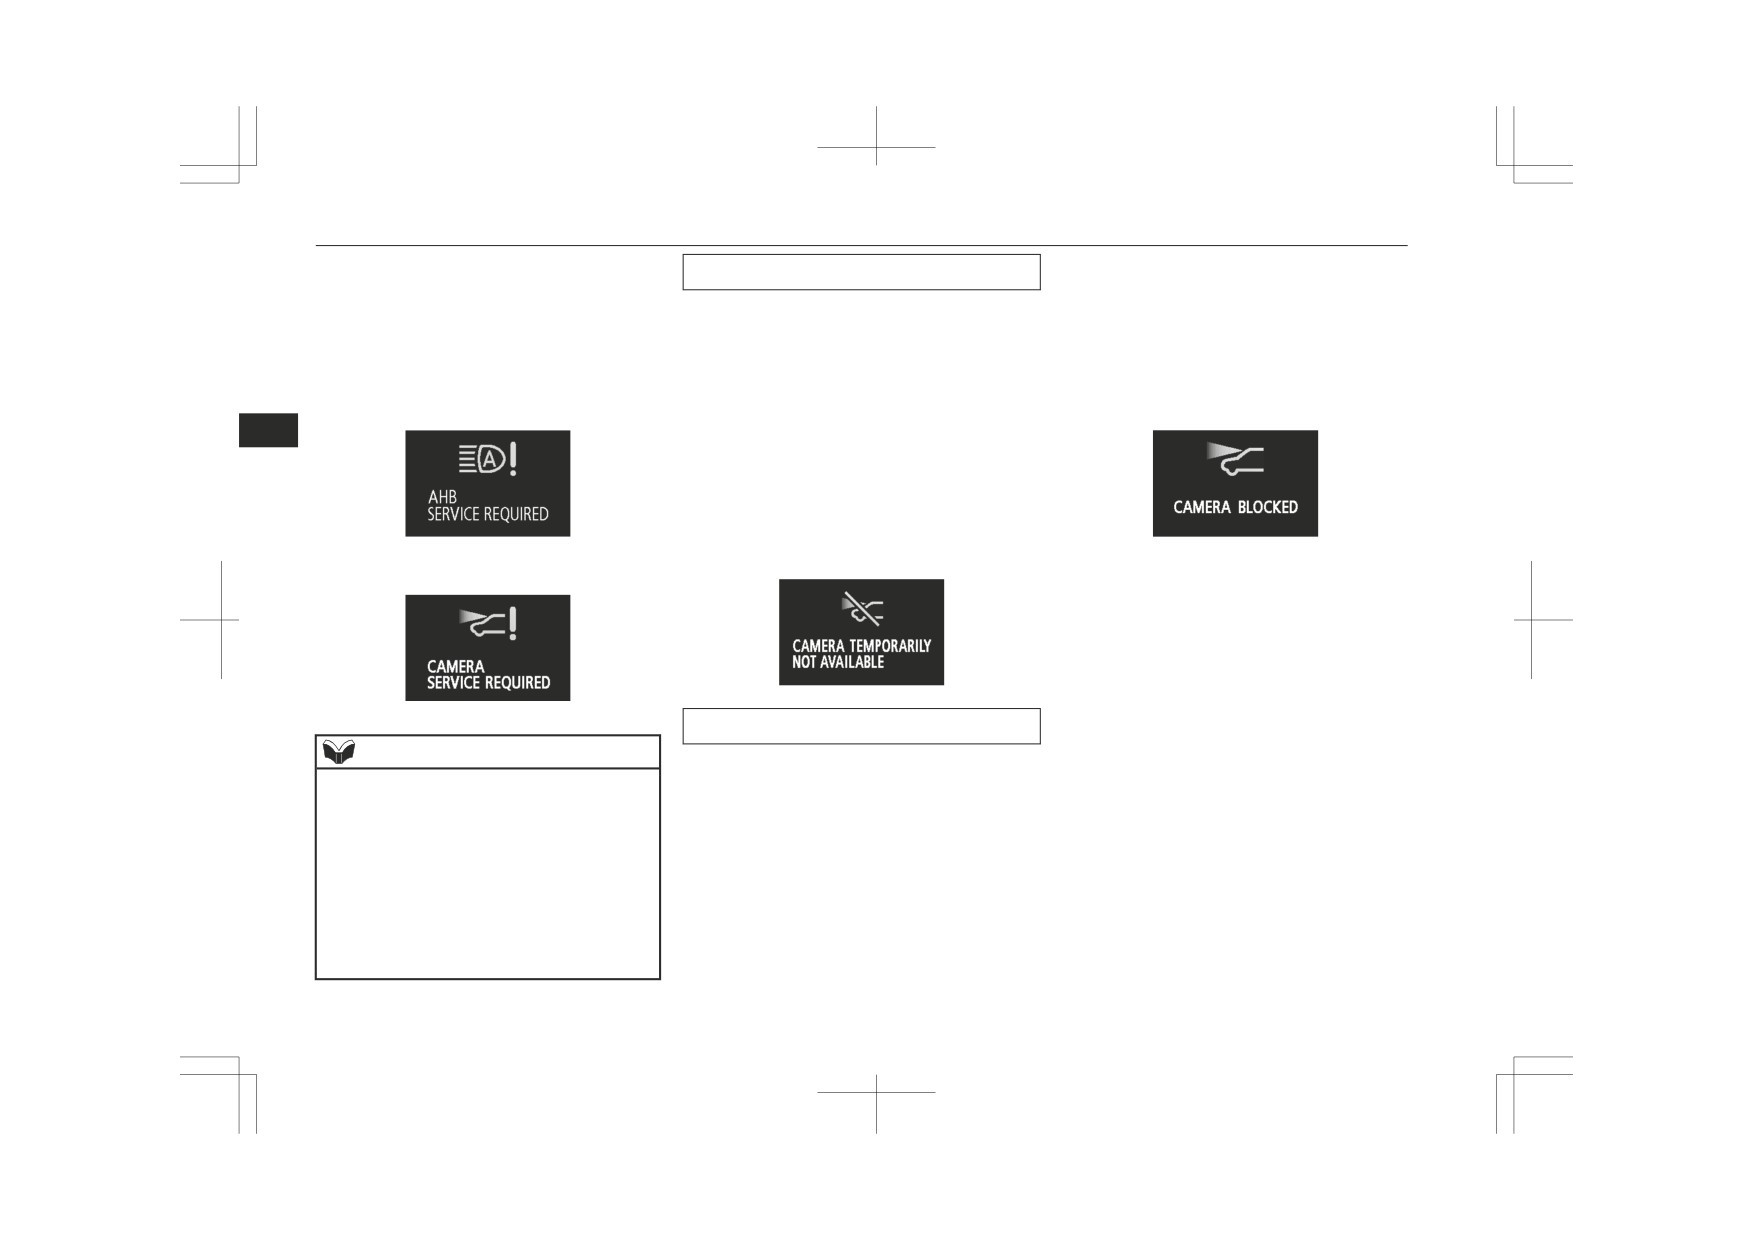
Combination headlamps and dipper switch
If the warning display remains even after the
When the sensor performance returns, the
Sensor is too hot or cold
ignition switch is turned to the “LOCK” posi-
AHB will resume operation.
If the system becomes temporarily unavaila-
tion or the operation mode is put in OFF and
If the warning display does not disappear af-
ble due to a high or low temperature of the
then turned back to ON, please contact a
ter waiting for a while, there is a possibility
sensor, the following warning display will
MITSUBISHI MOTORS Authorized Service
that the sensor has a malfunction. Contact a
appear.
Point.
MITSUBISHI MOTORS Authorized Service
After the temperature of the sensor has been
[When the AHB is malfunctioning]
Point for inspection of the sensor.
in range, the system will automatically return
5
to operation.
If the warning display does not disappear af-
ter waiting for a while, there is a possibility
that the AHB has a malfunction. Contact a
MITSUBISHI MOTORS Authorized Service
Point for inspection of the system.
[When the sensor is malfunctioning]
Windscreen is dirty
NOTE
If the AHB determines that its performance
has been degraded, the warning display will
z If the sensor or its surrounding area reaches
an extremely high temperature when parking
appear. This can occur when:
the vehicle under a blazing sun, the “AHB
z Foreign objects, such as dirt, snow or
SERVICE REQUIRED” warning display
ice, adhere to the windscreen of the sen-
may appear.
sor portion.
If the warning display remains even after the
z There are adverse weather conditions,
temperature of the sensor or its surrounding
such as rain, snow, sand storms, etc.
area has been in range, please contact a
MITSUBISHI MOTORS Authorized Serv-
z A vehicle in front or an oncoming vehi-
ice Point.
cle is splashing water, snow or dirt.
5-52
Instruments and controls

Combination headlamps and dipper switch
Welcome light*
2. Turn the ignition switch to the “LOCK”
NOTE
position or put the operation mode in
This function turns on the position and tail
OFF. Also, if a key was used to start the
lamps for approximately 30 seconds after the
engine, remove the key from the ignition
UNLOCK switch (A) on the remote control
switch.
transmitter is pressed when the combination
3. Within 60 seconds of turning the ignition
headlamps and dipper switch is in the “AU-
switch to the “OFF” position or putting
TO” position. The welcome light function
the operation mode in OFF, pull the turn
will operate only when it is dark outside the
5
signal lever towards you.
vehicle.
• Turn the combination headlamps and dip-
per switch to the “
” or “
” position.
• Turn the ignition switch to the “ON” posi-
tion or put the operation mode in ON.
z It is possible to modify functions as follows:
• The headlamps can be set to come on in
the low beam setting.
• The welcome light function can be deacti-
vated.
For further information, please contact your
MITSUBISHI MOTORS Authorized Serv-
NOTE
ice Point.
z While the welcome light function is operat-
ing, perform one of the following operations
Coming home light
to cancel the function.
This function turns on the headlamps in the
• Push the LOCK switch (B) on the remote
low beam setting for approximately 30 sec-
control transmitter.
onds after the ignition switch is turned to the
“LOCK” position or the operation mode is
put in OFF.
1. Turn the combination headlamps and
dipper switch to the “AUTO” position.
Instruments and controls
5-53
Headlamp levelling
4. The headlamps will come on in the low
Set the switch according to the following ta-
NOTE
beam setting for approximately 30 sec-
ble.
onds. After the headlamps go off, the
z It is possible to modify functions as follows:
• The time that the headlamps remain on
headlamps can be turned on again in the
can be changed.
low beam setting for approximately 30
• The coming home light function can be
seconds by pulling the turn signal lever
deactivated.
towards you within 60 seconds of turn-
For further information, please contact your
ing the ignition switch to the “LOCK”
MITSUBISHI MOTORS Authorized Serv-
5
position or putting the operation mode in
ice Point.
OFF.
To turn on the headlamps again after 60
Headlamp levelling
seconds of turning the ignition switch to
the “LOCK” position or putting the op-
Headlamp levelling switch*
eration mode in OFF, repeat the process
from step 1.
The angle of the headlamp beam varies de-
CAUTION
pending on the load carried by the vehicle.
z Always perform adjustments before driving.
The headlamp levelling switch can be used to
NOTE
Do not attempt to adjust while driving, as it
adjust the headlamp illumination distance
could cause an accident.
z
While the coming home light function is op-
(when the lower beam is illuminated) so that
erating, perform one of the following opera-
the headlamps’ glare does not distract other
tions to cancel the function.
Vehicle condition
Switch position
drivers.
• Pull the lever towards you.
“0”
• Turn the combination headlamps and dip-
per switch to the “
” or “
” position.
• Turn the ignition switch to the “ON” posi-
tion or put the operation mode in ON.
“0”
5-54
Instruments and controls

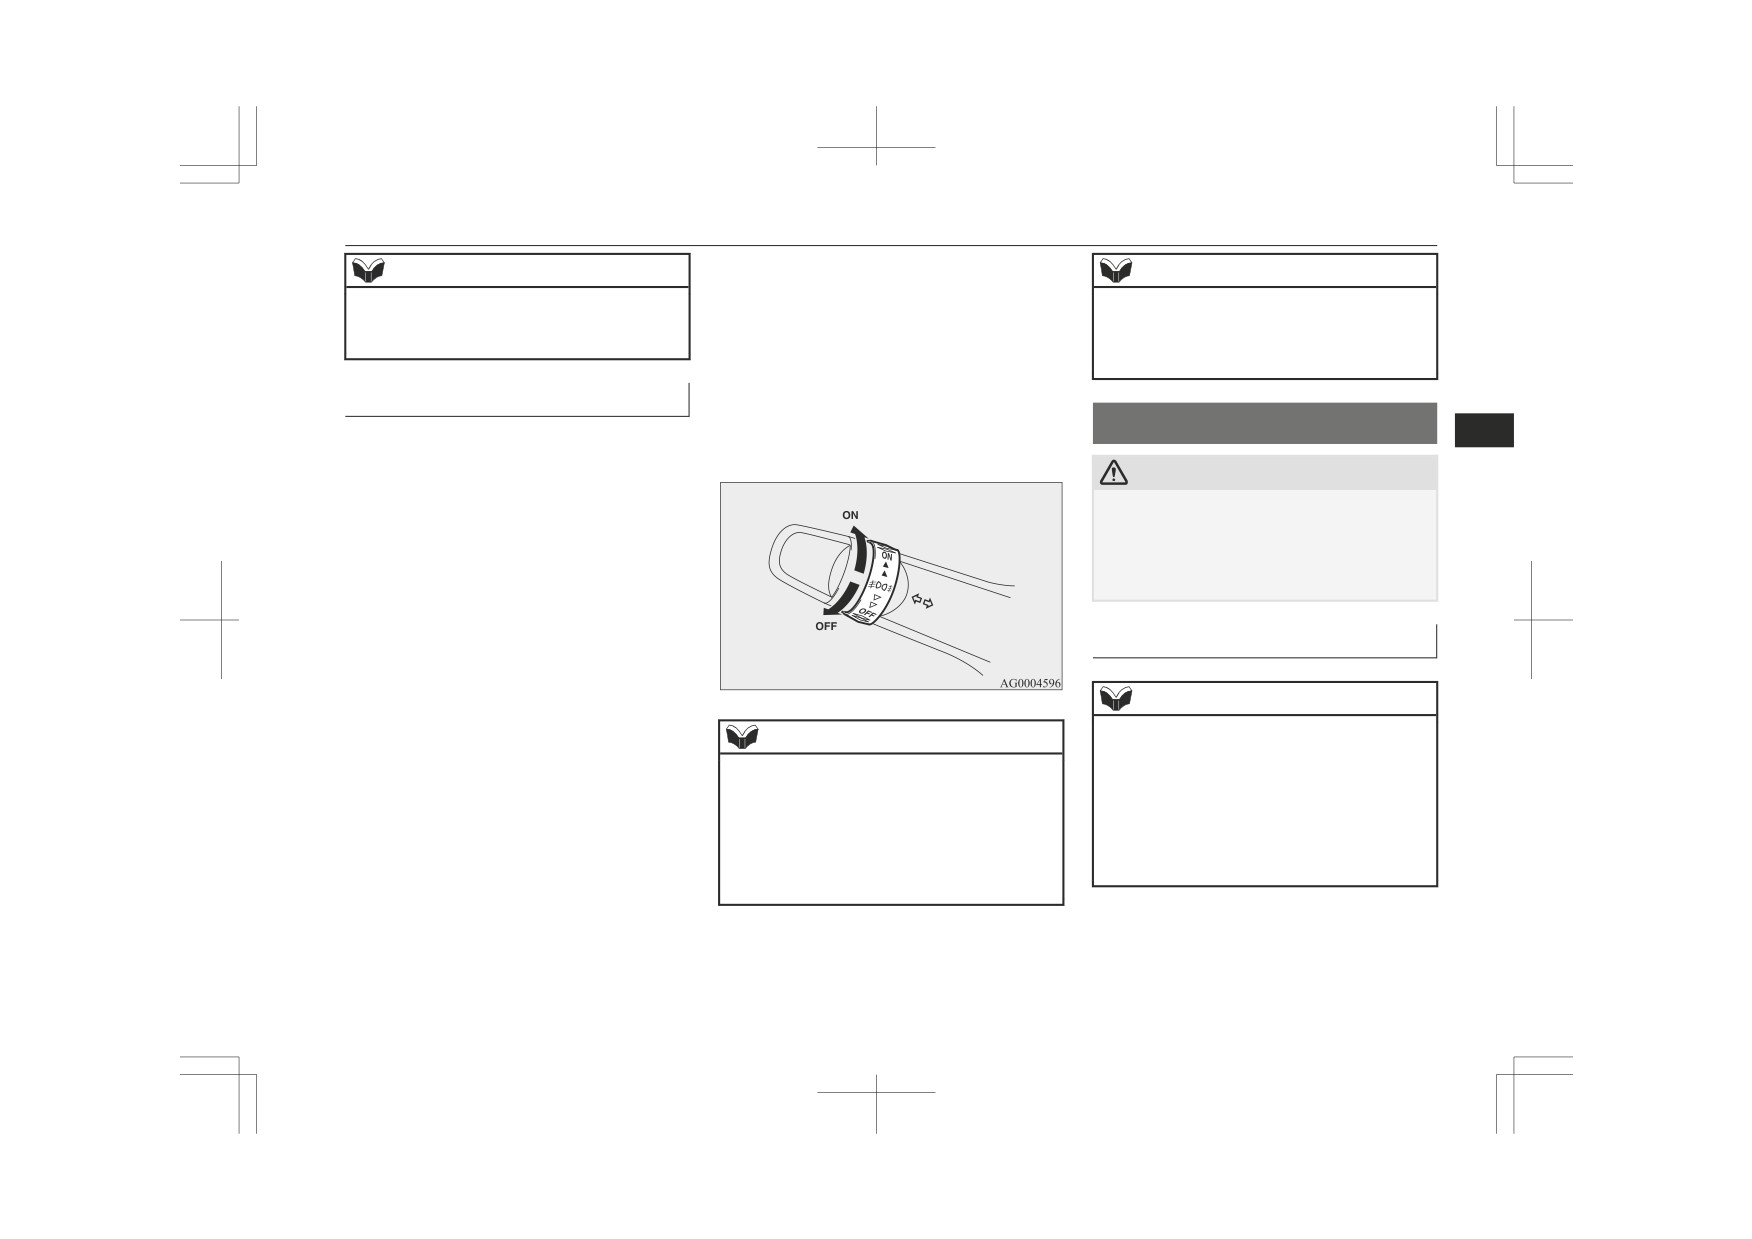
Turn-signal lever
Vehicle condition
Switch position
Automatic headlamp levelling*
Turn-signal lever
“1”
This mechanism automatically adjusts the di-
rection of the headlamps (beam position) de-
pending on changes in the condition of the
vehicle, such as the number of occupants or
luggage weight. When the headlamps are il-
“2”
luminated with the ignition switch or the op-
eration mode in ON, the beam position of the
5
headlamps is automatically adjusted when the
vehicle is stopped.
“2”
Headlamp automatic levelling
1- Turn-signals
system warning display
When making a normal turn, use posi-
●:1 person
tion (1). The lever will return automati-
:Full luggage loading
cally when cornering is completed.
2- Lane-change signals
Switch position Driver only/Driver
+
1
When moving the lever to (2) slightly to
0-
front passenger
change a lane, the turn-signal lamps and
indication lamp in the instrument cluster
Switch position 5 passengers
(including
If there is a fault in the automatic headlamp
will only flash while the lever is operat-
1-
driver)
levelling system, the warning display is dis-
ed.
Switch position 5 passengers
(including
played on the information screen in the multi-
Also, when you move the lever to (2)
2-
driver)
+ Full luggage
information display.
slightly then release it, the turn-signal
loading/Driver + full lug-
lamps and indication lamp in the instru-
gage loading
CAUTION
ment cluster will flash 3 times.
z If a warning is displayed, the system may be
malfunctioning, so we recommend you to
have your vehicle inspected.
Instruments and controls
5-55

Hazard warning flasher switch
Push the switch to turn on the hazard warning
NOTE
Fog lamp switch
flashers, all turn-signal lamps flash continu-
z If the lamp flashes unusually quickly, the
ously. To turn them off, push the switch
bulb in a turn-signal lamp may have burned
Front fog lamp switch*
again.
out. We recommend you to have the vehicle
The front fog lamps can be operated while
inspected.
the headlamps or tail lamps are on. Turn the
z It is possible to activate the following func-
knob in the “ON” direction to turn on the
tions.
• Flashing of the turn-signal lamps when
front fog lamps. An indication lamp in the in-
5
the lever is operated with the ignition
strument cluster will also come on. Turn the
switch or the operation mode is in ACC.
knob in the “OFF” direction to turn off the
• Deactivate the turn-signal lamp
3-flash
front fog lamps. The knob will automatically
function for lane changes.
return to its original position when you re-
• The time required to operate the lever for
lease it.
the 3-flash function can be adjusted.
For further information, we recommend you
to consult a MITSUBISHI MOTORS Au-
thorized Service Point.
NOTE
Hazard warning flasher
z
While the hazard warning lamps are blinking
due to having manually pushed the switch,
switch
the emergency stop signal system does not
operate.
Use the hazard warning flasher switch when
Refer to “Emergency stop signal system*”
the vehicle has to be parked on the road for
on page 6-39.
any emergency.
The hazard warning flashers can always be
operated, regardless of the ignition switch po-
NOTE
sition or the operation mode.
z The front fog lamps are automatically turned
off when the headlamps or tail lamps are
turned off. To turn the front fog lamps on
again, turn the knob in the “ON” direction
after turning on the headlamps or tail lamps.
5-56
Instruments and controls
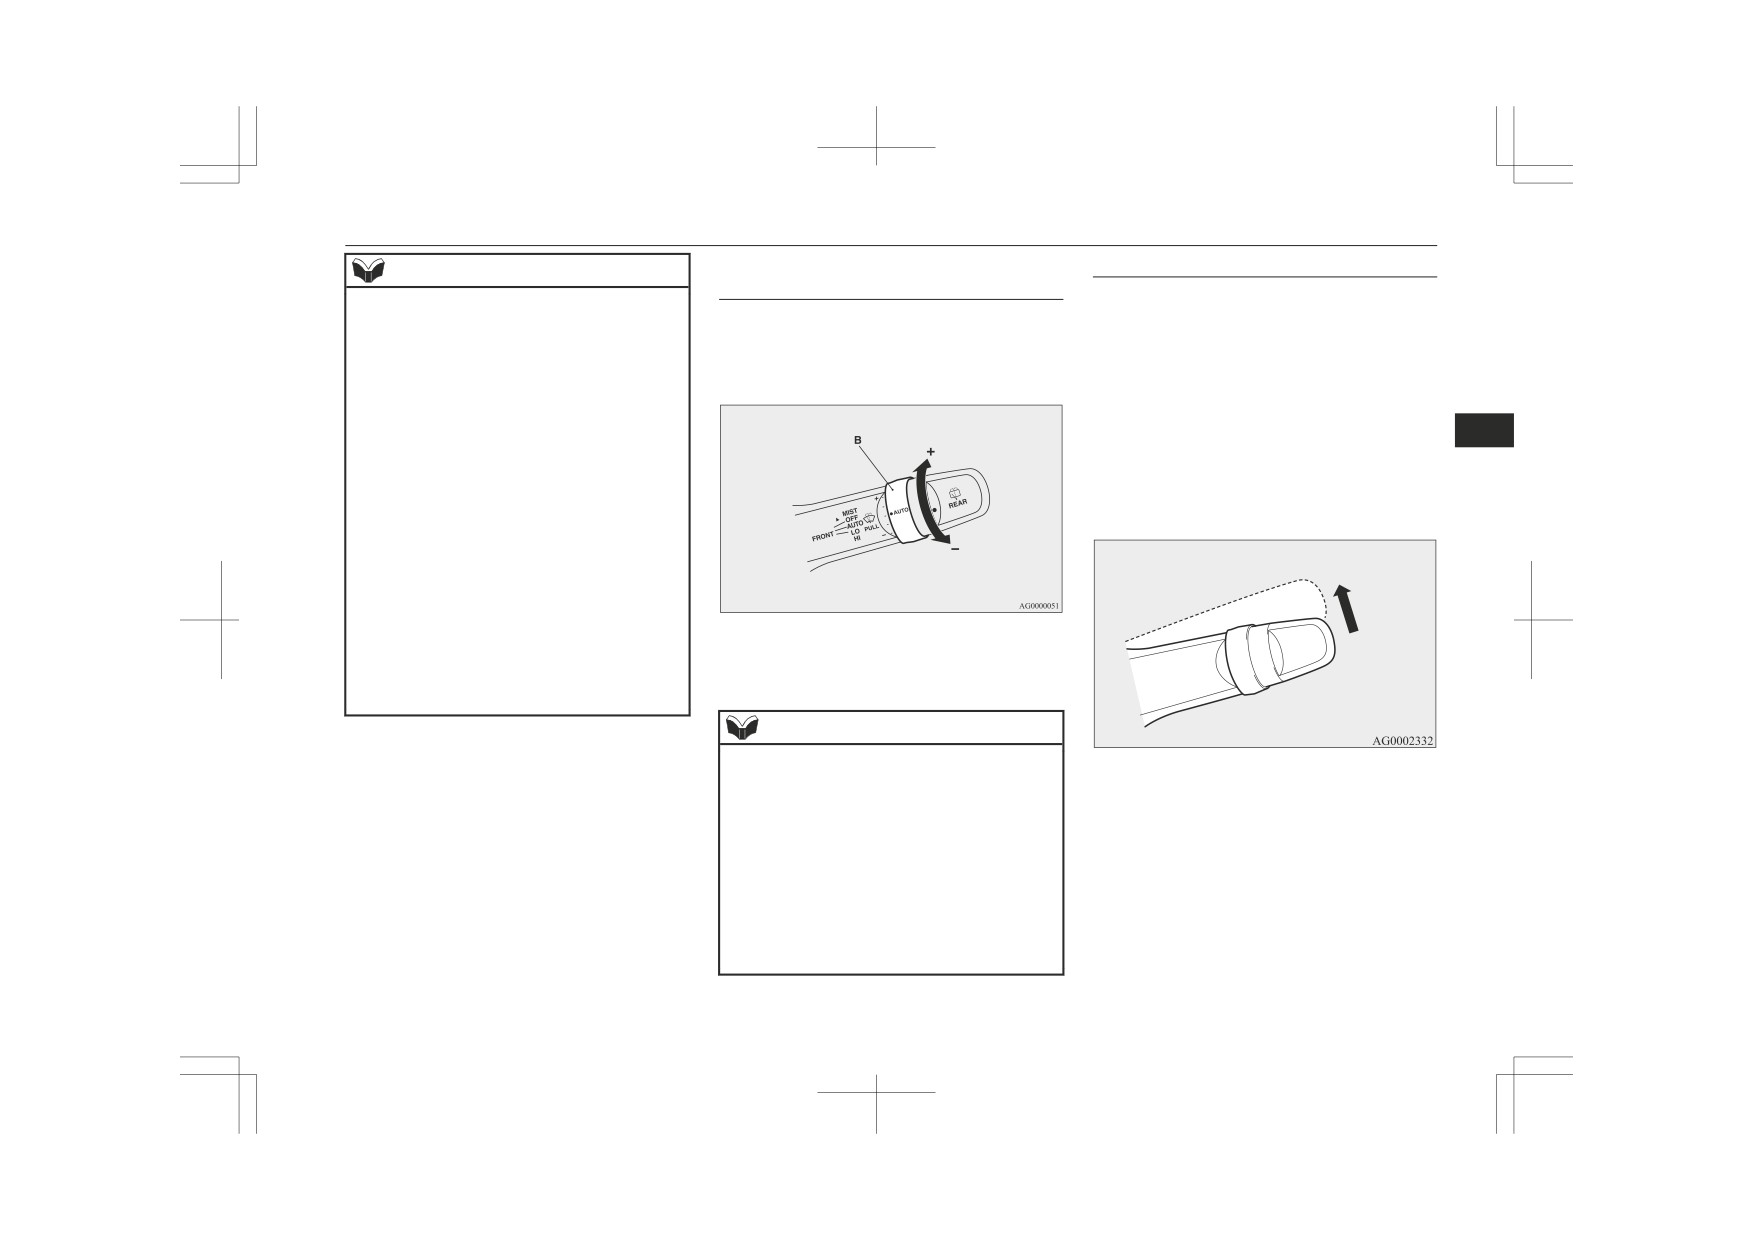
Wiper and washer switch
Turn the knob once in the “ON” direction to
NOTE
NOTE
turn on the front fog lamps. Turn the knob
z Do not use fog lamps except in conditions of
once more in the “ON” direction to turn on
z To turn the rear fog lamp on again, turn the
fog, otherwise excessive lamp glare may
knob twice in the “ON” direction after turn-
the rear fog lamp. To turn the rear fog lamp
temporarily blind oncoming vehicle drivers.
ing on the headlamps. (Vehicle with front
off, turn the knob once in the “OFF” direc-
fog lamps)
tion. Turn the knob once more in the “OFF”
Rear fog lamp switch
direction to turn off the front fog lamps. The
The rear fog lamp can be operated when the
knob will automatically return to its original
Wiper and washer switch
5
position when you release it.
headlamps or front fog lamps (if so equipped)
turn on.
CAUTION
An indication lamp in the instrument cluster
z If the washer is used in cold weather, the
comes on when the rear fog lamp is turned
washer fluid sprayed against the glass may
on.
freeze, which may hinder visibility. Warm
the glass with the defroster or rear window
[Vehicle without front fog lamps]
demister before using the washer.
Turn the knob once in the “ON” direction to
turn on the rear fog lamp. To turn the rear fog
Windscreen wipers
lamp off, turn the knob once in the “OFF” di-
rection. The knob will automatically return to
its original position when you release it.
NOTE
[Vehicle with front fog lamps]
NOTE
z To ensure a clear rearward view, the rear
window wiper will automatically perform
z
The rear fog lamp is automatically turned off
several continuous operations if the gearshift
when the headlamps or front fog lamps (if so
lever or the selector lever is put in the “R”
equipped) are turned off.
position while the windscreen wipers are op-
z
To turn the rear fog lamp on again, turn the
erating.
knob once in the “ON” direction after turn-
Refer to “Rear window wiper and washer”
ing on the headlamps. (Vehicle without front
on page 5-61.
fog lamps)
The windscreen wipers can be operated with
the ignition switch or the operation mode is
in ON or ACC.
Instruments and controls
5-57
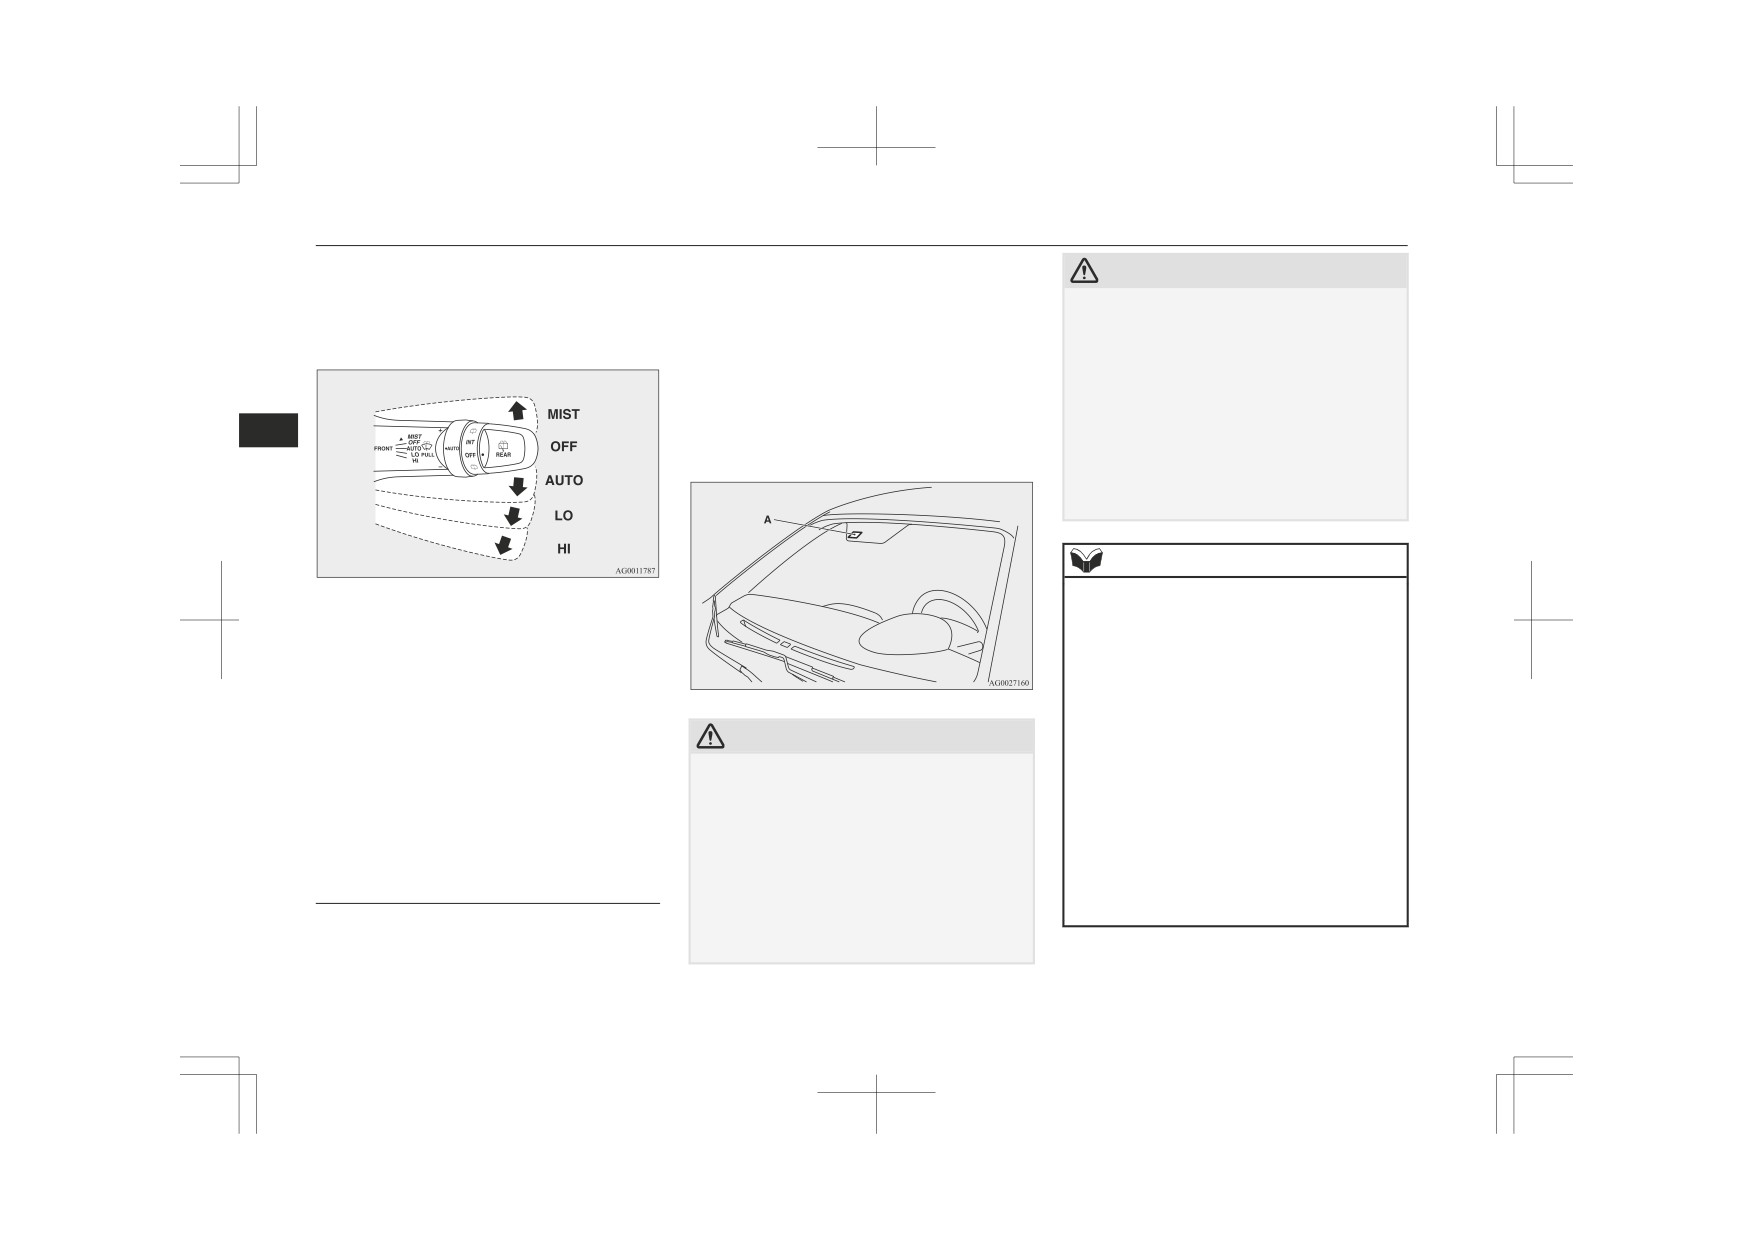
Wiper and washer switch
If the blades are frozen to the windscreen or
If the lever is put in the “AUTO” position,
CAUTION
rear window, do not operate the wipers until
the rain sensor (A) will detect the extent of
• When cleaning the outside surface of the
the ice has melted and the blades are freed,
rain (or snow, other moisture, dust, etc.) and
windscreen, if you touch on top of the
otherwise the wiper motor may be damaged.
the wipers will operate automatically.
rain sensor.
Keep the lever in the “OFF” position if the
• When cleaning the outside surface of the
windscreen is dirty and the weather is dry.
windscreen, if you wipe with a cloth on
Wiper operation under these conditions can
top of the rain sensor.
scratch the windscreen and damage the wip-
• When using an automatic car wash.
5
ers.
• A physical shock is applied to the wind-
screen.
• A physical shock is applied to the rain
sensor.
NOTE
z
To protect the rubber parts of the wipers, this
MIST-
Misting function
operation of the wipers does not take place
The wipers will operate once.
even if the lever is put in the “AUTO” posi-
tion when the vehicle is stationary and the
OFF-
Off
ambient temperature is approximately 0 °C
AU-
Auto-wiper control
or lower.
TO-
Rain sensor
z
Do not cover the sensor by affixing a sticker
or label to the windscreen. Also, do not put
The wipers will automatically oper-
CAUTION
any water-repellent coating on the wind-
ate depending on the degree of wet-
z
With the ignition switch or the operation
screen. The rain sensor would not be able to
ness on the windscreen.
mode in ON and lever in the “AUTO” posi-
detect the extent of rain, and the wipers
tion, the wipers may automatically operate
might stop working normally.
LO-
Slow
in the situations described below.
In the following cases, the rain sensor may
z
HI-
Fast
If your hands get trapped, you could suffer
be malfunctioning.
injuries or the wipers could malfunction. Be
For further information, we recommend you
sure to turn the ignition switch to the
to consult a MITSUBISHI MOTORS Au-
Rain sensor
“LOCK” position or put the operation mode
thorized Service Point.
Can only be used when the ignition switch or
in OFF, or move lever to the “OFF” position
the operation mode is in ON.
to deactivate the rain sensor.
5-58
Instruments and controls
Wiper and washer switch
To adjust the sensitivity of the
Misting function
NOTE
rain sensor.
• When the wipers operate at a constant in-
Move the lever in the direction of the arrow
terval despite changes in the extent of
With the lever in the “AUTO” (rain sensor)
and release, to operate the wipers once.
rain.
position, it is possible to adjust the sensitivity
Use this function when you are driving in
• When the wipers do not operate even
of the rain sensor by turning the knob (B).
mist or drizzle.
though it is raining.
The wipers will operate once if the lever is
z
The wipers may automatically operate when
raised to the “MIST” position and released
things such as insects or foreign objects are
when the ignition switch or the operation
5
affixed to the windscreen on top of the rain
sensor or when the windscreen is frozen.
mode is in the “ON” or “ACC” position. The
Objects affixed to the windscreen will stop
wipers will continue to operate while the lev-
the wipers when the wipers cannot remove
er is held in the “MIST” position.
them. To operate the wipers again, move the
lever in the “LO” or “HI” position.
Also, the wipers may operate automatically
due to strong direct sunlight or electromag-
netic wave. To stop the wipers, place the lev-
er in the “OFF” position.
z
Contact a MITSUBISHI MOTORS Author-
“+”- Higher sensitivity to rain
ized Service Point when replacing the wind-
screen or reinforcing the glass around the
“-”- Lower sensitivity to rain
sensor.
NOTE
z It is possible to activate the following func-
tions.
• Automatic operation (rain droplet sensi-
tive) can be changed to intermittent opera-
tion (vehicle-speed sensitive).
• Automatic operation (rain droplet sensi-
tive) can be changed to intermittent opera-
tion (except vehicle-speed sensitive).
For further information, we recommend you
to consult a MITSUBISHI MOTORS Au-
thorized Service Point.
Instruments and controls
5-59

Wiper and washer switch
The wipers will operate once if the lever is
Also, by releasing the lever soon after pulling
NOTE
moved to the “AUTO” position and the knob
it towards you, the washer fluid will be
(C) is turned in the “+” direction when the ig-
sprayed several times while the wipers are
z The factory settings for the comfort washer
and the function that operates the wipers
nition switch is in the “ON” position or the
operating several times.
(Comfort washer)
once more approximately
6 seconds later
operation mode is in ON.
Then approximately 6 seconds later, the wip-
may vary depending on the vehicle.
ers operate once more.
z It is possible to modify functions as follows:
Comfort washer will stop operating with any
• Causing the wiper never to operate when
operation of the lever.
washer fluid is sprayed.
5
• Deactivating or activating the comfort
washer.
• Deactivating or activating the function
that operates the wipers once more ap-
proximately 6 seconds later.
For further information, we recommend you
to consult a MITSUBISHI MOTORS Au-
thorized Service Point.
Windscreen washer
The windscreen washer can be operated with
the ignition switch or the operation mode in
ON or ACC.
CAUTION
The washer fluid will be sprayed onto the
z If the washer is used in cold weather, the
windscreen by pulling the lever towards you.
washer fluid sprayed against the glass may
When the wipers are not in operation or in in-
freeze resulting in poor visibility. Heat the
termittent operation, by pulling the lever to-
glass with the defroster or demister before
using the washer.
wards you, the wipers will operate several
times while the washer fluid is being sprayed.
Then approximately 6 seconds later, wipers
operate once more.
5-60
Instruments and controls