Mitsubishi ASX (2020 year). Manual in english - page 4

Seat belts
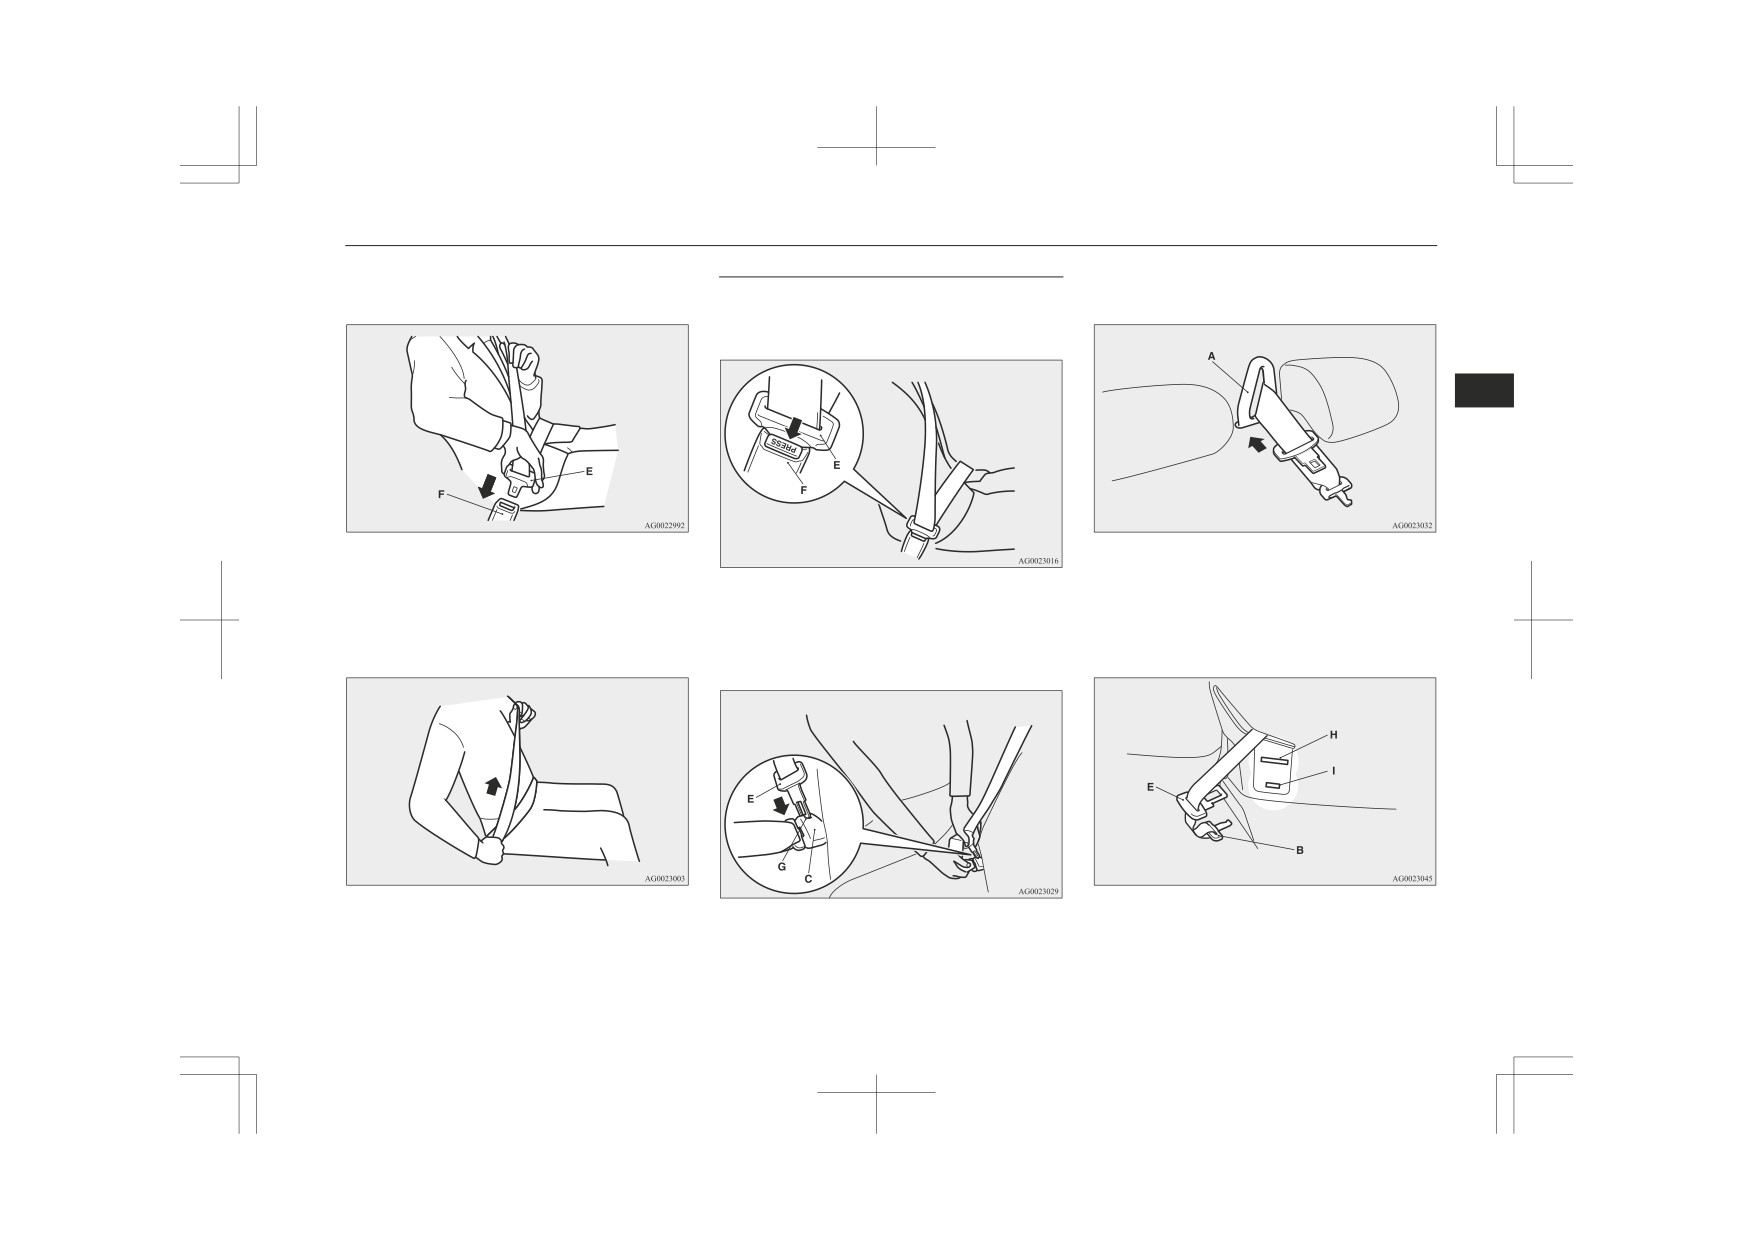
Raise or lower the seat belt anchor (A) while
To fasten
pressing the lock knob (B).
1. Pull the seat belt out slowly and pass it
through the seat belt guide (A).
Down
Up
4
WARNING
z When using the seat belt, make sure to se-
curely connect the latch plate (B) with the
WARNING
buckle (C). Failing to do so could signifi-
cantly reduce the amount of protection
z When adjusting the seat belt anchor, set it
NOTE
and cause serious injures in a collision or
at a position that is sufficiently high so
a sudden stop.
that the belt will make full contact with
z When the seat belts cannot be pulled out in a
your shoulder but will not touch your
locked condition, pull the belt once forceful-
ly and then return it.
neck.
After that, pull the belt out slowly once
again.
3-point type seat belt with 2
buckles
2. After making sure that the seat belt is
3-point type seat belt with 2 buckles is fitted
not twisted, insert the latch plate (B) into
in the rear centre seating position.
the buckle (C) aligning the marks (D) on
the plate and buckle until a “click” is
heard.
NOTE
z You can check if the belt locks by pulling it
forward quickly.
4-12
Seat and seat belts
Seat belts
3. Insert the latch plate (E) into the buckle
To unfasten
3. Retract the seat belt and remove it from
(F) until a “click” is heard.
the seat belt guide (A).
1. Hold the latch plate (E) and push the
button on the buckle (F).
4
4. Make sure the lap belt is positioned as
4. After the seat belt is retracted complete-
low as possible on the hips and pull the
ly, insert the latch plate (E) into the up-
2. Push the button (G) on the buckle (C)
shoulder belt to adjust the slackness of
per slit (H) and the latch plate (B) into
using the latch plate (E) to disconnect
the lap belt.
the lower slit (I).
the seat belt from the buckle.
Seat and seat belts
4-13
Pregnant women restraint
Pregnant women restraint
Pretensioner system
CAUTION
When the ignition switch or the operation
If you need to scrap the vehicle, please con-
z
WARNING
mode is under the following conditions, if
sult a MITSUBISHI MOTORS Authorized
there is a frontal impact or a side impact (ve-
Service Point.
z Seat belts work for everyone, including
It is important to do so because unexpected
hicles equipped with SRS side airbags and
pregnant women. Pregnant women should
activation of the pretensioner seat belts
SRS curtain airbags) severe enough to injure
4
use the available seat belts. This will re-
could cause injuries.
duce the likelihood of injury to both the
the driver and/or front passenger, the preten-
woman and the unborn child. The lap belt
sioner system will retract their respective seat
should be worn across the thighs and as
belts instantaneously, thus maximizing the
NOTE
snug against the hips as possible, but not
seat belt’s effectiveness.
across the waist. Consult your doctor if
z
The pretensioner seat belts will be activated
[Except for vehicles equipped with keyless
you have any additional questions or con-
if the vehicle suffers a severe frontal impact
operation system]
cerns.
or a severe side impact (vehicles equipped
The ignition switch is in the
“ON” or
with SRS side airbags and SRS curtain air-
“START” position.
bags), even if the seat belts are not worn.
Seat belt pretensioner
[Vehicles equipped with keyless operation
z
The pretensioner seat belts are designed to
system]
work only once. After the pretensioner seat
system and force limiter
belts have been activated, we recommend
The operation mode is in ON.
you have it replaced by a MITSUBISHI
system
MOTORS Authorized Service Point.
WARNING
The driver’s seat and front passenger’s seat
each have a seat belt equipped with a preten-
z To obtain the best results from your pre-
SRS warning
tensioner seat belt, make sure you have
sioner system.
The same warning lamp/display is shared by
adjusted your seat correctly and wear
your seat belt properly.
the SRS airbags and the pretensioner seat
belts.
Refer to
“SRS warning lamp/display” on
CAUTION
page 4-34.
z Installation of audio equipment or repairs in
the vicinity of the pretensioner seat belts or
Force limiter system
floor console must be performed in line with
In the event of a collision, each force limiter
MITSUBISHI MOTORS guidelines. It is
system will effectively absorb the load ap-
important to do so because the work could
affect the pretensioner systems.
plied to the seat belt to minimize the impact
to the passenger.
4-14
Seat and seat belts

Child restraint
Caution for installing the child
Use rearward facing child restraints in the
Child restraint
rear seat or turn off the front passenger’s air-
restraint on vehicles with a
bag ON-OFF switch (if so equipped). (Refer
When transporting children in your vehicle,
front passenger airbag
to “To turn an airbag off” on page 4-27)
some type of child restraint system should al-
ways be used according to the size of the
The label shown here is attached on vehicles
child. This is required by law in most coun-
with a front passenger airbag.
4
Front passenger’s
tries.
airbag ON
The regulations concerning driving with chil-
dren in the front seat may differ from country
to country. You are advised to comply with
the relevant regulations.
WARNING
z When possible, put children in the rear
seat. Accident statistics indicate that chil-
dren of all sizes and ages are safer when
properly restrained in the rear seat rather
WARNING
than in the front seat.
z
A REARWARD FACING CHILD RE-
z Holding a child in your arms is no substi-
STRAINT must NOT be used in the front
tute for a restraint system. Failure to use
WARNING
passenger seat if the front passenger’s air-
a proper restraint system can result in se-
z
Extreme Hazard!
bag has not been deactivated. The force of
vere or fatal injury to the child.
NEVER use a rearward facing child re-
an inflating airbag could kill or cause se-
z Each child restraint device or fixing is to
straint on a seat protected by an ACTIVE
rious injuries to the child. A rearward
be used only by one child.
AIRBAG in front of it, DEATH or SERI-
facing child restraint should be used in
z When attaching a child restraint system
OUS INJURY to the CHILD can occur.
the rear seat.
to the rear seat, prevent the front seat-
z
A FORWARD FACING CHILD RE-
backs from touching the child restraint
STRAINT should be used in the rear seat
system.
NOTE
whenever possible; if used in the front
Otherwise, the child could be seriously in-
seat, turn off the front passenger’s airbag
jured in the event of hard braking or a
z
The labels may be in different positions de-
ON-OFF switch.
collision.
pending on the vehicle model.
Seat and seat belts
4-15

Child restraint
Infants and small children
Depending on the seating position in the
NOTE
vehicle and the child restraint system
When transporting infants and small children
Before purchasing a child restraint system,
z
that you have, the child restraint can be
in your vehicle, follow the instruction given
try installing it in the rear seat to make sure
attached using one of the following two
below.
there is a good fit. Because of the location of
locations:
the seat belt buckles and the shape of the
seat cushion, it may be difficult to securely
• To the lower anchorage in the rear seat
4
install some manufacturer’s child restraint
ONLY if the child restraint has ISO-
systems.
FIX mountings (See page 4-17).
If the child restraint system can be pulled
• To the seat belt
(See pages
4-09,
forward or to either side easily on the seat
4-22).
cushion after the seat belt has been tight-
ened, choose another manufacturer’s child
restraint system.
Older children
Children who have outgrown the child re-
straint system should be seated in the rear
WARNING
seat and wear combination lap shoulder belt.
z
When installing a child restraint system,
The lap portion of the belt should be snug
Instruction:
refer to the instructions provided by the
and positioned low on the abdomen so that it
manufacturer of the restraint system.
z For small infants, an infant carrier
is below the top of the hip-bone. Otherwise,
Failure to do so can result in severe or fa-
should be used. For small children
the belt could intrude into the child’s abdo-
tal injury to the child.
whose height when seated allows the
After installation, push and pull the child
men during an accident and cause injury.
z
shoulder belt to lie in contact with the
restraint system back and forth, and side
face or the throat, a child seat should be
to side, to see that it is properly secured. If
used.
the child restraint system is not installed
securely, it may cause injury to the child
z The child restraint system should be ap-
or other occupants in the case of accident
propriate for the child’s weight and
or sudden stops.
height and properly fit in the vehicle.
z
When the child restraint system is not in
For a higher degree of safety: THE
use, keep your child restraint system se-
CHILD RESTRAINT SYSTEM
cured with the seat belt or remove it from
SHOULD BE INSTALLED IN THE
the vehicle in order to prevent it from be-
REAR SEAT.
ing thrown around inside the vehicle dur-
ing an accident.
4-16
Seat and seat belts
Child restraint
Suitability for various ISOFIX positions
Vehicle ISOFIX positions
Mass group
Size class
Fixture
Rear outboard
Carrycot
F
ISO/L1
X
4
G
ISO/L2
X
0
- Up to 10 kg
E
ISO/R1
IL
(0-9 months)
0+
- Up to 13 kg
E
ISO/R1
IL
(0-2 years)
—
ISO/R2X
IL
D
ISO/R2
IL, IL#1
C
ISO/R3
IL
I
- 9 to 18 kg
—
ISO/R2X
IL
(9 months-4 years)
D
ISO/R2
IL
C
ISO/R3
IL
B
ISO/F2
IUF
B1
ISO/F2X
IUF, IL#2
A
ISO/F3
IUF
II & III
- 15 to 36 kg
X
(4-12 years)
CAUTION
z When installing a child restraint system, remove the head restraint from the seat.
Seat and seat belts
4-17

Child restraint
Key of characters to be inserted in the table above:
z IUF- Suitable for ISOFIX forward child restraints systems of universal category approved for use in the mass group.
z IL- Suitable for ISOFIX child restraint systems of semi-universal category approved for use in the mass group.
z IL#- Suitable for particular ISOFIX child restraint systems given in the following list (MITSUBISHI MOTORS genuine parts).
z X- ISOFIX position not suitable for ISOFIX child restraint systems in this mass group.
4
IL# (Genuine part information)
UN-R44
UN-R129
Genuine part No.
Approval No.
Approval No.
MZ315055 (BABY-SAFE i-SIZE),
IL#1
―
E1-000008
MZ315056 (BABY-SAFE i-SIZE FLEX BASE)
IL#2
MZ313045 (DUO plus)
E1-04301133
―
CAUTION
z
“BABY-SAFE i-SIZE” and “BABY-SAFE i-SIZE FLEX BASE” are designed for children 40 to 83 cm in height.
NOTE
z MITSUBISHI MOTORS Europe B.V. reserves the right to changes without any prior announcement.
For detailed information, consult your MITSUBISHI MOTORS Authorized Service Point.
4-18
Seat and seat belts

Child restraint
Suitability for various seating positions
Seating position
Front passenger
Mass group
Activated air-
Deactivated Air-
Rear outboard
Rear centre
4
bag
bag*1
0
- Up to 10 kg
X
X
U
X
(0-9 months)
0+
- Up to 13 kg
X
L#1
U, L#1
L#1
(0-2 years)
I
-9 to 18 kg
X
L#2
U, L#2
L#2
(9 months-4 years)
II & III
-15 to 36 kg
X
L#3
U*2, L#3
X
(4-12 years)
*1: With front passenger’s airbag deactivated by means of front passenger’s airbag ON-OFF switch.
*2: Do not remove the head restraint when installing a booster cushion.
CAUTION
z When installing a child restraint system, remove the head restraint from the seat. However, do not remove the head restraint when installing a booster cush-
ion (see page 4-22).
Key of characters to be inserted in the table above:
z U- Suitable for “universal” category restraints approved for use in this mass group.
z L#- Suitable for particular child restraints in the following list (MITSUBISHI MOTORS genuine parts).
z X- Seat position not suitable for children in this mass group.
Seat and seat belts
4-19

Child restraint
L# (Genuine part information)
UN-R44
UN-R129
Genuine part No.
Approval No.
Approval No.
L#1
MZ315055 (BABY-SAFE i-SIZE)
―
E1-000008
4
L#2
MZ313045 (DUO plus)
E1-04301133
―
L#3
MZ315025 (KIDFIX XP)
E1-04301304
―
CAUTION
z
“BABY-SAFE i-SIZE” is designed for children 40 to 83 cm in height.
NOTE
z There is no applicable MITSUBISHI MOTORS Genuine Parts to the Mass Group “0-Up to 10 kg”.
MITSUBISHI MOTORS Europe B.V. reserves the right to changes without any prior announcement.
For further information, please contact a MITSUBISHI MOTORS Authorized Service Point.
4-20
Seat and seat belts
Child restraint
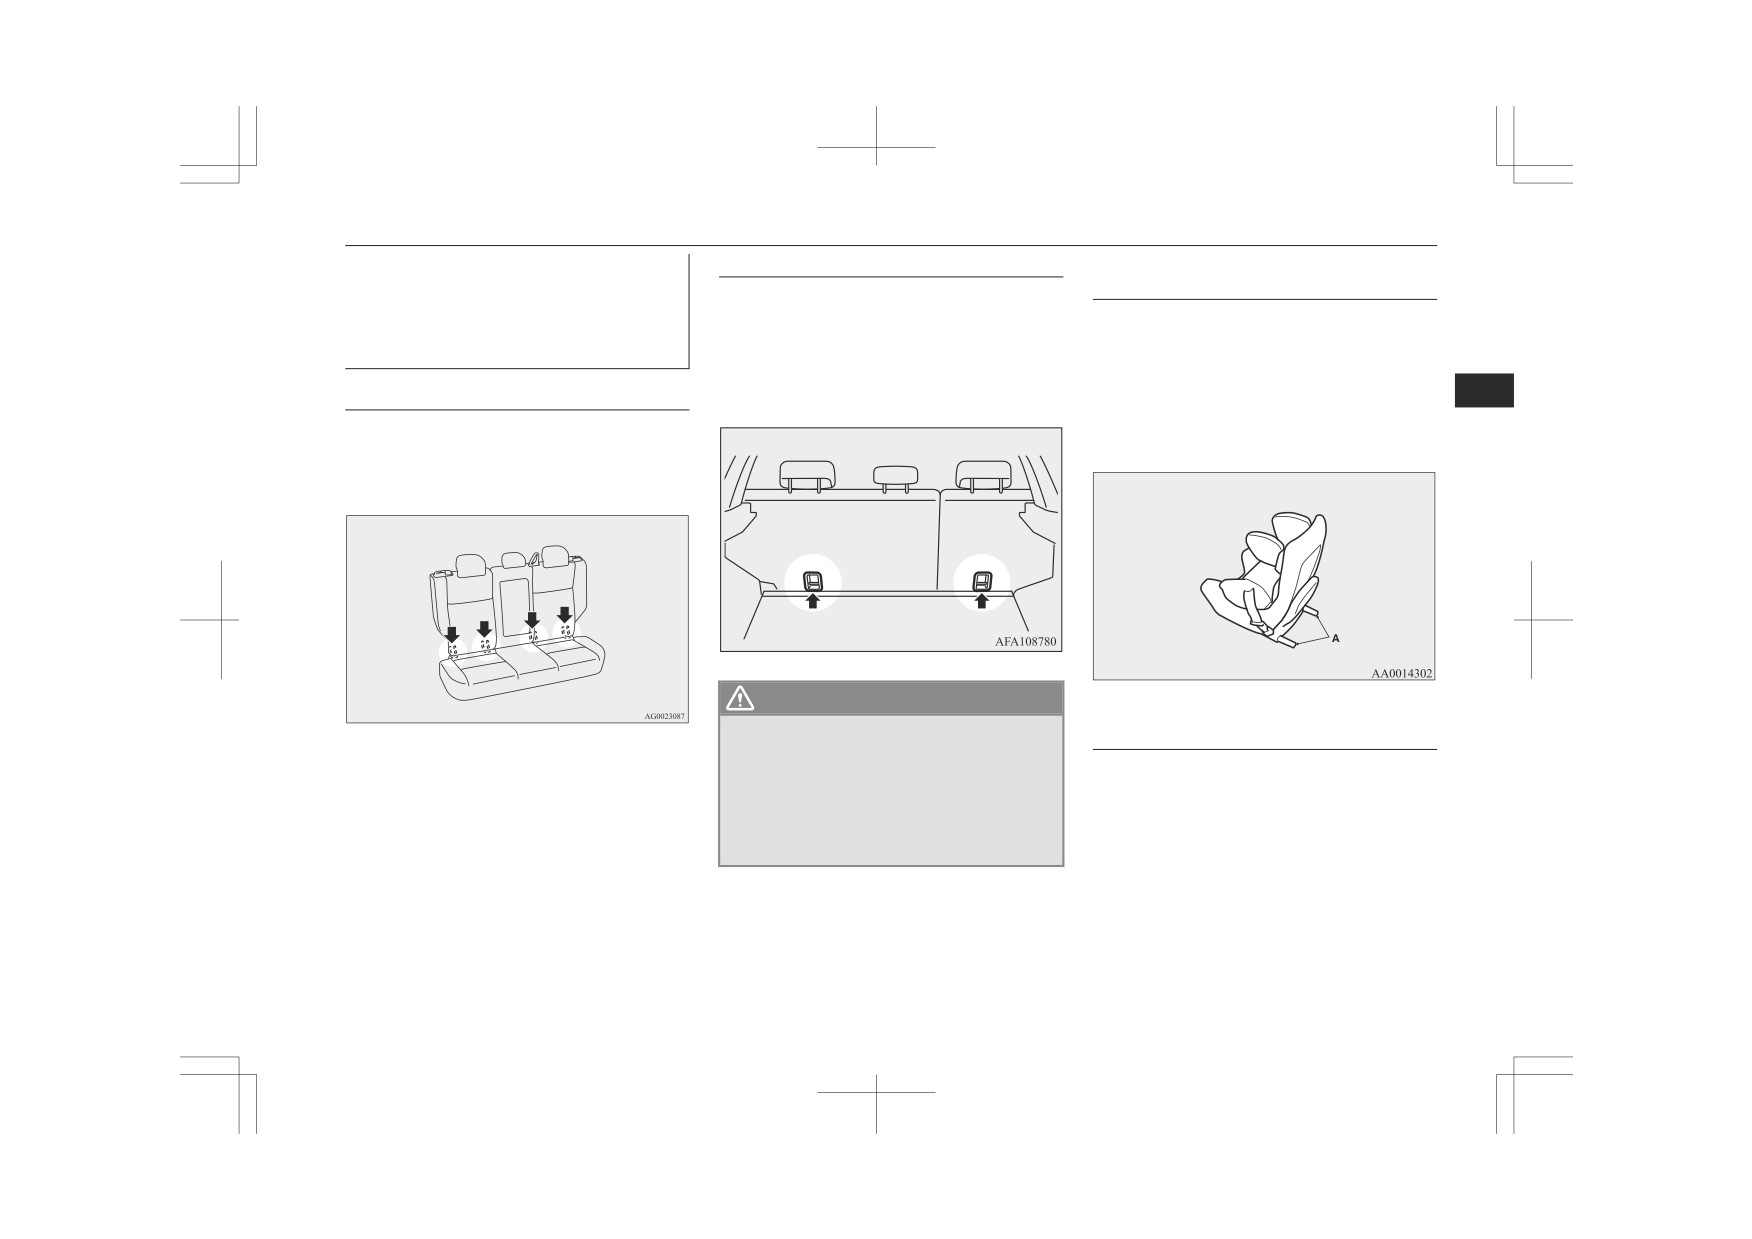
Installing a child restraint sys-
Tether anchorage locations
Child restraint system with
ISOFIX mountings
tem to the lower anchorage
There are 2 child restraint anchorage points
(ISOFIX child restraint mount-
located on the back of the rear seatbacks.
The child restraint system is designed only
ings) and tether anchorage
These are for fastening the child restraint
for seats that incorporate lower anchorages.
tether straps to the 2 rear seat seating posi-
Retain the child restraint system using the
tions.
lower anchorages.
4
Lower anchorage location
It is not necessary to retain the child restraint
Your vehicle’s rear seat is fitted with lower
system using the vehicle’s seat belts.
anchorages for attaching a child restraint sys-
tem with ISOFIX mountings.
WARNING
A- Child restraint system connectors
z Child restraint anchorages are designed
To install
to withstand only those loads imposed by
correctly fitted child restraints. Under no
1. Remove any foreign material in or
circumstances are they to be used for
around the connectors and ensure the ve-
adult seat belts, harnesses, or for attach-
hicle seat belt is in its normal storage po-
ing other items or equipment to the vehi-
sition.
cle.
2. Remove the head restraint from the loca-
tion in which you wish to install a child
restraint.
Refer to “Head restraints” on page 4-07.
Seat and seat belts
4-21

Child restraint
3. Open the gap a little between the seat
Installing a child restraint sys-
cushion (A) and the seatback (B) with
tem to a 3-point type seat belt
your hand to locate the lower anchorages
(with emergency locking mech-
(C).
4. Push the child restraint system’s connec-
anism)
tors (D) into the lower anchorages (C) in
4
accordance with the instructions provi-
3-point type seat belt location
ded by the child restraint system’s manu-
The child restraint system can be fitted by us-
facturer.
ing the 3-point type seat belt at the below il-
lustrated seating position.
NOTE
z If it is difficult to latch the tether strap hook
(E), turn the hook sideways.
6. Push and pull the child restraint in all di-
rections to be sure it is secure.
To remove
A- Vehicle seat cushion
Remove the child restraint in accordance
B- Vehicle seatback
with the instructions provided by the child re-
Installation:
C- Lower anchorage
straint system’s manufacturer.
D- Connector
1. Put a child restraint system on the seat in
which you wish to install it, and remove
If your child restraint system requires
the use of a tether strap, fasten the tether
the head restraint from the seat.
strap in accordance with steps 5.
Refer to “Head restraints” on page 4-07.
5. Latch the tether strap hook (E) of the
child seat to the tether anchorage bar (F)
and tighten the top tether strap hook so it
is securely fastened.
4-22
Seat and seat belts
Seat belt inspection
CAUTION
WARNING
WARNING
z
Do not remove the head restraint when in-
z
For some types of child restraint, the lock-
z
We recommend you to have all seat belt
stalling a booster cushion.
ing clip (A) should be used to help avoid
assemblies including retractors and at-
personal injury during a collision or sud-
taching hardware inspected after any col-
den manoeuvre.
lision. We recommend that seat belt as-
It must be fitted and used in accordance
semblies in use during a collision be re-
4
with the child restraint manufacturer’s
placed unless the collision was minor and
instructions.
the belts show no damage and continue to
The locking clip must be removed when
operate properly.
the child restraint is removed.
z
Do not attempt to repair or replace any
part of the seat belt assemblies; we recom-
mend you to have this work done by a
MITSUBISHI MOTORS Authorized
Service Point. Incorrect repair or replace-
ment could reduce the effectiveness of the
2. Fasten the seat belt to secure the child
belts and could result in serious injury in
restraint system. Make sure you hear a
the event of a collision.
z
Once the pretensioner has been activated,
“click” when you insert the latch plate in
it cannot be re-used.
the buckle.
It must be replaced together with the re-
3. Use the locking clip to completely elimi-
tractor.
nate any slackness.
4. Push and pull the child restraint in all di-
rections to be sure it is secure.
Seat belt inspection
Check the belts for cuts, worn or frayed web-
bing and for cracked or deformed metallic
parts. Replace the belt assembly if it is defec-
tive.
Seat and seat belts
4-23
Supplemental restraint system (SRS) - airbag
The SRS airbags are designed to supplement
The SRS is NOT a substitute for the seat
WARNING
the primary protection of the driver and front
belts. To ensure the maximum protection dur-
z
Do not insert any foreign objects (pieces
passenger side seat belt systems by providing
ing all types of collisions and accidents, all
of plastic, paper clips, buttons, etc.) in the
those occupants with protection against head
occupants, including the passengers as well
buckle or retractor mechanism. In addi-
and chest injuries in certain moderate-to-se-
as the driver, must wear their seat belts.
tion, do not modify, remove or install the
seat belt. Otherwise, the seat belt may not
vere frontal collisions.
4
How the Supplemental Re-
be able to provide adequate protection in
a collision or other situation.
The SRS driver’s knee airbag (if so equip-
straint System works
ped) is designed to supplement the primary
The SRS includes the following components:
protection of the driver’s seat belt system. It
can reduce the forward movement of the
driver’s lower legs and provide increased
overall body protection in certain moderate-
to-severe frontal collisions.
The SRS side airbags (if so equipped) are de-
signed to supplement properly worn seat
z
A dirty belt should be cleaned with neu-
belts and provide the driver and front passen-
tral detergent in warm water. After rins-
ger with protection against chest and abdo-
ing in water, let it dry in the shade. Do not
men injuries in certain moderate-to-severe
attempt to bleach or re-dye the belts be-
side impact collisions.
cause this will affect their characteristics.
1- Airbag module (Driver)
2- Front passenger’s airbag OFF indication
The SRS curtain airbags (if so equipped) are
lamp*
designed to supplement properly worn seat
Supplemental restraint
3- Airbag module (Passenger)
belts and provide the driver and passenger
system (SRS) - airbag
4- Driver’s knee airbag module*
with protection against head injuries in cer-
5- Front passenger’s airbag ON-OFF
tain moderate-to-severe side impact colli-
The information for SRS airbags includes im-
switch*
sions.
portant information concerning the driver’s
and front passenger’s airbags, the driver’s
knee airbag, the side airbags and the curtain
airbags.
4-24
Seat and seat belts
Supplemental restraint system (SRS) - airbag
The airbags deflate very rapidly after deploy-
WARNING
ment, so there is little danger of obscured vi-
z
Place all infants and small children in the
sion.
rear seat and properly restrained using an
appropriate child restraint system.
CAUTION
The rear seat is the safest place for infants
and children.
z
Airbags inflate at an extremely rapid speed.
4
In certain situations, contact with inflating
airbags can result in abrasions, bruises, and
the like.
6- Side airbag modules*
7- Curtain airbag modules*
WARNING
z
IT IS VERY IMPORTANT TO BE
Only when the ignition switch or the opera-
PROPERLY SEATED.
tion mode is under the following conditions,
A driver or front passenger too close to
the airbags will operate.
the steering wheel or instrument panel
[Except vehicles equipped with keyless oper-
during airbag deployment can be killed or
ation system]
seriously injured.
The ignition switch is in the
“ON” or
Airbags inflate very fast, and with great
“START” position.
force.
WARNING
If the driver and front passenger are not
[Vehicles equipped with keyless operation
z
Infants and small children should never
properly seated and restrained, the air-
system]
be unrestrained, stand up against the in-
bags may not protect you properly, and
The operation mode is in ON.
strument panel or be held in your arms or
could cause serious or fatal injuries when
The airbags deployment produces a sudden,
on your lap. They could be seriously in-
it inflates.
jured or killed in a collision, including
loud noise, and releases some smoke and
Do not sit on the edge of the seat or sit
z
when the airbag inflates. They should be
powder, but these conditions are not injuri-
with your lower legs too close to the in-
properly seated in the rear seat in an ap-
ous, and do not indicate a fire in the vehicle.
strument panel, or lean head or chest
propriate child restraint system. See the
close to the steering wheel or instrument
People with respiratory problems may feel
“Child restraint” section of this owner’s
panel. Do not put feet or legs on or against
some temporary irritation from chemicals
manual.
the instrument panel.
used to produce the deployment; open the
windows after airbag deployment, if safe to
do so.
Seat and seat belts
4-25
Supplemental restraint system (SRS) - airbag
WARNING
Caution for installing the child
restraint on vehicles with a
z
A REARWARD FACING CHILD RE-
STRAINT must NOT be used in the front
front passenger airbag
passenger seat if the front passenger’s air-
The label shown here is attached on vehicles
bag has not been deactivated. The force of
with a front passenger airbag.
an inflating airbag could kill or cause se-
4
rious injuries to the child.
A rearward facing child restraint should
be used in the rear seat.
z
A FORWARD FACING CHILD RE-
STRAINT should be used in the rear seat
whenever possible; if they must be used in
Use rearward facing child restraints in the
the front passenger seat, turn off the front
rear seat or turn off the front passenger’s air-
passenger’s airbag ON-OFF switch. Fail-
ure to do so could kill or cause serious in-
bag ON-OFF switch (if so equipped). (Refer
juries to the child.
to “To turn an airbag off” on page 4-27)
z
Older children should be seated in the
rear seat, properly wearing the seat belt,
with an appropriate booster seat if nee-
Front passenger’s
ded.
airbag ON
WARNING
z
Extreme Hazard!
NEVER use a rearward facing child re-
straint on a seat protected by an ACTIVE
AIRBAG in front of it, DEATH or SERI-
OUS INJURY to the CHILD can occur.
NOTE
z
The labels may be in different positions de-
pending on the vehicle model.
4-26
Seat and seat belts

Supplemental restraint system (SRS) - airbag
Front passenger’s airbag ON-
Front passenger’s airbag OFF
WARNING
OFF switch*
indication lamp*
z Do not fit any accessory that makes the
The front passenger’s airbag ON-OFF switch
The front passenger’s airbag OFF indication
indication lamp impossible to see, and do
not cover the indication lamp with a stick-
can be used to disable the front passenger’s
lamp is located in the instrument panel.
er. You would not be able to verify the sta-
airbag. If you have a child restraint system
tus of the passenger airbag system.
that cannot be fitted to any seat other than the
4
front passenger seat, be sure to turn OFF the
front passenger’s airbag ON-OFF switch be-
To turn an airbag off
fore using it.
(Refer to “To turn an airbag off” on page
WARNING
4-27.)
The front passenger’s airbag ON-OFF switch
z
To reduce risk of serious or fatal injury:
is located in the glove box.
• Always remove the key from the igni-
tion switch before operating a front
passenger’s airbag ON-OFF switch.
Failure to do so could adversely affect
the airbag performance.
• Wait at least 60 seconds to operate the
The indicator normally illuminates when the
front passenger’s airbag ON-OFF
ignition switch is turned to the “ON” position
switch after turning the ignition switch
or the operation mode is put in ON, and goes
to the “LOCK” position or putting the
off a few seconds later.
operation mode in OFF.
When the front passenger’s airbag ON-OFF
The SRS airbag system is designed to
switch is turned OFF, the indication lamp will
retain enough voltage to deploy the air-
stay on to show that the front passenger’s air-
bag.
bag is not operational. When the front pas-
• Always remove the key from the front
passenger’s airbag ON-OFF switch af-
senger’s airbag ON-OFF switch is turned
ter operating that switch. Failure to do
ON, the indication lamp goes off to show that
so could lead to improper position of
the front passenger’s airbag is operational.
the front passenger’s airbag ON-OFF
switch.
Seat and seat belts
4-27

Supplemental restraint system (SRS) - airbag
3. Turn the ignition switch to the “ON” po-
The driver’s airbag and the front passenger’s
WARNING
sition or put the operation mode in ON.
airbag are designed to inflate at the same
• Do not turn OFF the front passenger’s
The front passenger’s airbag OFF indi-
time even if the passenger seat is not occu-
airbag ON-OFF switch except when a
cation lamp will stay on.
pied.
child restraint system is fitted to the
front passenger seat.
• If the indicator does not come on when
4
the front passenger’s airbag ON-OFF
switch is turned OFF, do not fit a child
restraint system to the front passenger
seat. We recommend you to have the
system inspected by a MITSUBISHI
MOTORS Authorized Service Point.
• If the indication lamp remains on when
the front passenger’s airbag ON-OFF
switch is turned ON, do not allow any-
one to sit on the front passenger seat.
We recommend you to have the system
inspected
by a MITSUBISHI
Driver’s knee airbag system*
MOTORS Authorized Service Point.
The front passenger’s airbag is now deactiva-
The driver’s knee airbag is located under the
ted and will not deploy until switched on
again.
steering wheel.
To turn an airbag off, follow these steps:
The driver’s knee airbag is designed to de-
1. Insert the key into the front passenger’s
Driver’s and front passenger’s
ploy at the same time as the driver’s front air-
airbag ON-OFF switch, and turn it to the
airbag system
bag.
“OFF” position.
The driver’s airbag is located under the pad-
2. Remove the key from the key opening of
the front passenger’s airbag ON-OFF
ded cover in the middle of the steering wheel.
switch.
The front passenger’s airbag is contained in
the instrument panel above the glove box.
4-28
Seat and seat belts

Supplemental restraint system (SRS) - airbag
Deployment of front airbags
The front airbags and driver’s knee airbag
The front airbags and driver’s
will deploy if the severity of the impact is
knee airbag MAY NOT DE-
and driver’s knee airbag
above the designed threshold level, compara-
PLOY when…
ble to a collision at approximately 25 km/h
The front airbags and driver’s
With certain types of frontal collisions, the
(16 mph) when impacting straight into a solid
knee airbag ARE DESIGNED
vehicle’s body structure is designed to absorb
wall that does not move or deform. If the se-
TO DEPLOY when…
the shock to help protect the occupants from
4
verity of the impact is below the above
harm. (The vehicle body’s front area may de-
The front airbags and driver’s knee airbag are
threshold level, the front airbags and driver’s
form significantly as it absorbs the impact.)
designed to deploy when the vehicle suffers a
knee airbag may not deploy. However, this
Under such circumstances, the front airbags
moderate to severe frontal impact. Examples
threshold speed will be considerably higher if
and driver’s knee airbag may not deploy irre-
of some typical conditions are shown in the
the vehicle strikes an object that absorbs the
spective of the deformation and damage to
illustration.
impact by either deforming or moving (for
the vehicle body.
example, another stationary vehicle, pole or a
Examples of some typical conditions are
guard rail).
shown in the illustration.
Because frontal collisions can easily move
you out of position, it is important to always
properly wear your seat belts. Your seat belts
will help keep you a safe distance from the
steering wheel and instrument panel during
the initial stages of airbag deployment. The
initial stage of airbag inflation is the most
forceful, and can possibly cause serious or fa-
tal injuries. Moreover, the seat belts in your
1- Head-on collision with a solid wall at a
vehicle are your primary means of protection
speed of approximately 25 km/h
in a collision. The SRS airbags are designed
(16 mph) or higher
to provide additional protection. Therefore,
1- Collision with a utility pole, tree or other
2- Moderate-to-severe frontal impact with-
for your safety and the safety of all occu-
narrow object
in the shaded area between the arrows
pants, be sure to always properly wear your
2- Vehicle slides under the rear body of a
seat belts.
truck
3- Oblique frontal impacts
Seat and seat belts
4-29

Supplemental restraint system (SRS) - airbag
Because the front airbags and driver’s knee
The front airbags and driver’s
Because the front airbags and driver’s knee
airbag do not protect the occupant in all types
knee airbag MAY DEPLOY
airbag may deploy in certain types of unex-
of frontal collisions, be sure to always prop-
when…
pected impacts as shown in the illustration
erly wear your seat belts.
that can easily move you out of position, it is
The front airbags and driver’s knee airbag
important to always properly wear your seat
may deploy if the bottom of the vehicle suf-
The front airbags and driver’s
belts. Your seat belts will help keep you a
4
knee airbag ARE NOT DE-
fers a moderate-to-severe impact (undercar-
safe distance from the steering wheel and in-
riage damage).
SIGNED TO DEPLOY when…
strument panel during the initial stages of air-
Examples of some typical conditions are
bag deployment. The initial stage of airbag
The front airbags and driver’s knee airbag are
shown in the illustration.
inflation is the most forceful and can possibly
not designed to deploy in conditions where
cause serious or fatal injuries if you contact it
they cannot typically provide protection to
at this stage.
the occupant.
Such conditions are shown in the illustration.
WARNING
z
Do not attach anything to the steering
wheel’s padded cover, such as badges or
accessories. It might strike and injure an
occupant if the airbag inflates.
z
Do not set anything on, or attach anything
to, the instrument panel above the glove
1- Collision with an elevated median/island
box. It might strike and injure an occu-
pant if the airbag inflates.
or kerb
2- Vehicle travels over a deep hole/pothole
3- Vehicle drives down a steep slope and
1- Rear end collisions
hits the ground
2- Side collisions
3- Vehicle rolls onto its side or roof
Because the front airbags and driver’s knee
airbag do not protect the occupant in all types
of collisions, be sure to always properly wear
your seat belts.
4-30
Seat and seat belts
Supplemental restraint system (SRS) - airbag
The side airbag is designed to inflate only on
WARNING
WARNING
the side of the vehicle that is impacted, even
z
Do not attach accessories to, or put them
z Do not put packages, pets or other objects
with no passenger in the front seat.
in front of, the windscreen. These objects
between the airbags and the driver or
could restrict the airbag inflation, or
front passenger. It could affect airbag per-
strike and injure an occupant if the air-
formance, or could cause injury when the
bags inflate.
airbag inflates.
4
z
Do not attach additional keys or accesso-
z Right after the airbag inflation, several
ries
(hard, pointed or heavy objects) to
airbag system components will be hot. Do
the ignition key. Such objects could pre-
not touch these components. There is a
vent the driver’s knee airbag from inflat-
danger of being burnt.
ing normally or could be propelled and
z The airbag system is designed to work on-
cause serious injury if the airbag inflates.
ly once. Once the airbags have deployed,
z
Do not attach accessories to the lower por-
they will not work again. They must
tion of the driver’s side instrument panel.
promptly be replaced, and we recommend
Such objects could prevent the driver’s
you to have the entire airbag system in-
knee airbag from inflating normally or
spected by a MITSUBISHI MOTORS
could be propelled and cause serious in-
Authorized Service Point.
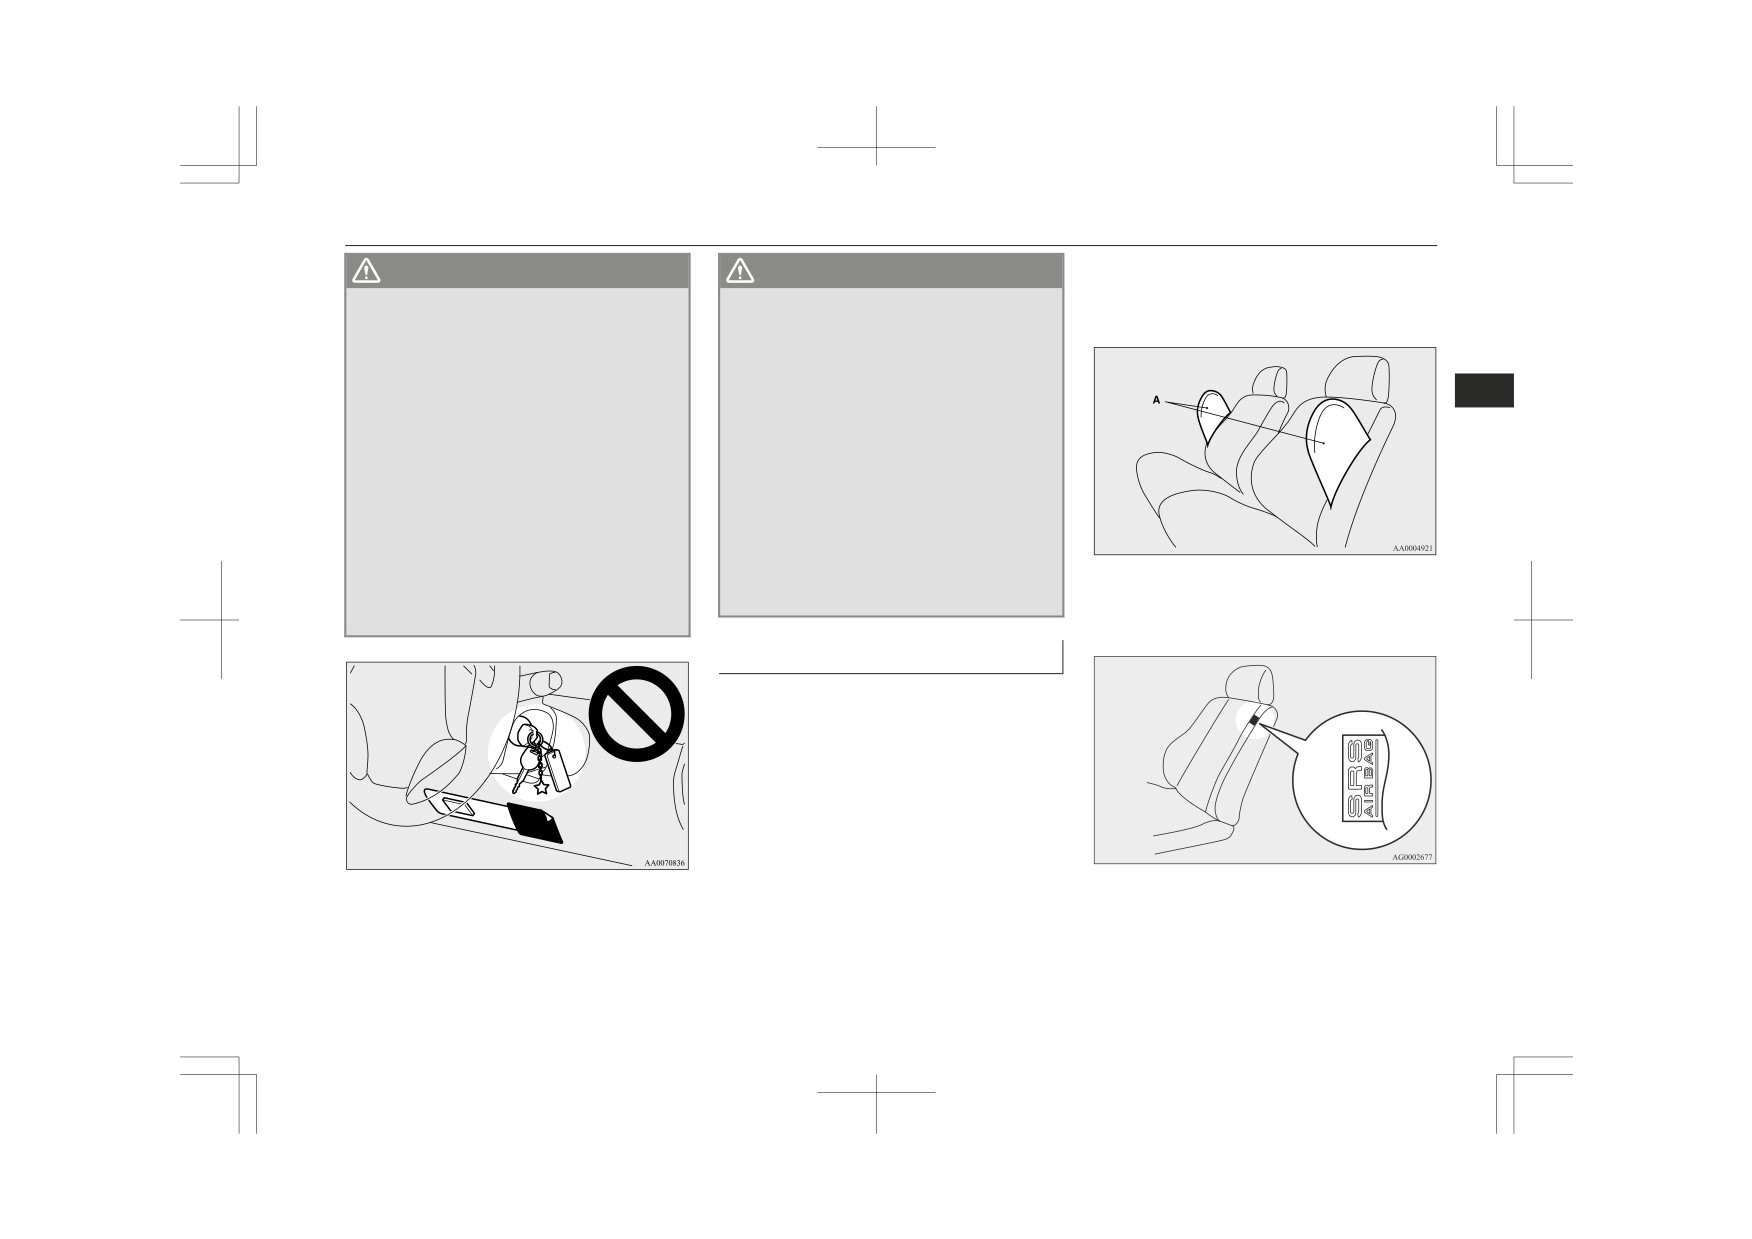
The label shown here is attached to the seat-
jury if the airbag inflates.
backs with a side airbag.
Side airbag system*
The side airbags (A) are contained in the
driver and front passenger seatbacks.
Seat and seat belts
4-31

Supplemental restraint system (SRS) - airbag
Curtain airbag system*
The typical condition is shown in the illustra-
The side airbags and curtain
tion.
airbags MAY NOT DEPLOY
The curtain airbags are contained in the front
when…
pillars and roof side rail. The curtain airbag is
designed to inflate only on the side of the ve-
With certain types of side collisions, the vehi-
hicle that is impacted, even with no passen-
cle’s body structure is designed to absorb the
ger in the front seat or rear seat.
shock to help protect the occupants from
4
harm. (The vehicle body’s side area may de-
form significantly as it absorbs the impact.)
Under such circumstances, the side airbags
and curtain airbags may not deploy irrespec-
tive of the deformation and damage to the ve-
hicle body. Also, depending on the location
of the impact, the side airbags and curtain air-
The seat belts in your vehicle are your pri-
bags may not deploy simultaneously.
mary means of protection in a collision. The
Examples of some typical conditions are
SRS side airbags and curtain airbags are de-
shown in the illustration.
signed to provide additional protection.
Therefore, for your safety and the safety of
Deployment of side airbags and
all occupants, be sure to always properly
curtain airbags
wear your seat belts.
The side airbags and curtain
airbags ARE DESIGNED TO
DEPLOY when…
The side airbags and curtain airbags are de-
signed to deploy when the vehicle suffers a
moderate-to-severe side impact to the middle
of the passenger compartment.
1- Side impacts in an area away from the
passenger compartment
2- Motorcycle or other similar small vehi-
cle collides with the side of vehicle
4-32
Seat and seat belts