Mitsubishi L200 (2018 year). Instruction - part 4


  Index      Mitsubishi     Mitsubishi L200 - instruction 2018 year in english


Search            


Content   ..  2  3  4  5   ..


Mitsubishi L200 (2018 year). Instruction - part 4


Electric window control switch

E00302303161

Each door window opens or closes while the
corresponding switch is operated.

Driver’s switch 
LHD

Driver’s switch 
RHD

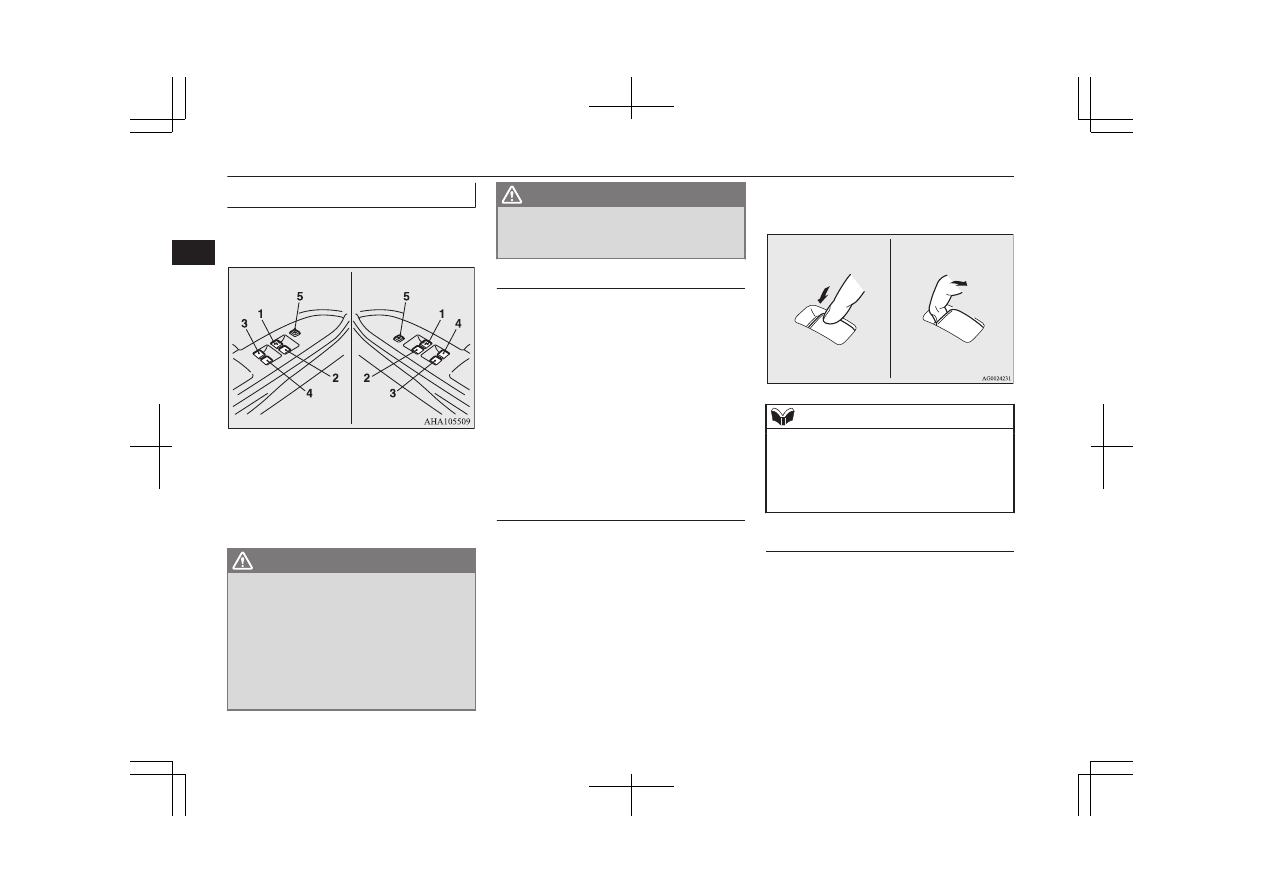
1- Driver’s door window
2- Front passenger’s door window
3- Rear left door window (Double cab)
4- Rear right door window (Double cab)
5- Lock switch

WARNING

l

Before operating the electric window con-
trol, make sure that nothing can get trap-
ped (head, hand, finger, etc.).

l

Never leave the vehicle without removing
the key.

l

Never leave a child (or other person who
might not be capable of safe operation of
the electric window control) in the vehicle
alone.

WARNING

l

The  child  may  tamper  with  the  switch  at
the  risk  of  its  hands  or  head  being  trap-
ped in the window.

Driver’s switches

The driver’s switches can be used to operate
all door windows. A window can be opened
or  closed  by  operating  the  corresponding
switch.
Press  the  switch  down  to  open  the  window,
and pull up the switch to close it.
If the switch for the driver’s window is fully
pressed down/pulled up, the door window au-
tomatically opens/closes completely.
If  you  want  to  stop  the  window  movement,
operate the switch lightly in the reverse direc-
tion.

Passenger’s switches

The passenger’s switches can be used to op-
erate  the  corresponding  passenger’s  door
windows.

Press  the  switch  down  for  opening  the  win-
dow, and pull up the switch for closing it.

NOTE

l

Repeated operation with the engine stopped
will run down the battery. Operate the win-
dow  switches  only  while  the  engine  is  run-
ning.

l

The rear door windows only open halfway.

Lock switch

E00303102361

When this switch is operated, the passenger’s
switches cannot be used to open or close the
door windows and the driver’s switch cannot
open  or  close  any  door  windows  other  than
the driver’s door window.

Electric window control*

3-22

OKTE18E1

Locking and unlocking

3

To unlock, press it once again.

1- Lock
2- Unlock

WARNING

l

A child may tamper with the switch at the
risk of its hands or head being trapped in
the window. When driving with a child in
the  vehicle,  please  press  the  window  lock
switch to disable the passenger’s switches.

Timer function

E00302402080

The  door  windows  can  be  opened  or  closed
for 30 seconds after the engine is stopped.
However, once the driver’s door or the front
passenger’s door is opened, the windows can-
not be operated.

Safety mechanism (driver’s

window only)

E00302502108

When  the  door  window  is  automatically
closed  by  pulling  up  the  switch  fully,  if  a
hand  or  head  is  trapped  in  the  closing  win-
dow, it will lower automatically.
Nonetheless,  make  sure  that  nobody  puts
their  head  or  hand  out  of  the  window  when
closing the driver’s door window.
The lowered window will become operation-
al after a few seconds.

WARNING

l

If  the  battery  terminals  are  disconnected
or the fuse for electric window is replaced,
the safety mechanism will be cancelled.
If  a  hand  or  head  got  trapped,  a  serious
injury could result.

CAUTION

l

The  safety  mechanism  is  cancelled  just  be-
fore the window is fully closed. This allows
the  window  to  close  completely.  Therefore
be especially careful that no fingers are trap-
ped in the window.

l

The  safety  mechanism  is  deactivated  while
the  switch  is  pulled  up.  Therefore  be  espe-
cially careful that fingers are not trapped in
the door window opening.

NOTE

l

The safety mechanism can be activated if the
driving  conditions  or  other  circumstances
cause the driver’s door window to be subjec-
ted to a physical shock similar to that caused
by a trapped hand or head.

l

If  the  safety  mechanism  is  activated  five  or
more  times  in  a  row,  the  safety  mechanism
will be cancelled and the door window will
not close correctly.
In  such  a  case,  the  following  procedure
should  be  implemented  to  rectify  this  situa-
tion. If the window is open, repeatedly raise
the  driver’s  door  window  switch  until  that
window  has  been  fully  closed.  Following
this, release the switch, raise the switch once
again and hold it in this condition for at least
1 second, then release it. You should now be
able to operate in the normal fashion.

l

If  the  battery  terminals  are  disconnected  or
the fuse for electric window is replaced, the
safety  mechanism  will  be  cancelled  and  the
door  window  will  not  automatically  open/
close completely.
If  the  window  is  open,  repeatedly  raise  the
driver’s  door  window  switch  until  the  win-
dow  has  been  fully  closed.  Following  this,
release  the  switch,  raise  the  switch  once
again and hold it in this condition for at least
1 second, then release it. You should now be
able to operate the driver’s door window in
the normal fashion.

Electric window control*

3-23

OKTE18E1

Locking and unlocking

3


OKTE18E1

Seat adjustment

E00400301887

Adjust the driver’s seat so that you are com-
fortable  and  that  you  can  reach  the  pedals,
steering  wheel,  switches  etc.  while  retaining
a clear field of vision.

WARNING

l

Do  not  attempt  to  adjust  the  seat  while
driving. This can cause loss of vehicle con-
trol  and  result  in  an  accident.  After  ad-
justments are made, ensure the seating is
locked  in  position  by  attempting  to  move
the  seat  forward  and  rearward  without
using the adjusting mechanism.

l

It  is  extremely  dangerous  to  ride  in  the
cargo area (inside or outside) of a vehicle.
Also, the cargo area and rear seats should
never be used as a play area by children.
In  a  collision,  people  or  children  riding
unrestrained in these areas are more like-
ly to be seriously injured or killed.

l

Do not allow people or children to ride in
any area of your vehicle that is not equip-
ped  with  seats  and  seat  belts,  and  make
sure that everyone travelling in your vehi-
cle is in a seat and wearing a seat belt, or
in the case of a child is strapped in a child
restraint.

WARNING

l

To minimize the risk of personal injury in
the event of a collision or sudden braking,
the  seatbacks  should  always  be  in  the  al-
most  upright  position  while  the  vehicle  is
in motion. The protection provided by the
seat  belts  may  be  reduced  significantly
when  the  seatback  is  reclined.  There  is
greater  risk  that  the  passenger  will  slide
under the seat belt, resulting in serious in-
jury, when the seatback is reclined.

l

Do not place objects under the seats. This
could  prevent  the  seat  from  locking  se-
curely, and it could lead to an accident. It
may also cause damage to the seat or oth-
er parts.

CAUTION

l

Make sure the seat is adjusted by an adult or
with  adult  supervision  for  correct  and  safe
operation.

l

Do  not  place  a  cushion  or  the  like  between
your  back  and  the  seatback  while  driving.
The effectiveness of the head restraints will
be reduced in the event of an accident.

l

The  reclining  mechanism  of  the  front  man-
ual seat’s seatback is spring loaded, causing
it to fold the seatback forward when the lock
lever  is  operated.  When  using  the  lever,  sit
close  to  the  seatback  or  hold  it  with  your
hand to control its return motion.

l

When  sliding  the  seats,  be  careful  not  to
catch your hand or foot.

CAUTION

l

If  your  vehicle  is  equipped  with  the  rear
seat, when sliding or reclining the seat rear-
ward,  pay  careful  attention  to  the  rear  seat
passengers. (Club cab and Double cab)

Front seats

E00400401468

Manual type*

1- To adjust forward or backward

Lift the handle and adjust the seat to the
desired position, and release the handle.

2- To recline the seatback

Pull the lever up and then lean backward
to  the  desired  position,  and  release  the
lever.

Seat adjustment

4-02

OKTE18E1

Seat and seat belts

4

3- To  adjust  seat  cushion  height  (driver’s

side only of Club cab and Double cab)
Turn the dial and adjust the seat cushion
height to the desired position.

Power type*

1- To adjust forward or backward

Operate  the  switch  as  indicated  by  the
arrows and adjust the seat to the desired
position.

2- To recline the seatback

Operate  the  switch  as  indicated  by  the
arrows  and  adjust  the  seatback  angle  to
the desired position.

3- To adjust seat height

Operate  the  switch  as  indicated  by  the
arrows  and  adjust  the  seat  height  to  the
desired position.
If the entire switch is operated, then the
entire seat moves.

4- To adjust seat cushion angle

Operate  the  switch  as  indicated  by  the
arrows and adjust the seat cushion angle
to the desired position.

NOTE

l

To  prevent  the  battery  from  running  down,
operate the switch with the engine running.

Heated seats*

E00401102254

The heated seats can be operated with the ig-
nition  switch  or  the  operation  mode  in  ON.
Operate  the  switch  as  indicated  by  arrows.
The indication lamp (A) will illuminate while
the heater is on.

1 (HI)

Heater high (for quick heating).

2

Heater off.

3 (LO)

Heater  low  (to  keep  the  seat
warm).

CAUTION

l

Operate in the high position for quick heat-
ing. Once the seat is warm, set the heater to
low to keep it warm. Slight variations in seat
temperature  may  be  felt  while  using  the
heated seats. This is caused by the operation
of  the  heater’s  internal  thermostat  and  does
not indicate a malfunction.

l

If  the  following  types  of  persons  use  the
heated  seats,  they  might  become  too  hot  or
receive  minor  burns  (red  skin,  heat  blisters,
etc.):

Children, elderly or ill people

People with sensitive skin

Excessively tired people

People  under  the  influence  of  alcohol  or
sleep inducing medication (cold medicine,
etc.)

l

Do  not  place  heavy  objects  on  the  seat  or
stick  pins,  needles,  or  other  pointed  objects
into it.

l

Do not use a blanket, cushion, or other mate-
rial  with  high  heat  insulation  properties  on
the  seat  while  using  the  heater;  this  might
cause the heater element to overheat

l

Do not use benzine, kerosene, petrol, alcohol
or other organic solvents when cleaning the
seats.  Doing  so  could  damage  not  only  the
seat cover, but also the heater element.

Front seats

4-03

OKTE18E1

Seat and seat belts

4

CAUTION

l

If water or any other liquid is spilled on the
seat,  allow  it  to  dry  thoroughly  before  at-
tempting to use the heater.

l

Turn the heater off immediately if it appears
to be malfunctioning during use.

Rear seat (Club cab and
Double cab)*

E00401301536

When a person is sitting in the middle seating
position  of  the  rear  seat,  adjust  the  head  re-
straint  to  height  at  which  it  lock  in  position.
Refer  to  “Head  restraints*”  on  page  4-05.
(Double cab)

Folding the seatback forward

(Double cab)

E00401601467

Pull  up  the  band  on  the  top  of  the  seatback
and fold it forward.

To return

E00415600041

Raise the seatback until it is locked securely
in place.
Push and pull the seatback lightly to be sure
it is secure.

Folding up the seat cushion

(Club cab)*

E00411301063

The right and left seat cushions can be folded
up separately.
To  fold  the  seat  cushions  up,  raise  the  seat
cushions.

Securely  retain  the  seat  cushion  by  hooking
the retaining band (A) onto the head restraint
(B) of the rear seat.

Armrest (Double cab)

E00401701804

To use the armrest, fold it down.
To  return  to  the  original  position,  push  it
backward  (into  the  seatback)  until  it  is  level
with the seat. (Double cab)

Rear seat (Club cab and Double cab)*

4-04

OKTE18E1

Seat and seat belts

4

NOTE

l

Do not climb or sit on the armrest. Doing so
could damage the armrest.

l

The top surface of the armrest contains a cup
holder for rear seat occupants.
Refer to “Cup holder” on page 7-106.

Head restraints*

E00403302869

WARNING

l

Driving  without  the  head  restraints  in
place  can  cause  you  and  your  passengers
serious injury or death in an accident. To
reduce  the  risk  of  injury  in  an  accident,
always make sure the head restraints are
installed  and  properly  positioned  when
the seat is occupied.

l

Never place a cushion or similar device on
the  seatback.  This  can  adversely  affect
head restraint performance by increasing
the  distance  between  your  head  and  the
restraint.

To adjust height

Front seats

Adjust  the  head  restraint  height  so  that  the
centre of the head restraint is as close as pos-
sible to ear level to reduce the chances of in-
jury in the event of collision. Any person too
tall for the head restraint to reach their seated
ear  level,  should  adjust  the  restraint  as  high
as possible.
To  raise  the  head  restraint,  move  it  upward.
To  lower  the  restraint,  move  it  downward
while  pushing  the  height  adjusting  knob  (A)
in  the  direction  of  the  arrow.  After  adjust-
ment,  push  the  head  restraint  downward  and
make sure that it is locked.

Rear centre seat

To  reduce  the  risk  of  injury  in  an  accident,
pull up the head restraint to the locked posi-
tion.
 
To raise the head restraint, move it upward.
To  lower  the  restraint,  move  it  downward
while  pushing  the  height  adjusting  knob  (A)
in  the  direction  of  the  arrow.  After  adjust-
ment,  push  the  head  restraint  downward  and
make sure that it is locked.

Head restraints*

4-05

OKTE18E1

Seat and seat belts

4

WARNING

l

When  a  person  sits  in  the  middle  seating
position of the rear seat, pull up the head
restraint  to  a  height  at  which  it  locks  in
position. Be sure to make this adjustment
before  starting  to  drive.  Serious  injuries
could  otherwise  be  suffered  as  the  result
of an impact. (Double cab)

NOTE

l

The head restraint height of the outer seat in
the rear seat cannot be adjusted.

To remove

Lift the head restraint with the height adjust-
ing knob (A) pushed in.

To install

Confirm  that  the  head  restraint  is  facing  the
correct  direction,  and  then  insert  it  into  the
seatback  while  pressing  the  height  adjusting
knob (A) in the direction indicated by the ar-
row.
The  head  restraint  stalk  with  the  adjustment
notches (B) must be installed in the hole with
the adjusting knob (A) (except head restraints
of the outer seat).

CAUTION

l

Confirm  that  the  height  adjusting  knob  (A)
is correctly adjusted as shown in the illustra-
tion,  and  also  lift  the  head  restraints  to  en-
sure  that  they  do  not  come  out  of  the  seat-
back.

CAUTION

l

The shape and size of the head restraint dif-
fers  according  to  the  seat.  Always  use  the
correct  head  restraint  provided  for  the  seat
and  do  not  install  the  head  restraint  in  the
wrong direction.

Head restraints*

4-06

OKTE18E1

Seat and seat belts

4

Seat belts

E00404802089

To  protect  you  and  your  passengers  in  the
event of an accident, it is most important that
the  seat  belts  are  worn  correctly  while  driv-
ing.
The front seat belts each have a pretensioner
system. (Single cab and Club cab)
The  front  seat  belts  and  the  rear  outer  seat
belts each have a pretensioner system. (Dou-
ble cab)
These belts are used the same way as a con-
ventional seat belt.
Refer  to  “Seat  belt  pretensioner  system  and
force limiter system*” on page 4-10.

WARNING

l

Seat belts should always be worn by every
adult  who  drives  or  rides  in  this  vehicle,
and by all children who are tall enough to
wear seat belts properly.
Other  children  should  always  use  proper
child restraint systems.

l

Always  place  the  shoulder  belt  over  your
shoulder and across your chest. Never put
it behind you or under your arm.

l

One seat belt should be used by only one
person.  Doing  otherwise  can  be  danger-
ous.

WARNING

l

The seat belt will provide its wearer with
maximum  protection  if  the  recliner  seat-
back  is  placed  in  fully  upright  position.
When  the  seatback  is  reclined,  there  is
greater  risk  that  the  passenger  will  slide
under the belt, especially in a forward im-
pact accident, and may be injured by the
belt or by striking the instrument panel or
seatbacks.

l

Remove any twists when using the belt.

l

No  modifications  or  additions  should  be
made  by  the  user  which  will  either  pre-
vent  the  seat  belt  adjusting  devices  from
operating to remove slack, or prevent the
seat belt assembly from being adjusted to
remove slack.

l

Never  hold  a  child  in  your  arms  or  on
your lap when riding in this vehicle, even
if you are wearing your seat belt. To do so
risks severe or fatal injury to the child in
a collision or sudden stop.

l

Always adjust the seat belt to a snug fit.

l

Always  wear  the  lap  portion  of  the  belt
over your hips.

3-point type seat belt (with

emergency locking mechanism)

E00404902888

This  type  of  belt  requires  no  length  adjust-
ment. Once worn, the belt adjusts itself to the
movement of the wearer, but in the event of a
sudden or strong shock, the belt automatical-
ly locks to hold the wearer’s body.

NOTE

l

You can check if the belt locks by pulling it
forward quickly.

To fasten

1. Pull the seat belt out slowly while hold-

ing the latch plate.

NOTE

l

When the seat belts cannot be pulled out in a
locked  condition,  pull  the  belts  once  force-
fully  and  then  return  them.  After  that,  pull
the belts out slowly once again.

2. Insert the latch plate into the buckle until

a “click” is heard.

Seat belts

4-07

OKTE18E1

Seat and seat belts

4

WARNING

l

Never  wear  the  lap  portion  of  the  belt
across your abdomen. During accidents it
can  press  sharply  against  the  abdomen
and increase the risk of injury.

l

The  seat  belts  must  not  be  twisted  when
worn.

3. Pull  the  belt  slightly  to  adjust  slackness

as desired.

To unfasten

Hold  the  latch  plate  and  push  the  button  on
the buckle.

NOTE

l

As the belt retracts automatically, keep hold-
ing the latch plate while retracting so that the
belt  stows  slowly.  Failure  to  do  this  could
damage the vehicle.

NOTE

l

If the seat belt (A) or ring (B) becomes dirty,
the belt may not retract smoothly. If the seat
belt  and  ring  are  dirty,  clean  them  with  a
mild soap or detergent solution.

Seat belt reminder

E00409802361


For  the  driver  and  the  front

passenger’s seat*

For the driver

For the front passenger

Type 1

Type 2

*-

This warning lamp shows the case
of the left-hand drive vehicles.

 
If  the  ignition  switch  is  turned  to  the  “ON”
position  or  the  operation  mode  is  put  in  ON
while  the  driver’s  and/or  the  front  passen-
ger’s  (if  so  equipped)  seat  belt  is  not  fas-
tened,  the  warning  lamp  comes  on  and  the
tone  sounds  for  approximately  6  seconds  to
remind  the  driver  and/or  the  front  passenger
(if so equipped) to fasten the seat belt.
If the vehicle is driven with the seat belt still
unfastened,  the  warning  lamp  will  blink  and
the  tone  will  sound  intermittently  until  the
seat belt is fastened.

WARNING

l

Do  not  install  any  accessory  or  sticker
that makes the lamp difficult to see.

NOTE

l

If  the  seat  belt  subsequently  remains  unfas-
tened, the warning lamp and the tone will is-
sue  further  warnings  each  time  the  vehicle
starts moving from a stop.

l

For  the  front  passenger  seat,  the  warning
function works only while a person is sitting
on the seat. (Club cab and Double cab)

Seat belts

4-08

OKTE18E1

Seat and seat belts

4

NOTE

l

When luggage is placed on the front passen-
ger  seat,  a  sensor  in  the  seat  cushion  may,
depending on the weight and position of the
luggage,  cause  the  warning  tone  to  sound
and the warning lamp to come on. (Club cab
and Double cab)

For the rear passenger’s seats*

E00415501047

*-

This  warning  lamp  shows  the
case of the 5-passenger vehicles.

 
If  the  ignition  switch  is  turned  to  the  “ON”
position  or  the  operation  mode  is  put  in  ON
while a seat belt is not fastened, the warning
lamp comes on for approximately 30 seconds
to remind the rear passenger to fasten the seat
belt.

If the vehicle is driven with the seat belt still
unfastened,  the  warning  lamps  come  on  for
approximately another 30 seconds. (This illu-
mination happens only the first time the vehi-
cle  starts  moving  with  the  seat  belt  still  un-
fastened.)
The warning lamps go off when the seat belt
is fastened.

WARNING

l

Do  not  install  any  accessory  or  sticker
that makes the lamp difficult to see.

NOTE

l

The warning lamp comes on even if no one
is sitting on the rear seats.

l

If a seat belt is unfastened while the vehicle
is being driven, the tone sounds for approxi-
mately  1  second  and  the  warning  lamp
comes on for approximately 30 seconds. At
the same time, the warning lamp for the seat
where the seat belt is not fastened comes on.

l

If  the  seat  belts  are  initially  fastened  but  a
seat  belt  is  unfastened  while  the  vehicle  is
stationary and the vehicle is then driven with
the  seat  belt  still  unfastened,  the  warning
lamp  comes  on  again  for  approximately  30
seconds.

Adjustable seat belt anchor

(front seats of Club cab and

Double cab)

E00405001720

The seat belt anchor height can be adjusted.
To  move  the  anchor,  pull  the  lock  knob  (A)
and  slide  the  anchor  to  the  desired  position.
Release the lock knob to lock the anchor into
position.

WARNING

l

When adjusting the seat belt anchor, set it
at  a  position  that  is  sufficiently  high  so
that  the  belt  will  make  full  contact  with
your  shoulder  but  will  not  touch  your
neck.

Seat belts

4-09

OKTE18E1

Seat and seat belts

4

Pregnant women restraint

E00405600064

WARNING

l

Seat  belts  work  for  everyone,  including
pregnant women. Pregnant women should
use  the  available  seat  belts.  This  will  re-
duce  the  likelihood  of  injury  to  both  the
woman and the unborn child. The lap belt
should  be  worn  across  the  thighs  and  as
snug  against  the  hips  as  possible,  but  not
across  the  waist.  Consult  your  doctor  if
you have any additional questions or con-
cerns.

Seat belt pretensioner
system and force limiter
system*

E00405701567

The front seat belts each have a pretensioner
system and force limiter system. (Single cab
and Club cab)
The  front  seat  belts  and  the  rear  outer  seat
belts  each  have  a  pretensioner  system  and
force limiter system. (Double cab)

Pretensioner system

E00405802464

When  the  ignition  switch  or  the  operation
mode  is  under  the  following  conditions,  if
there is a frontal impact or a side impact (ve-
hicles  equipped  with  SRS  side  airbags  and
SRS curtain airbags) severe enough to injure
the  driver  and/or  front  passenger  or  when  a
rollover  or  overturning  of  the  vehicle  is  de-
tected (if so equipped), the pretensioner sys-
tem  will  retract  the  respective  seat  belts  in-
stantaneously,  thus  maximizing  the  seat
belt’s effectiveness.
[Except  for  vehicles  equipped  with  keyless
operation system]
The  ignition  switch  is  in  the  “ON”  or
“START” position.
[Vehicles  equipped  with  keyless  operation
system]
The operation mode is in ON.

WARNING

l

To obtain the best results from your pre-
tensioner  seat  belt,  make  sure  you  have
adjusted  your  seat  correctly  and  wear
your seat belt properly.

CAUTION

l

Installation of audio equipment or repairs in
the vicinity of the pretensioner seat belts or
floor console must be performed in line with
MITSUBISHI  MOTORS  guidelines.  It  is
important  to  do  so  because  the  work  could
affect the pretensioner systems.

l

If you need to scrap the vehicle, please con-
sult  a  MITSUBISHI  MOTORS  Authorized
Service  Point.  It  is  important  to  do  so  be-
cause  unexpected  activation  of  the  preten-
sioner seat belts could cause injuries.

NOTE

l

The pretensioner seat belts will be activated
if the vehicle suffers a severe impact, even if
the seat belts are not worn.

l

The  pretensioner  seat  belts  are  designed  to
work  only  once.  After  the  pretensioner  seat
belts  have  been  activated,  we  recommend
you  to  have  them  replaced  by  a
MITSUBISHI  MOTORS  Authorized  Serv-
ice Point.

SRS warning lamp

E00405901413

This warning lamp is shared by the SRS air-
bags and the pretensioner seat belts.
Refer to “SRS warning lamp” on page 4-34.

Pregnant women restraint

4-10

OKTE18E1

Seat and seat belts

4

Force limiter system

E00406001280

In the event of a collision, each force limiter
system  will  effectively  absorb  the  load  ap-
plied  to  the  seat  belt  so  as  to  minimize  the
impact to the passenger.

Child restraint

E00406403552

When  transporting  children  in  your  vehicle,
some type of child restraint system should al-
ways  be  used  according  to  the  size  of  the
child.  This  is  required  by  law  in  most  coun-
tries.
The regulations concerning driving with chil-
dren in the front seat may differ from country
to  country.  You  are  advised  to  comply  with
the relevant regulations.

WARNING

l

When  possible,  put  children  in  the  rear
seat. Accident statistics indicate that chil-
dren  of  all  sizes  and  ages  are  safer  when
properly restrained in the rear seat rather
than in the front seat.

l

Holding a child in your arms is no substi-
tute for a restraint system. Failure to use
a proper restraint system can result in se-
vere or fatal injury to the child.

l

Each child restraint device or fixing is to
be used only by one child.

WARNING

l

When  attaching  a  child  restraint  system
to  the  rear  seat,  adjust  the  front  seat  to
prevent the front seatbacks from touching
the child’s feet and child restraint system.
Otherwise, the child could be seriously in-
jured  in  the  event  of  hard  braking  or  a
collision.

Caution for installing the child

restraint on vehicles with a

front passenger airbag

E00406501810

The label shown here is attached on vehicles
with a front passenger airbag.

WARNING

l

Extreme Hazard!
NEVER  use  a  rearward  facing  child  re-
straint on a seat protected by an ACTIVE
AIRBAG in front of it, DEATH or SERI-
OUS INJURY to the CHILD can occur.

NOTE

l

The labels may be in different positions de-
pending on the vehicle model.

Use  rearward  facing  child  restraints  in  the
rear seat or turn off the front passenger’s air-
bag  ON-OFF  switch.  (Club  cab  and  Double
cab, refer to “To turn an airbag off (Club cab
and Double cab)” on page 4-27)

Front passenger's 
airbag ON

Child restraint

4-11

OKTE18E1

Seat and seat belts

4

WARNING

l

A  REARWARD  FACING  CHILD  RE-
STRAINT must NOT be used in the front
passenger seat if the front passenger’s air-
bag has not been deactivated. The force of
an inflating airbag could kill or cause se-
rious  injuries  to  the  child.  A  rearward
facing  child  restraint  should  be  used  in
the rear seat.

l

A  FORWARD  FACING  CHILD  RE-
STRAINT should be used in the rear seat
whenever  possible;  if  it  must  be  used  in
the front passenger seat, turn off the front
passenger’s  airbag  ON-OFF  switch.  Fail-
ure to do so could kill or cause serious in-
juries to the child.

Infants and small children

E00406602339

When transporting infants and small children
in  your  vehicle,  follow  the  instruction  given
below.

Instruction:

l

For  small  infants,  an  infant  carrier
should  be  used.  For  small  children
whose  height  when  seated  allows  the
shoulder  belt  to  lie  in  contact  with  the
face or the throat, a child seat should be
used.

l

The child restraint system should be ap-
propriate  for  the  child’s  weight  and
height  and  properly  fit  in  the  vehicle.
For  a  higher  degree  of  safety:  THE
CHILD 

RESTRAINT 

SYSTEM

SHOULD  BE  INSTALLED  IN  THE
REAR SEAT.

l

Before  purchasing  a  child  restraint  sys-
tem, try installing it in the seat to make
sure  there  is  a  good  fit.  Because  of  the
location of the seat belt buckles and the
shape of the seat cushion, it may be dif-
ficult  to  securely  install  some  manufac-
turer’s child restraint systems.
If  the  child  restraint  system  can  be
pulled forward or to either side easily on
the  seat  cushion  after  the  seat  belt  has
been tightened, choose another manufac-
turer’s child restraint system.

WARNING

l

When  installing  a  child  restraint  system,
refer  to  the  instructions  provided  by  the
manufacturer  of  the  restraint  system.
Failure to do so can result in severe or fa-
tal injury to the child.

l

After installation, push and pull the child
restraint system back and forth, and side
to  side,  to  see  that  it  is  properly  secured.
If  the  child  restraint  system  is  not  instal-
led  securely,  it  may  cause  injury  to  the
child or other occupants in the case of ac-
cident or sudden stops.

l

When  the  child  restraint  system  is  not  in
use, keep your child restraint system fixed
firmly or remove it from the vehicle in or-
der  to  prevent  it  from  being  thrown
around  inside  the  vehicle  during  an  acci-
dent.

NOTE

l

Depending on the seating position in the ve-
hicle and the child restraint system that you
have,  the  child  restraint  can  be  attached  us-
ing one of the following two locations:

Using the lower anchorage in the rear seat
ONLY  if  the  child  restraint  has  ISOFIX
mountings (Double cab, See page 4-21).

Using the seat belt (See page 4-21).

Child restraint

4-12

OKTE18E1

Seat and seat belts

4

Older children

E00406701418

Children  who  have  outgrown  the  child  re-
straint  system  should  be  seated  in  the  seat
and wear combination lap shoulder belt.
The  lap  portion  of  the  belt  should  be  snug
and positioned low on the abdomen so that it
is  below  the  top  of  the  hip-bone.  Otherwise,
the  belt  could  intrude  into  the  child’s  abdo-
men during an accident and cause injury.

Child restraint

4-13

OKTE18E1

Seat and seat belts

4


Content   ..  2  3  4  5   ..