Mitsubishi Outlander XL. Manual - part 763


  Index      Mitsubishi     Mitsubishi Outlander XL - service repair manual 2007 year


Search            copyright infringement  


Content   ..  761  762  763  764   ..


Mitsubishi Outlander XL. Manual - part 763


lid glass. After the sunroof lid glass stops, press and
hold the up switch.

2.

Use  the  up  switch  to  set  the  sunroof  lid  glass  to  the  tilt-up
position. The sunroof lid glass activates for approximately 30
mm and stops automatically when the switch is pressed once.
Repeat this operation until the tilt-up position is reached and
hold  there  for  3  seconds  so  that  the  fully  closed  position
learning is completed.

HOW TO ADJUST THE FULLY CLOSED POSITION

SUCH AS WHEN THE SAFETY FUNCTION IS

ACTIVATED CONSECUTIVELY FIVE TIMES

Use  the  up  switch  to  set  the  sunroof  lid  glass  to  the  tilt-up
position.  The  sunroof  lid  glass  activates  for  approximately  30
mm and stops automatically when the switch is pressed once.
Repeat this operation until the tilt-up position is reached and hold
there for 3 seconds so that the fully closed position learning is
completed.

SUNROOF OPERATION CHECK

M14206000026USA0000010000

Check that the following items are normal before
carrying out this operation check.

Installation condition of the sunroof assembly

Installation

 condition,

 deformation

 and

contamination of the sunroof drive cable

Installation of sunroof lid glass

Sunroof switch and sunroof motor assembly

Check that the following items. If faulty, replace the
sunroof motor assembly.
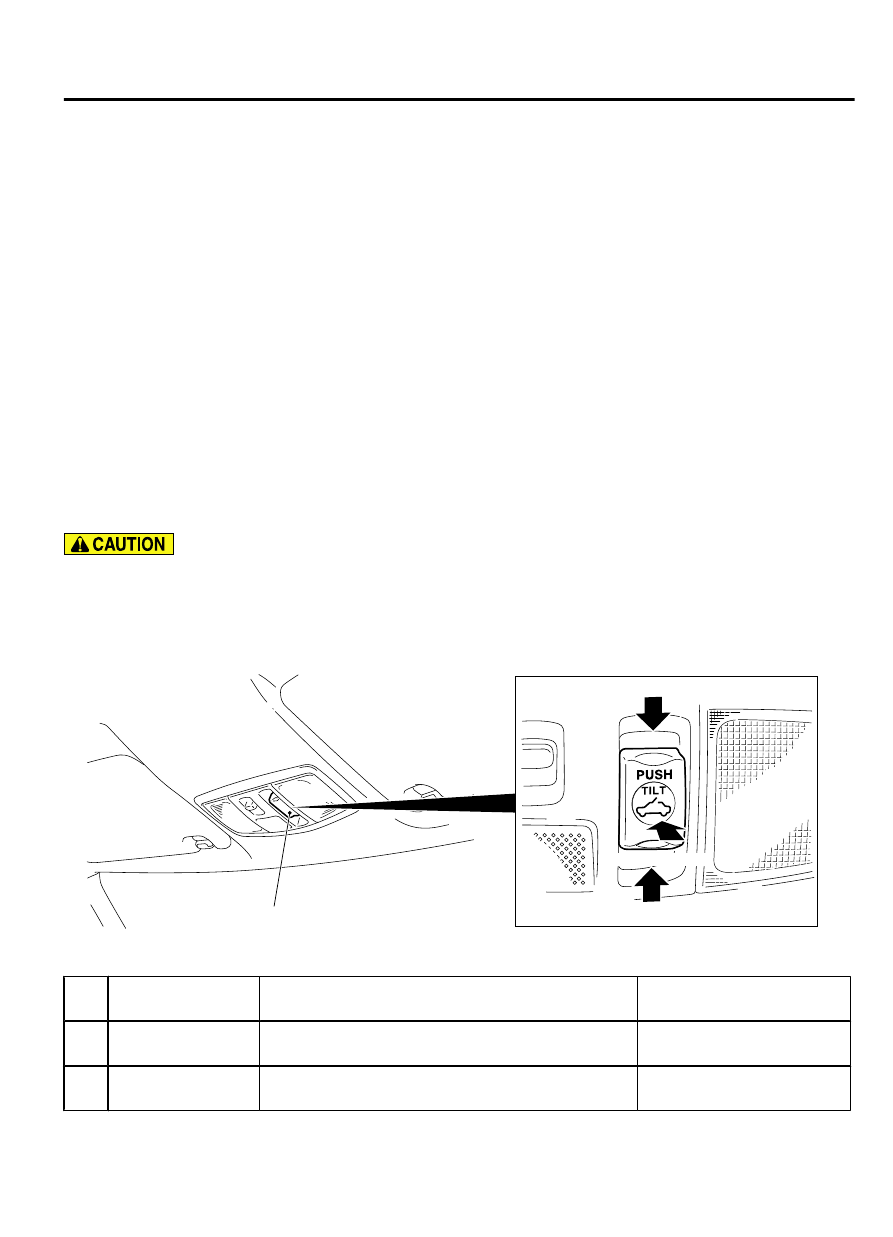
ZC6001500001

Sunroof switch

Open switch

Close/tilt-down switch

Tilt-up switch

BASIC OPERATION

NO. SUNROOF

FUNCTION

REQUIREMENTS  FOR  THE  SUNROOF  TO
FUNCTION

NORMAL OPERATION

01

OPEN

1.

Ignition switch: ON

2.

Sunroof switch: OPEN

Automatically  the  sunroof
fully opens.

02

CLOSE

1.

Ignition switch: ON

2.

Sunroof switch: CLOSE/TILT-DOWN

Automatically  the  sunroof
fully closes.

SUNROOF

42Ad-39

ON-VEHICLE SERVICE

NO. SUNROOF

FUNCTION

REQUIREMENTS  FOR  THE  SUNROOF  TO
FUNCTION

NORMAL OPERATION

03

TILT-UP

1.

Ignition switch: ON

2.

Sunroof switch: TILT-UP

The sunroof tilts up fully and
automatically.

04

TILT-DOWN

1.

Ignition switch: ON

2.

Sunroof switch: CLOSE/TILT-DOWN

The  sunroof  tilts  down  fully
and automatically.

05

AUTOMATIC
OPERATION
INTERRUPTION
(OPEN  OR  TILT-
UP)

A

1.

Ignition switch: ON

2.

Sunroof switch: OPEN or TILT-UP

The  sunroof  stops  the
automatic

 opening

operation.

B

1.

Ignition switch: ON

2.

Sunroof switch: CLOSE/TILT-DOWN (Push
the  sunroof  switch  to  the  CLOSE/TILT-
DOWN  position  while  the  sunroof  is
automatically  opening  and  release  the
switch within two seconds)

The  sunroof  stops  the
automatic

 opening

operation.

C

1.

Ignition switch: ON

2.

Sunroof switch: CLOSE/TILT-DOWN (Push
the  sunroof  switch  to  the  CLOSE/TILT-
DOWN  position  more  than  two  seconds
while the sunroof is automatically opening)

The  sunroof  stops  the
automatic

 opening

operation,  and  the  sunroof
closes  while  the  sunroof
switch  is  pushed  to  the
CLOSE/TILT-DOWN
position.

06

AUTOMATIC
OPERATION
INTERRUPTION
(CLOSE  OR  TILT-
DOWN)

A

1.

Ignition switch: ON

2.

Sunroof switch: CLOSE/TILT-DOWN

The  sunroof  stops  the
automatic closing operation.

B

1.

Ignition switch: ON

2.

Sunroof  switch:  OPEN  or  TILT-UP  (Push
the sunroof switch to the OPEN or TILT-UP
position  while  the  sunroof  is  automatically
opening and release the switch within two
seconds)

The  sunroof  stops  the
automatic closing operation.

C

1.

Ignition switch: ON

2.

Sunroof  switch:  OPEN  or  TILT-UP  (Push
the sunroof switch to the OPEN or TILT-UP
position  more  than  two  seconds  while  the
sunroof is automatically opening)

The  sunroof  stops  the
automatic closing operation,
and the sunroof opens while
the sunroof switch is pushed
to  the  OPEN  or  TILT-UP
position.

SUNROOF TIMER MECHANISM

In cases except the following, the basic operation and
jam  preventing  mechanism  will  be  maintained  for
thirty seconds after the ignition switch is turned to the
"LOCK" (OFF) position (Sunroof timer function).

If  you  open  a  door  within  that  period  (i.e.  a  door
switch  is  on),  the  sunroof  timer  function  will  be
cancelled immediately.

SAFETY MECHANISM

If any obstacle such as a hand or a head is detected
to  be  pinched  during  a  sunroof  lid  glass  closing
operation,  the  sunroof  lid  glass  is  opened  by

approximately 200 mm (7.9 inches) or more. (Safety
mechanism)

During  the  sunroof  lid  glass  closing  operation,  by
continuing the sunroof close switch operation, the
sunroof can be forcibly closed without activating the
safety  mechanism  even  when  the  obstacle  is
detected to be pinched.

During the safety mechanism activation, when the
sunroof  close  switch  is  operated,  the  sunroof  lid
glass  stops.  By  continuing  the  close  switch
operation,  the  sunroof  lid  glass  can  be  forcibly
closed  without  activating  the  safety  mechanism
even when the obstacle is detected to be pinched.

42Ad-40

SUNROOF

SUNROOF ASSEMBLY

SUNROOF ASSEMBLY

REMOVAL AND INSTALLATION

M14206000012USA0000010000

Post-installation operation
Roof lid glass assembly and sunroof assembly

Sunroof leakage check (Refer to P.42Ad-37.)

Sunroof alignment (Refer to P.42Ad-36.)

Learning procedures for sunroof fully closed position (Refer to P.42Ad-38.)

ZC6003000000

3

3

4

6

1

2

5

3

3

3.5 ± 0.5 N·m
31 ± 4 in-lb

5.0 ± 2.0 N·m
44 ± 18 in-lb

Section A – A

A

A

A

A

Grease: Use resin - proof silicone grease

Sunroof switch removal

·

Front  dome  light  assembly  (Refer  to
GROUP 52A, Headlining P.52A-15.)
Sunroof lid glass assembly removal

1.

Sunroof lid glass assembly

SUNROOF

42Ad-41

SUNROOF ASSEMBLY

Sunroof  motor  assembly  removal
steps

·

Front  dome  light  bracket  (Refer  to
GROUP 52A, Headlining P.52A-15.)

2.

Sunroof motor assembly
Sunroof assembly removal steps

·

Front  energy  absorber  roof  bracket
vehicles with curtain air bag (Refer to
GROUP 52A, Headlining P.52A-15.)

·

Rear  monitor  bracket  <Vehicles  with
rear monitor> (Refer to GROUP 54A,
Rear Display Unit P.54B-174.)

3.

Drain pipe connection

<<A>>

4.

Sunroof assembly
Drain pipe removal steps

·

Headlining  (Refer  to  GROUP  52A,
Headlining P.52A-15.)

·

Splash  shield  front  (Refer  to  P.
42Aa-9.)

>>A<<

5.

Front drain pipe

·

Splash shield rear (rear bumper side)
(Refer to P.42Aa-9.)

>>A<<

6.

Rear drain pipe


REMOVAL SERVICE POINT

<<A>> SUNROOF ASSEMBLY REMOVAL

ZC6003010000

Long nose pliers

Use a pair of long nose pliers or the like to remove the sunroof
assembly while turning it in the direction shown in the figure.

42Ad-42

SUNROOF

SUNROOF ASSEMBLY


Content   ..  761  762  763  764   ..