Mitsubishi Outlander (2003+). Manual - part 170


  Index      Mitsubishi     Mitsubishi Outlander - service repair manual 2003 year


Search            


Content   ..  168  169  170  171   ..


Mitsubishi Outlander (2003+). Manual - part 170


OUTPUT SHAFT

MANUAL TRANSMISSION OVERHAUL

22B-33

DISASSEMBLY SERVICE POINTS

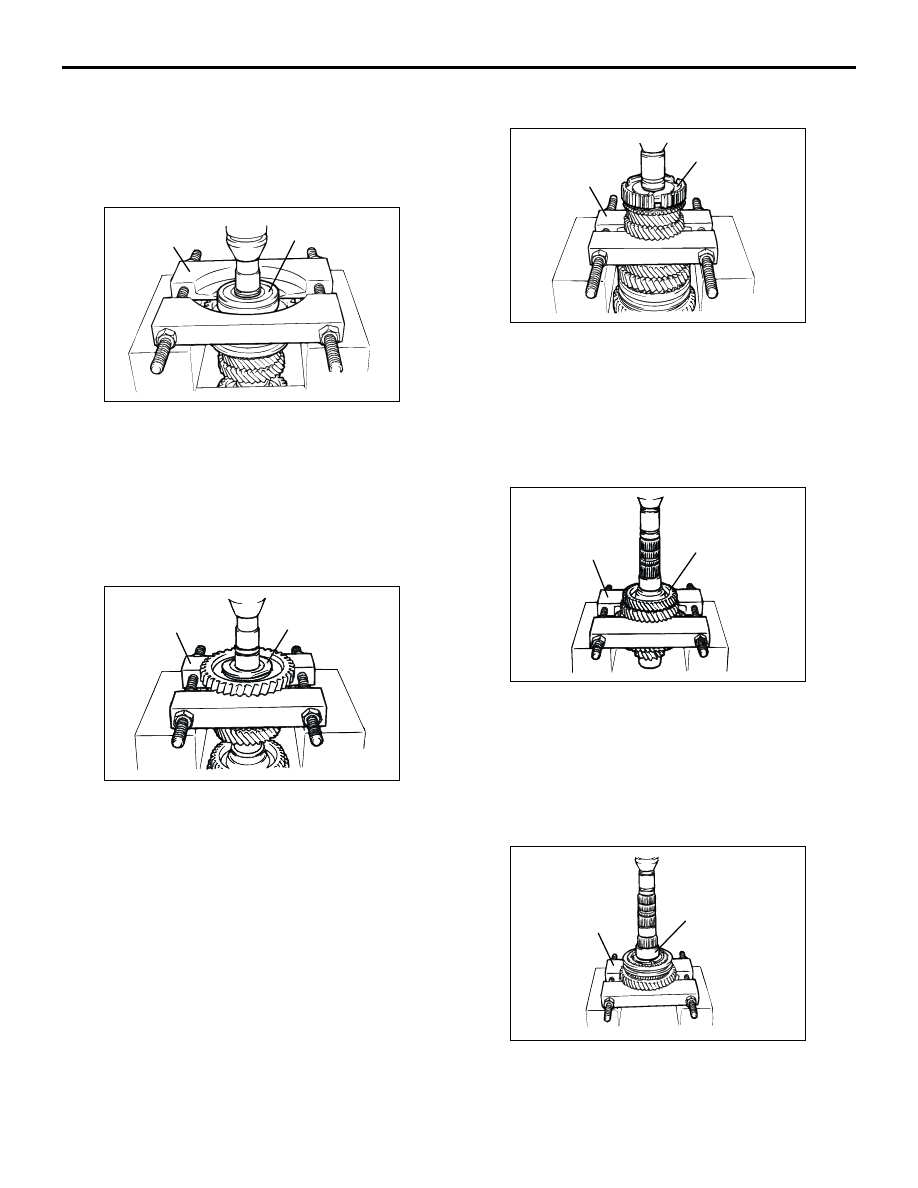
<<A>> BALL BEARING REMOVAL

1. Using special tool Bearing remover (MD998917), 

support the ball bearing, and then set them on the 
press.

2. Push down on the output shaft with the press, and 

remove the ball bearing.

<<B>> REVERSE GEAR BEARING SLEEVE 
REMOVAL

1. Using special tool Bearing remover (MD998801), 

support the reverse gear, and then set them on 
the press.

2. Push down on the output shaft with the press and 

remove the reverse gear bearing sleeve.

<<C>> 5TH SPEED-REVERSE SYNCHRONIZER 
HUB REMOVAL

1. Using special tool Bearing remover (MD998801), 

support the 4th speed gear, and then set them on 
the press.

2. Push down on the output shaft with the press and 

remove the 5th speed-reverse synchronizer hub.

<<D>> 3RD SPEED GEAR REMOVAL

1. Using special tool Bearing remover (MD998917), 

support the 2nd speed gear, and then set them on 
the press.

2. Push down on the output shaft with the press and 

remove the 3rd speed gear.

<<E>> 2ND SPEED GEAR SLEEVE REMOVAL

1. Using special tool Bearing remover (MD998917), 

support the 1st speed gear, and then set them on 
the press.

<<G>>

>>A<<

35. Roller bearing inner race
36. Output shaft

Disassembly steps (Continued)

AK204252

Ball bearing

MD998917

AC

AK204253

Reverse gear
bearing sleeve

MD998801

AB

AK204254 AB

Synchronizer hub

MD998801

AK204255

3rd speed gear

MD998917

AB

AK204256

MD998917

2nd speed gear sleeve

AC

OUTPUT SHAFT

MANUAL TRANSMISSION OVERHAUL

22B-34

2. Push down on the output shaft with the press and 

remove the 2nd speed gear sleeve.

<<F>> 1ST SPEED GEAR SLEEVE REMOVAL

1. Using special tool Bearing remover (MD998801), 

support the 1st speed gear sleeve, and then set 
them on the press.

2. Push down on the output shaft with the press and 

remove the 1st speed gear sleeve.

<<G>> ROLLER BEARING INNER RACE 
REMOVAL

1. Using special tool Bearing remover (MD998917), 

support the roller bearing inner race, and then set 
them on the press.

2. Push down on the output shaft with the press and 

remove the roller bearing inner race.

REASSEMBLY SERVICE POINTS

>>A<< ROLLER BEARING INNER RACE 
INSTALLATION

1. Using special tool Bearing remover (MD998801), 

support the output shaft gear, and then set them 
on the press.

2. Using special tools, install the roller bearing inner 

race with the press.

Installer cap (MD998812)

Installer adapter (MD998818)

>>B<< SNAP RING INSTALLATION

1. Install the thickest snap ring that can be fitted in 

the groove of output shaft.

2. Make sure that the front bearing inner race end 

play meets the standard value.

Standard value: 0 

 0.12 mm

>>C<<1ST SPEED GEAR SLEEVE INSTALLATION
1. Set the output shaft on the press support stand.

AK204257

1st speed gear sleeve

MD998801

AC

AK204258

Roller bearing
inner race

MD998917

AB

AK204260

MD998812

MD998801

MD998818

Roller bearing 
inner race

AB

AK204261

Snap ring

AB

OUTPUT SHAFT

MANUAL TRANSMISSION OVERHAUL

22B-35

2. Using special tools, install the 1st speed gear 

sleeve with the press.

Installer cap (MD998812)

Installer-200 (MD998814)

Installer adapter (MD998825)

>>D<< SYNCHRONIZER SPRING INSTALLATION

Install the synchronizer spring onto the outer 
synchronizer ring
as shown.

>>E<< 1ST-2ND SPEED SYNCHRONIZER HUB 
INSTALLATION
1. Set the output shaft on the press support stand.

2. Check that the 1st-2nd speed synchronizer hub is 

in the correct installation direction, and put it on 
the output shaft.

3. Using special tools, install the 1st-2nd speed 

synchronizer hub with the press.

Installer cap (MD998812)

Installer-200 (MD998814)

Installer adapter (MD998825)

4. Make sure that the outer synchronizer ring on the 

1st speed gear side can rotate freely.

>>F<< SYNCHRONIZER SLEEVE INSTALLATION

1. Check that the synchronizer sleeve is in the 

correct direction for installation, and install it on 
the 1st-2nd speed synchronizer hub.

2. Install the synchronizer sleeve so that the areas 

with teeth that have raised tips (three areas total) 
are aligned with the areas on the synchronizer 
hub that have deep grooves between the teeth 
(three areas total).

AK204262

MD998812

MD998814

1st speed
gear sleeve

MD998825

AC

AK204316

Synchronizer spring

AC

AK204305

Installation direction

AC

AK204265

MD998812

MD998814

MD998825

1st-2nd speed
synchronizer
hub

AC

AK204296

Identification
groove

Installation
direction

AC

AK204199AB

Projecting portion

Deep grooves

OUTPUT SHAFT

MANUAL TRANSMISSION OVERHAUL

22B-36

>>G<< 2ND SPEED GEAR SLEEVE 
INSTALLATION
1. Set the output shaft on the press support stand.

2. Using special tools, install the 2nd speed sleeve 

onto the output shaft with the press.

Installer cap (MD998812)

Installer-100 (MD998813)

Installer adapter (MD998822)

>>H<< 3RD SPEED GEAR INSTALLATION
1. Check that the 2nd speed gear and the outer 

synchronizer ring have been properly installed. 
Also, make sure the claws on the synchronizer 
cone (four places) are correctly fitted into the 
holes in the 2nd speed gear (four places).

2. Using special tools, install the 3rd speed gear 

onto the output shaft with the press.

Installer cap (MD998812)

Installer-200 (MD998814)

Installer adapter (MD998822)

3. Make sure that the 2nd speed gear and the outer 

synchronizer ring can rotate freely.

>>I<< SNAP RING INSTALLATION

1. Install the thickest snap ring that can be fitted in 

the groove of output shaft.

2. Make sure that the 3rd speed gear end play 

meets the standard value.

Standard value: 0 

 0.09 mm

>>J<< 4TH SPEED GEAR INSTALLATION
1. Set the output shaft on the press support stand.

2. Using special tools, install the 4th speed gear onto 

the output shaft with the press.

Installer cap (MD998812)

Installer-100 (MD998813)

Installer adapter (MD998819)

>>K<< 5TH SPEED GEAR SLEEVE 
INSTALLATION

Using special tools, install the 5th speed gear sleeve 
onto the output shaft with the press.

Installer cap (MD998812)

AK204266

MD998812

MD998813

MD998822

AC

AK204267

MD998812

MD998814

MD998822

3rd speed gear

AB

AK204268AB

Snap ring

AK204269

MD998812

MD998813

MD998819

4th speed gear

AB

AK204300

MD998812

MD998813

MD998819

5th speed
gear sleeve

AB


Content   ..  168  169  170  171   ..