Mitsubishi Montero (2002-2004). Manual - part 451


  Index      Mitsubishi     Mitsubishi Montero - service repair manual 2002-2004 year


Search            


Content   ..  449  450  451  452   ..


Mitsubishi Montero (2002-2004). Manual - part 451


OIL PAN AND OIL PUMP

TSB Revision

ENGINE OVERHAUL

11B-37

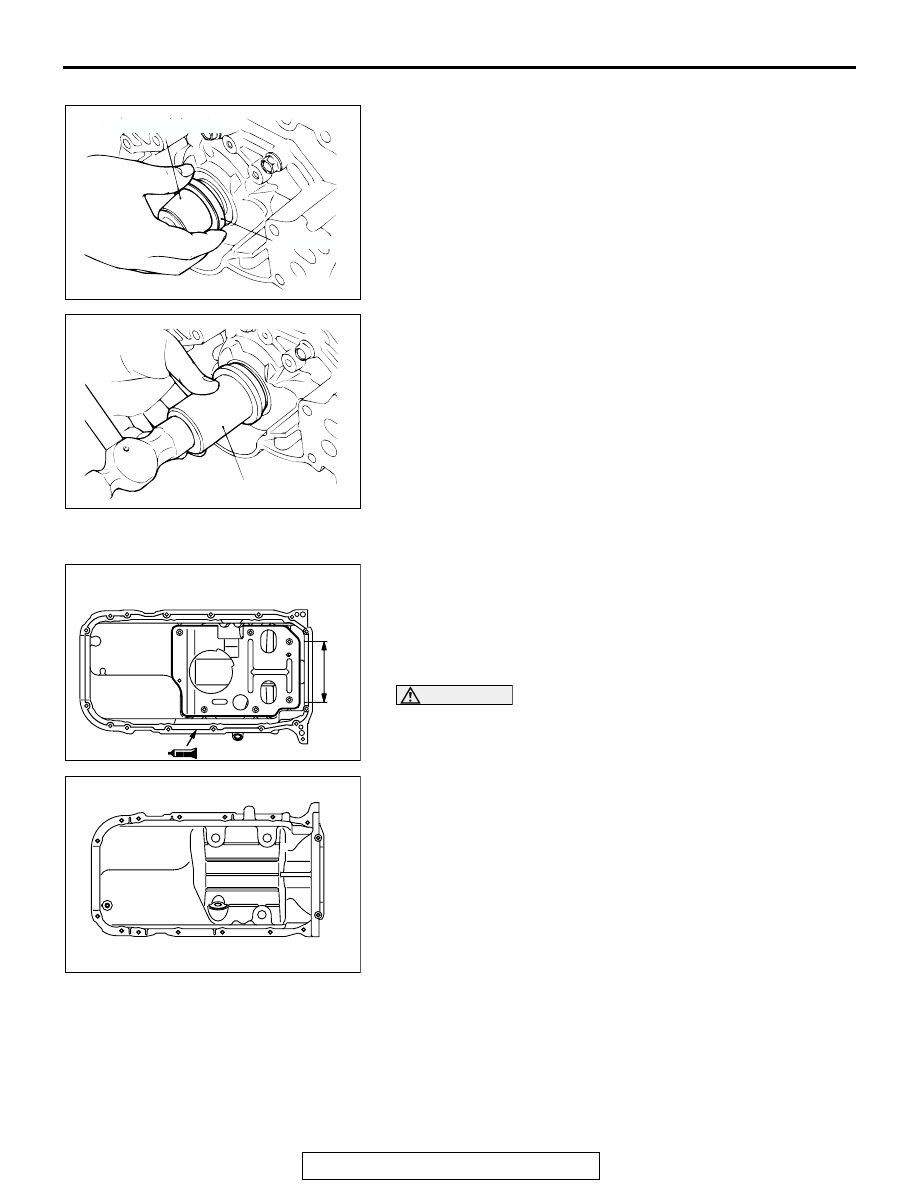
>>B<< CRANKSHAFT OIL SEAL INSTALLATION 
1. Install the guide of special tool MD998717 to the front end of 

the crankshaft.

2. Apply engine oil to the lip area of a new oil seal and push it 

in until it contacts the oil pump case.

3. Using special tool MD998717, press-fit the oil seal into the 

oil pump case.

.

>>C<<OIL PAN INSTALLATION
1. Clean the gasket surfaces of the cylinder block and upper oil 

pan.

2. Apply a 4 mm (0.2 inch) diameter bead of sealant Mitsubishi 

Genuine Parts number MD970389, or equivalent to the oil 
pan. Be sure to install the oil pan quickly while the sealant is 
wet (within 15 minutes).

CAUTION

When installing the upper oil pan, be sure not to expel the 
sealant from the oil pan flange at portion A in the illustra-
tion.
3. Tighten the upper oil pan bolts in the sequence shown.

Tightening torque: 9 

± 3 Nm (80 ± 26 in-lb)

4. After installation, keep the sealed area away from the oil and 

coolant for approximately one hour.

.

AKX00659 AB

MD998717 (GUIDE)

OIL SEAL

AKX00660

MD998717

AB

AKX01403AB

LIQUID GASKET APPLICATION AREA

(TOP VIEW)

A

AKX01404AC

1

5

11

14

15

10

6

2

3

7

12

16

9

13

8

4

FLANGE BOLT TIGHTENING

SEQUECE(BOTTOM VIEW)

OIL PAN AND OIL PUMP

TSB Revision

ENGINE OVERHAUL

11B-38

>>D<< DRAIN PLUG GASKET INSTALLATION

CAUTION

If the gasket is installed in the wrong direction, oil leaks 
will be occurred.
Install the drain plug gasket as illustrated.

.

>>E<< OIL FILTER INSTALLATION
1. Clean the installation surface of the filter bracket.
2. Apply engine oil to the O-ring of the oil filter.
3. Screw the oil filter on until the O-ring contacts the bracket. 

Then tighten 3/4 turn [14 

±1 N⋅ m(124 ± 9 in-lb)]

.

>>F<< SEALANT APPLICATION TO ENGINE OIL 
PRESSURE GAUGE UNIT

CAUTION

Keep the end of threaded portion clear of sealant. Avoid an 
overtightening.
Apply 3M

ä ATD Part number 8672 or equivalent to the engine 

oil pressure switch.

AKX00726

DRAIN PLUG

OIL PAN 
SIDE

GASKET

OIL PAN

AB

AKX00692

BRACKET 
SIDE

AB

AKX00688

OIL PAN AND OIL PUMP

TSB Revision

ENGINE OVERHAUL

11B-39

INSPECTION

M1113008200159

.

OIL PUMP
1. Check the tip clearance.

Standard value: 0.06 

 0.18 mm (0.003  0.007 inch)

2. Check the side clearance.

Standard value: 0.04 

 0.10 mm (0.002  0.003 inch)

3. Check the body clearance.

Standard value: 0.10 

 0.18 mm (0.004  0.007 inch)

Limit: 0.35 mm (0.013 inch)

.

OIL COOLER BYPASS VALVE
1. Make sure that valve moves smoothly.
2. Ensure that the dimension L measures the standard value 

under normal temperature and humidity.

Standard value: 34.5 mm (1.358 inches)

3. The dimension must be the standard value when measured 

after the valve has been dipped in 97 to 103

°C (207 to 

217

°F) oil.

Standard value: 40.0 mm (1.575 inches) 

AKX00743

AKX00744

AKX00745

AK000032

L

VALVE

AB

PISTON AND CONNECTING ROD

TSB Revision

ENGINE OVERHAUL

11B-40

PISTON AND CONNECTING ROD

REMOVAL AND INSTALLATION

M1113008400443

AK201085

1

2

3

4

5

6

7

8

9

10

11

12

13

14

27 ± 2 N·m
20 ± 1 ft-lb

   + 90˚

AB

APPLY ENGINE OIL
TO ALL MOVING
PARTS BEFORE
INSTALLTION.

REMOVAL STEPS

>>G<<

1. CONNECTING ROD CAP NUT

<<A>> >>F<<

2. CONNECTING ROD CAP

>>D<<

3. CONNECTING ROD BEARING, 

LOWER

>>E<<

4. PISTON AND CONNECTING ROD 

ASSEMBLY

>>D<<

5. CONNECTING ROD BEARING, 

UPPER

>>C<<

6. PISTON RING NO.1

>>C<<

7. PISTON RING NO.2

>>B<<

8. OIL RING
9. SNAP RING

<<B>> >>A<<

10. PISTON PIN
11. SNAP RING
12. PISTON
13. CONNECTING ROD
14. BOLT

REMOVAL STEPS (Continued)


Content   ..  449  450  451  452   ..