Mitsubishi Montero (2002-2004). Manual - part 4


  Index      Mitsubishi     Mitsubishi Montero - service repair manual 2002-2004 year


Search            


Content   ..  1  2  3  4  5  ..


Mitsubishi Montero (2002-2004). Manual - part 4


WINDOW GLASS

TSB Revision

BODY

42-13

WINDSHIELD

REMOVAL AND INSTALLATION

M1422001000238

Required Special Tools:

• MB990449: Window Molding Remover

• MB990480: Glass Holder

REMOVAL SERVICE POINT

.

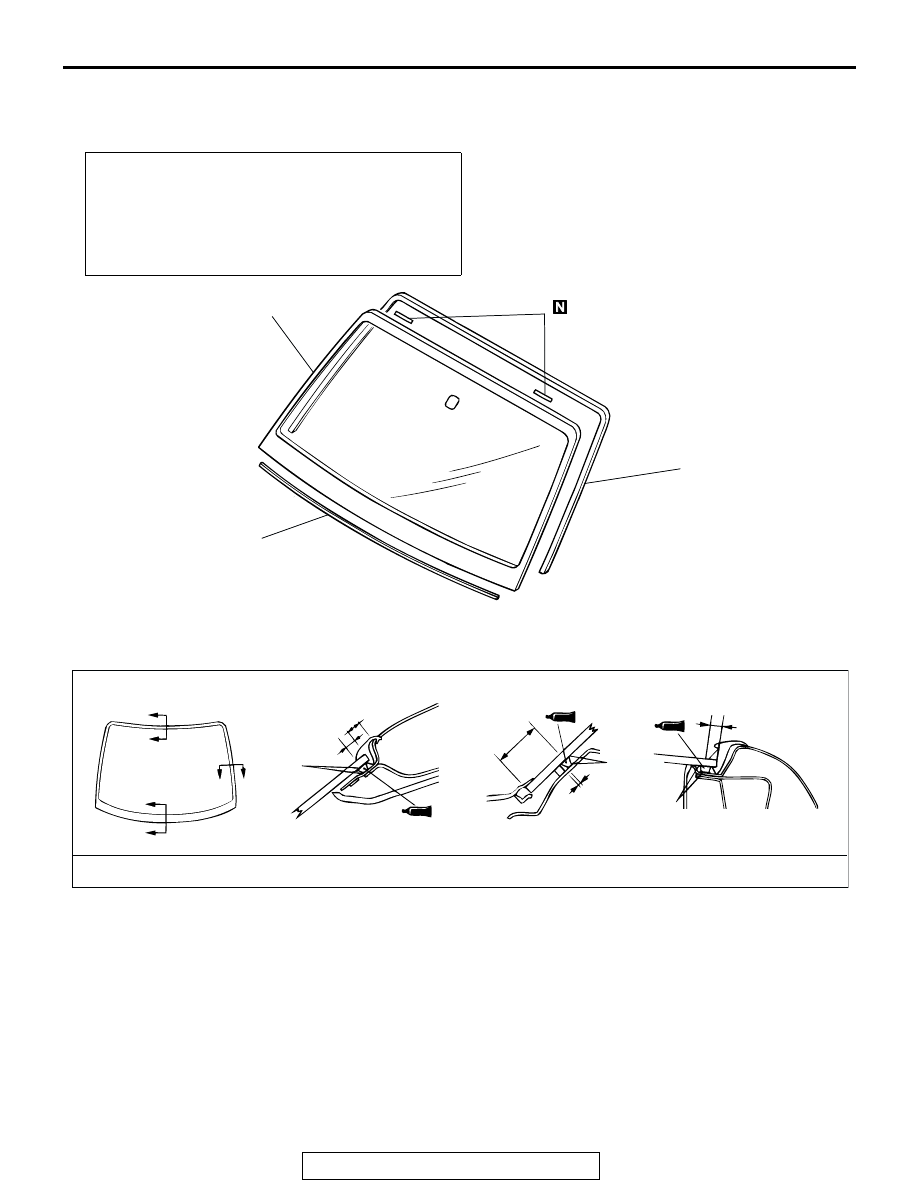
<<A>> WINDSHIELD REMOVAL
1. To protect the body (paint surface), apply cloth tape to all 

body areas around the installed windshield.

Pre-removal and Post-installation Operation
• Front Deck Garnish Removal and Installation (Refer to 

GROUP 51, Windshield Wiper and Washer 

P.51-21

.)

• Front Pillar Trim Removal and Installation (Refer to 

GROUP 52A, Trims 

P.52A-8

.)

• Headlining Removal and Installation (Refer to GROUP 

52A, Headlining 

P.52A-10

.) 

ACX00469

ACX02416

ACX0470

1

2

3

4

A

A

B

B

C

C

SECTION A   A

SECTION B   B

SECTION C   C

UNIT: mm(in)

ADHESIVE: 3M  AAD PART NO. 8609 SUPER FAST URETHANE AND 3M  AAD PART NO. 8608 SUPER FAST
URETHANE PRIMER OR EQUIVALENT

7.7(0.30)

9.8(0.38)

PRIMER

PRIMER

32.5(1.3)

PRIMER

2.0(0.08)

8.0(0.31)

PRIMER

AB

REMOVAL STEPS

<<A>> >>A<<

1. WINDSHIELD

>>A<<

2. WINDSHIELD MOLDING

>>A<<

3. WINDOW SPACER

>>A<<

4. GLASS STOPPER

WINDOW GLASS

TSB Revision

BODY

42-14

2. Using a sharp-point drill, make a hole in the windshield 

adhesive.

3. Pass the piano wire from the inside of the vehicle through 

the hole.

CAUTION

Do not let the piano wire touch the edge of the windshield.
4. Pull the piano wire alternately from the inside and outside 

along the windshield to cut the adhesive.

5. Make mating marks on the windshield and body.

6. Use special tool MB990480 to remove the windshield.

CAUTION

• Be careful not to remove more adhesive than is neces-

sary.

• Be careful also not to damage the paintwork on the 

body surface with the knife. If the paintwork is dam-
aged, repair the damaged area with repair paint or anti-
rust agent.

7. Use a knife to cut away the remaining adhesive so that the 

thickness is within 2 mm (0.08 inch) around the entire 
circumference of the body flange.

8. Finish the flange surfaces so that they are smooth.

CAUTION

Allow the cleaned area to dry for at least three minutes. Do 
not touch any surface that has been cleaned.
9. When reusing the windshield, remove the adhesive still 

adhering to the windshield, and clean with 3M

ä AAD Part 

number 8906 or equivalent.

10.Clean the body side in the same way.

INSTALLATION SERVICE POINT

.

>>A<< GLASS STOPPER/WINDSHIELD MOLDING/WIND-
SHIELD SPACER/WINDSHIELD
1. When replacing the windshield, temporarily set the 

windshield against the body, and place a mating mark on the 
windshield and body.

2. Use 3M

ä AAD Part number 8906 or equivalent to degrease 

the inside and outside of the windshield and the body 
flanges.

ACX00474AB

ACX00475AB

MB990480

ACX00476 AB

WINDOW GLASS

TSB Revision

BODY

42-15

CAUTION

• The primer strengthens the adhesive, so be sure to 

apply it evenly around the entire circumference. How-
ever, a too thick application will weaken the adhesive.

• Do not touch the coated surface.

3. Soak a sponge in the primer, and apply evenly to the 

windshield and the body in the specified places.

4. Allow the windshield to dry for at least three minutes after 

applying primer.

5. Mount the glass stopper and the windshield spacer correctly 

at the specified position so that there is no bend or rise at 
the inside of the windshield.

6. Align the mating mark on the windshield molding and the 

notch on the windshield to mount the windshield molding.

ACX00478

WINDSHIELD

GLASS STOPPER

GLASS END LINE

ALIGN THE GLASS 
STOPPER END WITH 
THE CERAMIC NOTCH

CERAMIC LINE

GLASS END LINE

41.5 (1.6)

11.5 (0.44)

WINDSHIEILD SPACER

CERAMIC LINE

AC

13.2 (0.5)

UNIT: mm (in)

X0013CA

ACX00479AB

WINDSHIELD MOULDING

MARKING

WINDSHIELD

NOTCH

CERAMIC LINE

WINDOW GLASS

TSB Revision

BODY

42-16

7. Fill a sealant gun with adhesive. Then apply the adhesive 

evenly around the windshield within 30 minutes after 
applying the primer.
NOTE: Cut the tip of the sealant gun nozzle into a V shape 
to simplify adhesive application.

8. Align the mating marks on the windshield and the body, and 

lightly press the windshield evenly so that it adheres 
completely.

9. Use a spatula or similar tool to remove any excessive 

adhesive. Clean the surface with 3M

ä AAD Part number 

8906 or equivalent. Avoid moving the vehicle until the 
adhesive sets.

CAUTION

• Do not move the vehicle unless absolutely necessary.
• When testing for water leakage, do not pinch the end of 

the hose to spray the water.

10.Wait 30 minutes or more, and then test for water leakage.

QUARTER WINDOW GLASS

REMOVAL AND INSTALLATION

M1422002500173

ACX00480

10 mm

(0.4 in)

15 mm

(0.6 in)

AB

Pre-removal and Post-installation Operation
• Quarter Trim Upper Removal and Installation (Refer to 

GROUP 52A, Trims 

P.52A-8

.)

ACX00482

1

2

3

4

5

6

7

A

A

SECTION A   A

CLIP

7

4

6

PRIMER

BODY PANEL

ADHESIVE: 3M AAD PART NO. 8513 GROMMETED
WINDSHIELD SEALANT OR EQUIVALENT

AB

REMOVAL STEPS
1. LEVER
2. QUARTER WINDOW LINK
3. RUBBER, NUT

<<A>> >>A<<

4. QUARTER WINDOW GLASS

5. QUARTER WINDOW 

WEATHERSTRIP

<<A>> >>A<<

6. QUARTER WINDOW MOLDING
7. QUARTER WINDOW GARNISH

REMOVAL STEPS (Continued)


Content   ..  1  2  3  4  5  ..