Mitsubishi Montero (2002-2004). Manual - part 3


  Index      Mitsubishi     Mitsubishi Montero - service repair manual 2002-2004 year


Search            


Content   ..  1  2  3  4  ..


Mitsubishi Montero (2002-2004). Manual - part 3


FUEL FILLER LID

TSB Revision

BODY

42-9

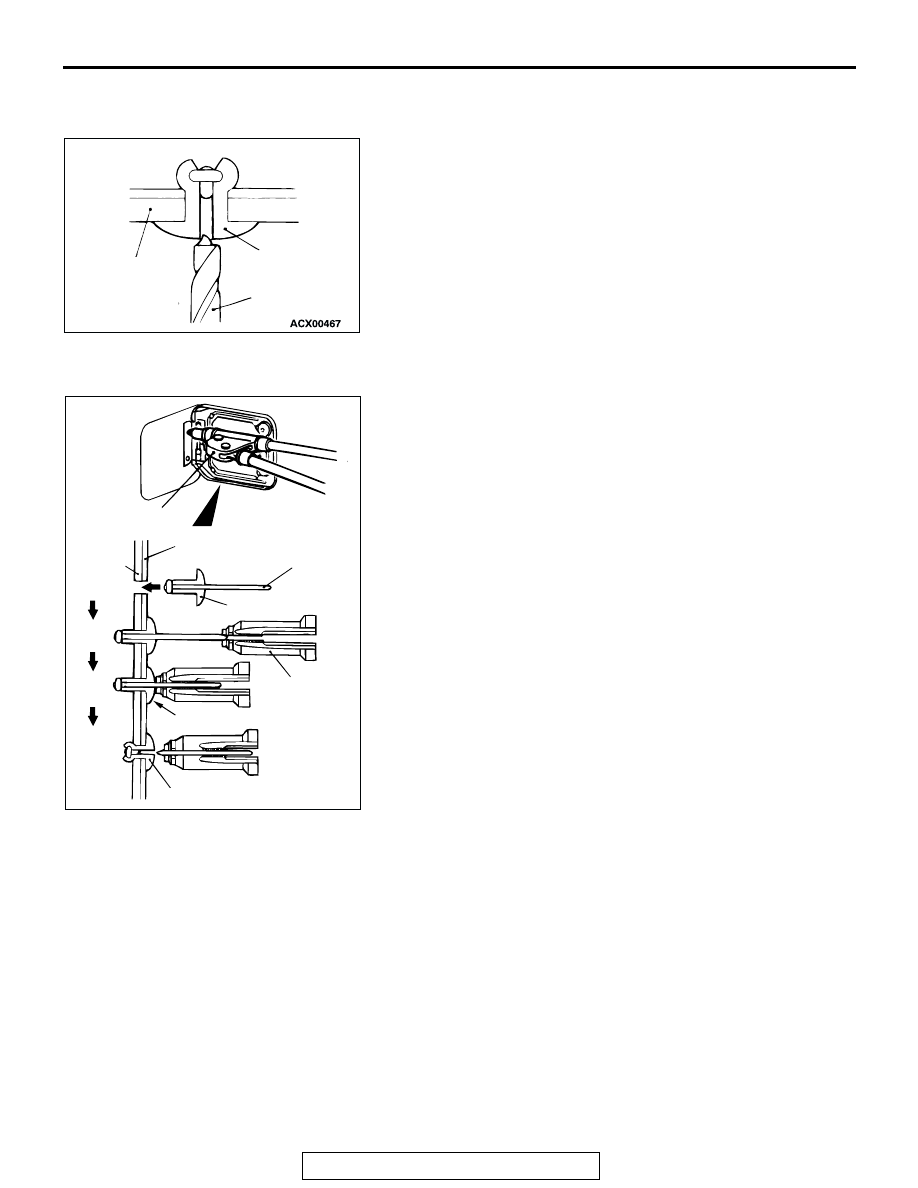
REMOVAL SERVICE POINT

.

<<A>> RIVET REMOVAL 
Use a drill [

φ6.5 − 7.5 mm (φ0.25 − 0.29 inch)] to break the rivet 

by drilling a hole, and remove the rivet.

INSTALLATION SERVICE POINT

.

>>A<< RIVET INSTALLATION
1. Insert the rivet [

φ6.4mm (φ0.25 inch)] into the body panel 

and wide fender.

2. Insert the "A" side of the rivet into the riveter.
3. Pressing the flange surface of the rivet, move the handle of 

the riveter.

4. The thinnest point of "A" is cut and the rivet is held in the 

position.

DRILL

RIVET

FUEL FILLER  
DOOR PANEL 

AB

ACX00468

RIVETER

BODY 
PANEL

FUEL FILLER DOOR 
PANEL ASSEMBLY

RIVETER

RIVET

FLANGE SURFACE

RIVET

A

1

2

3

4

AB

WINDOW GLASS

TSB Revision

BODY

42-10

WINDOW GLASS

GENERAL DESCRIPTION

M1422000100287

The windshield, quarter window and liftgate glass are 
attached by urethane-base adhesive to the window 
frame. This adhesive provides improved glass hold-
ing and sealing, and also permits use of body open-
ings having a greater structural strength.

ITEM

APPLICATION

QUANTITY

Wire (dia 

× length)

For cutting adhesive

Five pieces of wire 0.6 mm 

× 1 m 

(0.02 in 

× 3.3 ft)

Sealant gun

For adhesive application

One

Wiping shop towels

As required

Sealer

For prevention of water leaks and 
gathering after adhesive application

As required

3M

ä AAD Part No. 8880 or 

equivalent

For cleaning

As required

Glass holder MB990480

For holding window glass

Two

Window molding remover 
MB990449

For roof drip molding removal

One

WINDOW GLASS

TSB Revision

BODY

42-11

WINDOW GLASS INSTALLATION

WINDOW GLASS DIAGNOSIS

INTRODUCTION TO WINDOW GLASS DIAGNOSIS

M1422006700221

If water leaks from the windshield, the quarter win-
dow glass, the back door glass, or the seal or body 
flange may be faulty.

CLEANING OF ADHESION SURFACE
CUT OFF THE RESIDUAL ADHESIVE
UNTIL THE THICKNESS IS LESS THAN
2 mm (0.08 inch). CLEAN THE ADHESION
SURFACE WITH 3M  ADD PART
NO. 8880 OR EQUIVALENT, AND LET
DRY FOR 3 MINUTES OR MORE.

CLEANING OF ADHESION SURFACE
COMPLETELY CUT OFF ALL OF THE
RESIDUAL ADHESIVE. CLEAN THE
ADHESIVE SURFACE WITH 3M  AAD
PART NO. 8880 OR EQUIVALENT, AND
LET DRY FOR 3 MINUTES OR MORE.

CLEANING OF ADHESION SURFACE
CLEAN OFF ANY DIRT ADHERING TO
THE ADHESION SURFACE WITH 3M
AAD PART NO. 8880 OR EQUIVALENT,
AND LET DRY FOR 3 MINUTES OR
MORE.

ATTACHING OF WINDOW SPACER
ATTACH THE WINDOW SPACER TO SET
THE POSITIONS FOR THE GLASS TO BE
INSTALLED.

GLUING OF WINDOW DAM AND WINDOW SPACER
GLUE THE WINDOW DAM AND WINDOW SPACER TO THE GLASS, FOLLOWING THE
STANDARD POSITION ALL THE WAY AROUND THE INSIDE EDGE OF THE GLASS.

APPLICATION OF PRIMER
APPLY THE PRIMER TO THE ADHESION 
SURFACE OF THE BODY, AND LET DRY 
FOR 3 MINUTES OR MORE.

APPLICATION OF PRIMER
APPLY SUFFICIENT PRIMER EVENLY TO THE ADHESION SURFACE SO THAT THERE
IS NO PATCHINESS.
AFTER APPLICATION, LET DRY FOR 3 TO 30 MINUTES.

APPLICATION OF ADHESIVE
WITHIN 30 MINUTES AFTER APPLYING THE PRIMER, APPLY THE ADHESIVE EVENLY
ALL THE WAY AROUND THE INSIDE EDGE OF THE GLASS.

INSTALLING THE GLASS
AFTER APPLYING THE ADHESIVE, LIGHTLY PRESS THE GLASS
EVENLY SO THAT IT ADHERES COMPLETELY.

CLEANING
AFTER REMOVING EXCESS ADHESIVE FROM THE BODY OR
GLASS WITH A SPATULA, ETC. CLEAN OFF WITH 3M  AAD
PART NO. 8880 OR EQUIVALENT.

CHECKING FOR WATER LEAKS
CARRY OUT A SHOWER TEST TO CHECK THAT NO WATER WILL
LEAKS THROUGH.

REPLACE THE GLASS

REUSING THE GLASS

WINDOW GLASS INSTALLATION
PROCEDURE

BODY SIDE

WINDOW GLASS SIDE

AC204055

WINDOW GLASS

TSB Revision

BODY

42-12

WINDOW GLASS DIAGNOSTIC TROUBLESHOOTING STRATEGY

M1422006800046

Use these steps to plan your diagnostic strategy. If 
you follow them carefully, you will be sure that you 
have exhausted most of the possible ways to find a 
window glass fault.
1. Gather information from the customer.

2. Verify that the condition described by the 

customer exists.

3. Find the malfunction by following the Symptom 

Chart.

4. Verify malfunction is eliminated.

SYMPTOM CHART

M1422006900258

SYMPTOM PROCEDURES

INSPECTION PROCEDURE 1: Water Leak through Windshield/Water Leak through Quarter Window 
Glass/Water Leak through Back Door Glass

DIAGNOSIS

STEP 1. Check if the seal is faulty.

Q: Is the seal faulty?

YES : 

Repair the seal, then go to Step 3.

NO : 

Go to Step 2.

STEP 2. Check if the body flange is deformed.

Q: Is the body flange deformed?

YES : 

Repair or replace the body flange, then go 

to Step 3.

NO : 

Go to Step 3.

STEP 3. Retest the system.

Q: Is any water leaking?

YES : 

Return to Step 1.

NO : 

This diagnosis complete.

SPECIAL TOOLS

M1422000600033

SYMPTOM

INSPECTION 
PROCEDURE

REFERENCE PAGE

Water leak through windshield

1

P.42-12

Water leak through quarter window glass
Water leak through back door glass

TOOL

TOOL NUMBER AND 
NAME

SUPERSESSION

APPLICATION

MB990480 
Glass holder

General service tool

Removal and installation of 
window glass

MB990449 
Window molding remover

General service tool

Removal of drip molding

MB990480

MB990449


Content   ..  1  2  3  4  ..