Mitsubishi Montero (1998+). Manual - part 88


  Index      Mitsubishi     Mitsubishi Montero - service repair manual 1998 year


Search            


Content   ..  86  87  88  89   ..


Mitsubishi Montero (1998+). Manual - part 88


         1) Start and run engine at 2000 RPM. Ensure battery is fully

charged. Turn defogger switch to ON position. Using a voltmeter, check

voltage at center section of each defogger grid filament.

         2) If voltage is about 6 volts, grid filament is okay. If

voltage is about 12 volts, an open is present in negative circuit.

Move probe slowly toward negative terminal to determine location of

open circuit.

         3) If voltage is zero volts, an open is present in positive

circuit. Move probe slowly toward positive terminal to determine

location of open circuit. Repair grid as necessary. See

GRID FILAMENT REPAIR under ON-VEHICLE SERVICE.

         ON-VEHICLE SERVICE

         GRID FILAMENT REPAIR

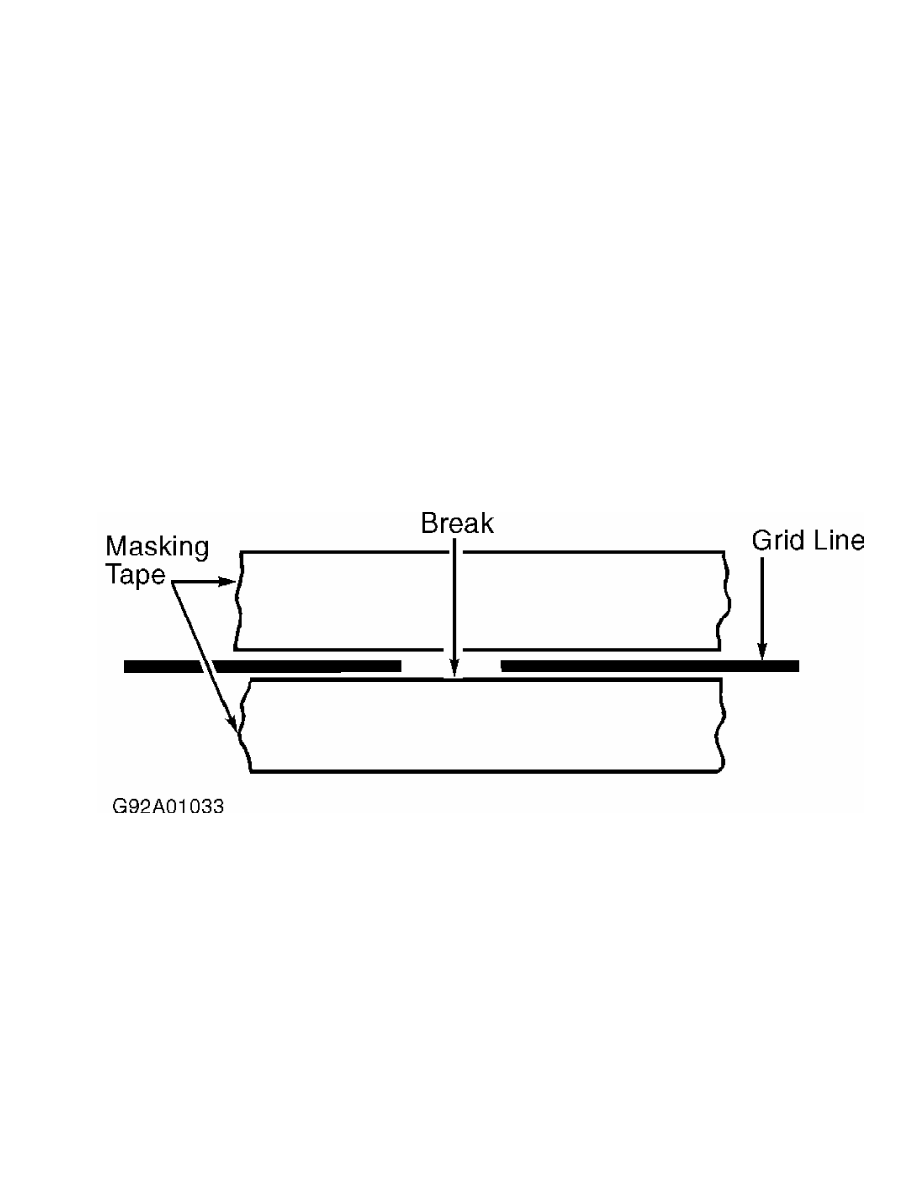
         Clean broken wire tips thoroughly. Place masking tape along

both sides of broken wire. See Fig. 8. Apply Repair Paste (DuPont

4817) to broken section of grid. Remove masking tape after paste has

dried. Wait 24 hours before using defogger.

Fig. 8:  Repairing Rear Defogger Grid Element

         REMOVAL & INSTALLATION

         DEFOGGER SWITCH

         Removal & Installation (Diamante)

         Defogger switch is integral with A/C system ECU. To remove

A/C ECU, remove center console. Remove audio panel. Remove radio.

Remove A/C ECU. To install, reverse removal procedure.

         Removal & Installation (Eclipse)

         Remove upper stoppers from glove compartment. Drop down glove

compartment. From glove compartment opening, reach behind center air

outlet assembly and disconnect harness connectors to switches. Release

metal clips from center air outlet assembly. Remove center air outlet.

Remove defogger switch from center air outlet. To install, reverse

removal procedure.

         Removal & Installation (Galant)

         At heater unit, remove center air outlet cool air by-pass

lever cable from damper lever. To remove center air outlet, push

springs at bottom of center air outlet upward. Outlet is located above

radio. Remove switch from center air outlet. To install, reverse

removal procedure. Turn cool air by-pass lever on outlet fully upward.

Pull air by-pass lever fully downward and install cool air by-pass

lever cable to damper lever.

         Removal & Installation (Mirage)

         Remove driver-side lower dash panel. Remove center console

assembly and foot distribution duct. Disconnect rear window defogger

switch harness connector. Remove switch. To install, reverse removal

procedure.

         Removal & Installation (Montero)

         Remove defogger switch by prying switch off instrument

cluster bezel. Disconnect wiring harness from defogger switch. Remove

switch. To install, reverse removal procedure.

         Removal & Installation (Montero Sport)

         Remove instrument cluster bezel. Bezel is held in by metal

clips. Disconnect wiring harness from defogger switch. Remove switch

from behind bezel. To install, reverse removal procedure.

         Removal & Installation (3000GT)

         Remove knee protector. Remove steering column upper and lower

covers. Remove instrument cluster bezel. Disconnect wiring harness

from defogger switch. Remove defogger switch. To install, reverse

removal procedure.

         WIRING DIAGRAMS

Fig. 9:  Rear Window & Mirror Defogger System Wiring Diagram

(Diamante)

Fig. 10:  Rear Window Defogger System Wiring Diagram (Eclipse)


Content   ..  86  87  88  89   ..