Mitsubishi Galant (2004+). Manual - part 1642


  Index      Mitsubishi     Mitsubishi Galant - service repair manual 2004 year


Search            


Content   ..  1640  1641  1642  1643   ..


Mitsubishi Galant (2004+). Manual - part 1642


TRANSAXLE

TSB Revision

AUTOMATIC TRANSAXLE OVERHAUL

23B-57

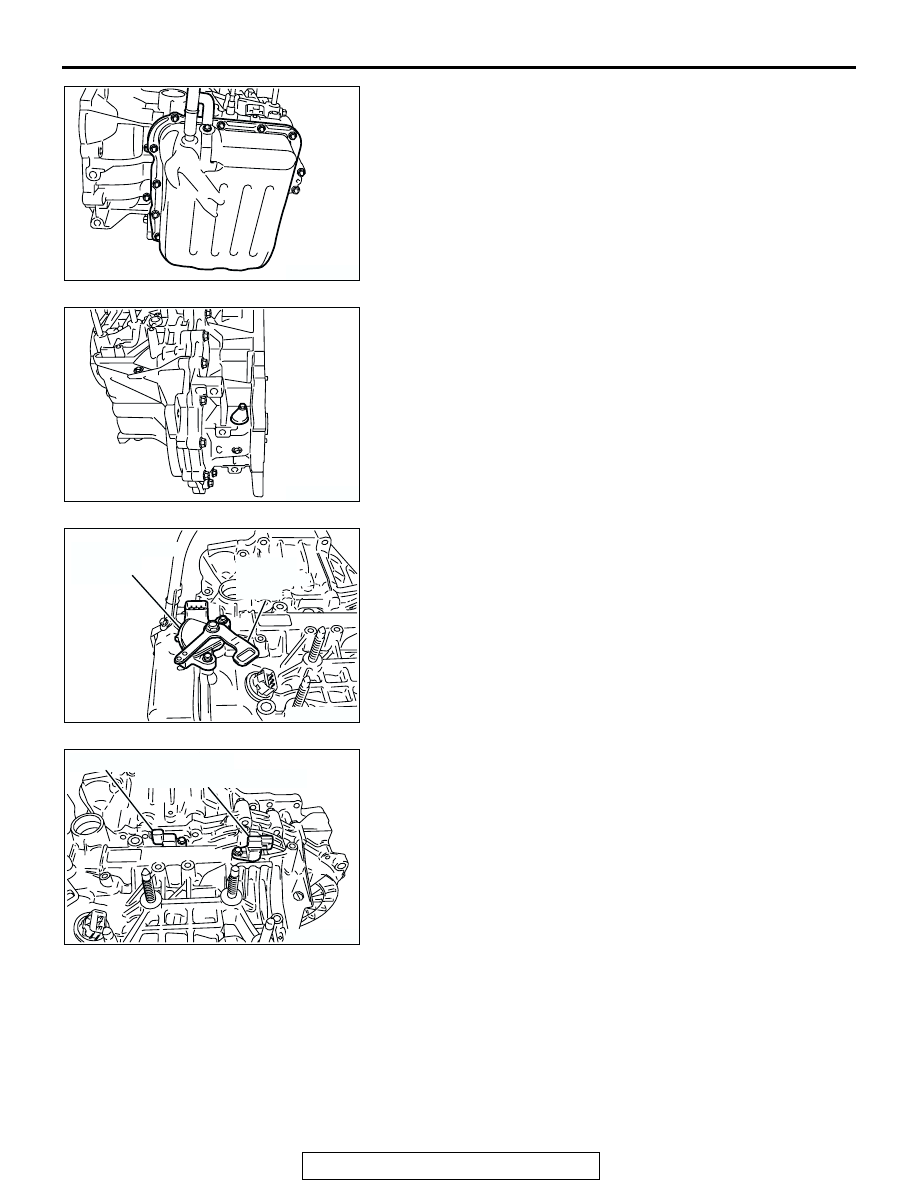
98.Install the valve body cover, and then tighten its mounting 

bolts to the specified torque.

Tightening torque: 11 

± 1 Nm (95 ± 9 in-lb)

99.Install the sealing cap and tighten the bolt to the specified 

torque.

Tightening torque: 5.0 

± 1.0 Nm (43 ± 9 in-lb)

100.Install the park/neutral position switch and tighten the bolt 

to the specified torque.

Tightening torque: 11 

± 1 Nm (95 ± 9 in-lb)

101.Install the manual control lever and tighten the nut to the 

specified torque.

Tightening torque: 22 

± 3 Nm (16 ± 2 ft-lb)

102.Install the input shaft speed sensor and output shaft speed 

sensor and tighten the bolt to the specified torque.

Tightening torque: 11 

± 1 Nm (95 ± 9 in-lb)

AK300221

AK300220

AK300219AD

PARK/NEUTRAL 
POSITION 
SWITCH

MANUAL
CONTROL
LEVER

AK300218AE

OUTPUT SHAFT SPEED SENSOR

INPUT SHAFT SPEED SENSOR

TRANSAXLE

TSB Revision

AUTOMATIC TRANSAXLE OVERHAUL

23B-58

103.Press Face "A" of the air breather to be even with Face "B" 

of the transmission case as shown in the drawing.

104.Apply ATF on the both sides of the new gasket and threads 

of the eyebolts, and then tighten to the specified torque.

Tightening torque: 24 

± 3 Nm (18 ± 2 ft-lb)

105.Tighten the oil cooler feed pipe clamp bolt to the specified 

torque.

Tightening torque: 11 

± 1 Nm (95 ± 9 in-lb)

106.Install the oil dipstick.
107.Install the cable support brackets to the specified torque.

Tightening torque: 23 

± 3 Nm (17 ± 2 ft-lb)

108.Install the roll stopper brackets.

Tightening torque: 70 

± 10 Nm (52 ± 7 ft-lb)

CAUTION

Apply ATF to the oil pump drive hub before installing the 
torque converter. Be careful not to damage the oil seal lip 
when installing the torque converter.
109.Install the torque converter, and align it with the oil pump 

so that the shown dimension "A" meets the reference value.

Reference value:

Approximately 12.2 mm (0.48 inch) <F4A4B>
Approximately 9.4 mm (0.37 inch) <F4A5A>

AK203140 AE

A

A

B

B

AK301263AC

A

OIL PUMP

TSB Revision

AUTOMATIC TRANSAXLE OVERHAUL

23B-59

OIL PUMP

DISASSEMBLY AND ASSEMBLY

M1233001300206

Required Special Tool:

• MD998334: Oil Seal Installer

ASSEMBLY SERVICE POINTS

.

>>A<< OIL SEAL INSTALLATION
1. Apply a small amount of ATF to the oil seal lip.
2. Use special tool MD998334 to tap the oil seal in the oil pump 

body.

.

>>B<< O-RING INSTALLATION
Install a new O-ring to the outer groove of the oil pump, and 
apply ATF or petroleum jelly (Vaseline) to the O-ring.

AK301599

3

4

2

1

AB

APPLY AUTOMATIC
TRANSMISSION FLUID
TO ALL MOVING PARTS
BEFORE INSTALLATION.

DISASSEMBLY STEPS

>>B<<

1.

O-RING

2.

SEAL RING

>>A<<

3.

OIL SEAL

4.

OIL PUMP ASSEMBLY

DISASSEMBLY STEPS 

AK300522AD

MD998334

UNDERDRIVE CLUTCH AND INPUT SHAFT

TSB Revision

AUTOMATIC TRANSAXLE OVERHAUL

23B-60

UNDERDRIVE CLUTCH AND INPUT SHAFT

DISASSEMBLY AND ASSEMBLY

M1233024500137

Required Special Tools:

• MB991628: Spring Compressor

• MB991629: Spring Compressor

• MD998907: Spring Compressor

• MD998924: Spring Compressor Retainer

AK301600

13

10

15

15

10

12

13

11

14

11

12

14

6

8

9

8

3

2

2

3

1

1

9

5

4

4

5

7

6

7

AB

APPLY AUTOMATIC
TRANSMISSION FLUID
TO ALL MOVING PARTS
BEFORE INSTALLATION.

DISASSEMBLY STEPS

1.

SNAP RING

2.

INPUT SHAFT

3.

SEAL RING

>>D<<

4.

SNAP RING

>>C<<

5.

CLUTCH REACTION PLATE

>>C<<

6.

CLUTCH DISC

<<A>>

>>C<<

7.

CLUTCH PLATE

>>B<<

8.

SNAP RING

9.

SPRING RETAINER

>>A<<

10. D-RING
11. RETURN SPRING
12. UNDERDRIVE CLUTCH PISTON

>>A<<

13. D-RING

>>A<<

14. D-RING
15. UNDERDRIVE CLUTCH 

RETAINER

DISASSEMBLY STEPS 


Content   ..  1640  1641  1642  1643   ..