Mitsubishi Galant (2004+). Manual - part 158


  Index      Mitsubishi     Mitsubishi Galant - service repair manual 2004 year


Search            


Content   ..  156  157  158  159   ..


Mitsubishi Galant (2004+). Manual - part 158


OIL PAN AND OIL SCREEN

TSB Revision

ENGINE MECHANICAL <3.8L ENGINE>

11C-39

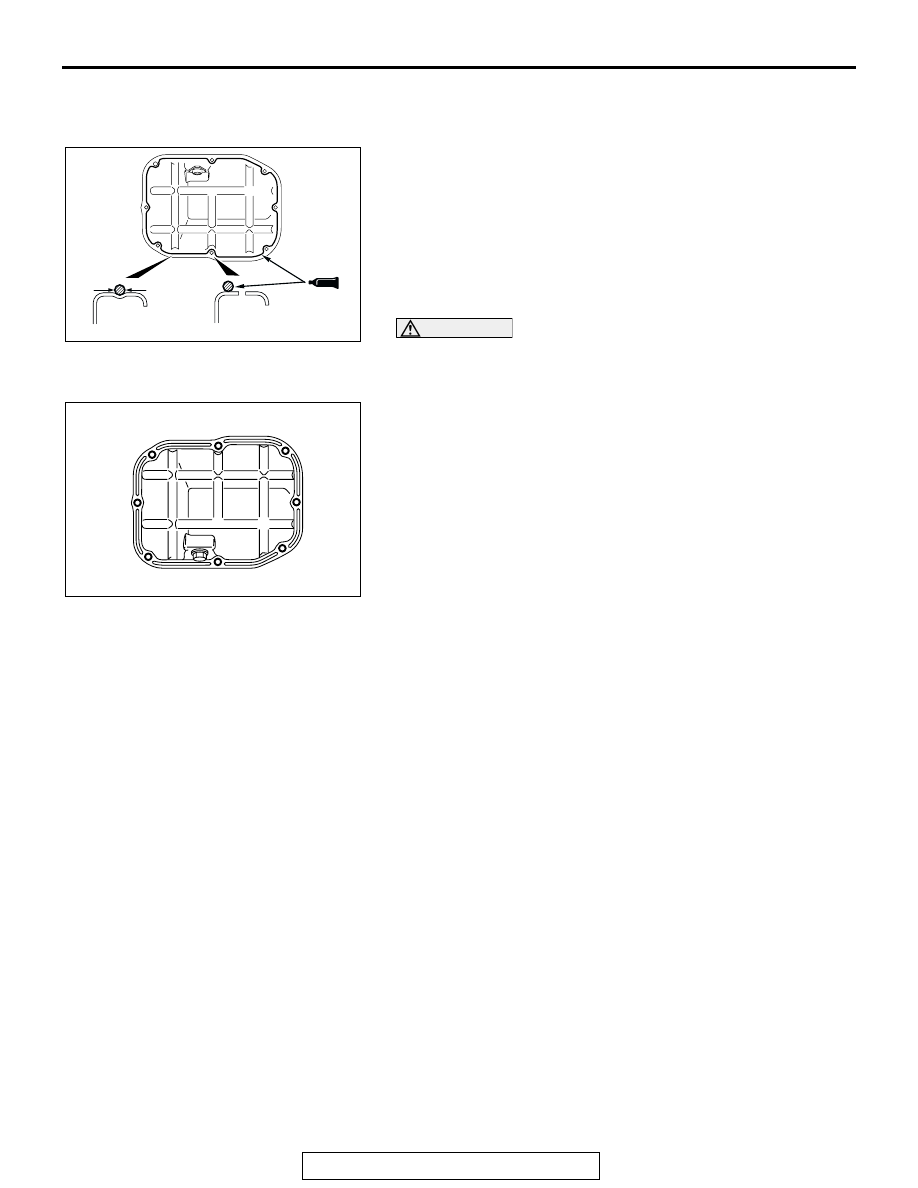
>>B<< ENGINE LOWER OIL PAN INSTALLATION
1. Remove sealant from the engine lower oil pan and engine 

upper oil pan.

2. Apply a bead of the sealant to the mating surface of the 

engine lower oil pan as shown.

Specified sealant: 3M

 AAD Part No.8672, 8704, 3M 

AAD Part No.8679/8678 or equivalent

NOTE: Install the engine lower oil pan within 15 minutes 
after applying sealant.

3. Assemble the engine lower oil pan to the engine upper oil 

pan.

CAUTION

Then wait at least one hour. Never start the engine or let 
engine oil or coolant touch the sealant surface during that 
time.
4. Tighten the bolts in order of the numbers shown in the 

illustration.

INSPECTION

M1112002600134

• Check the oil pan for cracks.

• Check the oil pan sealant-coated surface for damage and 

deformation.

• Check the oil screen for cracked, clogged or damaged wire 

net and pipe.

AC205271

Ø 4.0 mm
(0.16 in)

GROOVE
PORTION

BOLT HOLE
PORTION

AB

AC206508

1

2

3

4

5

6

7

8

AB

CRANKSHAFT OIL SEAL

TSB Revision

ENGINE MECHANICAL <3.8L ENGINE>

11C-40

CRANKSHAFT OIL SEAL

REMOVAL AND INSTALLATION <FRONT OIL SEAL>

M1112003400478

Required Special Tool:
MD998717: Crankshaft Front Oil Seal Installer

Pre-removal and Post-installation Operation
Timing Belt Removal and Installation (Refer to 

P.11C-48

.)

AC205520

6

ENGINE OIL

1

2

3

4

5

6

N

8.5 ± 0.5 N·m
76 ± 4 in-lb

AB

REMOVAL STEPS

1.

CRANKSHAFT POSITION 
SENSOR

>>B<<

2.

CRANKSHAFT SPROCKET

>>B<<

3.

CRANKSHAFT SENSING BLADE

>>B<<

4.

CRANKSHAFT SPACER

5.

KEY

>>A<<

6.

CRANKSHAFT FRONT OIL SEAL

REMOVAL STEPS (Continued)

CRANKSHAFT OIL SEAL

TSB Revision

ENGINE MECHANICAL <3.8L ENGINE>

11C-41

INSTALLATION SERVICE POINTS

.

>>A<< CRANKSHAFT FRONT OIL SEAL INSTALLATION
1. Apply a small amount of engine oil to the oil seal lip and then 

insert.

2. Using special tool MD998717, tap the oil seal into the front 

case.

.

>>B<< CRANKSHAFT SPACER / CRANKSHAFT SENSING 
BLADE / CRANKSHAFT SPROCKET INSTALLATION
To prevent the crankshaft pulley mounting bolt from loosening, 
degrease or clean the crankshaft, the crankshaft spacer, the 
crankshaft sensing blade and the crankshaft at the shown posi-
tions.

ACX00363AB

OIL SEAL

MD998717

CRANKSHAFT

MD998717

ACX01536AB

CRANKSHAFT

CRANKSHAFT

SPACER

CRANKSHAFT

SENSING BLADE

CRANKSHAFT

SPROCKET

SHADED PART : DEGREASE

CLEANING

CRANKSHAFT OIL SEAL

TSB Revision

ENGINE MECHANICAL <3.8L ENGINE>

11C-42

REMOVAL AND INSTALLATION <REAR OIL SEAL>

M1112003700446

Required Special Tools:

• MD998718: Crankshaft Rear Oil Seal Installer

• MD998781: Flywheel Stopper

REMOVAL SERVICE POINT

.

<<A>> DRIVE PLATE BOLTS REMOVAL
Use special tool MD998781 to secure the drive plate and 
remove the drive plate bolts.

Pre-removal and Post-installation Operation
Transaxle Assembly Removal and Installation (Refer to 
GROUP 23A, Transaxle <F4A4B>

P.23A-400

 , 

<F4A5A>

P.23A-400

 .)

AC306784

ENGINE OIL

1

2

3

74 ± 1 N·m
55 ± 1 ft-lb

N

AB

4

4

REMOVAL STEPS

<<A>>

>>B<<

1.

DRIVE PLATE BOLTS

2.

ADAPTOR PLATE

3.

DRIVE PLATE

>>A<<

4.

CRANKSHAFT REAR OIL SEAL

REMOVAL STEPS (Continued)

AC306686

MD998781

AB


Content   ..  156  157  158  159   ..