Mitsubishi Galant. Manual - part 560
 

  Index      Mitsubishi     Mitsubishi Galant - service repair manual 2001 year


Search            


Content   ..  558  559  560  561   ..


Mitsubishi Galant. Manual - part 560


DOOR

TSB Revision

BODY

42-23

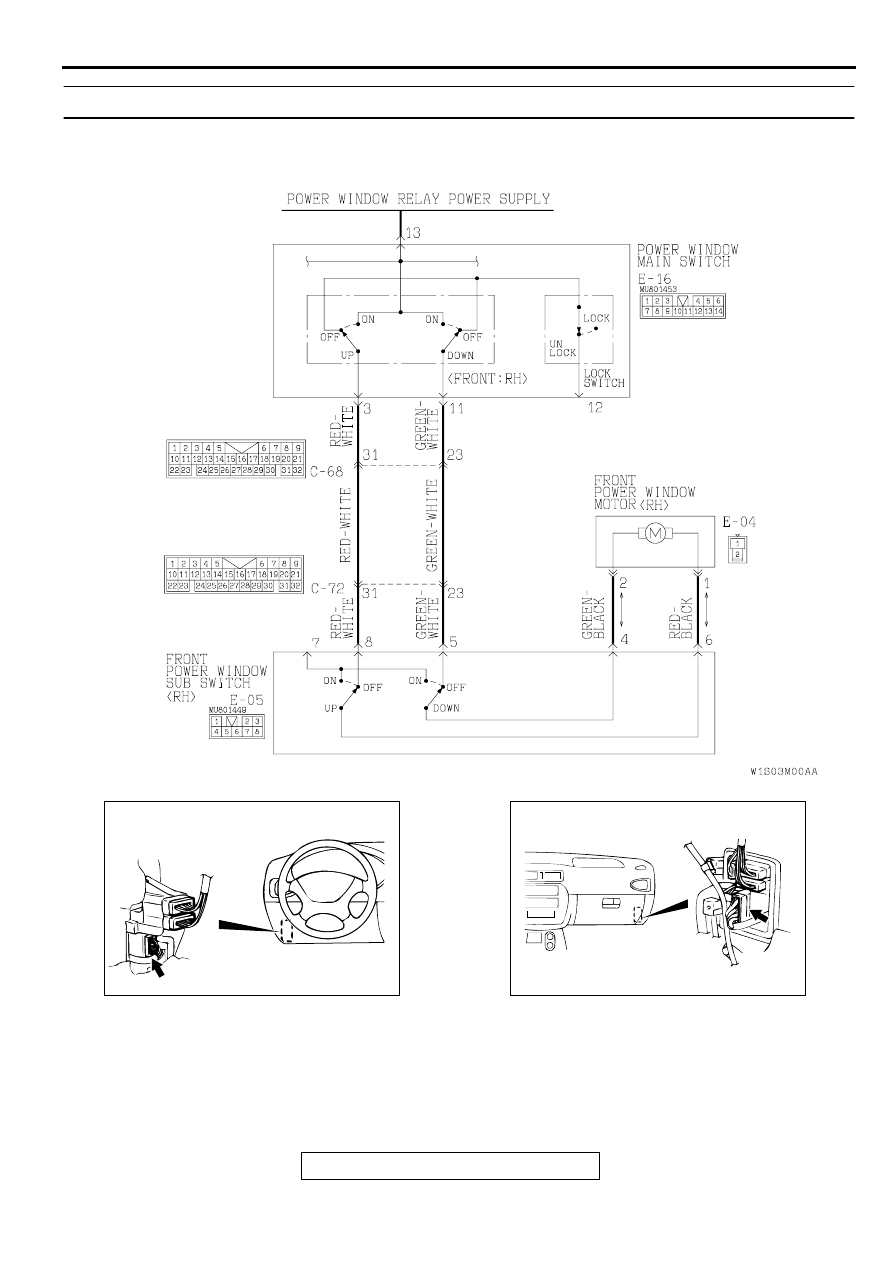
INSPECTION PROCEDURE 2: Only the front door window <RH> does not open and close.

AC000573AB

Front Power Window Motor <RH> Drive Circuit

AC003079AG

CONNECTOR
BLOCK (LH)

CONNECTOR: C-68

AC003415 AD

CONNECTOR: C-72

CONNECTOR
BLOCK (RH)

DOOR

TSB Revision

BODY

42-24

CIRCUIT OPERATION

•

When the power window switch is operated up or 
down, the power window motor operates and 
opens or closes the door window.

TECHNICAL DESCRIPTION (COMMENT)

•

The cause may be a malfunction of the front 
power window motor <RH> drive circuit.

TROUBLESHOOTING HINTS

•

Malfunction of the power window main switch

•

Malfunction of the front power window sub-switch 
<RH>

•

Malfunction of the front power window motor 
<RH>

•

Damaged harness wires or connectors

DIAGNOSIS

STEP 1. Check the power window main switch continuity.
(1) Remove the power window main switch. (Refer to 

P.42-54

.)

(2) Check the continuity when the front power window main 

switch <RH> is turned to the UP position or DOWN position.

Q: Is the power window main switch damaged?

YES : Replace it, then go to Step 6.
NO :  Go to Step 2.

AC000570

CONNECTOR: E-16

AC

AC000576

E-04

E-05

CONNECTORS: E-04, E-05

AB

FRONT <RH> SWITCH PO-
SITION

TESTER CON-
NECTION

SPECIFIED 
CONDITION

When the lock 
switch is 
locked.

UP

3 

−

 13

Continuity

OFF

3 

−

 11

Continuity

DOWN

11 

−

 13

Continuity

When the lock 
switch is un-
locked.

UP

3 

−

 13, 11 

−

 12

Continuity

OFF

3 

−

 11 

−

 12

Continuity

DOWN

11 

−

 13, 3 

−

 12

Continuity

AC000571

5

4

6

13

3

2

1

14

12

11

10

9

8

7

DOOR

TSB Revision

BODY

42-25

STEP 2. Check the front power window sub-switch 
continuity.
(1) Remove the front power window sub-switch <RH>. (Refer 

to 

P.42-54

.)

(2) Check the continuity when the front power window sub-

switch <RH> is turned to the UP position or DOWN position.

Q: Is the front power window sub-switch <RH> damaged?

YES : Replace it, then go to Step 6.
NO :  Go to Step 3.

STEP 3. Check the front power window motor <RH> 
operation.
(1) Remove the front power window regulator <RH>. (Refer to 

P.42-56

.)

(2) Connect a battery directly to the motor terminals and check 

that the motor runs smoothly.

Q: Is the front power window motor <RH> damaged?

YES : Replace it, then go to Step 6.
NO :  Go to Step 4.

STEP 4. Check the harness wires between front power 
window sub-switch <RH> connector E-05 and front power 
window motor <RH> connector E-04.
Q: Are there any damaged wires between front power 

window sub-switch <RH> connector E-05 and front 
power window motor <RH> connector E-04?
YES : 
Repair them, then go to Step 6.
NO :  Go to Step 5.

 SWITCH POSI-
TION

TESTER 
CONNECTION

SPECIFIED 
CONDITION

UP

4 

−

 5, 6 

−

 7

Continuity

OFF

4 

−

 5, 6 

−

 8

Continuity

DOWN

6 

−

 8, 4 

−

 7

Continuity

AC000464

1

2 3

4 5 6 7 8

TESTER CONNECTION

SLIDER POSITION

1

−

Battery(+), 2

−

Battery(-)

UP

2

−

Battery(+), 1

−

Battery(-)

DOWN

AC000798

2

1

SLIDER

AB

AC000576

E-04

E-05

CONNECTORS: E-04, E-05

AB

DOOR

TSB Revision

BODY

42-26

STEP 5. Check the harness wires between power window 
main switch connector E-16 and front power window sub-
switch <RH> connector E-05.
Q: Are there any damaged wires between power window 

main switch connector E-16 and front power window 
sub-switch <RH> connector E-05?
YES : 
Repair them, then go to Step 6.
NO :  Go to Step 6.

NOTE: After inspecting intermediate connector C-68 or C-72, 
inspect the wire. If intermediate connector C-68 or C-72 is 
damaged, repair or replace it. Refer to GROUP 00E 

P.00E-2

, 

Harness Connector Inspection. Then go to Step 6.

STEP 6. Check symptoms

Q: Does the door window <RH> open and close normally?

YES : This diagnosis is complete.
NO :  Return to Step 1.

AC000570

CONNECTOR: E-16

AC

AC000576AC

CONNECTOR: E-05

AC003079AG

CONNECTOR
BLOCK (LH)

CONNECTOR: C-68

AC003415 AD

CONNECTOR: C-72

CONNECTOR
BLOCK (RH)


Content   ..  558  559  560  561   ..