Mitsubishi Pajero Pinin. Manual - part 25


  Index      Mitsubishi     Mitsubishi Pajero Pinin - service repair manual 2001 year


Search            


Content   ..  23  24  25  26   ..


Mitsubishi Pajero Pinin. Manual - part 25


ENGINE <4G9-MPI> – 

On-vehicle Service

11B-11

MANIFOLD VACUUM CHECK

1.

Before inspection, set the vehicle to the pre-inspection
condition.

2.

Turn the ignition switch to LOCK (OFF) position.

3.

Connect the engine tachometer or connect the MUT-

II

to the diagnosis connector.
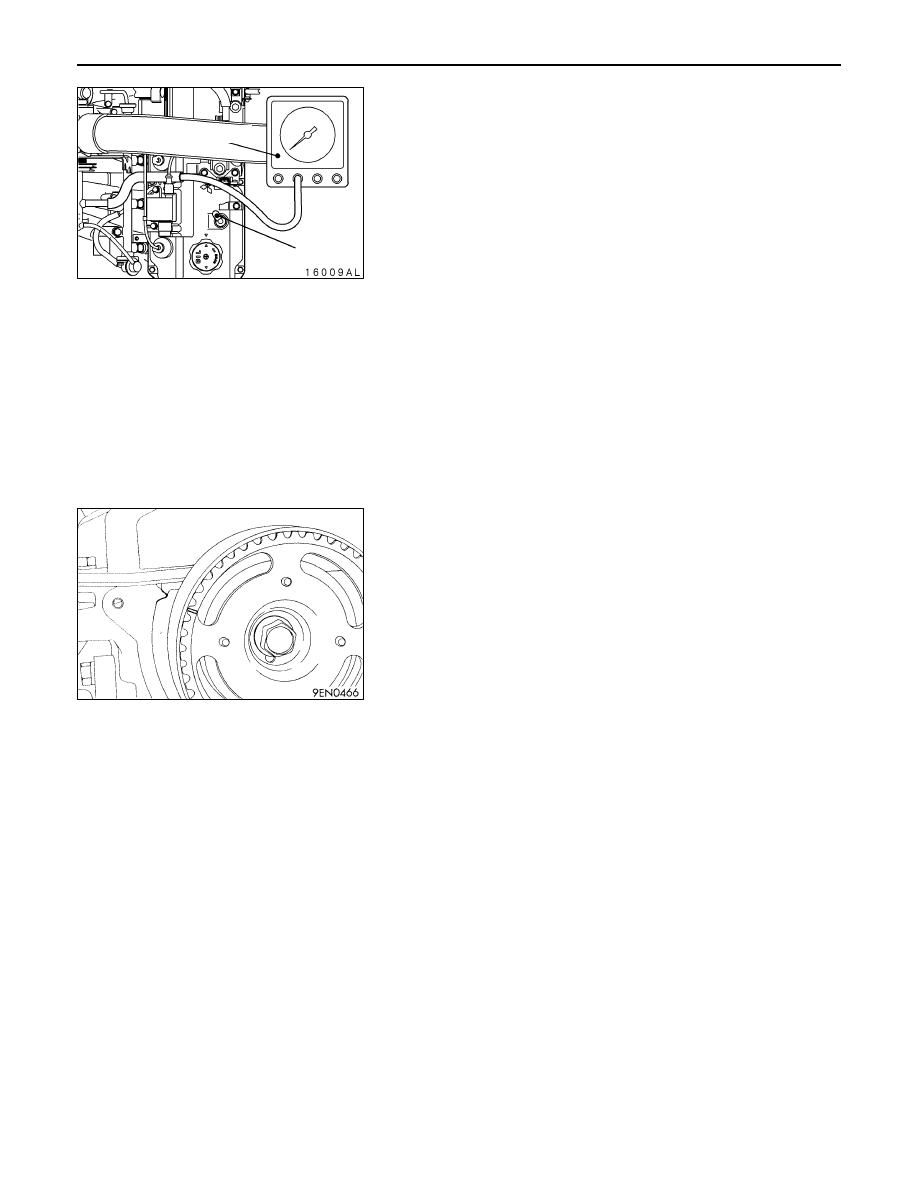
4.

Disconnect the ventilation hose from the positive crankcase
ventilation (PCV) valve, and then connect a vacuum gauge
to the ventilation hose. Plug the positive crankcase
ventilation (PCV) valve.

5.

Check the intake manifold vacuum while the engine is
idling.

Limit: Min. 60 kPa

6.

Turn the ignition switch to LOCK (OFF) position.

7.

Remove the vacuum gauge, and then connect the
ventilation hose to the positive crankcase ventilation (PCV)
valve.

8.

Remove the engine tachometer or the MUT-

II

.

TIMING BELT TENSION ADJUSTMENT

1.

Remove the timing belt upper cover.

2.

Turn the crankshaft clockwise to set the No. 1 cylinder
to top dead compression centre.

Caution
As the purpose of this procedure is to apply the proper
amount of tension to the timing belt by means of the
cam drive torque, be sure not to rotate the crankshaft
in the opposite direction.

3.

Remove the access cover.

4.

Loosen the timing belt tensioner fixing bolt to apply tension
to the belt by means of the force of the tensioner spring.

Caution
The bolt can be loosened 90

_

  – 180

_

.

If the belt is loosened more than necessary, the bolt
may fall inside the cover.

5.

Tighten the timing belt tensioner fixing bolt.

6.

Install the access cover.

7.

Install the timing belt upper cover.

Plug

Vacuum gauge

ENGINE <4G9-MPI> – 

On-vehicle Service

11B-12

LASH ADJUSTER CHECK

If an abnormal noise (knocking) that seems to be coming
from the lash adjuster is heard after starting the engine and
does not stop, carry out the following check.

NOTE
(1) The abnormal noise which is caused by a problem

with the lash adjusters is generated after the engine
is started, and will vary according to the engine speed.
However, this noise is not related to the actual engine
load.
Because of this, if the noise does not occur immediately
after the engine is started, if it does not change in
accordance with the engine speed, or if it changes
in accordance with the engine load, the source of
the noise is not the lash adjusters.

(2) If there is a problem with the lash adjusters, the noise

will almost never disappear, even if the engine has
been run at idle to let it warm up.
The only case where the noise might disappear is
if the oil in the engine has not been looked after properly
and oil sludge has caused the lash adjusters to stick.

1.

Start the engine.

2.

Check that the noise occurs immediately after the engine
is started, and that the noise changes in accordance with
changes in the engine speed.
If the noise does not occur immediately after the engine
is started, or if it does not change in accordance with
the engine speed, the problem is not being caused by
the lash adjusters, so check for some other cause of the
problem. Moreover, if the noise does not change in
accordance with the engine speed, the cause of the
problem is probably not with the engine. (In these cases,
the lash adjusters are normal.)

3.

While the engine is idling, check that the noise level does
not change when the engine load is varied (for example, by
shifting from N 

 D).

If the noise level changes, the cause of the noise is probably
parts striking because of worn crankshaft bearings or
connecting rod bearings. (In such cases, the lash adjusters
are normal.)

4.

After the engine has warmed up, run it at idle and check
if any noise can be heard.
If the noise has become smaller or disappeared, oil sludge
could make the lash adjusters stick. Clean the lash
adjusters. (Refer to the Engine Workshop Manual.) If not
improved, go to step 5.

5.

Bleed air from the lash adjusters.

6.

If the noise has not disappeared even after the air bleeding,
clean the lash adjusters. (Refer to the Engine Workshop
Manual.)

ENGINE <4G9-MPI> – 

On-vehicle Service

11B-13

<LASH ADJUSTER AIR BLEEDING>

NOTE
(1) If the vehicle is parked on a slope for a long period

of time, the amount of oil inside the lash adjuster will
decrease, and air may get into the high pressure
chamber when starting the engine.

(2) After parking the vehicle for long periods, the oil drains

out of the oil passage, and it takes time for the oil
to be supplied to the lash adjuster, so air can get
into the high pressure chamber.

(3) If either of the above situations occur, the abnormal

noise can be eliminated by bleeding the air from inside
the lash adjusters.

1.

Check the engine oil and replenish or replace the oil if
necessary.

NOTE
(1) If there is a only small amount of oil, air will be drawn

in through the oil screen and will get into the oil
passage.

(2) If the amount of oil is greater than normal, then the

oil will being mixed by the crankshaft and a large
amount of air may get mixed into the oil.

(3) If the oil is degenerated, air and oil will not separate

easily in oil, and the amount of air mixed into the
oil will increase.

(4) If the air which has been mixed in with the oil due

to any of the above reasons gets into the high pressure
chamber of the lash adjuster, the air inside the high
pressure chamber will be compressed when the valve
is open and the lash adjuster will over-compress,
resulting in abnormal noise when the valve closes.
This is the same effect as if the valve clearance is
adjusted to be too large by mistake. If the air inside
the lash adjusters is then released, the operation of
the lash adjusters will return to normal.

Good

High-
pressure
chamber

ENGINE <4G9-MPI> – 

On-vehicle Service/Crankshaft Pulley

11B-14

2.

Run the engine at idle for 1 – 3 minutes to let it warm
up.

3.

With no load on the engine, repeat the drive pattern shown
in the illustration at left and check if the abnormal noise
disappears. (The noise should normally disappear after
10 – 30 repetitions, but if there is no change in the noise
level after 30 repetitions or more, the problem is probably
not due to air inside the lash adjusters.)

4.

After the noise has disappeared, repeat the drive pattern
shown in the illustration at left a further 5 times.

5.

Run the engine at idle for 1 – 3 minutes and check that
the noise has disappeared.

CRANKSHAFT PULLEY

REMOVAL AND INSTALLATION

Pre-removal and Post-installation Operation

D

Under Cover Removal and Installation

D

Drive Belt Tension Adjustment (Refer to P.11B-5.) <only after installation>

(Engine Oil)

2

3

4

1

182 

±

4

  N

·

m

Removal steps

1. Power steering oil pump drive

belt <Vehicles without A/C>,
Power steering oil pump and A/C
compressor drive belt
<Vehicles with A/C>

2. Alternator drive belt

A

A

" "

A

A

3. Crankshaft pulley

"

A

A

4. Front flange

Gradually open the
throttle valve.

Drive pattern for air bleeding

Close the throttle
valve.

Approx.
3,000 r/min

15
seconds

15
seconds

Idle speed

Once


Content   ..  23  24  25  26   ..