Mitsubishi Lancer. Manual - part 219


  Index      Mitsubishi     Mitsubishi Lancer - service repair manual 2006 year


Search            


Content   ..  217  218  219  220   ..


Mitsubishi Lancer. Manual - part 219


ON-VEHICLE SERVICE

ENGINE LUBRICATION

12-4

ON-VEHICLE SERVICE

ENGINE OIL CHECK

M1121000900342

ACX00892 AC

Good

Maximum

Minimum

<4G1>

AC205268

Maximum

Minimum

Good

AC

<4G6>

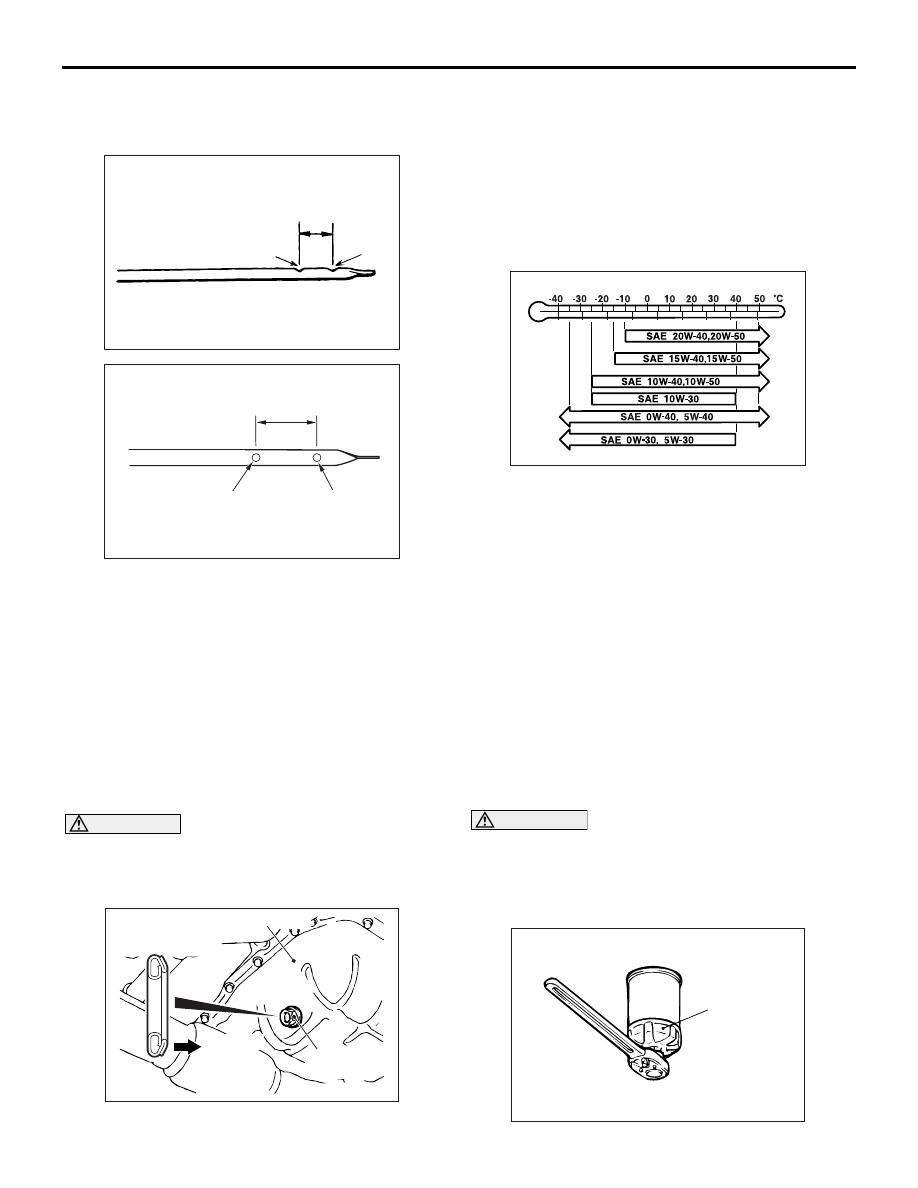
1. Pull out the engine oil level gauge slowly and 

check that the oil level is in the illustrated range.

2. Check that the oil is not excessively dirty, that 

there is no coolant or petrol mixed in, and that it 
has sufficient viscosity.

ENGINE OIL REPLACEMENT

M1121001000416

1. Start the engine and allow it to warm up until the 

temperature of the coolant reaches 80 

° C to 90 

° C.

2. Remove the engine oil filler cap.

CAUTION

Use care as engine oil could be hot.
3. Remove the engine oil pan drain plug to drain 

engine oil.

AC208299

Engine oil pan

AC

Engine oip pan
drain plug

Engine oip pan
drain plug

Engine oil
pan side

4. Install a new engine oil pan drain plug gasket so 

that it faces in the direction shown in the 
illustration, and then tighten the engine oil pan 
drain plug to the specified torque.

Tightening torque: 39 

± 5 N⋅ m

NOTE: Install the engine oil pan drain plug gasket 
so it faces in the direction shown in the illustration.

AC301513

5. Refill with specified quantity of engine oil.

Specified Engine Oil (ACEA and API classifica-

tion): ACEA A1, A2 or A3/API SG or higher

Total quantity (Includes volume inside engine 

oil filter): 

3.3 L <4G1>
4.3 L <4G6>

6. Install the engine oil filler cap.
7. Check engine oil level.

ENGINE OIL FILTER REPLACEMENT

M1121001100383

1. Start the engine and allow it to warm up until the 

temperature of the coolant reaches 80 

° C to 90 

° C.

2. Remove the engine oil filler cap.

CAUTION

Use care as engine oil could be hot.
3. Remove the engine oil pan drain plug to drain 

engine oil.

4. Remove the under cover.

AC000093

MB991396
<4G1>,
MB991828
<4G1>,
MB991610
<4G6> or
commercially-
available  tool

AI

ON-VEHICLE SERVICE

ENGINE LUBRICATION

12-5

5. Use the respective tool in the following table to 

remove the engine oil filter.

Number

Special tool

MD348631 <4G1> Oil filter wrench (MB991828) or 

equivalent

MD365876 <4G1>
MD360935 <4G1> Oil filter wrench (MB991396) or 

equivalent

MD136466 <4G6> Commercially- available tool
MD322508 <4G6>
MD356000 <4G6> Oil filter wrench (MB991610) or 

equivalent

6. Clean the filter bracket side mounting surface.

AC103250AD

O-ring

7. Apply a small amount of engine oil to the O-ring of 

the new engine oil filter.

8. Once the O-ring of the engine oil filter is touching 

the flange, use the respective tool in the following 
table to tighten to the specified torque.

Number

Special tool

Tightening torque

MD348631 
<4G1>

Oil filter wrench 
(MB991828) or 
equivalent

Approximately 3/4 
turn (16 

± 4 N⋅ m)

MD365876 
<4G1>
MD360935 
<4G1>

Oil filter wrench 
(MB991396) or 
equivalent

Approximately 1 turn 
(14 

± 2 N⋅ m)

MD136466 
<4G6>

Commercially- 
available tool

Approximately 3/4 
turn (17 

± 3 N⋅ m)

MD322508 
<4G6>
MD356000 
<4G6>

Oil filter wrench 
(MB991610) or 
equivalent

Approximately 3/4 
turn (14 

± 2 N⋅ m)

9. Install the engine oil pan drain plug and refill the 

engine oil (Refer to 

P.12-4

).

10.Race the engine 2

−3 times, and check to be sure 

that no engine oil leaks from installation section of 
the engine oil filter.

OIL PRESSURE CHECK

M1121002300830

AK101640

<4G1>

Oil pressure
switch

Oil filter

AD

AK300647AB

<4G6>

Oil filter bracket

Oil pressure switch

1. Check engine oil quantity.

AKX00294

MD998012

AF

CAUTION

Since sealant is applied to the thread of oil pres-
sure switch, take care not to damage the oil pres-
sure switch when removing it.
2. Use the special tool Oil pressure switch wrench 

(MD998012) to remove the oil pressure switch.
NOTE: Remove the terminal of oil pressure switch 
where the special tool Oil pressure switch wrench 
(MD998012) is not fitted.

3.  Install the oil pressure gauge.

NOTE: Use an adapter of PT 1/8 thread.

4. Run the engine to warm it.
5. After the engine has been warmed up, check that 

oil pressure is within the standard value.

Standard value:

At idle: 29 kPa or more
At 3,500 r/min: 294 

 686 kPa

ON-VEHICLE SERVICE

ENGINE LUBRICATION

12-6

6. Remove the oil pressure gauge.

AKX00295AD

7. Apply the specified sealant to the thread of oil 

pressure switch.

Specified sealant: 3M ATD Part No. 8660 or 
equivalent

AKX00294

MD998012

AF

CAUTION

Do not start the engine within one hour after the 
oil pressure switch has been installed.
8. Use the special tool Oil pressure switch wrench 

(MD998012) to tighten the oil pressure switch to 
the specified torque.

Tightening torque:

19 

± 3 N⋅ m <4G1>

10 

± 2 N⋅ m <4G6>

42-1

GROUP 42

BODY

CONTENTS

HOOD. . . . . . . . . . . . . . . . . . . . .

42-3

ON-VEHICLE SERVICE. . . . . . . . .

42-3

ADJUSTMENT OF CLEARANCE 


AROUND HOOD . . . . . . . . . . . . . . . . . . 

42-3

ADJUSTMENT OF ALIGNMENT OF 


HOOD STEPPED PORTION AND 


HOOD STRIKER . . . . . . . . . . . . . . . . . . 

42-3

ADJUSTMENT OF HOOD HEIGHT  . . . 

42-3

HOOD. . . . . . . . . . . . . . . . . . . . . . .

42-4

REMOVAL AND INSTALLATION  . . . . . 

42-4

FENDER. . . . . . . . . . . . . . . . . . .

42-5

SPECIAL TOOL . . . . . . . . . . . . . . .

42-5

FENDER. . . . . . . . . . . . . . . . . . . . .

42-6

REMOVAL AND INSTALLATION  . . . . . 

42-6

FUEL FILLER LID . . . . . . . . . . .

42-8

REMOVAL AND INSTALLATION .

42-8

STRUT TOWER BAR  . . . . . . . .

42-9

REMOVAL AND INSTALLATION .

42-9

WINDOW GLASS. . . . . . . . . . . 

42-10

ADHESIVE  . . . . . . . . . . . . . . . . . . .

42-10

SPECIAL TOOLS . . . . . . . . . . . . . .

42-10

WINDOW REPAIR  . . . . . . . . . . . . .

42-10

WINDSHIELD . . . . . . . . . . . . . . . . .

42-12

REMOVAL AND INSTALLATION. . . . . . 

42-12

REAR WINDOW GLASS 


<SEDAN> . . . . . . . . . . . . . . . . . . . .

42-17

REMOVAL AND INSTALLATION. . . . . . 

42-17

QUARTER WINDOW GLASS 


<WAGON>  . . . . . . . . . . . . . . . . . . .

42-20

REMOVAL AND INSTALLATION. . . . . . 

42-20

TAILGATE WINDOW GLASS 


<WAGON>  . . . . . . . . . . . . . . . . . . .

42-23

REMOVAL AND INSTALLATION. . . . . . 

42-23

DOOR . . . . . . . . . . . . . . . . . . . . 

42-25

SERVICE SPECIFICATIONS . . . . .

42-25

SEALANT . . . . . . . . . . . . . . . . . . . .

42-25

SPECIAL TOOLS . . . . . . . . . . . . . .

42-26

Continued on next page   


Content   ..  217  218  219  220   ..