Mitsubishi Eclipse / Eclipse Spyder (2000-2002). Service and repair manual - part 54


  Index      Mitsubishi     Mitsubishi Eclipse / Eclipse Spyder (2000-2002). Service and repair manual


Search            


Content   ..  52  53  54  55   ..


Mitsubishi Eclipse / Eclipse Spyder (2000-2002). Service and repair manual - part 54


CRANKSHAFT FRONT OIL SEAL

TSB Revision

ENGINE MECHANICAL <3.0L ENGINE>

11C-25

INSPECTION

M1112002900102

Check the oil pan for cracks.

Check the oil pan sealant-coated surface for damage and 
deformation.

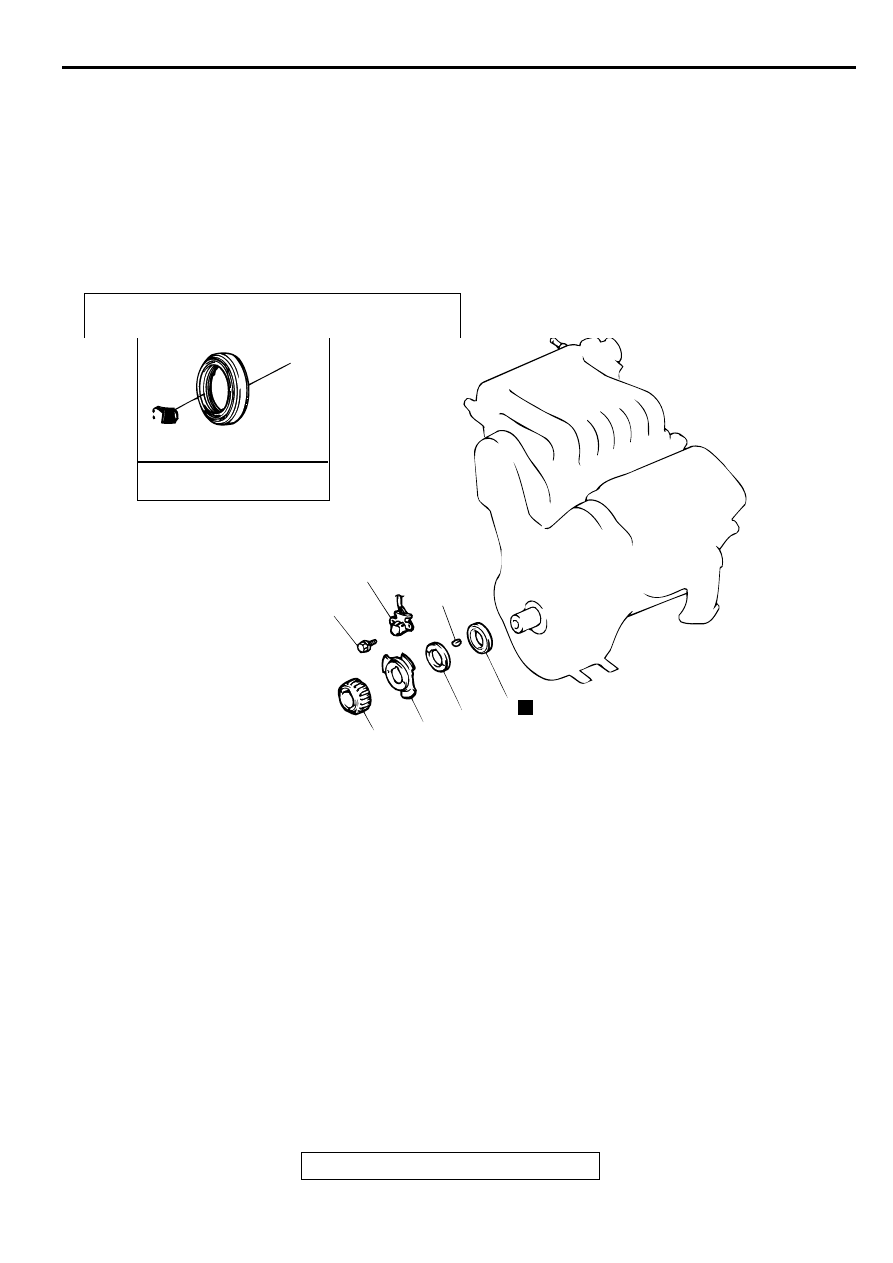
C R A N K SH A FT FR O N T O IL SEA L

REMOVAL AND INSTALLATION

M1112003400133

Required Special Tool:

MD998717: Crankshaft Front Oil Seal Installer

Pre-removal and Post-installation Operation

Timing Belt Removal and Installation (Refer to 

P.11C-32

.)

AC001728AB

8.8 ± 1.0 N·m
78 ± 9 in-lb

1

2

3

4

5

6

6

ENGINE OIL

N

REMOVAL STEPS

>>B<<

1.

CRANKSHAFT SPROCKET

2.

CRANKSHAFT POSITION 
SENSOR

>>B<<

3.

CRANKSHAFT SENSING 
BLADE

>>B<<

4.

CRANKSHAFT SPACER

5

.

KEY

>>A<<

6.

CRANKSHAFT FRONT OIL 
SEAL

REMOVAL STEPS (Continued)

CRANKSHAFT FRONT OIL SEAL

TSB Revision

ENGINE MECHANICAL <3.0L ENGINE>

11C-26

INSTALLATION SERVICE POINTS

>>A<< CRANKSHAFT FRONT OIL SEAL INSTALLATION
1. Apply a small amount of engine oil to the oil seal lip and then 

insert.

2. Using special tool MD998717, tap the oil seal into the front 

case.

>>B<< CRANKSHAFT SPACER/CRANKSHAFT SENSING 
BLADE/CRANKSHAFT SPROCKET INSTALLATION
To prevent the crankshaft pulley mounting bolt from loosening, 
degrees or clean the crankshaft, the crankshaft spacer, the 
crankshaft sensing blade and the crankshaft at the shown 
positions.

ACX00363 AB

OIL SEAL

MD998717

CRANKSHAFT

MD998717

ACX01536 AB

CRANKSHAFT

CRANKSHAFT

SPACER

CRANKSHAFT

SENSING BLADE

CRANKSHAFT

SPROCKET

SHADED PART : DEGREASE

CLEANING

CRANKSHAFT REAR OIL SEAL

TSB Revision

ENGINE MECHANICAL <3.0L ENGINE>

11C-27

C R A N K SH A FT R EA R  O IL SEA L

REMOVAL AND INSTALLATION

M1112003700134

Required Special Tools:

MD998718: Crankshaft Rear Oil Seal Installer

MD998781: Flywheel Stopper

REMOVAL SERVICE POINTS

<<A>> TRANSAXLE ASSEMBLY REMOVAL

CAUTION

Do not remove the flywheel mounting bolt shown by the 
arrow. If this bolt is removed, the flywheel will become out 
of balance and damaged.
<M/T>: Refer to GROUP 22A, Transaxle Assembly 

P.22A-14

.

<A/T>: Refer to GROUP 23A, Transaxle Assembly 

P.23A-353

.

AC001730

74 ± 2 N·m
55 ± 1 ft-lb

74 ± 2 N·m
55 ± 1 ft-lb

1

2

3

5

2

4

<A/T>

<M/T>

5

ENGINE OIL

AB

REMOVAL STEPS

<<A>>

TRANSAXLE ASSEMBLY

CLUTCH COVER AND CLUTCH 
DISC <M/T> (REFER TO GROUP 
21B, CLUTCH 

P.21B-2

.)

<<B>>

>>B<<

1.

PLATE <M/T>

<<B>>

>>B<<

2.

ADAPTER PLATE

<<B>>

>>B<<

3.

FLYWHEEL <M/T>

<<B>>

>>B<<

4.

DRIVE PLATE <A/T>

>>A<<

5.

CRANKSHAFT REAR OIL SEAL

REMOVAL STEPS (Continued)

AC000126

FLYWHEEL

BOLT

AB

<M/T>

CRANKSHAFT REAR OIL SEAL

TSB Revision

ENGINE MECHANICAL <3.0L ENGINE>

11C-28

<<B>> PLATE <M/T>/ADAPTER PLATE/FLYWHEEL <M/T>/
DRIVE PLATE <A/T> REMOVAL
Use special tool MB998781 to secure the flywheel or drive 
plate, and remove the bolts.

INSTALLATION SERVICE POINTS

>>A<< CRANKSHAFT REAR OIL SEAL INSTALLATION
1. Apply a small amount of engine oil to the entire 

circumference of the oil seal lip.

2. Use special tool MD998718 to tap in the oil seal as shown in 

the illustration.

>>B<< DRIVE PLATE <A/T>/FLYWHEEL <M/T>/ADAPTER 
PLATE/PLATE <M/T> INSTALLATION
Use special tool MD998781 to hold the flywheel or drive plate 
in the same manner as removal. Then install the bolts.

ACX00296 AB

MD998781

ACX00356 AB

MD998718

ACX00296 AB

MD998781


Content   ..  52  53  54  55   ..