Mitsubishi Eclipse. Manual - part 956


  Index      Mitsubishi     Mitsubishi Eclipse - service repair manual 2004 year


Search            


Content   ..  954  955  956  957   ..


Mitsubishi Eclipse. Manual - part 956


DOOR

TSB Revision

BODY

42-49

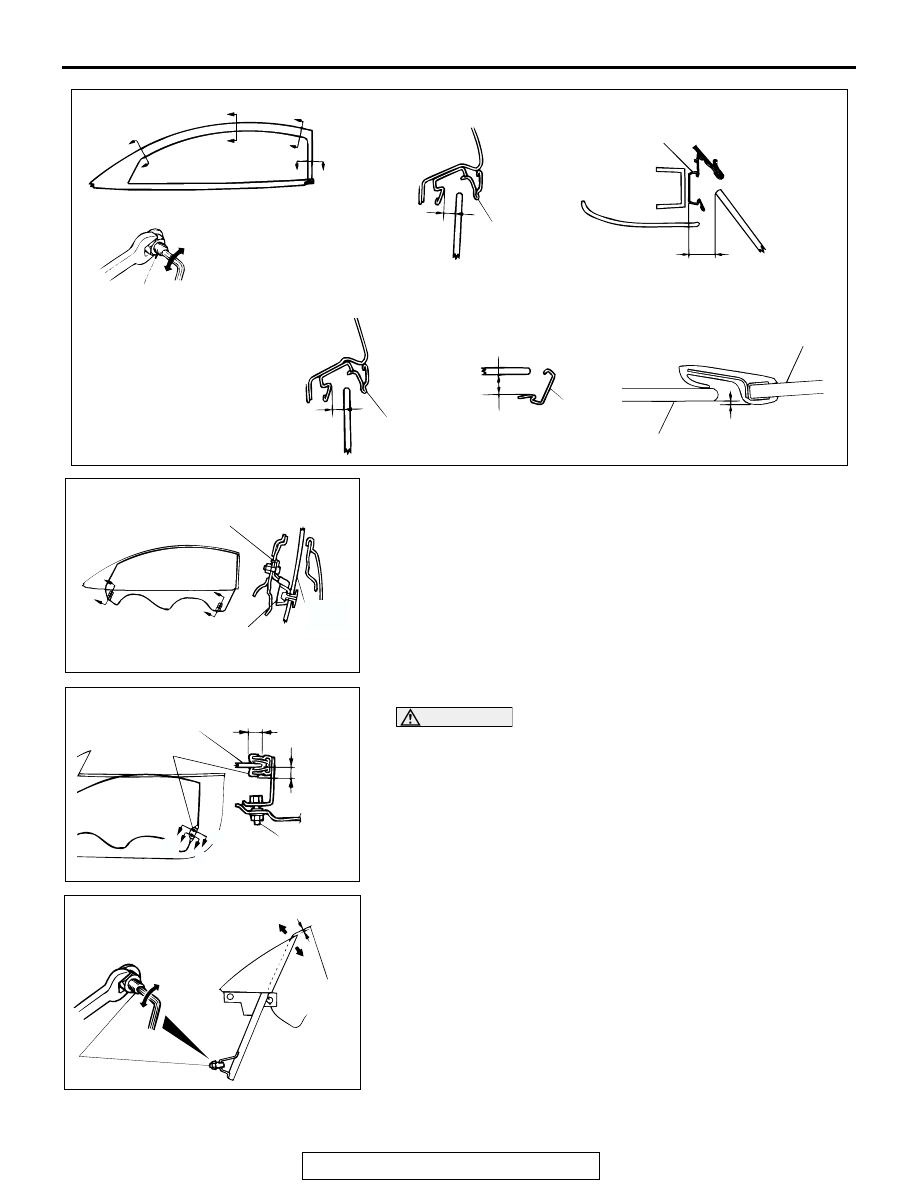
7. Press the up-stop against the window glass stop, and then 

tighten the up-stop nut.

8. Lower the window glass to the extreme position.

CAUTION

The adjusting bolts should be turned by the same number 
of threads.
9. Tighten the adjusting bolts (upper and lower) until the rear 

lower sash is positioned as shown in the illustration, and 
then lock the nuts place.

10.Raise the window glass to the extreme position.
11.Turn the adjusting bolt until the gap between the delta sash 

assembly and the window glass end meets the shown 
dimension.

12.Lower the window glass.
13.Lock the adjusting bolt of the delta sash assembly with a nut
14.Tighten the two upper bolts at the delta sash assembly.

AC003392

G

G

H

H

I

I

J

J

SECTION G – G

<ECLIPSE>

SECTION H –H

<ECLIPSE SPYDER>

SECTION I – I

<ECLIPSE>

SECTION J – J

<ECLIPSE>

<ECLIPSE SPYDER>

LARGER

DIMENSION

ADJUSTING

BOLT

SMALLER

DIMENSION

WEATHERSTRIP

HOLDER

7.1 – 9.1 mm

(0.28 – 0.36 in)

WEATHERSTRIP HOLDER

20 mm (0.80 in)

WEATHERSTRIP

HOLDER

5.9 – 7.9 mm

(0.23 – 0.31 in)

WEATHER

STRIP

HOLDER

11.1 – 13.1 mm

(0.44 – 0.52 in)

QUARTER WINDOW

GLASS

FRONT DOOR

GLASS

2.0 mm (0.08 in)

AC000473

K

K

K

K

SECTION K –K

UP-STOP

WINDOW

GLASS

WINDOW

GLASS

STOP

AC

AC000474AC

L

L

L

L

SECTION L – L

REAR LOWER

SASH

WINDOW GLASS

14 mm (0.6 in)

11.5 mm

(0.45 in)

ADJUSTING

BOLT

AC000475

ADJUSTING BOLT

DELTA
SASH ASSEMBLY
TILTING
REARWARD

DELTA
SASH
ASSEMBLY
TILTING
FORWARD

0.5 – 1.5 mm

(0.02 – 0.06 in)

WINDOW

GLASS END

AB

DOOR

TSB Revision

BODY

42-50

CAUTION

Ensure that the weatherstrip is not wrinkled or out of posi-
tion.
15.Install the drip line weatherstrip to the weatherstrip holder. 

<ECLIPSE> (Refer to 

P.42-66

.)

16.Install the topstack rail weatherstrip to the weatherstrip 

holder. <ECLIPSE SPYDER> (Refer to 

P.42-143

.)

17.Install the door trim and the waterproof film (Refer to 

P.42-54

.)

18.Check the door window glass alignment according to 

following procedure.

(1) Close the door window glass fully, and close the door 

until the clearance between the door window glass rear 
end and the weatherstrip reaches 100 mm (3.9 inches). 
At this time, the distance between the rear end of the belt 
line molding outer and the quarter panel should be 113.5 
− 118.5 mm (4.46 − 4.67 inches) <ECLIPSE> and 126 − 

130 mm (4.9 

− 5.1 inches) <ECLIPSE SPYDER>.

AC004087

DOOR GLASS

REAR END

100 

(3.9)

BELTLINE

MOULDING

OUTER

REAR END

113.5 – 118.5 (4.46 – 4.67)

<ECLIPSE>

126 – 130 (4.9 – 5.1)

<ECLIPSE SPYDER>

AB

mm(in)

DOOR

TSB Revision

BODY

42-51

(2) The clearance between the glass and the glass catch 

should be within the range of standard values (a, c, e, g) 
when the window is fully closed and the door is closed 
gently.

Standard value

(a): 2.9 

± 1.0 mm (0.11 ± 0.04 inches)

(c): 4.5 

± 1.0 mm (0.18 ± 0.04 inches)

(e): 5.0 mm (0.20 inches)
(g): 3.4 mm (0.13 inches)
(i): 10.7 

± 1.0 mm (0.42 ± 0.04 inches)

(j): 8.7 mm (0.32 inches)

NOTE: IF the clearance is too small, the glass catch will 
move above the glass when the door is closed. If the 
clearance is too large, wind noise may be generated at 
high vehicle speeds because the glass catch is not 
hooked onto the glass.

(3) The amount of catch of the door catch on the door glass 

and the weatherstrip should be at the standard values b, 
d, f:
when the window is closed fully and then the door is 
closed.

Standard value

(b): 2.7 

± 1.0 mm (0.11 ± 0.04 inches)

(d): 2.7 

± 1.0 mm (0.11 ± 0.04 inches)

(f): 8.0 mm (0.32 inches)
(h): 2.4 

± 1.0 mm (0.09 ± 0.04 inches) 

(4) The door glass should slide smoothly over its full range of 

movement when the door is closed.

(5) The glass catch and the weatherstrip should be parallel 

with the door glass and the two up-stops should touch 
simultaneously when the glass is fully closed.

AC003393

M

M

N

N

O

O

P

P

SECTION M – M

<ECLIPSE>

SECTION N – N

<ECLIPSE>

<ECLIPSE SPYDER>

SECTION O – O

<ECLIPSE>

SECTION P – P

<ECLIPSE>

<ECLIPSE SPYDER>

a

b

c

d

e

f

g

h

i

j

AB

DOOR

TSB Revision

BODY

42-52

DOOR INSIDE HANDLE PLAY CHECK AND 
ADJUSTMENT

M1423001500054

1. Check that the door inside handle play is within the standard 

value range.

Standard value (A): 3.2 mm (0.13 inch)

2. If the door inside handle play is outside the standard value 

range, remove the door trim. (Refer to 

P.42-54

.)

3. Loosen the inside handle mounting screws, and then move 

the inside handle back and forth to adjust the play.

DOOR OUTSIDE HANDLE PLAY CHECK

M1423001600051

1. Check that the door outside handle play is within the 

standard value range.

Standard value (B): 2.4 mm (0.09 inch)

2. If the door outside handle play is not within the standard 

value range, check the door outside handle or the door latch 
assembly. Replace if necessary.

CIRCUIT BREAKER (INCORPORATED IN THE 
POWER WINDOW MOTOR) INSPECTION

M1429001000046

1. Pull the power window switch to the UP position to fully 

close the door window glass, and keep pulling the switch for 
a further 10 seconds.

2. Release the power window switch from the UP position and 

immediately press it to the DOWN position. The condition of 
the circuit breaker is good if the door window glass starts to 
move downwards within 60 seconds.

AC000478

A

A

A

SECTION A – A

AB

AC000479

A

A

B

SECTION A – A

AB


Content   ..  954  955  956  957   ..