Mitsubishi Colt Ralliart. Manual - part 587


  Index      Mitsubishi     Mitsubishi Colt Ralliart - service repair manual


Search            


Content   ..  585  586  587  588   ..


Mitsubishi Colt Ralliart. Manual - part 587


REAR BUMPER ASSEMBLY

EXTERIOR

51-10

REMOVAL SERVICE POINT
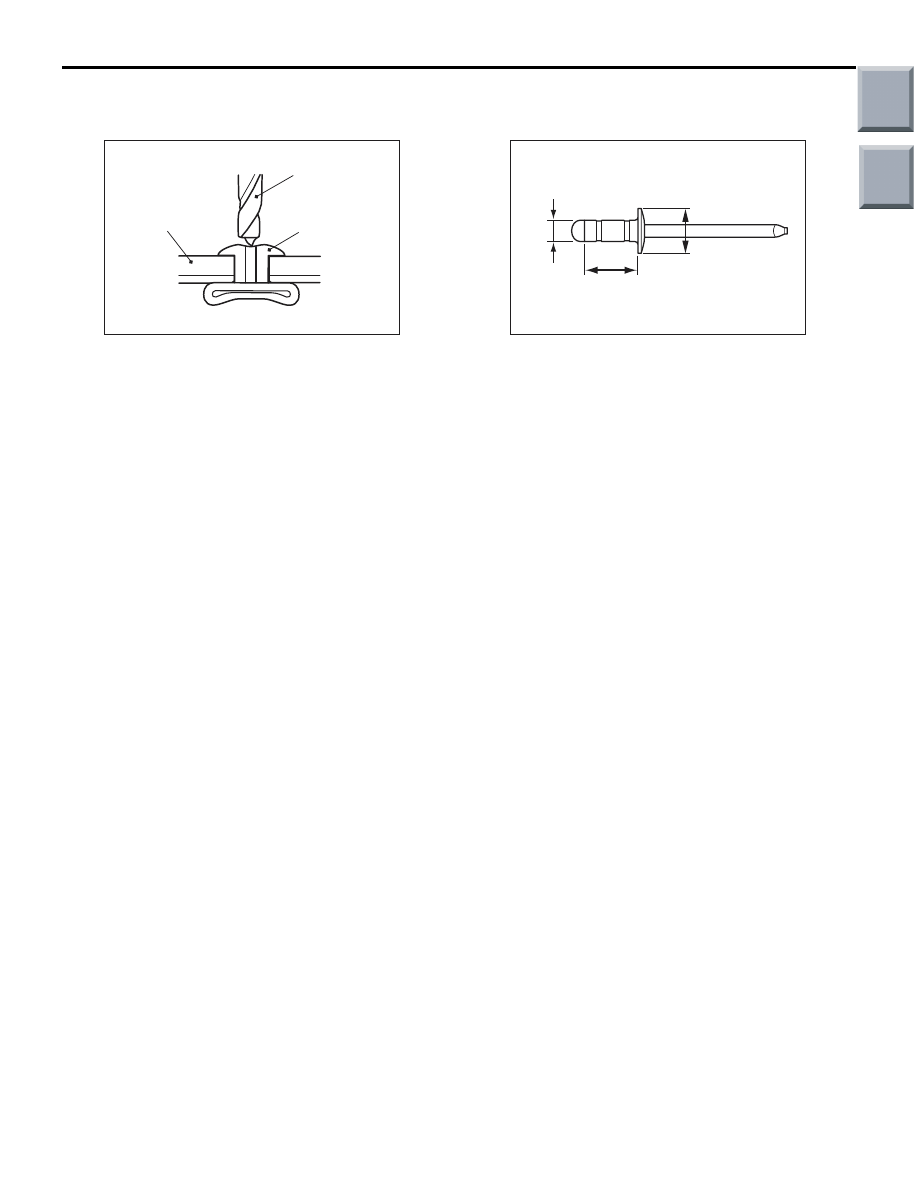
<<B>> RIVETS REMOVAL

AC600336AB

Rivet

Drill

Rear bumper
side lower
bracket

Use a drill (4.0 mm) to make a hole in the rivet to 
break it, and then remove the rivet.

 INSTALLATION SERVICE POINT
>>B<< RIVETS INSTALLATION

AC600337AB

Unit: mm

10.2

Ø4.0

Ø8.0

Use a rivet tool to attach the rivet by the following 
procedure.
1. Insert the rivet into the base material rear bumper 

side lower bracket.

2. Attach the rivet by using the rivet tool.

Main

Index

Group

TOC

OVERFENDER <RALLIART Version-R>

EXTERIOR

51-11

OVERFENDER <RALLIART Version-R>

ADHESIVE

M1511000501452

Application

Specified adhesive

Front / Rear/Rear door 
overfender

Double-sided tape: Generic products
a: 3.0 mm width and 1.2mm thickness
b: 0.8mm thickness

REMOVAL AND INSTALLATION

M1511024700178

AC511796

5

3

1

4

AB

C

C

D

D

A

A

B

B

2

6

8

7

1

1

4

3

3

Boss

Section A – A

Section B – B

Section C – C

Section D – D

Clip

Clip

Clip

Main

Index

Group

TOC

AC511797AB

a

b

b

b

b

b

b

a

a

a

a

E

E

E

E

E

E

3

2,5,6,7

4

5

6

2

1

E

E

7

Double-sided tape: Generic products,
a: 3.0 mm width and 1.2 mm thickness
b: 0.8 mm thickness 

Double-sided tape affixed location

Section E – E

Removal steps 

Side air dam (Refer to 

P.51-25

)

1.

Front overfender

2.

Front overfender pad

3.

Rear overfender

4.

Rear door overfender

5.

Rear overfender pad A

6.

Rear door garnish pad

7.

Rear overfender pad B

>>

A

<<

8.

Rear door lower black-out tape 
(body side)

OVERFENDER <RALLIART Version-R>

EXTERIOR

51-12

Removal steps (Continued)

Main

Index

Group

TOC

OVERFENDER <RALLIART Version-R>

EXTERIOR

51-13

INSTALLATION SERVICE POINT
>>A<<REAR DOOR LOWER BLACK-OUT 
TAPE INSTALLATION

1. INSTALLATION POSITION

AC600859

AB

Door opening line

43.6 mm

A

A

Rear door lower
black-out tape

Black-out tape

1.7 mm

Rear overfender
installation hole

Section A – A

 Rear door 
 overfender

Rear
overfender

CAUTION

• The ambient temperature should be 20 to 

38

°C. Ensure that the working area is clean.

• If ambient temperature is less than 15°C, heat 

the black-out tape and application surface to 
a temperature of 20 to 30

°C.

• Be careful that air bubbles are not formed 

under the black-out tape.

2. INSTALLATION PROCEDURE

(1) Wipe the black-out tape application surface 

and clean it with a rag moistened with 
isopropyl alcohol.

(2) Remove backing paper from the black-out 

tape, and apply the tape to the specified 
position.

(3) Remove an application tape from the black-out 

tape.

Main

Index

Group

TOC


Content   ..  585  586  587  588   ..