Mitsubishi Grandis. Manual - part 819


  Index      Mitsubishi     Mitsubishi Grandis - service repair manual


Search            


Content   ..  817  818  819  820   ..


Mitsubishi Grandis. Manual - part 819


DOOR SASH TAPE

EXTERIOR

51-11

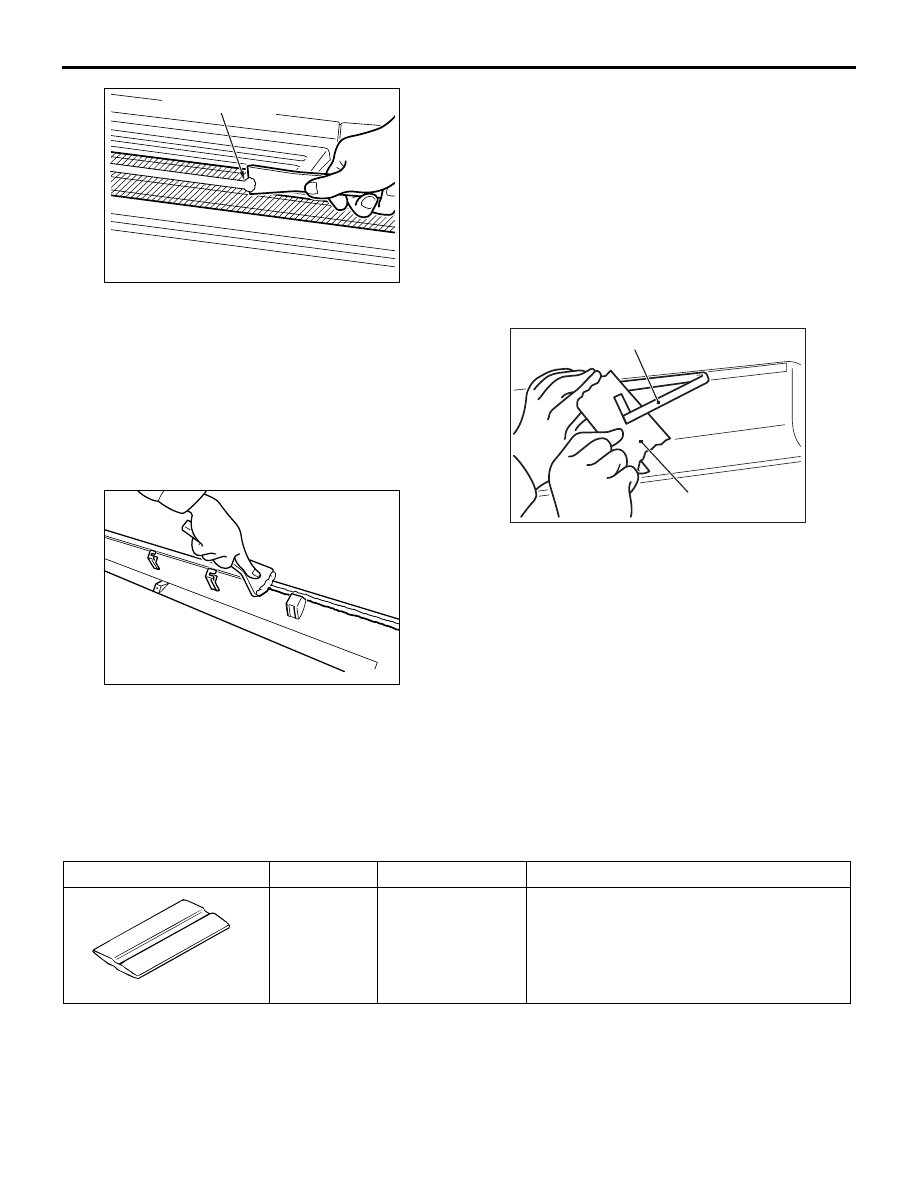
2. Scrape off the double-sided tape with a resin 

spatula as possible.

3. Peel off the protection tape.
4. Wipe the body surface and clean it with a rag 

moistened with isopropyl alcohol.

<Remove double-sided tape remaining on side sill 
garnish and adhere double-sided tape (when 
re-using side sill garnish)>

1. Scrape off the double-sided tape on the side sill 

garnish with a resin spatula as possible.

2. Wipe the side sill garnish surface and clean it with 

a rag moistened with isopropyl alcohol.

3. Remove only a small portion of the residual 

adhesive.

4. Adhere the double-sided tape as specified on the 

side sill garnish (Refer to double-sided tape 
adherence location). 

INSTALLATION SERVICE POINT
>>A<< SIDE SILL GARNISH 
INSTALLATION

1. Tear off the double-sided tape backing paper.

NOTE: If Attach the adhesive tape to the edge of 
the backing paper, it will be easy to tear off.

2. Install the side sill garnish.

NOTE: If The double-sided tape is difficult to affix 
in cold temperature, etc., warm the bonding 
surfaces of the body and side sill garnish to about 
40

 60

°

C before affixing the tape.

3. Firmly press in the side sill garnish.

DOOR SASH TAPE

SPECIAL TOOL

M1511000601125

AC200050

AB

Double-sided tape

AC103187

AC103247

Backing paper

Adhesive tape

AC

Tool

Number

Name

Application

MB990528

Stripe tape spatula Door sash tape

MB990528

DOOR SASH TAPE

EXTERIOR

51-12

DOOR SASH TAPE

REMOVAL AND INSTALLATION

M1511024100013

Pre-removal and Post-installation Operation
• Door Trim Assembly Removal and Installation (Refer to 

GROUP 52A, Door Trim 

P.52A-12

.)

• Door Beltline Weather Strip Inner Removal and 

Installation (Refer to GROUP 42, Window Glass 

Runchannel and Door Opening Weather Strip 

P.42-40

.)

• Door Opening Weather Strip Outer Removal and 

Installation (Refer to GROUP 42, Window Glass 

Runchannel and Door Opening Weather Strip 

P.42-40

.)

• Door Window Glass Runchannel Removal and Installation 

(Refer to GROUP 42, Window Glass Runchannel and 

Door Opening Weather Stri

P.42-40

.)

• Door Mirror Removal and Installation (Refer to 

P.51-46

.)

• Door Beltline Moulding Removal and Installation (Refer to 

GROUP 42, Window Glass Runchannel and Door 

Opening Weather Strip 

P.42-40

.)

AC303038

AB

2

6

9

10

8

1

7

5

3

4

N

N

N

N

N

N

N

N

N

N

Front door sash outer tape 
removal steps

<<A>>

>>A<<

1.

Door sash outer tape A

<<A>>

>>A<<

2.

Door sash outer tape B
Rear door sash outer tape 
removal steps

<<A>>

>>B<<

3.

Door sash outer tape C

<<A>>

>>B<<

4.

Door sash outer tape D

<<A>>

>>B<<

5.

Door sash outer tape E

Front door sash inner tape 
removal steps

<<A>>

>>C<<

6.

Door sash inner tape F

<<A>>

>>C<<

7.

Door sash outer tape G
Rear door sash inner tape 
removal steps

<<A>>

>>D<<

8.

Door sash outer tape H

<<A>>

>>D<<

9.

Door sash outer tape I

<<A>>

>>D<<

10. Door sash outer tape J

DOOR SASH TAPE

EXTERIOR

51-13

REMOVAL SERVICE POINT
<<A>> FRONT DOOR SASH TAPES 
REMOVAL

CAUTION

Pay attention to keep from getting burned by hot 
door panel or tapes.
1. Use a hair drier to warm the tape.

2. Peel the tip of the tape with your finger, and then 

peel off the tape parallel to the application 
surface.

DOOR SASH TAPE

EXTERIOR

51-14

INSTALLATION SERVICE POINT
>>A<< FRONT DOOR SASH OUTER 
TAPES INSTALLATION

CAUTION

• The ambient temperature should be 20 to 

30

°C.  Ensure that the working area is clean. 

Ideally, the tape application should be done at 
ambient temperature of 25

°C.

• If ambient temperature is less than 15°C, heat 

the tape and application surface to a 
temperature of 20 to 30

°C. If ambient 

temperature is 35

°C or higher, cool down 

them.

• The adhesive property of the tape is 

deteriorated at low temperature, so the tape 
may come adrift easily. Meanwhile, it gets 
softened at hot temperature.

• When beginning to apply the tape, pay 

particular attention. If the end of the tape 
cannot be applied to the specified position 
with an accuracy of less than 1 mm, it may 
cause the poor appearance or adhesion.

Use the special tool Stripe tape spatula 

(MB990528) to apply the tape with a steady 
pace and pressure. If you do not apply the 
tape with a steady pace or pressure, or abort 
the application, a shallow groove (lateral 
groove called as "Shock line") may be 
present on the tape surface. Meanwhile, if you 
apply it too quickly, air bubbles may be 
formed under the tape.

1. Wrap a soft cloth (synthetic fiber) around the tip of 

the special tool.

2. Use isopropyl alcohol to degrease the tape 

application surface.

3. Wipe away dirt from the tape.
4. Apply the front door sash tape outer (B) according 

to the procedure below.

(1) Align the tape with the specified application 

position.

(2) Position it with a magnet, and secure with a 

clip temporarily.

(3) Peel off the released paper behind the cut line 

in the vehicle rear side, and press the tape.

(4) While peeling off the remaining released paper 

from vehicle rear to front, press the tape.

(5) Peel off the application tape in the direction of 

180 degree from the applied direction.

(6) Press the folded area of the tape at 3 positions 

(60 degrees, 120 degrees, and holding), 
rolling in toward the vehicle inside direction.

5. Apply the front door sash tape outer (A) according 

to the procedure below.

AC303428

40 to 50˚

30 to 45˚

10 to 20 mm

10 to 20 mm

AB

MB990528

MB990528

Door sash tape

Door sash tape

Backing paper

Backing paper

<Pushing direction>

<Pulling direction>

3 to 7 cm/sec.

3 to 7 cm/sec.

AC303465

3.5 mm

AB

Overlap: 3mm

RH only

Locating 
point

Backing paper
cut-line

AC303415

AB

MB990528

120˚

60˚

Hemming part


Content   ..  817  818  819  820   ..