Mitsubishi L200. Manual - part 340
AK800442
48
49
50
52
57
51
54
55
56
53
58
59
62
60
61
63
64
65
66
67
68
69
70
71
72
73
74
75
76
77
Apply gear oil to
all moving parts
before installation.
35 ± 6 N·m
AC
19 ± 3 N·m
19 ± 3 N·m
46
45
44
47
43
42
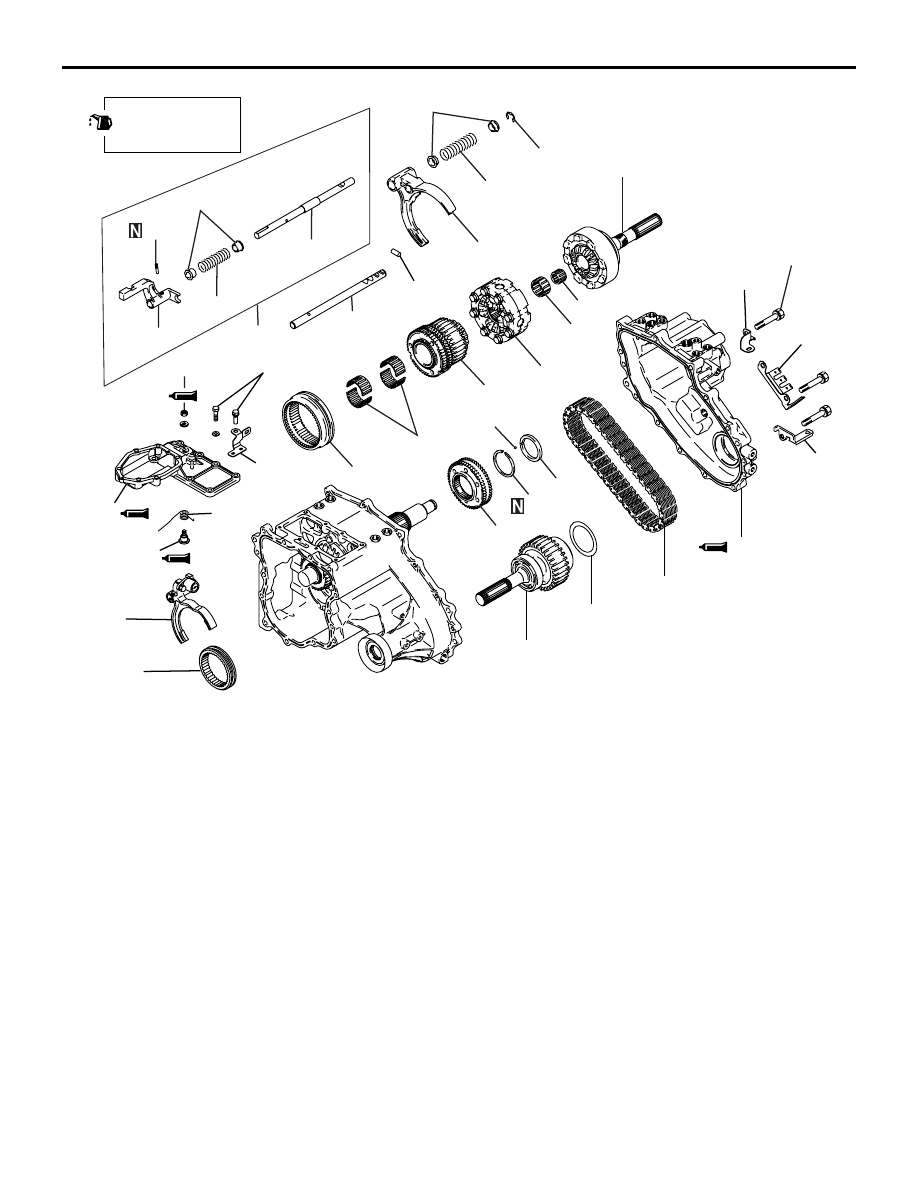
Disassembly steps
42. Harness bracket
>>R<<
43. Control housing
>>Q<<
44. Support pin
>>Q<<
45. Return spring
<<
A
>>
>>
K
<<
46. H-L shift rail
47. H-L shift fork
>>
J
<<
48. H-L clutch sleeve
49. Harness bracket
50. Harness bracket
51. Harness bracket
<<A>>
>>
I
<<
52. Chain cover
53. Interlock plunger
54. Wave spring
55. Rear output shaft
56. Needle bearing
57. Needle bearing
58. Center differential case
<<
C
>>
>>
H
<<
59. 2-4WD synchronizer
<<
C
>>
>>
H
<<
60. Chain
<<
C
>>
>>
H
61. Front output shaft
62. Needle bearing
63. E-ring
64. Spring seat
65. Spring
66. 2-4WD shift lug and shift rail
assembly
>>
G
<< 67. Spring pin
68. 2-4WD shift lug
69. Spring retainer
70. Spring
71. 2-4WD shift rail
72. 2-4WD shift fork
73. 2-4WD synchronizer sleeve
74. Spacer
75. Steel ball
>>
F
<<
76. Snap ring
77. Differential lock hub
TRANSFER
AUTOMATIC TRANSMISSION OVERHAUL <V4A5>
23C-69
Disassembly steps (Continued)