Mitsubishi L200. Manual - part 49
LUBRICANT
ENGINE LUBRICATION
12-3
LUBRICANT
M1121000402923
Item
Vehicles without DPF
Vehicles with DPF
Engine oil ACEA classification
A1/B1, A3/B3, A3/B4 or
A5/B5
C1, C2, C3 or C4
Engine oil API classification
CF-4
‚àí
Engine oil JASO classification
‚àí
DL-1
Engine oil
quantity L
2WD with 15 inch tyres
Oil pan
6.5
Oil filter
0.8
Oil cooler
0.1
Total
7.4
2WD with 16 inch tyres,
4WD
Oil pan
5.5
Oil filter
0.8
Oil cooler
0.1
Total
6.4
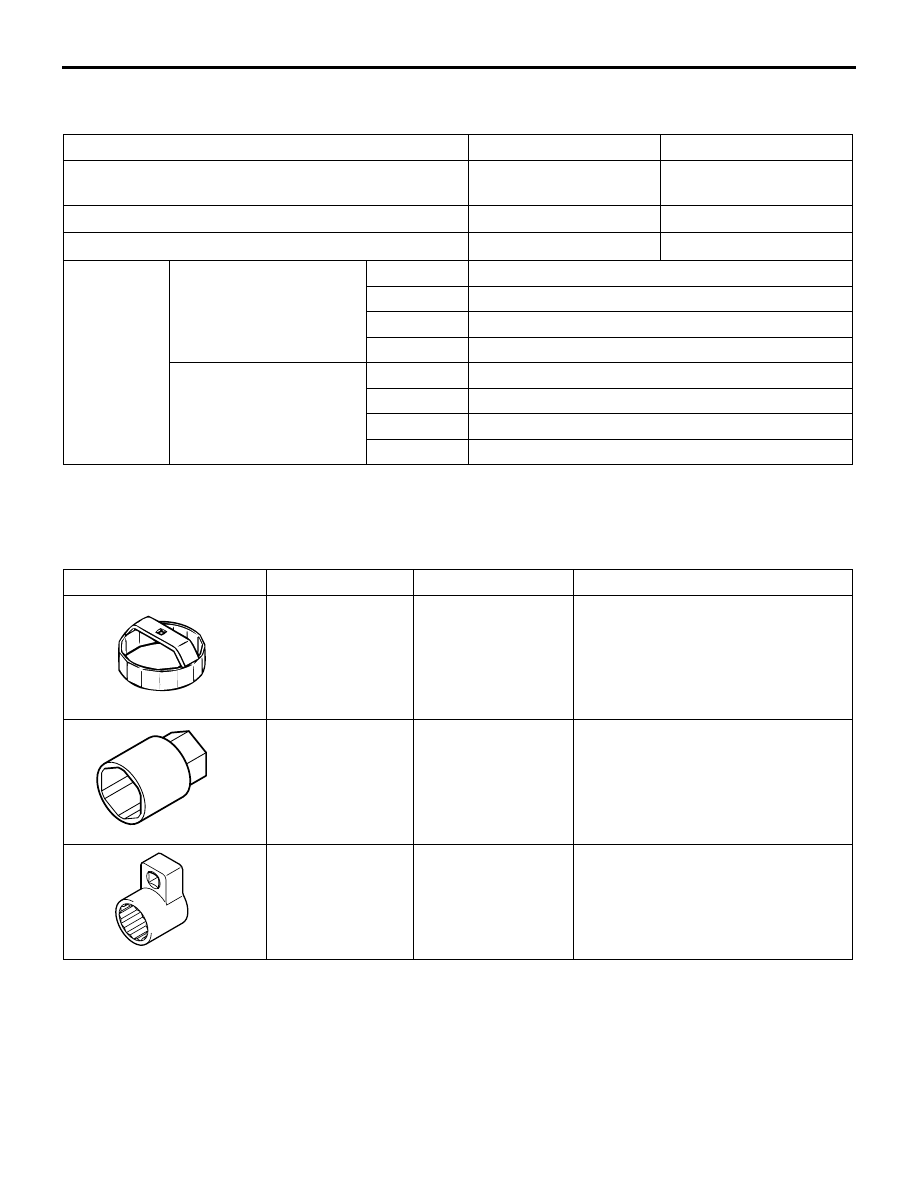
SPECIAL TOOLS
M1121000602433
Tool
Number
Name
Use
MH061590
MH061590
Oil filter wrench
Removal and installation of engine
oil filter
MD998012
Oil pressure switch
wrench
Removal and installation of engine
oil pressure switch <Except Euro5>
MB992118
MB992118
Oil pressure switch
wrench
Removal and installation of engine
oil pressure switch <Euro5>

ON-VEHICLE SERVICE
ENGINE LUBRICATION
12-4
ON-VEHICLE SERVICE
ENGINE OIL CHECK
M1121000901475
ACB00687
"X" mark
Maximum
Minimum
AB
CAUTION
When burning away and removing soot accumu-
lated in the DPF, fuel can mix with the engine oil
and an increase in the engine oil level may occur.
This does not indicate an abnormality. However,
if the engine oil level is at or over the "X" mark on
the engine oil level gauge, change the engine oil
<Vehicles with diesel particulate filter (DPF)>.
1. Pull out the engine oil level gauge slowly and
check that the engine oil level is in the illustrated
range.
2. Check that the engine oil is not excessively dirty,
that there is no engine coolant or fuel mixed in,
and that it has sufficient viscosity.
ENGINE OIL REPLACEMENT
M1121001003608
<Vehicles without diesel particulate filter
(DPF)>
1. Start the engine and allow it to warm up until the
temperature of the coolant reaches 80
°C to 90
°C.
2. Remove the engine oil filler cap.
WARNING
Use care as oil could be hot.
3. Remove the drain plug to drain oil.
AC502277
Engine oil
pan side
Engine oil pan
drain plug
AC
4. Install a new drain plug gasket so that it faces in
the direction shown in the illustration, and then
tighten the drain plug to the specified torque.
Tightening torque: 39
± 5 N⋅m
NOTE: Install the drain plug gasket so it faces in
the direction shown in the illustration.
5. Refill with specified quantity of oil.
Specified Engine Oil
• ACEA classification: "For service A1/B1,
A3/B3, A3/B4 or A5/B5"
• API classification: "For service CF-4"
Total quantity (Includes volume inside oil fil-
ter and oil cooler):
<2WD with 15 inch tyres> 7.4L
<2WD with 16 inch tyres, 4WD> 6.4L
NOTE:
AC903479
Select engine oil of the proper SAE viscosity
number according to the atmospheric tempera-
ture.
6. Install the engine oil filler cap.
7. Check oil level.
<Vehicles with diesel particulate filter
(DPF)>
1. Start the engine and allow it to warm up until the
temperature of the coolant reaches 80
°C to 90
°C.
2. Remove the engine oil filler cap.
WARNING
Use care as oil could be hot.
3. Remove the drain plug to drain oil.