Mazda CX-9 Grand Touring. Manual - part 389


  Index      Mazda     Mazda CX-9 Grand Touring - service repair manual 2008 year


Search            


Content   ..  387  388  389  390   ..


Mazda CX-9 Grand Touring. Manual - part 389


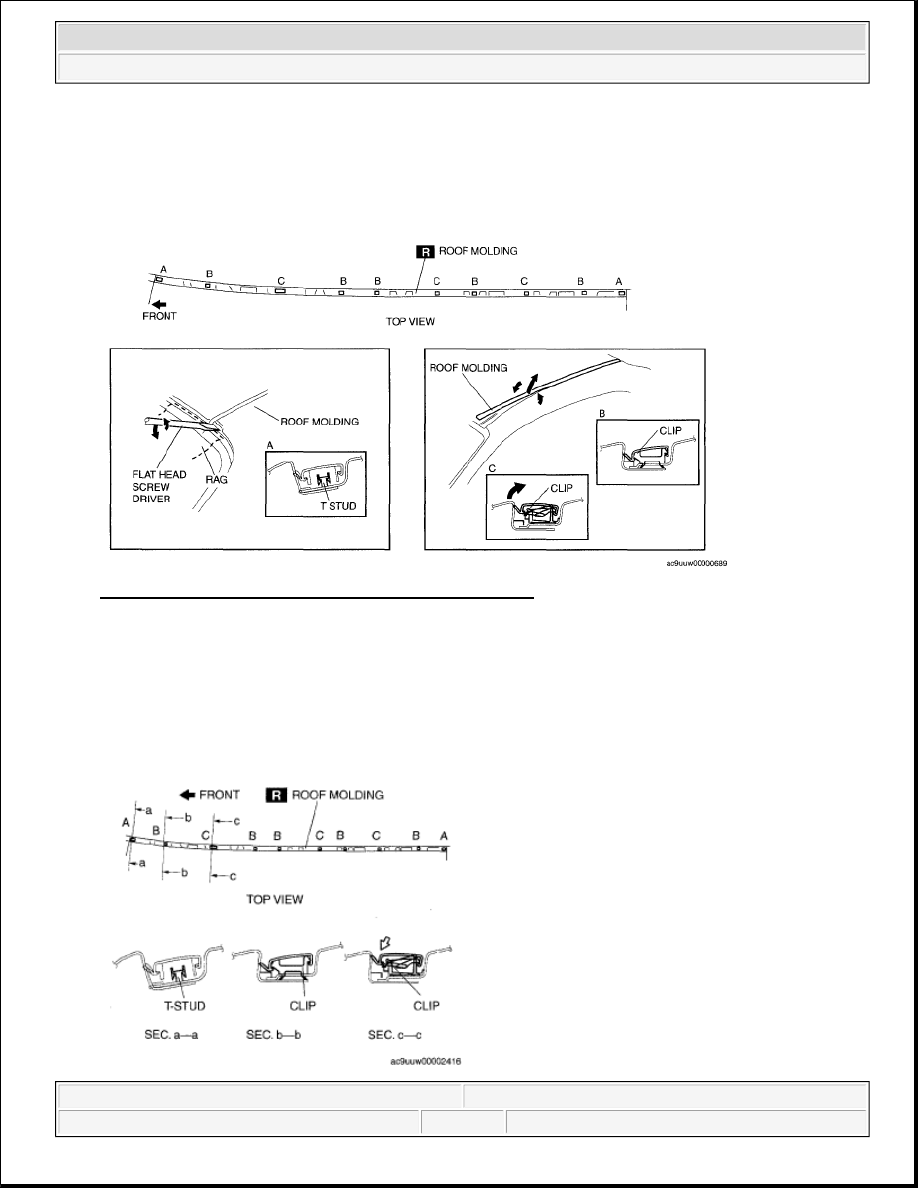
1. Detach the T-stud which secure sections A of roof molding, using a flat head screwdriver or equivalent 

tool.  

2. While pulling the roof molding up, detach it from the clips at section B, C, and then remove the roof 

molding. 

Fig. 9: Identifying Roof Molding With T-Stud And Clips 
Courtesy of MAZDA MOTORS CORP. 

ROOF MOLDING INSTALLATION 

1. Attach the roof molding to the T-stud at the front portion of section A.  

2. Hook the roof molding to clips B, C and press it in to attach.  

3. Attach the roof molding to the T-stud at the rear portion of section A. 


2008 Mazda CX-9 Grand Touring 

2008 ACCESSORIES & BODY, CAB Exterior Trim - Mazda CX-9


Microsoft 


Sunday, November 15, 2009 10:44:03 AM

Page 8 

© 2005 Mitchell Repair Information Company, LLC. 

Fig. 10: Identifying Roof Molding With T-Stud And Clips
Courtesy of MAZDA MOTORS CORP.
 

ROOF CARRIER BRACKET REMOVAL/INSTALLATION 

1. Disconnect the negative battery cable.  

2. Partially peel back the seaming welt.  

3. Remove the following parts: 

1. A-pillar trim (See A-PILLAR TRIM REMOVAL/INSTALLATION .)  

2. Front scuff plate inner (See FRONT SCUFF PLATE REMOVAL/INSTALLATION .)  

3. Rear scuff plate inner (See REAR SCUFF PLATE REMOVAL/INSTALLATION .)  

4. Front seat belt lower anchor installation bolt (Driver side) (See FRONT SEAT BELT 

REMOVAL/INSTALLATION .)  

5. B-pillar lower trim (See B-PILLAR LOWER TRIM REMOVAL/INSTALLATION .)  

6. Front seat belt upper anchor installation bolt (See FRONT SEAT BELT 

REMOVAL/INSTALLATION .)  

7. B-pillar upper trim (See B-PILLAR UPPER TRIM REMOVAL/INSTALLATION .)  

8. Trunk box (See TRUNK BOX REMOVAL/INSTALLATION .)  

9. Seat side box (See SEAT SIDE BOX REMOVAL/INSTALLATION .)  

10. Trunk end trim (See TRUNK END TRIM REMOVAL/INSTALLATION .)  

11. Third-row seat (See THIRD-ROW SEAT REMOVAL/INSTALLATION .)  

12. Third-row seat belt lower anchor installation bolt (See THIRD-ROW SEAT BELT 

REMOVAL/INSTALLATION .)  

13. Trunk side trim (See TRUNK SIDE TRIM REMOVAL/INSTALLATION .)  

14. Roof side trim (See ROOF SIDE TRIM REMOVAL/INSTALLATION .)  

15. Second-row seat belt upper anchor installation bolt (See SECOND-ROW SEAT BELT 

REMOVAL/INSTALLATION .)  

16. C-pillar trim (See C-PILLAR TRIM REMOVAL/INSTALLATION .)  

17. Third-row seat belt upper anchor installation bolt (See THIRD-ROW SEAT BELT 

REMOVAL/INSTALLATION .)  

18. D-pillar trim (See D-PILLAR TRIM REMOVAL/INSTALLATION .)  

19. Front map light (See FRONT MAP LIGHT REMOVAL/INSTALLATION .)  

20. Sunvisor (See SUNVISOR REMOVAL/INSTALLATION .)  

21. Assist handle (See ASSIST HANDLE REMOVAL/INSTALLATION .)  

22. Headliner (See HEADLINER REMOVAL/INSTALLATION .)  

4. Remove the nuts.  

5. Remove the roof carrier bracket.  

6. Install in the reverse order of removal. 


2008 Mazda CX-9 Grand Touring 

2008 ACCESSORIES & BODY, CAB Exterior Trim - Mazda CX-9


Microsoft 


Sunday, November 15, 2009 10:44:03 AM

Page 9 

© 2005 Mitchell Repair Information Company, LLC. 

REAR FINISHER REMOVAL/INSTALLATION 

1. Remove the liftgate upper trim. (See LIFTGATE UPPER TRIM REMOVAL/INSTALLATION )  

2. Remove the liftgate side trim. (See LIFTGATE SIDE TRIM REMOVAL/INSTALLATION )  

3. Remove the liftgate lower trim. (See LIFTGATE LOWER TRIM REMOVAL/INSTALLATION .)  

4. Set the noise filter out of the way. (See NOISE FILTER REMOVAL/INSTALLATION .)  

5. Remove the bolts.  

6. Remove the dynamic damper. 

Fig. 12: Identifying Dynamic Damper With Bolts & Torque Specifications 
Courtesy of MAZDA MOTORS CORP. 

7. Disconnect the request switch connector and the rear mount camera connector.  

NOTE:

Install the roof carrier bracket so that the arrow on it faces inward. 

Fig. 11: Identifying Roof Carrier Bracket With Nuts & Torque 
Specifications 
Courtesy of MAZDA MOTORS CORP. 


2008 Mazda CX-9 Grand Touring 

2008 ACCESSORIES & BODY, CAB Exterior Trim - Mazda CX-9


Microsoft 


Sunday, November 15, 2009 10:44:03 AM

Page 10 

© 2005 Mitchell Repair Information Company, LLC. 

8. Remove the nuts.  

9. Pull the rear finisher outward, then disengage clip A, B, and C from the body.  

10. Remove the rear finisher.  

11. Remove the request switch. (See REQUEST SWITCH REMOVAL/INSTALLATION [ADVANCED 

KEYLESS SYSTEM] .)(Vehicles with advanced keyless system)  

12. Remove the rear mount camera. (See REAR MOUNT CAMERA REMOVAL/INSTALLATION .)

(Vehicles with rear mount camera)  

13. Install in the reverse order of removal. 

Fig. 13: Identifying Request Switch Connector, Rear Mount Camera Connector & Torque 
Specifications
 
Courtesy of MAZDA MOTORS CORP. 

REAR SASH MOLDING INSTALLATION 

1. When installing a new rear sash molding, follow the procedure below: 

1. Remove the adhesive remaining on the body using razor.  

2. Remove any grease or dirt from the adhesion surface of the body.  

2. When reusing the rear sash molding, follow the procedure below: 

1. Remove the adhesive remaining on the rear sash molding and the body using a razor.  

2. Remove any grease or dirt from the adhesion surface of the rear sash molding and the body.  

3. Apply primer to the bonding area of the rear sash molding. 

NOTE:

Double-sided adhesive tape has already been attached to the new rear 
sash molding.  

WARNING:

Using a razor with bare hands can cause injury. Always wear gloves 
when using a razor.  


2008 Mazda CX-9 Grand Touring 

2008 ACCESSORIES & BODY, CAB Exterior Trim - Mazda CX-9


Microsoft 


Sunday, November 15, 2009 10:44:03 AM

Page 11 

© 2005 Mitchell Repair Information Company, LLC. 


Content   ..  387  388  389  390   ..