Mazda CX-9 Grand Touring. Manual - part 388


  Index      Mazda     Mazda CX-9 Grand Touring - service repair manual 2008 year


Search            


Content   ..  386  387  388  389   ..


Mazda CX-9 Grand Touring. Manual - part 388


1. Remove the windshield wiper arm and blade. (See WINDSHIELD WIPER ARM AND BLADE 

REMOVAL/INSTALLATION .)  

2. Remove the front fender molding. 

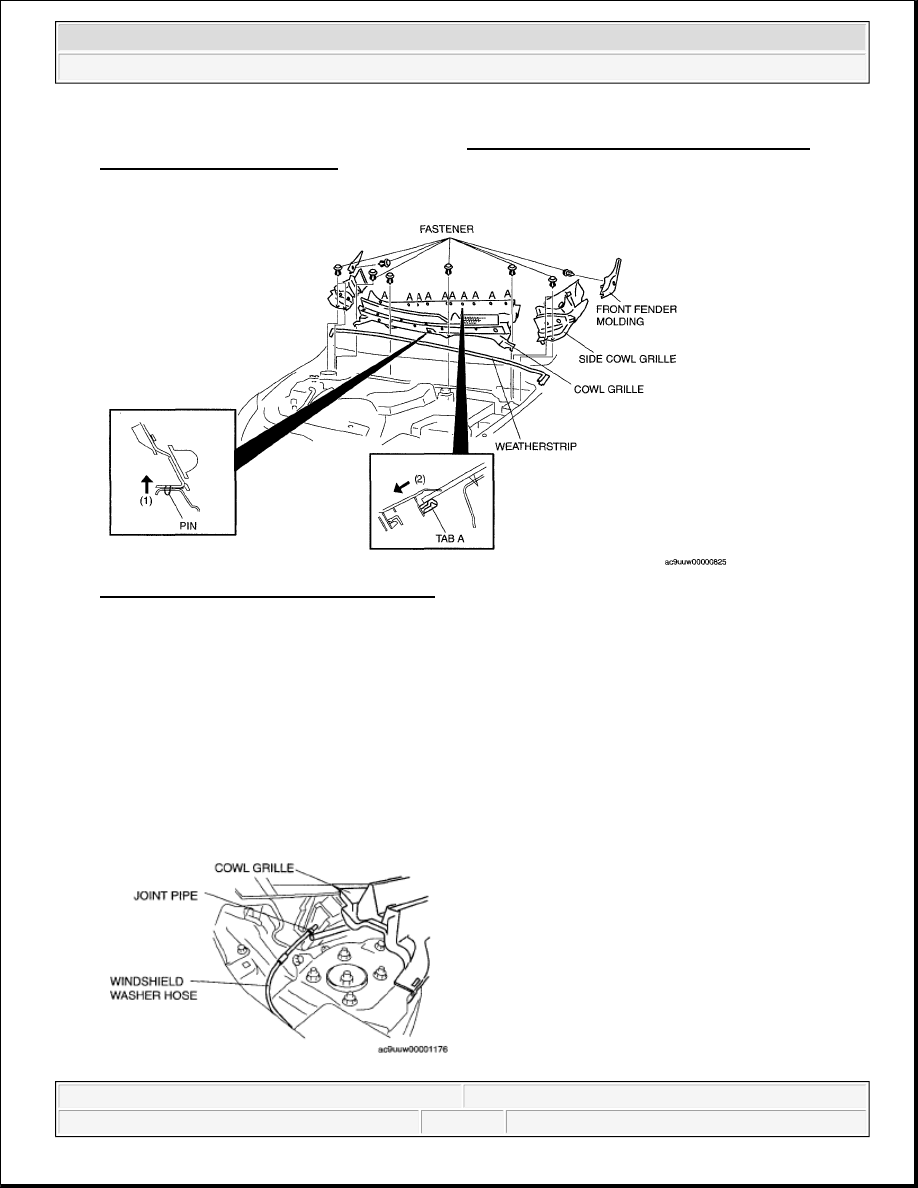
Fig. 3: Identifying Cowl Grille Components 
Courtesy of MAZDA MOTORS CORP. 

3. Remove the weatherstrip.  

4. Remove the fastener.  

5. Remove the side cowl grille.  

6. Pull the cowl grille in the direction of arrow (1) so that it is free from the pins, pull tabs A in the direction 

of arrow (2), and then remove the windshield.  

7. Disconnect the windshield washer hose.  

8. Remove the cowl grille.  

9. Install in the reverse order of removal. joint pipe 


2008 Mazda CX-9 Grand Touring 

2008 ACCESSORIES & BODY, CAB Exterior Trim - Mazda CX-9


Microsoft 


Sunday, November 15, 2009 10:44:03 AM

Page 4 

© 2005 Mitchell Repair Information Company, LLC. 

Fig. 4: Identifying Cowl Grille, Windshield Washer Hose And Joint Pipe 
Courtesy of MAZDA MOTORS CORP. 

FRONT BELTLINE MOLDING REMOVAL/INSTALLATION 

REMOVAL 

1. Fully open the front door glass.  

2. Disconnect the negative battery cable.  

3. Remove the inner garnish. (See INNER GARNISH REMOVAL/INSTALLATION .)  

4. Remove the front door trim. (See FRONT DOOR TRIM REMOVAL/INSTALLATION .)  

5. Remove the power outer mirror. (See POWER OUTER MIRROR REMOVAL/INSTALLATION .)  

6. Remove clip A using a protective tape-wrapped flathead screwdriver.  

7. Lift (partially peeling back) the front beltline molding in the direction of the arrow and then remove tabs 

B.  

8. Remove the clip C.  

9. Remove the front beltline molding. 

Fig. 5: Identifying Front Beltline Molding With Clips And Tab 
Courtesy of MAZDA MOTORS CORP. 

INSTALLATION 

1. Install the clip A.  

2. Install the tabs B.  

3. Install the clip C.  

4. Install the front beltline molding.  

5. Install the power outer mirror. (See POWER OUTER MIRROR REMOVAL/INSTALLATION .) 


2008 Mazda CX-9 Grand Touring 

2008 ACCESSORIES & BODY, CAB Exterior Trim - Mazda CX-9


Microsoft 


Sunday, November 15, 2009 10:44:03 AM

Page 5 

© 2005 Mitchell Repair Information Company, LLC. 

6. Install the front door trim. (See FRONT DOOR TRIM REMOVAL/INSTALLATION .)  

7. Install the inner garnish. (See INNER GARNISH REMOVAL/INSTALLATION .)  

8. Connect the negative battery cable. 

Fig. 6: Identifying Front Beltline Molding With Clips And Tab 
Courtesy of MAZDA MOTORS CORP. 

REAR BELTLINE MOLDING REMOVAL/INSTALLATION 

REMOVAL 

1. Fully lower the rear door glass.  

2. Remove the clip A using a protective tape-wrapped flathead screwdriver.  

3. Lift (partially peeling back) the rear beltline molding in the direction of the arrow and then remove tabs 

B.  

4. Remove the clip C.  

5. Remove the rear beltline molding. 


2008 Mazda CX-9 Grand Touring 

2008 ACCESSORIES & BODY, CAB Exterior Trim - Mazda CX-9


Microsoft 


Sunday, November 15, 2009 10:44:03 AM

Page 6 

© 2005 Mitchell Repair Information Company, LLC. 

Fig. 7: Identifying Rear Beltline Molding With Clips And Tab 
Courtesy of MAZDA MOTORS CORP. 

INSTALLATION 

1. Install the clip A.  

2. Install the tabs B.  

3. Install the clip C.  

4. Install the rear beltline molding. 

Fig. 8: Identifying Rear Beltline Molding With Clips And Tab 
Courtesy of MAZDA MOTORS CORP. 

ROOF MOLDING REMOVAL 


2008 Mazda CX-9 Grand Touring 

2008 ACCESSORIES & BODY, CAB Exterior Trim - Mazda CX-9


Microsoft 


Sunday, November 15, 2009 10:44:03 AM

Page 7 

© 2005 Mitchell Repair Information Company, LLC. 


Content   ..  386  387  388  389   ..