Mazda CX 7. Manual - part 401


  Index      Mazda     Mazda CX 7 - service repair manual 2007 year


Search            


Content   ..  399  400  401  402   ..


Mazda CX 7. Manual - part 401


SECURITY AND LOCKS 

09-14–39

09-14

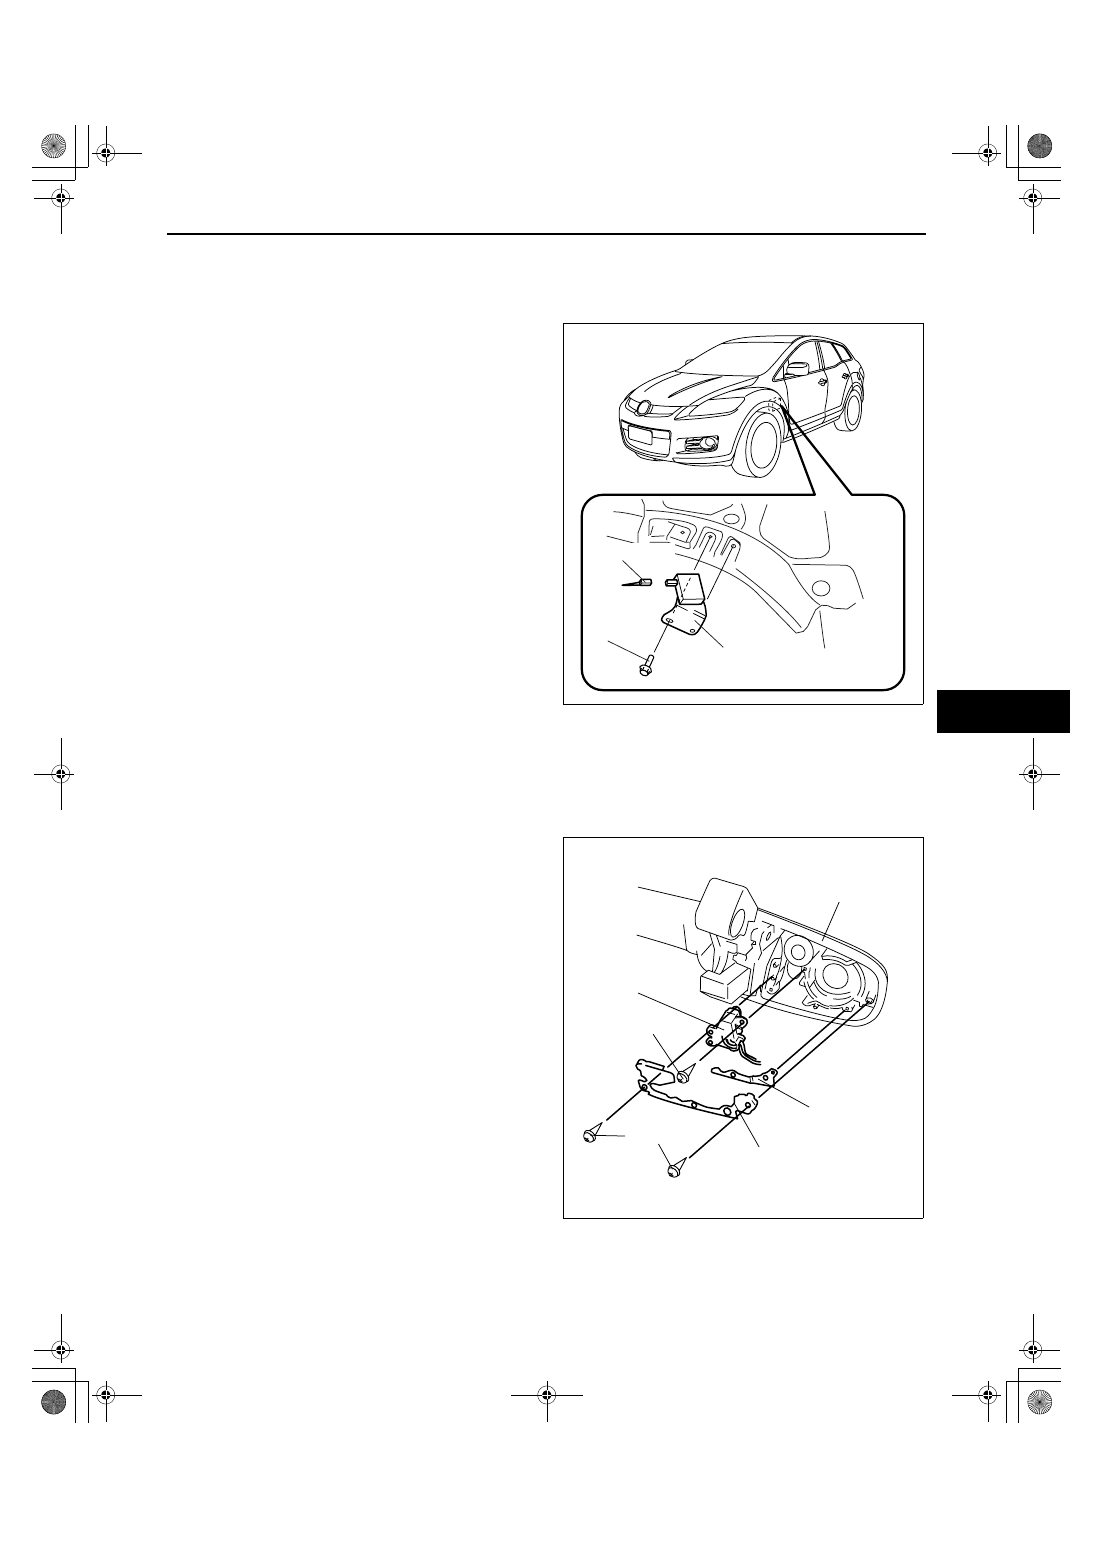
KEYLESS BEEPER REMOVAL/INSTALLATION[ADVANCED KEYLESS SYSTEM]

id0914008078b1

1. Disconnect the negative battery cable.
2. Remove the mud gurde.
3. Remove the BOLTS.
4. Disconnect the connector, then remove the 

keyless acxuuw00002518eper.

5. Install in the reverse order of removal.

End Of Sie

REQUEST SWITCH REMOVAL/INSTALLATION[ADVANCED KEYLESS SYSTEM]

id0914008079b1

Driver-side/passenger-side

1. Disconnect the negative battery cable.
2. Remove the front door trim. (See 09-17-20 FRONT DOOR TRIM REMOVAL/INSTALLATION.)
3. Remove the front outer handle. (See 09-14-8 FRONT OUTER HANDLE REMOVAL/INSTALLATION.)
4. Remove the screws A, then remove the handle seat and plate.
5. Remove screw B, then remove the request switch.

CONNECTOR

KEYLESS BEEPER

BOLT

acxuuw00002518

OUTER HANDLE

REQUEST
SWITCH

PLATE

HANDLE SEAT

SCREW A

SCREW B

acxuuw00002519

SECURITY AND LOCKS 

09-14–40

Liftgate

1. Disconnect the negative battery cable.
2. Remove the nut, then remove the request switch from the liftgate.
3. Install in the reverse order of removal.

End Of Sie

REQUEST SWITCH INSPECTION[ADVANCED KEYLESS SYSTEM]

id0914008080b1

1. Inspect for continuity between request switch 

terminals A and B.

• If not as specified, replace the request switch.

End Of Sie

REQUEST SWITCH

CONNECTOR

NUT

acxuuw00002520

A

B

B

A

acxuuw00002521

: Continuity 

Switch

position

Push (ON)

Not push (OFF)

Terminal 

B

A

acxuuw00002522

SUNROOF 

09-15–1

09-15

09-15

SUNROOF

SUNROOF LOCATION INDEX . . . . . . . .  09-15–1
SUNROOF SWITCH 

REMOVAL/INSTALLATION. . . . . . . . . .  09-15–2

SUNROOF SWITCH INSPECTION . . . . .  09-15–2
DEFLECTOR 

REMOVAL/INSTALLATION. . . . . . . . . .  09-15–2

GLASS PANEL 

REMOVAL/INSTALLATION. . . . . . . . . .  09-15–3

GLASS PANEL ADJUSTMENT  . . . . . . .  09-15–3
SUNROOF UNIT 

REMOVAL/INSTALLATION. . . . . . . . . .  09-15–4

SUNROOF UNIT 

DISASSEMBLY/ASSEMBLY . . . . . . . . .  09-15–5

Sunroof Motor Assembly Note . . . . . . .  09-15–6

Rear Drip Assembly Note . . . . . . . . . . . 09-15–6
Guide Disassembly Note. . . . . . . . . . . . 09-15–6
Guide Assembly Note . . . . . . . . . . . . . . 09-15–7
Decoration Link Assembly Note  . . . . . . 09-15–7

SUNROOF MOTOR 

REMOVAL/INSTALLATION  . . . . . . . . . . 09-15–8

SUNROOF MOTOR INSPECTION . . . . . . 09-15–8

Terminal voltage table (Reference) . . . . 09-15–8

FRONT DRAIN HOSE REMOVAL  . . . . . . 09-15–9
FRONT DRAIN HOSE 

INSTALLATION. . . . . . . . . . . . . . . . . . . . 09-15–10

REAR DRAIN HOSE REMOVAL  . . . . . . . 09-15–11
REAR DRAIN HOSE INSTALLATION . . . 09-15–12

End of Toc

WM: BODY AND ACCESSORIES

SUNROOF LOCATION INDEX

id091500800100

.

7

1

5

2

3

4

6

acxuuw00001465

1

Sunroof switch
(See 09-15-2 SUNROOF SWITCH REMOVAL/
INSTALLATION.)
(See 09-15-2 SUNROOF SWITCH INSPECTION.)

2

Sunroof unit
(See 09-15-4 SUNROOF UNIT REMOVAL/
INSTALLATION.)
(See 09-15-5 SUNROOF UNIT DISASSEMBLY/
ASSEMBLY.)

3

Glass panel
(See 09-15-3 GLASS PANEL REMOVAL/
INSTALLATION.)
(See 09-15-3 GLASS PANEL ADJUSTMENT.)

4

Rear drain hose
(See 09-15-11 REAR DRAIN HOSE REMOVAL.)
(See 09-15-12 REAR DRAIN HOSE 
INSTALLATION.)

5

Sunroof motor
(See 09-15-8 SUNROOF MOTOR REMOVAL/
INSTALLATION.)
(See 09-15-8 SUNROOF MOTOR INSPECTION.)

6

Front drain hose
(See 09-15-9 FRONT DRAIN HOSE REMOVAL)
(See 09-15-10 FRONT DRAIN HOSE 
INSTALLATION)

7

Deflector
(See 09-15-2 DEFLECTOR REMOVAL/
INSTALLATION)

SUNROOF 

09-15–2

End Of Sie

SUNROOF SWITCH REMOVAL/INSTALLATION

id091500800200

Note

• The sunroof switch is together with the front map light.

1. Disconnect the negative battery cable.
2. Remove the map light from the headliner. (See 09-18-22 MAP LIGHT REMOVAL/INSTALLATION.)
3. Install in the reverse order of removal.

End Of Sie

SUNROOF SWITCH INSPECTION

id091500800300

1. Inspect for continuity between the sunroof switch 

terminals using an ohmmeter.

• If not as specified, replace the sunroof switch.

End Of Sie

WM: SUNROOF UNIT

DEFLECTOR REMOVAL/INSTALLATION

id091500800400

1. Fully open the glass panel.
2. Press the spring in the direction shown by the 

arrow and remove it from the hook.

3. Remove the deflector.
4. Install in the reverse order of removal.

End Of Sie

H

F

D

G

A

H

F

G

D

*

A

SLIDE
OPEN

SLIDE
CLOSE

TILT
UP

TILT
DOWN

acxuuw00001253

A

G

H

D

F

: Continuity 

Terminal 

Switch position

Slide open

Slide closed

Tilt up

Tilt down

Off

acxuuw00001254

SPRING

DEFLECTOR

HOOK

DEFLECTOR

acxuuw00001165


Content   ..  399  400  401  402   ..