Mazda CX 7. Manual - part 324
 

  Index      Mazda     Mazda CX 7 - service repair manual 2007 year


Search            


Content   ..  322  323  324  325   ..


Mazda CX 7. Manual - part 324


SEAT BELT 

08-11–1

08-11

08-11

SEAT BELT

LOCATION INDEX. . . . . . . . . . . . . . . . . .  08-11–1
FRONT SEAT BELT 

REMOVAL/INSTALLATION. . . . . . . . . .  08-11–2

Connector Removal Note. . . . . . . . . . .  08-11–3

ADJUSTER ANCHOR 

REMOVAL/INSTALLATION. . . . . . . . . .  08-11–3

REAR SEAT BELT 

REMOVAL/INSTALLATION. . . . . . . . . .  08-11–3

REAR CENTER SEAT BELT 

REMOVAL/INSTALLATION. . . . . . . . . .  08-11–4

SEAT BELT INSPECTION. . . . . . . . . . . .  08-11–4

Belt  . . . . . . . . . . . . . . . . . . . . . . . . . . . . 08-11–4
ELR . . . . . . . . . . . . . . . . . . . . . . . . . . . . 08-11–4
ALR . . . . . . . . . . . . . . . . . . . . . . . . . . . . 08-11–5
Load Limiter Retractor. . . . . . . . . . . . . . 08-11–5

FRONT BUCKLE 

REMOVAL/INSTALLATION  . . . . . . . . . . 08-11–5

REAR BUCKLE 

REMOVAL/INSTALLATION  . . . . . . . . . . 08-11–6

BUCKLE SWITCH INSPECTION . . . . . . . 08-11–6
CHILD-RESTRAINT SEAT ANCHOR 

REMOVAL/INSTALLATION  . . . . . . . . . . 08-11–6

End of Toc

WM: SEAT BELT

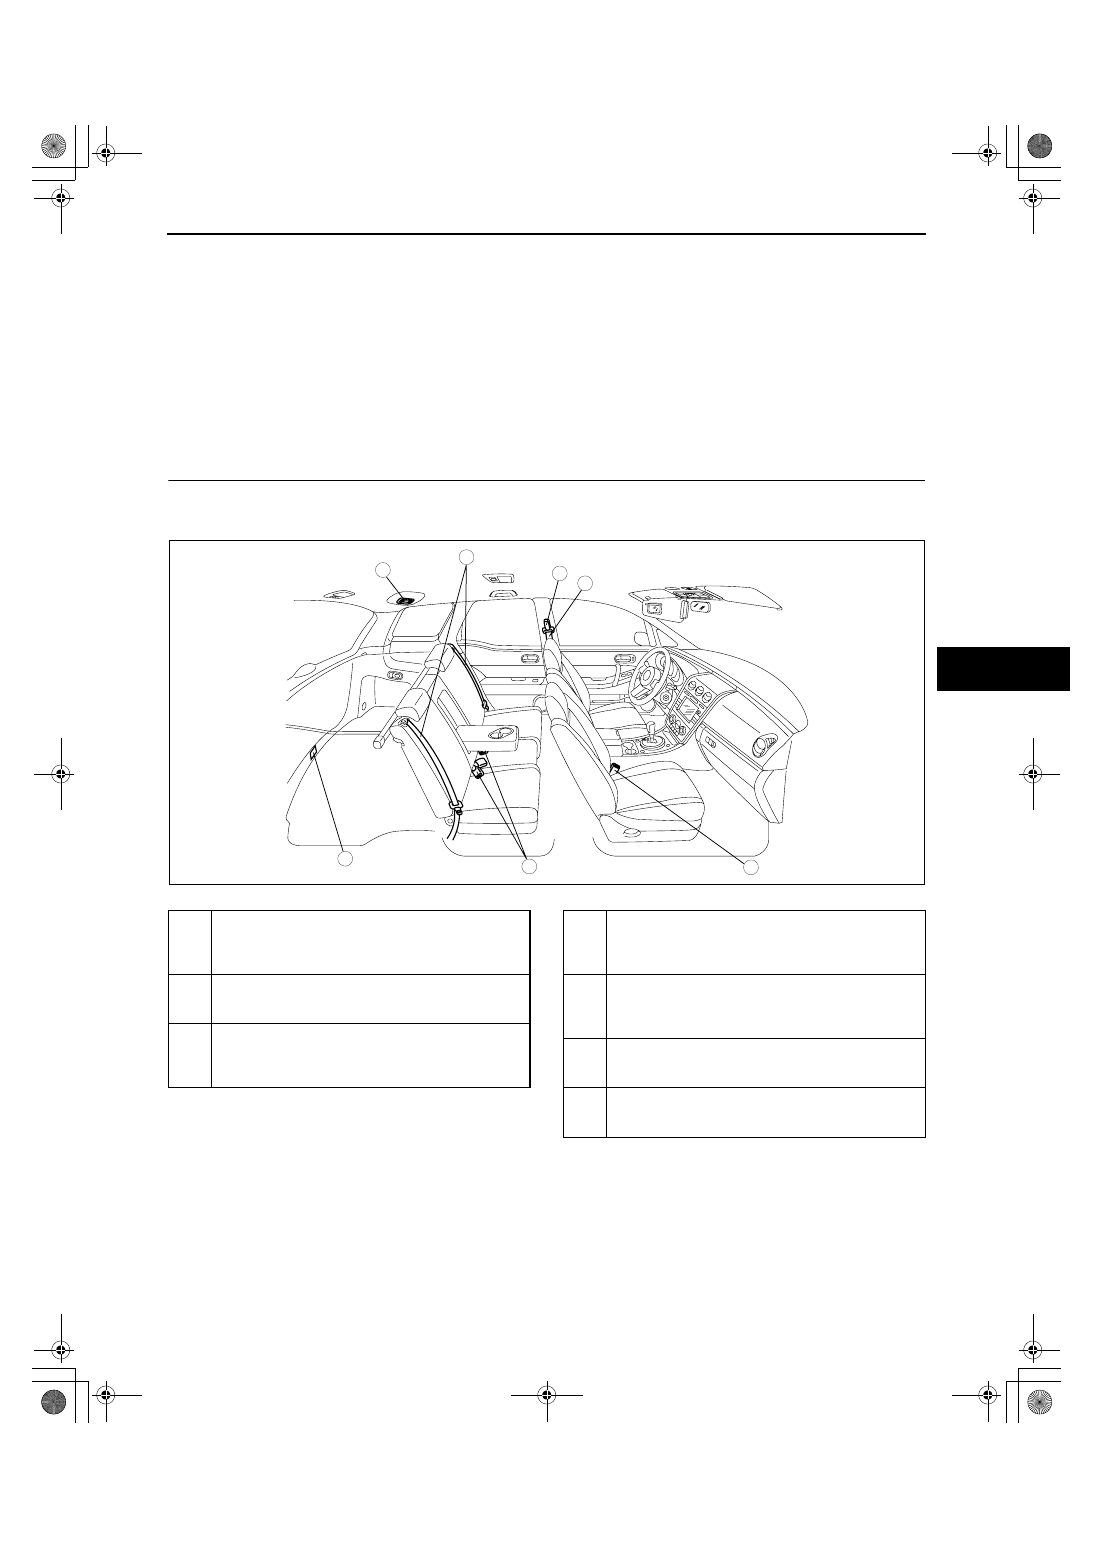
LOCATION INDEX

id081100800200

.

End Of Sie

WM: FRONT SEAT BELT

5

4

3

6

1

2

7

acxuuw00002082

1

Front seat belt
(See 08-11-2 FRONT SEAT BELT REMOVAL/
INSTALLATION.)
(See 08-11-4 SEAT BELT INSPECTION.)

2

Adjuster anchor
(See 08-11-3 ADJUSTER ANCHOR REMOVAL/
INSTALLATION.)

3

Front  buckle
(See 08-11-5 FRONT BUCKLE REMOVAL/
INSTALLATION.)
(See 08-11-6 BUCKLE SWITCH INSPECTION.)

4

Rear seat belt
(See 08-11-3 REAR SEAT BELT REMOVAL/
INSTALLATION.)
(See 08-11-4 SEAT BELT INSPECTION.)

5

Rear center seat belt
(See 08-11-4 REAR CENTER SEAT BELT 
REMOVAL/INSTALLATION.)
(See 08-11-4 SEAT BELT INSPECTION.)

6

Rear  buckle
(See 08-11-6 REAR BUCKLE REMOVAL/
INSTALLATION.)

7

Child-restraint seat anchor
(See 08-11-6 CHILD-RESTRAINT SEAT ANCHOR 
REMOVAL/INSTALLATION.)

1871-1U-06B(08-11).fm  1 ページ  2006年3月15日 水曜日 午前11時37分

SEAT BELT 

08-11–2

FRONT SEAT BELT REMOVAL/INSTALLATION

id081100800600

Warning

• Handling the front seat belt (pre-tensioner seat belt) improperly can accidentally deploy the pre-

tensioner seat belt, which may seriously injure you. Read the air bag system service warnings and 
cautions before handling the front seat belt. (See 08-10-3 AIR BAG SYSTEM SERVICE WARNINGS.) 
(See 08-10-5 AIR BAG SYSTEM SERVICE CAUTIONS.)

Warning

• The side air bag sensor is attached to the lower part of the B-pillar. When working around the B-

pillar, disconnect the negative battery cable avoiding excessive impact to the lower part of the B-
pillar.

Caution

• The ELR (emergency locking retractor) has a spring that will unwind if the retractor cover is 

removed. The spring cannot be rewound by hand. If this occurs, the ELR will not work properly. 
Therefore, do not disassemble the retractor.

1. Turn the ignition switch to the LOCK position.
2. Disconnect the negative battery cable and wait for 1min or more.
3. Remove the front scuff plate inner. (See 09-17-19 FRONT SCUFF PLATE REMOVAL/INSTALLATION.)
4. Remove the rear scuff plate inner. (See 09-17-19 REAR SCUFF PLATE REMOVAL/INSTALLATION.)
5. Remove the B-pillar lower trim. (See 09-17-16 B-PILLAR LOWER TRIM REMOVAL/INSTALLATION.)
6. Remove in the order indicated in the table.

.

7. Install in the reverse order of removal.
8. Turn the ignition switch to the ON position.
9. Verify that the air bag system warning light illuminates for approx. 6 s and goes out.

• If the air bag system warning light dose not operate, refer to the on-board diagnostic system (air bag 

system) and perform inspection of the system.

N·m {kgf·m, ft·lbf}

38.3—78.4 

{3.90—7.99, 

28.3—57.8}

38.3—78.4 
{3.90—7.99, 
28.3—57.8}

36.3—54.0 
{3.71—5.50, 
26.8—39.8}

PASSENGER'S SEAT

FRONT

8.8—12.8 N·m 
{89.8—130 kgf·cm, 
77.9—113 in·lbf}

5

4

3

1

2

1

1

2

acxuuw00001026

1

Cover

2

Bolt  A

3

Bolt  B

4

Front seat belt

5

Connector
(See 08-11-3 Connector Removal Note.)

1871-1U-06B(08-11).fm  2 ページ  2006年3月15日 水曜日 午前11時37分

SEAT BELT 

08-11–3

08-11

Connector Removal Note

1. Using a flathead screwdriver, pry out the 

connector stopper plate.

2. Disconnect the connector.

End Of Sie

ADJUSTER ANCHOR REMOVAL/INSTALLATION

id081100802000

Warning

• The side air bag sensor is attached to the lower part of the B-pillar. When working around the B-

pillar, disconnect the negative battery cable or work carefully, avoiding excessive impact to the 
lower part of the B-pillar.

1. Turn the ignition switch to the LOCK position.
2. Disconnect the negative battery cable.
3. Remove the following parts:

(1) Front seat belt upper anchor installation bolt (See 08-11-2 FRONT SEAT BELT REMOVAL/

INSTALLATION.)

(2) Front scuff plate inner (See 09-17-19 FRONT SCUFF PLATE REMOVAL/INSTALLATION.)
(3) Rear scuff plate inner (See 09-17-19 REAR SCUFF PLATE REMOVAL/INSTALLATION.)
(4) B-pillar lower trim (See 09-17-16 B-PILLAR LOWER TRIM REMOVAL/INSTALLATION.)
(5) B-pillar upper trim (See 09-17-16 B-PILLAR UPPER TRIM REMOVAL/INSTALLATION.)

4. Remove in the order indicated in the table.

.

5. Install in the reverse order of removal.

End Of Sie

WM: REAR SEAT BELT

REAR SEAT BELT REMOVAL/INSTALLATION

id081100800800

Note

• Rear seat belts are built into the rear seat back. See rear seat disassembly/assembly to removal/

installation the rear seat belt. (See 09-13-8 REAR SEAT DISASSEMBLY/ASSEMBLY.)

End Of Sie

PRE-TENSIONER 
SEAT BELT 
CONNECTOR

STOPPER 
PLATE

acxuuw00001027

1

Bolt

2

Adjuster anchor

1

2

38.2—78.4
{3.90—7.99, 
28.2—57.8}

N·m {kgf·m, ft·lbf}

1

38.2—78.4
{3.90—7.99, 
28.2—57.8}

acxuuw00002087

1871-1U-06B(08-11).fm  3 ページ  2006年3月15日 水曜日 午前11時37分

SEAT BELT 

08-11–4

REAR CENTER SEAT BELT REMOVAL/INSTALLATION

id081100800900

Caution

• The ELR (emergency locking retractor) has a spring that will unwind if the retractor cover is 

removed. The spring cannot be rewound by hand. If this occurs, the ELR will not work properly. 
Therefore, do not disassemble the retractor.

1. Remove the following parts:

(1) A-pillar lower trim (See 09-17-16 A-PILLAR LOWER TRIM REMOVAL/INSTALLATION.)
(2) A-pillar trim (See 09-17-15 A-PILLAR TRIM REMOVAL/INSTALLATION.)
(3) Front scuff plate inner (See 09-17-19 FRONT SCUFF PLATE REMOVAL/INSTALLATION.)
(4) Rear scuff plate inner (See 09-17-19 REAR SCUFF PLATE REMOVAL/INSTALLATION.)
(5) B-pillar lower trim (See 09-17-16 B-PILLAR LOWER TRIM REMOVAL/INSTALLATION.)
(6) Front seat belt upper anchor installation bolt (See 08-11-2 FRONT SEAT BELT REMOVAL/

INSTALLATION.)

(7) B-pillar upper trim (See 09-17-16 B-PILLAR UPPER TRIM REMOVAL/INSTALLATION.)
(8) Rear seat (See 09-13-7 REAR SEAT REMOVAL/INSTALLATION.)
(9) Sub trunk box (See 09-17-25 SUB TRUNK BOX REMOVAL/INSTALLATION.)
(10)Trunk end trim (See 09-17-24 TRUNK END TRIM REMOVAL/INSTALLATION.)
(11)Trunk side trim (See 09-17-24 TRUNK SIDE TRIM REMOVAL/INSTALLATION.)
(12)C-pillar trim (See 09-17-17 C-PILLAR TRIM REMOVAL/INSTALLATION.)
(13)D-pillar trim (See 09-17-18 D-PILLAR TRIM REMOVAL/INSTALLATION.)
(14)Map light (See 09-18-22 MAP LIGHT REMOVAL/INSTALLATION.)
(15)Sunvisor (See 09-17-26 SUNVISOR REMOVAL/INSTALLATION.)
(16)Assist handle (See 09-17-27 ASSIST HANDLE REMOVAL/INSTALLATION.)
(17)Headliner (See 09-17-27 HEADLINER REMOVAL/INSTALLATION.)

2. Remove in the order indicated in the table.

3. Install in the reverse order of removal.

End Of Sie

WM: SEAT BELT

SEAT BELT INSPECTION

id081100800300

Belt

1. Verify that the belt is installed properly with no twists or kinks.
2. Verify that there is no damage to the seat belt and no deformation of the metal fittings.

• If there is any malfunction, replace the seat belt.

ELR

1. Verify that the belt can be pulled out smoothly, 

and that it retracts smoothly.

• If there is any malfunction, replace the seat 

belt.

2. Verify that the retractor locks when the belt is 

pulled quickly.

• If there is any malfunction, replace the seat 

belt.

3. Remove the retractor.

1

Bolt

2

Rear center seat belt

38.3—78.4 
{3.90—7.99, 
28.3—57.8}

1

2

N·m {kgf·m, ft·lbf}

acxuuw00001031

acxuuw00002083

1871-1U-06B(08-11).fm  4 ページ  2006年3月15日 水曜日 午前11時37分


Content   ..  322  323  324  325   ..