Mazda Protege 5. Manual - part 315


  Index      Mazda     Mazda Protege 5 - service repair manual 2002 year


Search            


Content   ..  313  314  315  316   ..


Mazda Protege 5. Manual - part 315


GLASS/WINDOWS/MIRRORS 

09–12–15

09–12

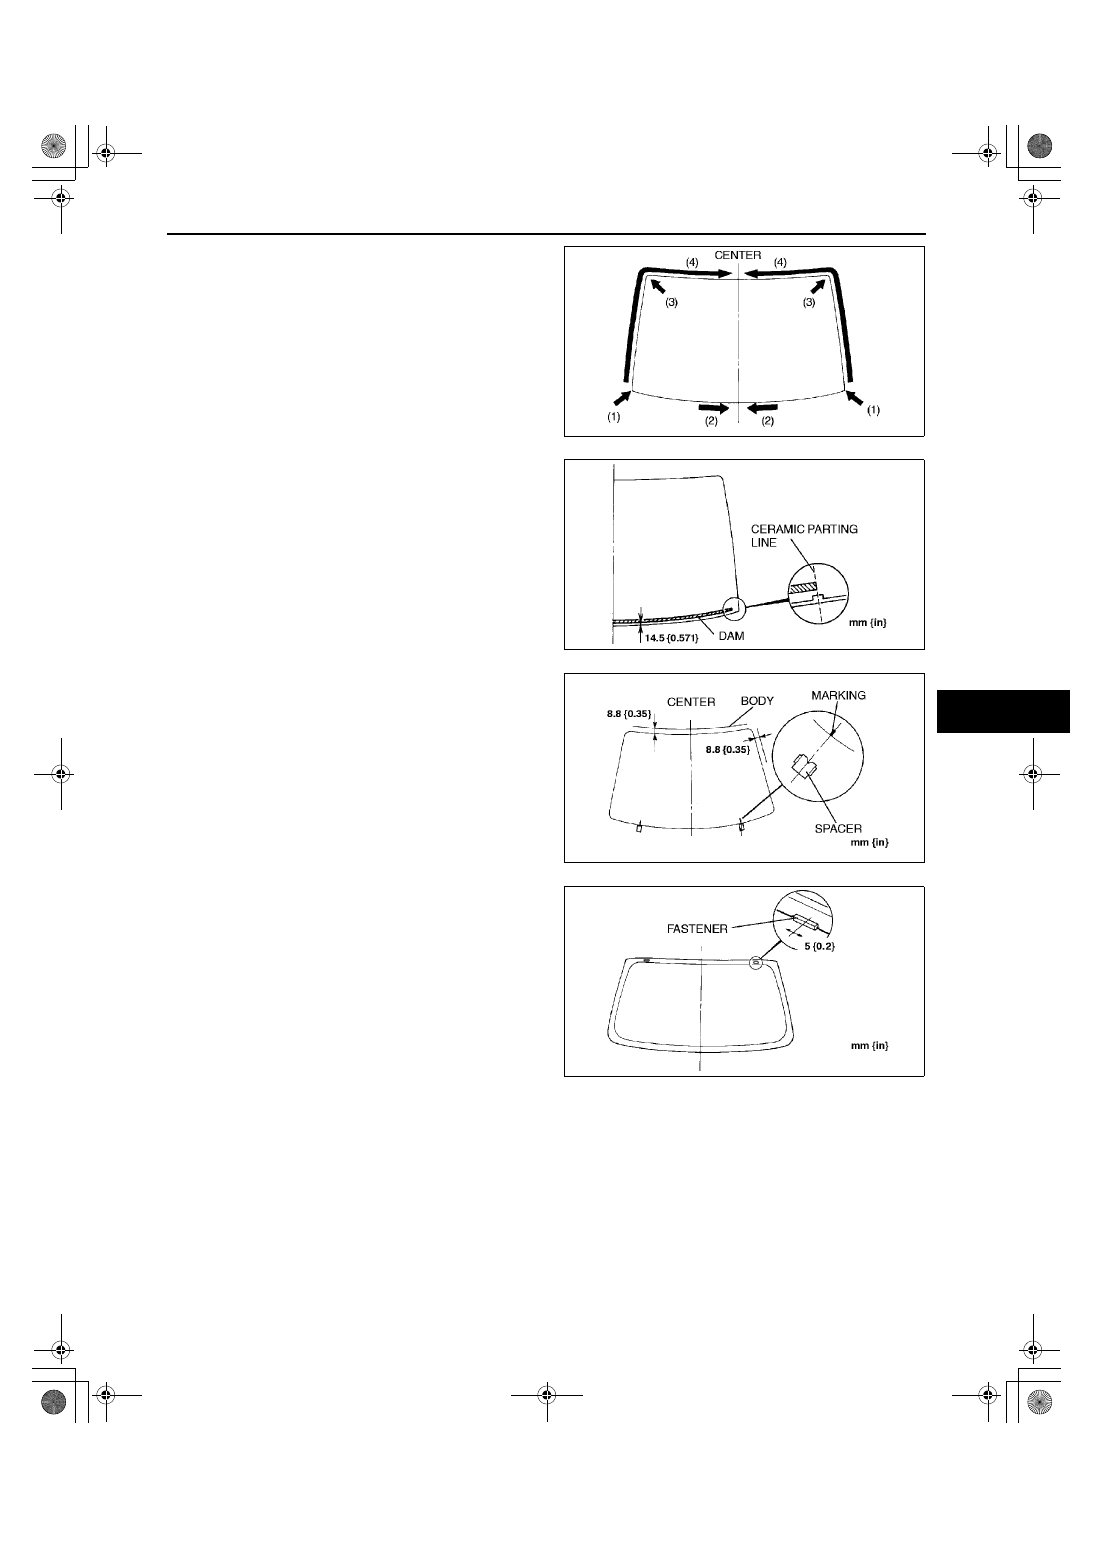
3. Align the lower corners of the molding and glass. 

(1)

4. Install the lower, starting from the outer ends and 

moving inward. (2)

5. Align the marking of the molding with the ceramic 

parting line on the glass. (3)

6. Install the sides and upper, starting from the lower 

edge and moving upward and inward, being 
careful not to pull out the corners. (4)

7. Securely bond a dam on the lower side of the 

glass 14.5 mm {0.571 in} from the edge.

8. Install spacers into the hole.
9. Temporarily install the glass onto the body and 

adjust the glass-to-body clearance.

10. Make a marks on the glass directly above the V-

notch of the spacers.

11. Verify that the gap along the upper and side edge 

is 8.8 mm {0.35 in}.

12. Remove the windshield.

13. Install the fasteners on the body as shown.

X3U912WAX

Y3U912WA5

X3U912WAZ

Y3U912WAH

1712-1U-01G(09-12).fm  15 ページ  2001年6月29日 金曜日 午前10時30分

GLASS/WINDOWS/MIRRORS 

09–12–16

14. Install the fasteners and spacers onto the glass 

as shown.

15. Use a brush to apply primer to the bonding area 

of the glass and body within the region shown.

Caution

••••

Keep the area free of dirt and grease, and 
do not touch the surface, otherwise the 
primer may not properly bond to the 
surface of the glass and body, which may 
cause leaks to occur.

Note

Use only glass primer on the glass, and 
body primer on the body and molding. Allow 
it to dry for approximately 30 minutes.

16. Once the primer is dry, apply sealant measuring 

11.0 mm {0.433 in} in height and 5.0 mm {0.20 
in} 
in width around the entire circumference to fill 
the gap between the dam and the edge of the 
glass.

17. Align the marks on the glass with the V-notches in 

the spacers and install the glass onto the body.

18. Press firmly inward on the glass to compress the 

sealant.

Y3U912WA6

Y3U912WA7

Y3U912WA8

1712-1U-01G(09-12).fm  16 ページ  2001年6月29日 金曜日 午前10時30分

GLASS/WINDOWS/MIRRORS 

09–12–17

09–12

19. Verify that the gap along the upper and side edge is 8.8 mm {0.35 in}.
Hardening time of sealant

20. Install the headliner. (See 09–17–16 HEADLINER REMOVAL/INSTALLATION.)

5HB

Caution

••••

To prevent the sealant from cracking or the glass from being pushed out by air pressure if a door 
is closed, open all of the windows and leave them open until the sealant has hardened.

1. Cut away the old sealant using a razor so that 1—2 mm {0.04—0.07 in} thickness of sealant remains around 

the circumference of the frame.

If all the sealant has come off in any one place, apply some primer after degreasing, and allow it 30 
minutes
 to dry. Then put on new sealant to create a 2 mm {0.08 in} layer.

Warning

••••

Using a razor with bare hands can cause 
injury. Always wear gloves when using a 
razor.

2. Clean and degrease the ceramic parting of the 

glass and the bonding area on the body.

3. Align the weld joint of the molding with lower 

center of the glass. (1)

4. Install the molding around the entire 

circumference of the glass (2).

5. Install the fasteners onto the body as shown.

Temperature

Surface 

hardening time

Time required 

until car can be 
put into service

°

C {41 

°

F}

Approx. 1.5 h

Approx. 12 h

20 

°

C {68 

°

F}

Approx. 1 h

Approx. 4 h

35 

°

C {95 

°

F}

Approx. 10 min.

Approx. 2 h

A3U0912W014

A3U0912W015

A3U0912W016

1712-1U-01G(09-12).fm  17 ページ  2001年6月29日 金曜日 午前10時30分

GLASS/WINDOWS/MIRRORS 

09–12–18

6. Install the spacer, pins and fasteners onto the 

glass as shown.

7. Use a brush to apply primer to the bonding area 

of the glass and body within the region shown.

Caution

••••

Keep the area free of dirt and grease, and 
do not touch the surface, otherwise the 
primer may not properly bond to the 
surface of the glass and body, which may 
cause leaks to occur.

Note

Use only glass primer on the glass, and 
body primer on the body and molding. Allow 
it to dry for approximately 30 minutes.

8. Once the primer is dry, apply sealant measuring 

11.0 mm {0.433 in} in height and 5.0 mm {0.20 
in} 
in width around the entire circumference to fill 
the gap between the dam and the edge of the 
glass.

9. Align the pins and install the glass onto the body.

A3U0912W017

A3U0912W018

A3U0912W019

1712-1U-01G(09-12).fm  18 ページ  2001年6月29日 金曜日 午前10時30分


Content   ..  313  314  315  316   ..