Mazda Protege 5. Manual - part 314


  Index      Mazda     Mazda Protege 5 - service repair manual 2002 year


Search            


Content   ..  312  313  314  315   ..


Mazda Protege 5. Manual - part 314


GLASS/WINDOWS/MIRRORS 

09–12–11

09–12

REAR WINDOW GLASS REMOVAL

A3U091263931W01

4SD

1. Remove the headliner. (See 09–17–16 HEADLINER REMOVAL/INSTALLATION.)
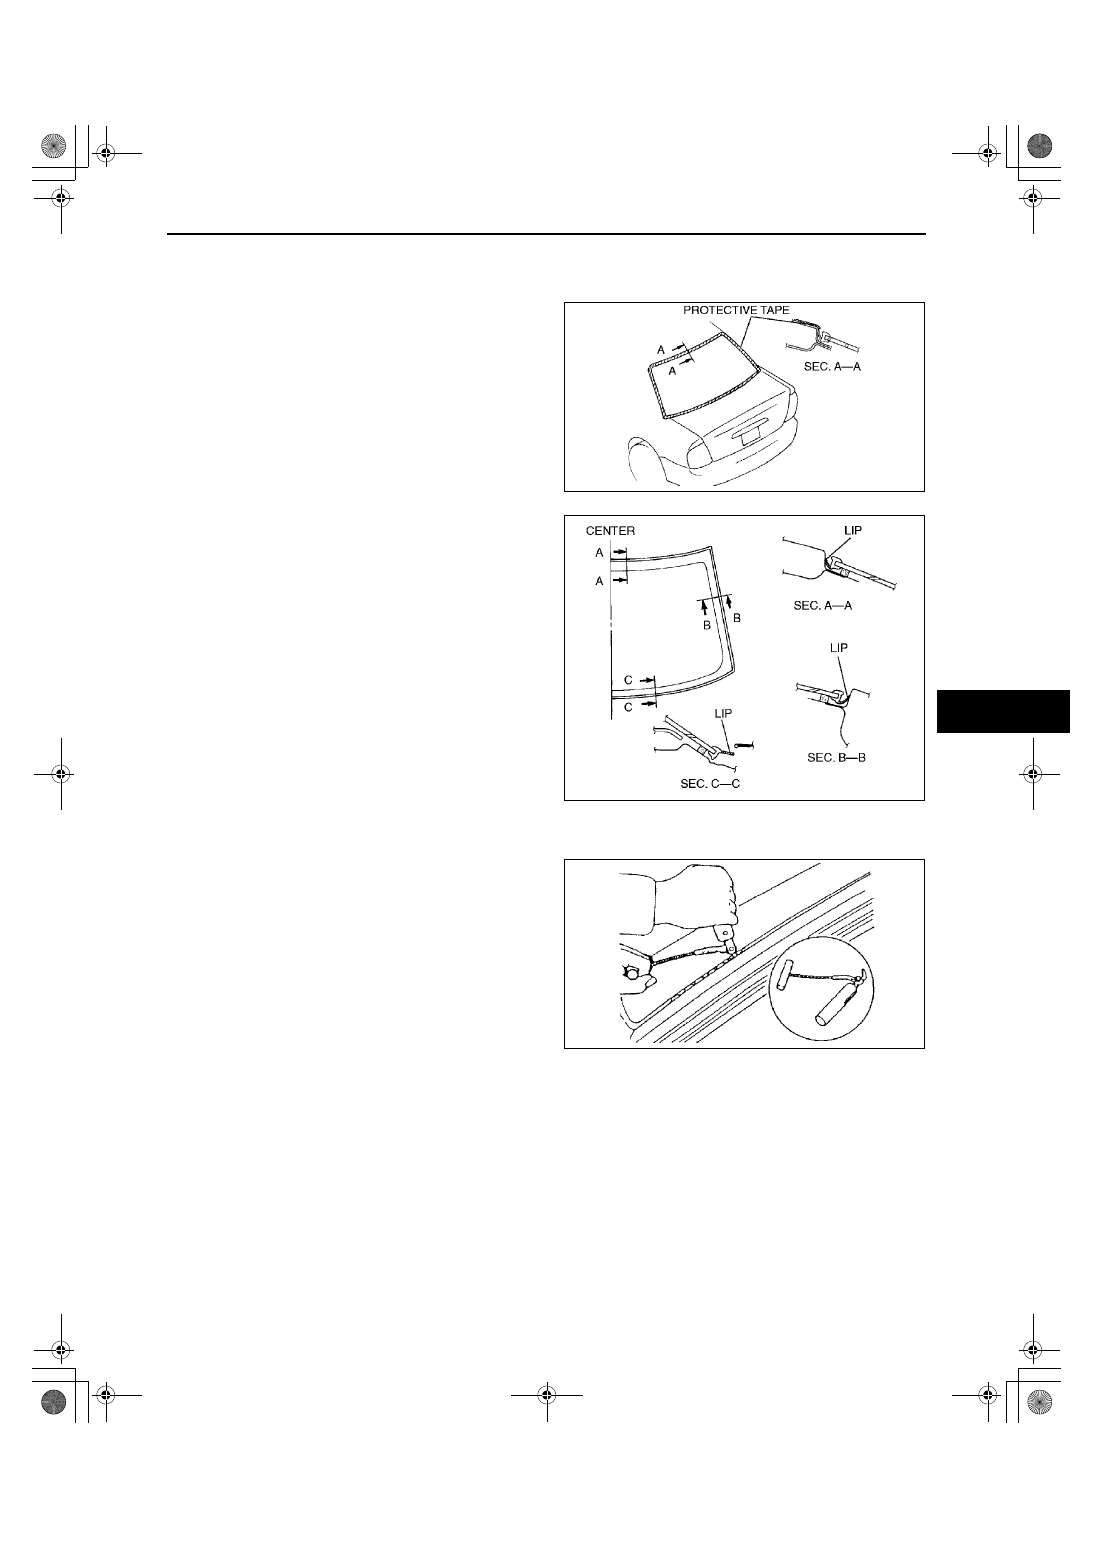
2. Apply protective tape along the edge of body to 

protect it from damage.

3. Remove the lip of the rear window molding using 

a razor.

Warning

••••

Using a razor with bare hands can cause 
injury. Always wear gloves when using a 
razor.

Note

The rear window molding is a replacement 
part.

Not Reusing Rear Window Glass

1. Use a tool like that shown in the figure, and insert 

the blade into the sealant.

Note

For the areas of the sealant that are difficult 
to cut, use the SST (piano wire) and follow 
the procedures under “Reusing rear window 
glass”.

2. Pull through the sealant around the edge of the 

glass.

3. Remove the glass.

Reusing Rear Window Glass

Note

Before removing the rear window glass from the body, mark the position of the rear window glass by 
affixing tape to the windshield and body panel.

X3U912WAP

A3U0912W0101

X3U912WAR

1712-1U-01G(09-12).fm  11 ページ  2001年6月29日 金曜日 午前10時30分

GLASS/WINDOWS/MIRRORS 

09–12–12

1. Use an awl to saw through the sealant, except 

where there are fasteners and spacers, from the 
inside of the vehicle.

2. Pass the SST (piano wire) through the hole.

Warning

••••

Using a SST (piano wire) with bare hands 
can cause injury. Always wear gloves 
when using a SST (piano wire).

3. Wind each end of the wire around a bar.

4. Working with another person, saw through the 

sealant around the edge of the glass, being 
careful not to damage the body.

Note

Use a long sawing action to spread the work 
over the whole length of the SST (piano 
wire) to prevent it from breaking.

5. Remove the rear window glass.

6. Remove the spacers and fasteners.
7. Remove the rear window molding from the rear 

window glass.

5HB

1. Remove the rear wiper arm and blade. (See 09–19–12 REAR WIPER ARM AND BLADE REMOVAL/

INSTALLATION.)

2. Remove the liftgate trim.
3. Remove the rear spoiler.

X3U912WAS

X3U912WAT

X3U912WAU

X3U912WAV

1712-1U-01G(09-12).fm  12 ページ  2001年6月29日 金曜日 午前10時30分

GLASS/WINDOWS/MIRRORS 

09–12–13

09–12

4. Apply protective tape along the edge of body to 

protect it from damage.

5. Remove the lip of the rear window molding using 

a razor.

Warning

••••

Using a razor with bare hands can cause 
injury. Always wear gloves when using a 
razor.

Note

The rear window molding is a replacement 
part.

Not Reusing Rear Window Glass

1. Use a tool like that shown in the figure, and insert 

the blade into the sealant.

Note

For the areas of the sealant that are difficult 
to cut, use the SST (piano wire) and follow 
the procedures under “Reusing rear window 
glass”.

2. Pull through the sealant around the edge of the 

glass.

3. Remove the glass.

Reusing Rear Window Glass

1. Use an awl to saw through the sealant, except 

where there are fasteners and spacers, from the 
inside of the vehicle.

A3U0912W009

A3U0912W010

X3U912WAR

A3U0912W011

1712-1U-01G(09-12).fm  13 ページ  2001年6月29日 金曜日 午前10時30分

GLASS/WINDOWS/MIRRORS 

09–12–14

2. Pass the SST (piano wire) through the hole.

Warning

••••

Using a SST (piano wire) with bare hands 
can cause injury. Always wear gloves 
when using a SST (piano wire).

3. Wind each end of the SST (piano wire) around a 

bar.

4. Working with another person, saw through the 

sealant around the edge of the glass, being 
careful not to damage the body.

Note

Use a long sawing action to spread the work 
over the whole length of the SST (piano 
wire) to prevent it from breaking.

5. Remove the rear window glass.

6. Remove the pins, fasteners and spacers.
7. Remove the rear window molding from the rear 

window glass.

End Of Sie

REAR WINDOW GLASS INSTALLATION

A3U091263931W02

4SD

Caution

••••

To prevent the sealant from cracking or the glass from being pushed out by air pressure if a door 
is closed, open all of the windows and leave them open until the sealant has hardened.

1. Cut away the old sealant using a razor so that 1—2 mm {0.04—0.07 in} thickness of sealant remains around 

the circumference of the frame.

If all the sealant has come off in any one place, apply some primer after degreasing, and allow it 30 
minutes
 to dry. Then put on new sealant to create a 2 mm {0.08 in} layer.

Warning

••••

Using a razor with bare hands can cause 
injury. Always wear gloves when using a 
razor.

2. Clean and degrease an approximately 50.0 mm 

{1.97 in} wide strip around the circumference of 
the glass and the bonding area on the body.

A3U0912W012

X3U912WAU

A3U0912W013

WSXWXX0003J

1712-1U-01G(09-12).fm  14 ページ  2001年6月29日 金曜日 午前10時30分


Content   ..  312  313  314  315   ..