Jeep Grand Cherokee SRT8 (2009 year). Instruction - part 5


  Index      Jeep     Jeep Grand Cherokee SRT8 - instruction 2009 year in english


Search            


Content   ..  3  4  5  6   ..


Jeep Grand Cherokee SRT8 (2009 year). Instruction - part 5


If you are installing LATCH-compatible child restraints
in adjacent rear seating positions, you can use the
LATCH anchors or the vehicle’s seat belt for the outboard
position, but you must use the vehicle’s seat belt at the
center position. If your child restraints are not LATCH-
compatible, you can only install the child restraints using
the vehicle’s seat belts. For typical installation instruc-
tions, refer to “Installing the LATCH-Compatible Child
Restraint System”.

Installing the LATCH-Compatible Child Restraint
System
We urge that you carefully follow the directions of the
manufacturer when installing your child restraint. Not all
child restraint systems will be installed as described here.
Again, carefully follow the installation instructions that
were provided with the child restraint system.

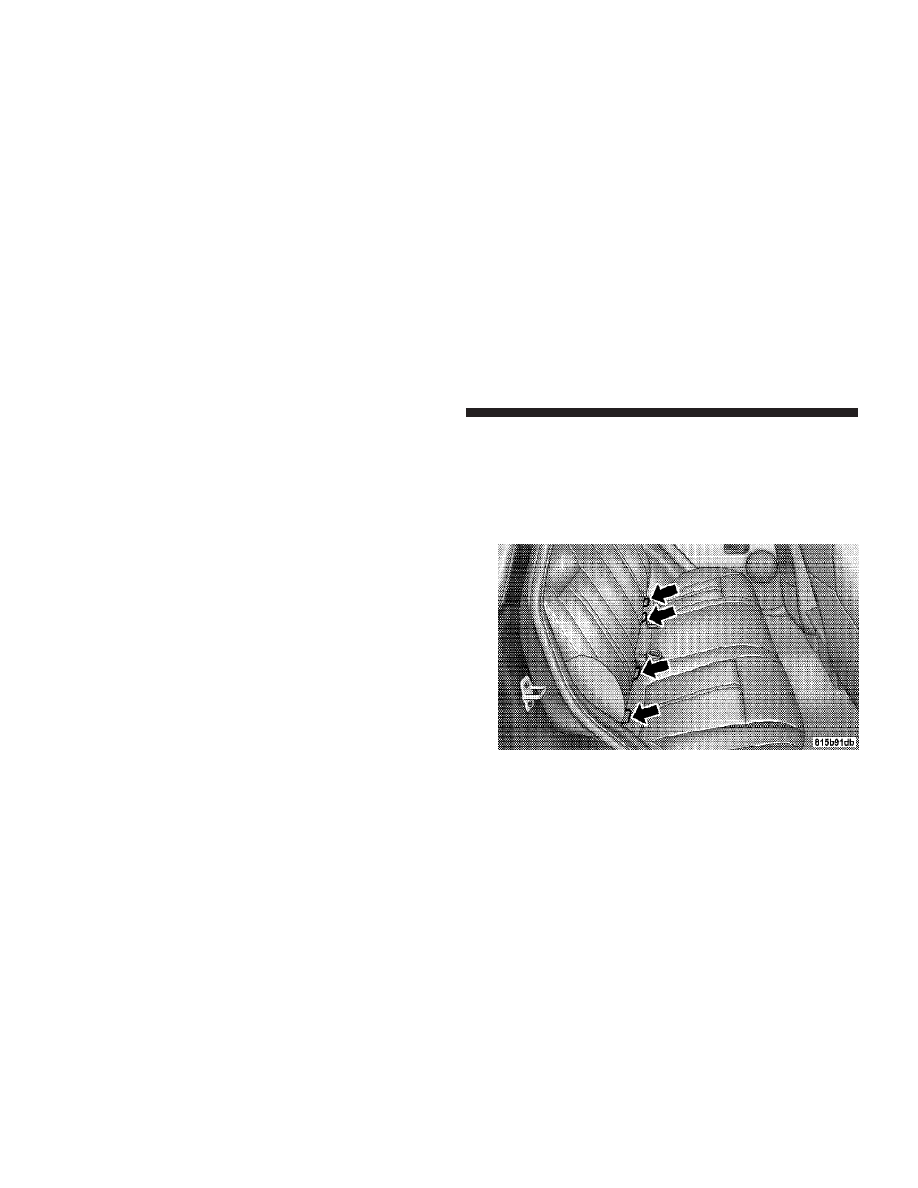
The rear seat lower anchorages are round bars, located at
the rear of the seat cushion where it meets the seatback,
and are just visible when you lean into the rear seat to
install the child restraint. You will easily feel them if you
run your finger along the intersection of the seatback and
seat cushion surfaces.

Latch Anchorages

64

THINGS TO KNOW BEFORE STARTING YOUR VEHICLE

In addition, there are tether strap anchorages behind each
rear seating position located on the back of the seat.

Many, but not all restraint systems will be equipped with
separate straps on each side, with each having a hook or
connector for attachment to the lower anchorage and a

means of adjusting the tension in the strap. Forward-
facing toddler restraints and some rear-facing infant
restraints will also be equipped with a tether strap, a
hook for attachment to the tether strap anchorage and a
means of adjusting the tension of the strap.

First, loosen the adjusters on the lower straps and on the
tether strap so that you can more easily attach the hooks
or connectors to the vehicle anchorages. Next, attach the
lower hooks or connectors over the top of the anchorage
bars, pushing aside the seat cover material. Then, locate
the tether anchorage directly behind the seat where you
are placing the child restraint and attach the tether strap
to the anchorage, being careful to route the tether strap to
provide the most direct path between the anchor and the
child restraint. Finally, tighten all three straps as you
push the child restraint rearward and downward into the
seat, removing slack in the straps according to the child
restraint manufacturer’s instructions.

Tether Strap Mounting

THINGS TO KNOW BEFORE STARTING YOUR VEHICLE

65

2

WARNING!

Improper installation of a child restraint to the
LATCH anchorages can lead to failure of an infant or
child restraint. The child could be badly injured or
killed. Follow the manufacturer’s directions exactly
when installing an infant or child restraint.

Installing Child Restraints Using the Vehicle Seat
Belts
The passenger seat belts are equipped with either cinch-
ing latch plates or automatic locking retractors, which are
designed to keep the lap portion tight around the child
restraint so that it is not necessary to use a locking clip. If
the seat belt has a cinching latch plate, pulling up on the
shoulder portion of the lap/shoulder belt will tighten the
belt. The cinching latch plate will keep the belt tight,
however, any seat belt system will loosen with time, so
check the belt occasionally and pull it tight if necessary.

For seat belts having an Automatic Locking Retractor
(ALR), pull the belt from the retractor until there is
enough allowance to pass it through the child restraint
and slide the latch plate into the buckle. Then, pull the
belt until it is fully extended from the retractor. Allow the
belt to return into the retractor, pulling on the excess
webbing to tighten the lap portion about the child
restraint. Refer to “Automatic Locking Mode” earlier in
this section.

In the rear seat, you may have trouble tightening the
lap/shoulder belt on the child restraint because the
buckle or latch plate is too close to the belt path opening
on the restraint. Disconnect the latch plate from the
buckle and twist the short buckle-end belt several times
to shorten it. Insert the latch plate into the buckle with the
release button facing out.

If the belt still can’t be tightened, or if by pulling and
pushing on the restraint loosens the belt, you may need

66

THINGS TO KNOW BEFORE STARTING YOUR VEHICLE

to do something more. Disconnect the latch plate from
the buckle, turn the buckle around, and insert the latch
plate into the buckle again. If you still can’t make the
child restraint secure, try a different seating position.

To attach a child restraint tether strap:

Route the tether strap over the seatback and attach the
hook to the tether anchor located on the back of the seat.
For the outboard seating positions, route the tether over
the head rests, and attach the hook to the tether anchor
located on the back of the seat.

WARNING!

Always remove the subwoofer from the vehicle
whenever the tether anchors behind the subwoofer
are required for proper installation of a child re-
straining device. In the event of an accident, or under
severe vehicle maneuvers, leaving the subwoofer
unsecured in the vehicle could result in serious or
fatal injury to anyone in the vehicle.

THINGS TO KNOW BEFORE STARTING YOUR VEHICLE

67

2

WARNING!

An incorrectly anchored tether strap could lead to
increased head motion and possible injury to the
child. Use only the anchor positions directly behind
the child seat to secure a child restraint top tether
strap.

Transporting Pets
Airbags deploying in the front seat could harm your pet.
An unrestrained pet will be thrown about and possibly
injured, or injure a passenger during panic braking or in
a collision. Pets should be restrained in the rear seat in
pet harnesses or pet carriers that are secured by seat belts.

Tether Strap Mounting

68

THINGS TO KNOW BEFORE STARTING YOUR VEHICLE

ENGINE BREAK-IN RECOMMENDATIONS

A long break-in period is not required for the engine in
your vehicle.

Drive moderately during the first 300 miles (500 km).
After the initial 60 miles (100 km), speeds up to 50 or
55 mph (80 or 90 km/h) are desirable.

While cruising, brief full-throttle acceleration within the
limits of local traffic laws, contributes to a good break-in.
Wide-open throttle acceleration in low gear can be detri-
mental and should be avoided.

The engine oil installed in the engine at the factory is a
high-quality energy conserving type lubricant. Oil changes
should be consistent with anticipated climate conditions
under which vehicle operations will occur. The recom-
mended viscosity and quality grades are shown under
“Engine Oil”, under “Maintenance Procedures” in sec-
tion 7 of this manual. NON-DETERGENT OR STRAIGHT
MINERAL OILS MUST NEVER BE USED.

A new engine may consume some oil during its first few
thousand miles (kilometers) of operation. This should be
considered as a normal part of the break-in and not
interpreted as an indication of difficulty.

SAFETY TIPS

Exhaust Gas

WARNING!

Exhaust gases can injure or kill. They contain carbon
monoxide (CO) which is colorless and odorless.
Breathing it can make you unconscious and can
eventually poison you. To avoid breathing (CO),
follow these safety tips:

• Do not inhale exhaust gases. They contain carbon

monoxide, a colorless and odorless gas which can kill.
Never run the engine in a closed area, such as a
garage, and never sit in a parked vehicle with the

THINGS TO KNOW BEFORE STARTING YOUR VEHICLE

69

2

engine running for a extended period. If the vehicle is
stopped in an open area with engine running for more
than a short period, adjust the ventilation system to
force fresh, outside air into the vehicle.

• Guard against carbon monoxide with proper mainte-

nance. Have the exhaust system inspected every time
the vehicle is raised. Have any abnormal conditions
repaired promptly. Until repaired, drive with all side
windows fully open.

• Always run the climate control in panel or floor mode

when driving with any windows open, even if only
slightly, to help keep fresh air circulating inside the
vehicle; otherwise, poisonous gases could be drawn
into the vehicle.

Safety Checks You Should Make Inside the
Vehicle

Seat Belts
Inspect the seat belt system periodically, checking for
cuts, frays and loose parts. Damaged parts must be
replaced immediately. Do not disassemble or modify the
system.

Seat belt assemblies must be replaced after an accident if
they have been damaged i.e., (bent retractor, torn web-
bing, etc.). If there is any question regarding belt or
retractor condition, replace the belt.

Airbag Warning Light
The light should come on, and remain on for six to eight
seconds as a bulb check, when the ignition switch is first
turned ON. If the bulb is not lit during starting, have it
replaced. If the light stays on or comes on while driving,
have the system checked by an authorized dealer.

70

THINGS TO KNOW BEFORE STARTING YOUR VEHICLE

Defrosters
Check operation by selecting the DEFROST mode and
place the blower control on high speed. You should be
able to feel the air directed against the windshield. See
your authorized dealer for service if your defroster is
inoperable.

Safety Checks You Should Make Outside the
Vehicle

Tires
Examine tires for excessive tread wear or uneven wear
patterns. Check for stones, nails, glass, or other objects
lodged in the tread. Inspect for tread cuts or sidewall
cracks. Check wheel nuts for tightness. Check the tires
(including spare) for proper pressure.

Lights
Have someone observe the operation of all exterior lights
while you work the controls. Check turn signal and high
beam indicator lights on the instrument panel.

Fluid Leaks
Check the area under the vehicle after overnight parking
for fuel, coolant, oil or other fluid leaks. Also, if gasoline
fumes are detected, the cause should be located and
corrected immediately.

THINGS TO KNOW BEFORE STARTING YOUR VEHICLE

71

2

UNDERSTANDING THE FEATURES OF YOUR VEHICLE

CONTENTS

䡵 Mirrors . . . . . . . . . . . . . . . . . . . . . . . . . . . . . . 78

▫ Automatic Dimming Mirror . . . . . . . . . . . . . . 78
▫ Outside Mirrors . . . . . . . . . . . . . . . . . . . . . . 79
▫ Outside Mirrors Folding Feature . . . . . . . . . . 79
▫ Driver’s And Front Passenger Outside

Automatic Dimming Mirror — If Equipped . . . 79

▫ Power Outside Mirrors . . . . . . . . . . . . . . . . . 79
▫ Heated Power Mirrors — If Equipped . . . . . . 80
▫ Illuminated Vanity Mirrors — If Equipped . . . 80

䡵 Hands-Free Communication (UConnect威) —

If Equipped . . . . . . . . . . . . . . . . . . . . . . . . . . . 81

▫ Operation . . . . . . . . . . . . . . . . . . . . . . . . . . 83
▫ Phone Call Features . . . . . . . . . . . . . . . . . . . 91
▫ UConnect威 System Features . . . . . . . . . . . . . . 94
▫ Advanced Phone Connectivity . . . . . . . . . . . . 99
▫ Things You Should Know About Your

UConnect

威 System . . . . . . . . . . . . . . . . . . . 101

▫ General Information . . . . . . . . . . . . . . . . . . 109

3

䡵 Voice Recognition System (VR) —

If Equipped . . . . . . . . . . . . . . . . . . . . . . . . . . 109

▫ Voice Recognition System (VR) Operation . . . 109
▫ Commands . . . . . . . . . . . . . . . . . . . . . . . . . 111
▫ Voice Training . . . . . . . . . . . . . . . . . . . . . . 114

䡵 Seats . . . . . . . . . . . . . . . . . . . . . . . . . . . . . . 114

▫ Front Manual Seat Adjustment . . . . . . . . . . . 114
▫ Front Seat Adjustment — Recline . . . . . . . . . 115
▫ Manual Lumbar Support Adjustment . . . . . . 116
▫ Eight-Way Driver’s Power Seat . . . . . . . . . . . 116
▫ Four-Way Passenger’s Power Seat — If

Equipped . . . . . . . . . . . . . . . . . . . . . . . . . . 117

▫ Head Restraints . . . . . . . . . . . . . . . . . . . . . 117
▫ Front Heated Seats — If Equipped . . . . . . . . 118

▫ Rear Heated Seats — If Equipped . . . . . . . . . 119
▫ 60/40 Split Rear Seat . . . . . . . . . . . . . . . . . . 121

䡵 Driver Memory Seat — If Equipped . . . . . . . . 123

▫ Setting Memory Positions And Linking

Remote Keyless Entry (RKE) Transmitter To
Memory 
. . . . . . . . . . . . . . . . . . . . . . . . . . . 124

▫ Memory Position Recall . . . . . . . . . . . . . . . . 125
▫ To Disable A RKE Transmitter Linked To

Memory . . . . . . . . . . . . . . . . . . . . . . . . . . . 126

▫ Easy Entry/Exit Seat . . . . . . . . . . . . . . . . . . 127

䡵 To Open And Close The Hood . . . . . . . . . . . . 128
䡵 Lights . . . . . . . . . . . . . . . . . . . . . . . . . . . . . 128

▫ Multifunction Lever . . . . . . . . . . . . . . . . . . 128
▫ Headlights And Parking Lights . . . . . . . . . . 129

74

UNDERSTANDING THE FEATURES OF YOUR VEHICLE

▫ Automatic Headlight System —

If Equipped . . . . . . . . . . . . . . . . . . . . . . . . 129

▫ SmartBeams — If Equipped . . . . . . . . . . . . . 130
▫ Daytime Running Lights — If Equipped . . . . 131
▫ Automatic Headlight Leveling — HID

Headlights Only . . . . . . . . . . . . . . . . . . . . . 131

▫ Instrument Panel And Interior Lights . . . . . . 132
▫ Battery Saver Feature . . . . . . . . . . . . . . . . . 132
▫ Lights-On Reminder . . . . . . . . . . . . . . . . . . 133
▫ Fog Lights — If Equipped . . . . . . . . . . . . . . 133
▫ Turn Signals . . . . . . . . . . . . . . . . . . . . . . . . 134
▫ High Beam Switch . . . . . . . . . . . . . . . . . . . 135
▫ Flash-To-Pass . . . . . . . . . . . . . . . . . . . . . . . 135
▫ Headlight Time Delay . . . . . . . . . . . . . . . . . 135

▫ Interior Lights . . . . . . . . . . . . . . . . . . . . . . 136
▫ Front Map/Reading Lights . . . . . . . . . . . . . 136

䡵 Windshield Wipers And Washers . . . . . . . . . . 136

▫ Mist . . . . . . . . . . . . . . . . . . . . . . . . . . . . . 138
▫ Speed Sensitive Intermittent Wiper System . . 138
▫ Rain Sensing Wipers — If Equipped . . . . . . . 138

䡵 Tilt/Telescoping Steering Column . . . . . . . . . . 140
䡵 Adjustable Pedals — If Equipped . . . . . . . . . . 141
䡵 Electronic Speed Control — If Equipped . . . . . 142

▫ To Activate . . . . . . . . . . . . . . . . . . . . . . . . . 143
▫ To Set At A Desired Speed . . . . . . . . . . . . . . 143
▫ To Deactivate . . . . . . . . . . . . . . . . . . . . . . . 143
▫ To Resume Speed . . . . . . . . . . . . . . . . . . . . 143

UNDERSTANDING THE FEATURES OF YOUR VEHICLE

75

3

▫ To Vary The Speed Setting . . . . . . . . . . . . . . 143
▫ To Accelerate For Passing . . . . . . . . . . . . . . 144

䡵 Rear Park Assist System — If Equipped . . . . . . 145

▫ Rear Park Assist Sensors . . . . . . . . . . . . . . . 145
▫ Rear Park Assist Warning Display . . . . . . . . 146
▫ Enable/Disable The Rear Park Assist

System . . . . . . . . . . . . . . . . . . . . . . . . . . . . 148

▫ Service The Rear Park Assist System . . . . . . . 148
▫ Cleaning The Rear Park Assist System . . . . . 149

䡵 Rear Camera — If Equipped . . . . . . . . . . . . . . 149

▫ Turning The Rear Camera On Or Off . . . . . . 149

䡵 Overhead Console . . . . . . . . . . . . . . . . . . . . . 150

▫ Courtesy/Reading Lights . . . . . . . . . . . . . . 151

▫ Sunglasses Storage . . . . . . . . . . . . . . . . . . . 151

䡵 Garage Door Opener — If Equipped . . . . . . . . 151

▫ Programming HomeLink威 . . . . . . . . . . . . . . 153
▫ Gate Operator/Canadian Programming . . . . 155
▫ Using HomeLink威 . . . . . . . . . . . . . . . . . . . 156
▫ Reprogramming A Single HomeLink威

Button . . . . . . . . . . . . . . . . . . . . . . . . . . . . 156

▫ Security . . . . . . . . . . . . . . . . . . . . . . . . . . . 156
▫ Troubleshooting Tips . . . . . . . . . . . . . . . . . . 157
▫ General Information . . . . . . . . . . . . . . . . . . 157

䡵 Power Sunroof — If Equipped . . . . . . . . . . . . 158

▫ Opening Sunroof - Express . . . . . . . . . . . . . 159
▫ Closing Sunroof - Express . . . . . . . . . . . . . . 159

76

UNDERSTANDING THE FEATURES OF YOUR VEHICLE

▫ Pinch Protect Feature . . . . . . . . . . . . . . . . . 159
▫ Pinch Protect Override . . . . . . . . . . . . . . . . 159
▫ Venting Sunroof - Express . . . . . . . . . . . . . . 159
▫ Sunshade Operation . . . . . . . . . . . . . . . . . . 159
▫ Wind Buffeting . . . . . . . . . . . . . . . . . . . . . . 160
▫ Sunroof Maintenance . . . . . . . . . . . . . . . . . 160
▫ Ignition Off Operation . . . . . . . . . . . . . . . . . 160
▫ Sunroof Fully Closed . . . . . . . . . . . . . . . . . . 160

䡵 Power Outlets . . . . . . . . . . . . . . . . . . . . . . . . 160

▫ Front Power Outlet . . . . . . . . . . . . . . . . . . . 160
▫ Rear Power Outlet — If Equipped . . . . . . . . 160

䡵 Power Inverter — If Equipped . . . . . . . . . . . . 162

䡵 Cupholders . . . . . . . . . . . . . . . . . . . . . . . . . . 164
䡵 Cargo Area Features . . . . . . . . . . . . . . . . . . . 164

▫ Cargo Light . . . . . . . . . . . . . . . . . . . . . . . . 164
▫ Rear Storage Compartment . . . . . . . . . . . . . 165
▫ Retractable Cargo Area Cover — If

Equipped . . . . . . . . . . . . . . . . . . . . . . . . . . 165

▫ Cargo Tie-Down Hooks . . . . . . . . . . . . . . . . 167
▫ Cargo Load Floor . . . . . . . . . . . . . . . . . . . . 168

䡵 Rear Window Features . . . . . . . . . . . . . . . . . . 169

▫ Rear Window Wiper/Washer . . . . . . . . . . . . 169
▫ Rear Window Defroster — If Equipped . . . . . 170

UNDERSTANDING THE FEATURES OF YOUR VEHICLE

77

3

MIRRORS

Automatic Dimming Mirror

This mirror automatically adjusts for headlight glare
from vehicles behind you. You can turn the feature on or
off by pressing the button at the base of the mirror. A light
next to the button will illuminate to indicate when the
dimming feature is activated.

CAUTION!

To avoid damage to the mirror during cleaning, never
spray any cleaning solution directly onto the mirror.
Apply the solution onto a clean cloth and wipe the
mirror clean.

Automatic Dimming Mirror

78

UNDERSTANDING THE FEATURES OF YOUR VEHICLE

Outside Mirrors

To receive maximum benefit, adjust the outside mirrors
to center on the adjacent lane of traffic with a slight
overlap of the view obtained on the inside mirror.

WARNING!

Vehicles and other objects seen in the right side
convex mirror will look smaller and farther away
than they really are. Relying too much on your right
side mirror could cause you to collide with another
vehicle or other objects. Use your inside mirror when
judging the size or distance of a vehicle seen in the
right side mirror.

Outside Mirrors Folding Feature

All outside mirrors are hinged and may be moved either
forward or rearward to resist damage. The hinges have
three detent positions; full forward, full rearward and
normal.

Driver’s and Front Passenger Outside Automatic
Dimming Mirror — If Equipped

If your vehicle is equipped with a outside automatic
dimming mirrors, they will operate when the inside
automatic dimming mirror is on. The outside mirrors
operate off the inside mirror switch and will automati-
cally adjust for annoying headlight glare when the inside
mirror does.

Power Outside Mirrors

The power mirror switch is located on the drivers door
trim panel next to the power door lock switch. A rotary
knob selects the left mirror, right mirror or off position.

UNDERSTANDING THE FEATURES OF YOUR VEHICLE

79

3


Content   ..  3  4  5  6   ..