Jeep XJ. Manual - part 437


  Index      Jeep     Jeep XJ - service repair manual 2001 year


Search            


Content   ..  435  436  437  438   ..


Jeep XJ. Manual - part 437


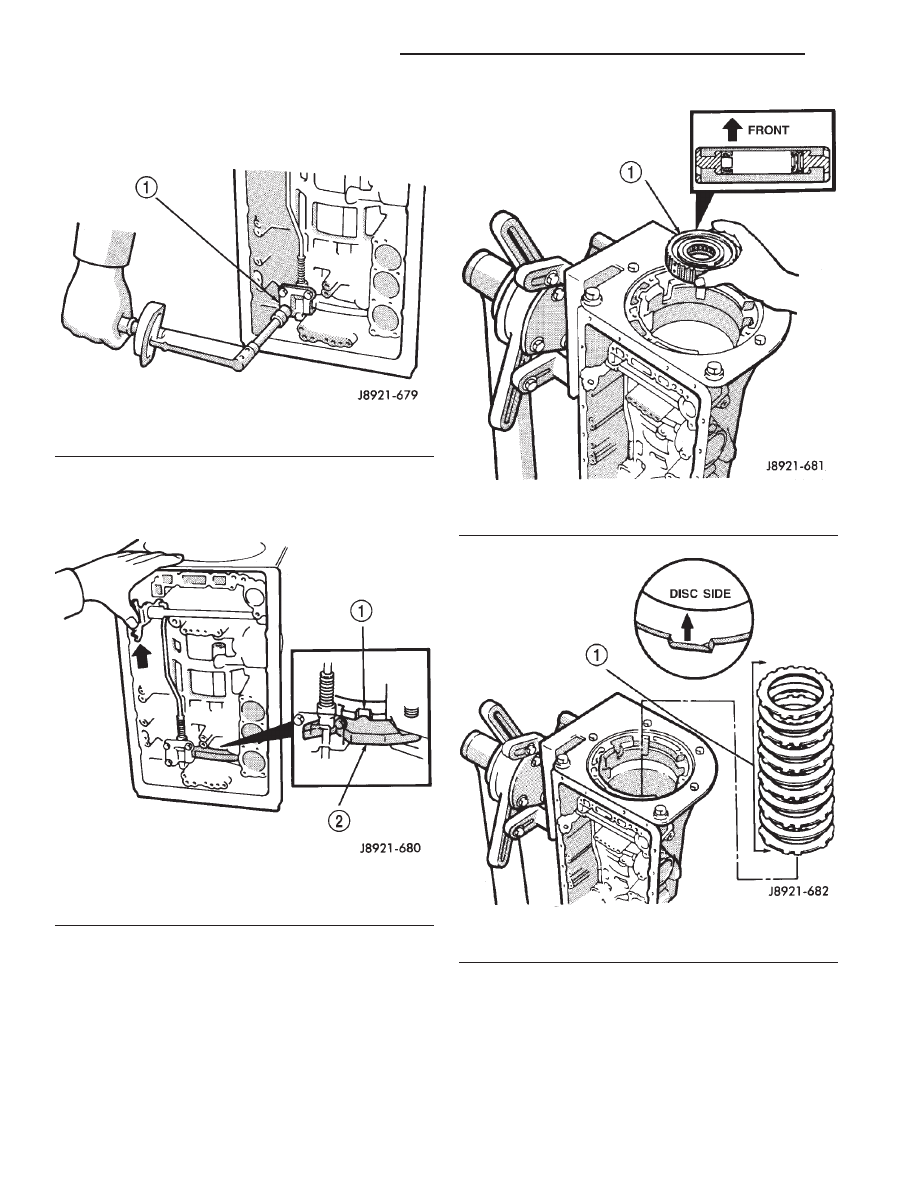
(25) Position park lock rod bracket on case and

tighten bracket attaching bolts to 10 N·m (7 ft. lbs.)
torque (Fig. 147).

(26) Verify park lock operation. Move shift sector

to Park position. Park pawl should be firmly engaged
(locked) in planetary ring gear (Fig. 148).

(27) Install No. 1 one–way clutch (Fig. 149). Short

flanged side of clutch faces up and toward case front.

(28) Install second brake pack (Fig. 150). Install

disc then plate. Continue installation sequence until
five discs and five plates are installed.

(29) Install

second

brake

pack

retainer

with

rounded edge of retainer facing disc.

(30) Install second brake pack snap ring.

Fig. 147 Park Rod Bracket Installation

1 – PARK ROD BRACKET

Fig. 148 Checking Park Pawl Engagement

1 – REAR PLANETARY RING GEAR
2 – PARK PAWL

Fig. 149 Installing No. 1 One–Way Clutch

1 – NO. 1 ONE-WAY CLUTCH

Fig. 150 Second Brake Pack Installation

1 – SECOND BRAKE PACK

21 - 284

AW–4 AUTOMATIC TRANSMISSION

XJ

DISASSEMBLY AND ASSEMBLY (Continued)

(31) Check brake pack clearance with feeler gauge

(Fig. 151). Clearance should be 0.062 – 1.98 mm
(0.024 – 0.078 in.). If brake pack clearance is not cor-
rect, brake pack components are not seated. Reas-
semble brake pack if necessary.

(32) Install planetary sun gear and input drum

(Fig. 152). Be sure drum thrust washer tabs are
seated in drum. Use petroleum jelly to hold thrust
washer in position if necessary.

(33) Install front planetary gear on sun gear (Fig.

153).

(34) Support output shaft with wood blocks (Fig.

154).

Fig. 151 Checking Second Brake Pack Clearance

1 – BRAKE PACK
2 – FEELER GAUGE

Fig. 152 Installing Sun Gear And Input Drum

1 – SUN GEAR AND INPUT DRUM

Fig. 153 Installing Front Planetary Gear

1 – FRONT PLANETARY GEAR

Fig. 154 Supporting Output Shaft

1 – OUTPUT SHAFT
2 – WOOD BLOCKS

XJ

AW–4 AUTOMATIC TRANSMISSION

21 - 285

DISASSEMBLY AND ASSEMBLY (Continued)

(35) Install planetary snap ring on sun gear with

snap ring plier tool 7541 (Fig. 155).

(36) Install tabbed thrust race on front planetary

gear. Washer tabs face down and toward gear. Race
outer diameter is 47.8 mm (1.882 in.). Inside diame-
ter is 34.3 mm (1.350 in.).

(37) Install second coast brake band (Fig. 156).

(38) Install pin in second coast brake band. Then

install retaining ring on pin (Fig. 157).

(39) Install thrust bearing and race in forward–di-

rect clutch (Fig. 158). Coat bearing/race with petro-
leum jelly to hold them in place.

(40) Verify forward–direct clutch thrust bearing

size.

• Race outer diameter is 48.9 mm (1.925 in.) and

inside diameter is 26.0 mm (1.024 in.).

• Bearing outer diameter is 46.7 mm (1.839 in.)

and inside diameter is 26.0 mm (1.024 in.).

(41) Coat front planetary ring gear race with

petroleum jelly and install it in ring gear (Fig. 159).

Fig. 155 Installing Front Planetary Snap Ring

1 – SNAP RING PLIER TOOL
2 – FRONT PLANETARY
3 – SNAP RING

Fig. 156 Installing Second Coast Brake Band

1 – SECOND COAST BRAKE BAND

Fig. 157 Installing Second Coast Brake Band

Retaining Pin

1 – SECOND COAST BRAKE BAND
2 – BAND RETAINING PIN
3 – RETAINING RING (INSTALL ON PIN)

21 - 286

AW–4 AUTOMATIC TRANSMISSION

XJ

DISASSEMBLY AND ASSEMBLY (Continued)

(42) Verify ring gear race size. Outer diameter is

47.0 mm (1.850 in.) and inside diameter is 26.5 mm
(1.045 in.).

(43) Align forward–direct clutch disc splines with

screwdriver (Fig. 160).

(44) Align and install front planetary ring gear in

forward–direct clutch (Fig. 161).

(45) Coat bearing and race with petroleum jelly

and install them in ring gear (Fig. 162). Verify bear-
ing/race size.

• Bearing outer diameter is 47.7 mm (1.878 in.)

and inside diameter is 32.6 mm (1.283 in.).

• Race outer diameter is 53.6 mm (2.110 in.) and

inside diameter is 30.6 mm (1.205 in.).

(46) Install assembled planetary gear/forward–di-

rect clutch (Fig. 163).

(47) Check clearance between sun gear input drum

and direct clutch drum (Fig. 164). Clearance should
be 9.8 – 11.8 mm (0.386 – 0.465 in.). If clearance is
incorrect,

planetary

gear/forward–direct

clutch

assembly is not seated or is improperly assembled.
Remove, and correct if necessary.

Fig. 158 Installing Forward–Direct Clutch Thrust

Bearing And Race

1 – THRUST BEARING
2 – RACE
3 – FORWARD-DIRECT CLUTCH ASSEMBLY

Fig. 159 Installing Planetary Ring Gear Race

1 – PLANETARY RING GEAR
2 – THRUST RACE

Fig. 160 Aligning Forward–Direct Clutch Splines

1 – CLUTCH SPLINE ALIGNING TOOL
2 – FORWARD-DIRECT CLUTCH

Fig. 161 Installing Front Planetary Ring Gear

1 – RING GEAR
2 – FORWARD-DIRECT CLUTCH

XJ

AW–4 AUTOMATIC TRANSMISSION

21 - 287

DISASSEMBLY AND ASSEMBLY (Continued)


Content   ..  435  436  437  438   ..