Jeep Wrangler TJ. Manual - part 561
 

  Index      Jeep     Jeep Wrangler TJ - service repair manual 2005 year


Search            


Content   ..  559  560  561  562   ..


Jeep Wrangler TJ. Manual - part 561


WEATHERSTRIP/SEALS

TABLE OF CONTENTS

page

page

HOOD TO COWL WEATHERSTRIP

REMOVAL

. . . . . . . . . . . . . . . . . . . . . . . . . . . . . 86

INSTALLATION

. . . . . . . . . . . . . . . . . . . . . . . . . 86

FULL DOOR INNER BELT WEATHERSTRIP

DESCRIPTION - FULL DOOR INNER BELT

WEATHERSTRIP

. . . . . . . . . . . . . . . . . . . . . . 86

FULL DOOR OUTER BELT SEAL

REMOVAL

. . . . . . . . . . . . . . . . . . . . . . . . . . . . . 87

INSTALLATION

. . . . . . . . . . . . . . . . . . . . . . . . . 87

FULL DOOR WEATHERSTRIP

REMOVAL

. . . . . . . . . . . . . . . . . . . . . . . . . . . . . 87

INSTALLATION

. . . . . . . . . . . . . . . . . . . . . . . . . 87

HALF DOOR WEATHERSTRIP

REMOVAL

. . . . . . . . . . . . . . . . . . . . . . . . . . . . . 88

INSTALLATION

. . . . . . . . . . . . . . . . . . . . . . . . . 88

TAILGATE WEATHERSTRIP AND CHANNEL

REMOVAL

. . . . . . . . . . . . . . . . . . . . . . . . . . . . . 88

INSTALLATION

. . . . . . . . . . . . . . . . . . . . . . . . . 88

WINDSHIELD FRAME WEATHERSTRIP

REMOVAL

. . . . . . . . . . . . . . . . . . . . . . . . . . . . . 89

INSTALLATION

. . . . . . . . . . . . . . . . . . . . . . . . . 89

HOOD TO COWL
WEATHERSTRIP

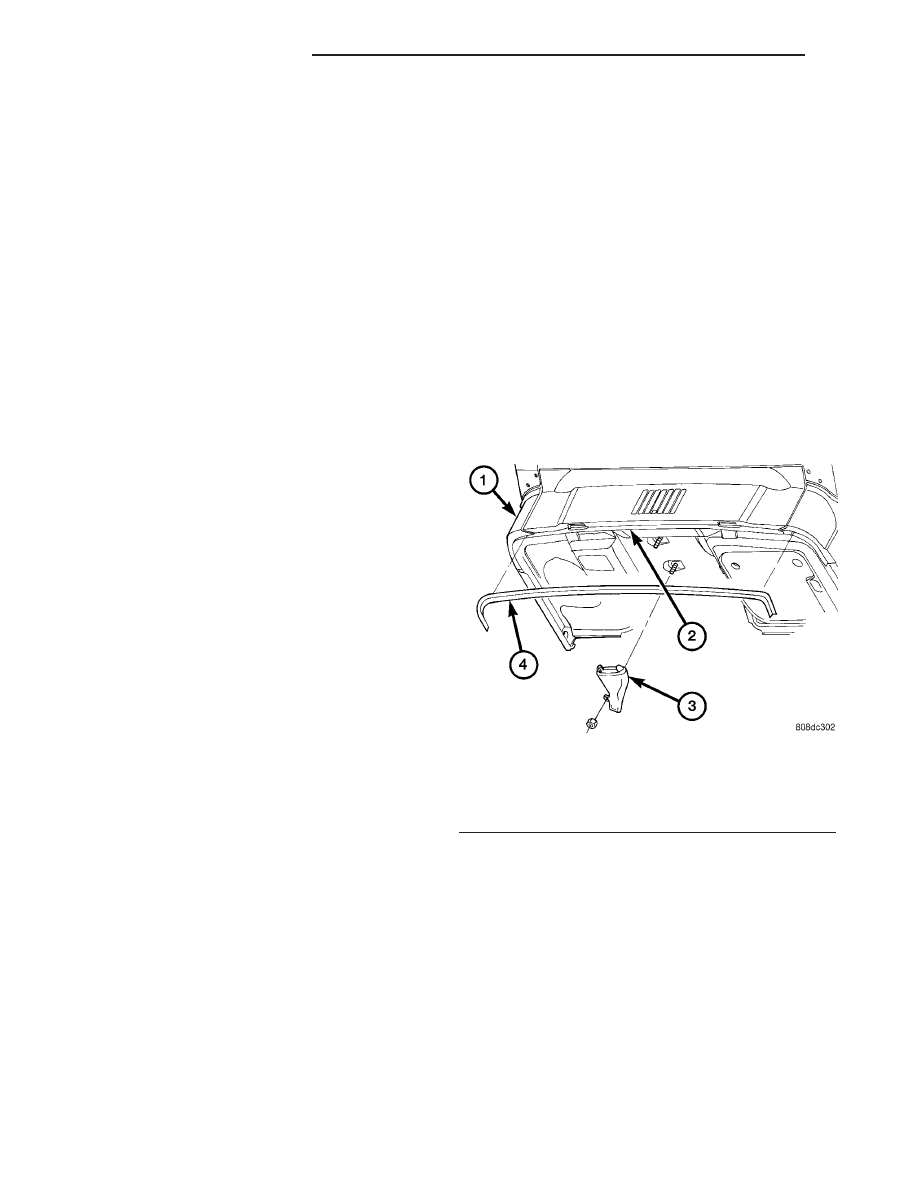
REMOVAL

(1) Carefully separate the weatherstrip from the

cowl flange (Fig. 1).

INSTALLATION

(1) Position the weatherstrip on the cowl flange

and press it into place.

FULL DOOR INNER BELT
WEATHERSTRIP

DESCRIPTION - FULL DOOR INNER BELT
WEATHERSTRIP

The inner belt weatherstrip is attached to the door

trim panel and is not serviceable. If the inner belt
weatherstrip needs to be replaced, replace the door
trim panel.

Fig. 1 HOOD TO COWL WEATHERSTRIP

1 - COWL
2 - COWL FLANGE
3 - COWL PLENUM DRAIN
4 - HOOD TO COWL WEATHERSTRIP

23 - 86

WEATHERSTRIP/SEALS

TJ

FULL DOOR OUTER BELT
SEAL

REMOVAL

(1) Remove the door sail panel.
(2) Disengage the clips attaching the outer belt

seal to the door (Fig. 2).

(3) Separate the seal from the door.

INSTALLATION

(1) Position the seal on the door.
(2) Engage the clips attaching the outer belt seal

to the door.

(3) Install the door sail panel.

FULL DOOR WEATHERSTRIP

REMOVAL

NOTE: The upper portion of the weatherstrip is
seated into a channel around the window opening
frame. The lower portion of the weatherstrip is
attached to the door with push-in fasteners.

(1) Peel the weatherstrip from the channel.
(2) Remove the push-in fasteners attaching the

weatherstrip to the door (Fig. 3).

INSTALLATION

(1) Position the lower part of the weatherstrip and

seat the push-in fasteners fully.

(2) Install the weatherstrip in the upper weather-

strip channel seat fully.

Fig. 2 FULL DOOR OUTER BELT SEAL

1 - OUTER BELTLINE WEATHERSTRIP
2 - OUTSIDE DOOR HANDLE
3 - CLIPS

Fig. 3 FULL DOOR WEATHERSTRIP

1 - FULL DOOR
2 - WEATHERSTRIP
3 - WATERDAM
4 - OUTER DOOR BELT SEAL

TJ

WEATHERSTRIP/SEALS

23 - 87

HALF DOOR WEATHERSTRIP

REMOVAL

NOTE: The weatherstrip is attached to the door with
push-in fasteners.

(1) Remove trim panel. (Refer to 23 - BODY/HALF

DOOR/TRIM PANEL - REMOVAL)

(2) Remove window retaining sleeve.
(3) Remove the push-in fasteners attaching the

weatherstrip to the door. (Fig. 4)

INSTALLATION

NOTE: The weatherstrip is attached to the door with
push-in fasteners.

(1) Position the weatherstrip onto the door and

seat the push-in fasteners fully.

(2) Install window retaining sleeve.
(3) Install trim panel. (Refer to 23 - BODY/HALF

DOOR/TRIM PANEL - INSTALLATION)

TAILGATE WEATHERSTRIP
AND CHANNEL

REMOVAL

(1) Open the tailgate.
(2) Remove the push-in fasteners attaching the

weatherstrip to the top corners of the tailgate (Fig.
5).

(3) Peel the weatherstrip from the upper tailgate

corners.

(4) Slide the weatherstrip out of the tailgate chan-

nel.

(5) If the weatherstrip channel requires replace-

ment, peel the weatherstrip channel from the tail-
gate.

INSTALLATION

(1) If the weatherstrip channel is being replaced;

(a) Clean the channel contact surface on the tail-

gate with isopropyl alcohol, or equivalent.

(b) Peel the paper backing from the weatherstrip

channel.

(c) Install the push pin fasteners attaching the

weatherstrip to the tailgate.

(d) Position weatherstrip channel to the tailgate

and press into place.

(e) Use hand pressure or a roller to wet out the

tape adhesive holding the weatherstrip channel to
the tailgate.
(2) Install the push pin fasteners attaching the

weatherstrip to the tailgate.

(3) Slide the weatherstrip into the weatherstrip

channel.

Fig. 4 HALF DOOR WEATHERSTRIP

1 - HALF DOOR
2 - WEATHERSTRIP

Fig. 5 TAILGATE WEATHERSTRIP

1 - TAILGATE
2 - WEATHERSTRIP

23 - 88

WEATHERSTRIP/SEALS

TJ

WINDSHIELD FRAME
WEATHERSTRIP

REMOVAL

UPPER (Header)

(1) Disconnect the top from the windshield frame.
(2) Disengage the push-in fasteners attaching the

weatherstrip to the windshield frame.

(3) Peel the weatherstrip from the frame.

LOWER

NOTE: The lower windshield frame weatherstrip can
be removed with the frame tilted forward to the full
horizontal position.

(1) Remove the wiper arms. (Refer to 8 - ELEC-

TRICAL/WIPERS/WASHERS/WIPER

ARMS

-

REMOVAL)

(2) Disconnect the top from the windshield frame.
(3) Remove the cowl grille. (Refer to 23 - BODY/

EXTERIOR/COWL

GRILLE

AND

SCREEN

-

REMOVAL)

(4) Remove the torx screws on each side of the

windshield frame allowing the windshield frame to
tilt to the full horizontal position.

(5) Disengage the outboard push-in fasteners at

the top of cowl on each hinge pillar (Fig. 6).

(6) Remove the weatherstrip from the cowl.

INSTALLATION

UPPER (Header)

(1) Clean the seal contact surface on the wind-

shield frame with isopropyl alcohol or equivalent.

NOTE: Ensure that the contact surface is dry and
free from any residue, poor adhesion will result.

(2) Position the weatherstrip on the windshield

frame, align the push-in fasteners and press it into
place (Fig. 6).

(3) Remove adhesive backing from the bottom of

the weatherstrip.

(4) Using forceful hand pressure, seat the adhesive

on the contact surface.

NOTE: If tape surface becomes contaminated, it will
not adhere to the windshield frame.

(5) Connect the top to the windshield frame.

LOWER

(1) Position the weatherstrip on the cowl.
(2) Align the outer push-in fasteners and press

them into place.

(3) Tilt the windshield frame rearward to the full

vertical position.

NOTE: Ensure weatherstrip outer detail mates with
the a-pillar trim. Outer detail must be flush with trim
surface for proper sealing performance.

(4) Install the torx screws on each side of the

windshield securing the windshield frame.

(5) Connect the top to the windshield frame.
(6) Install cowl grille. (Refer to 23 - BODY/EXTE-

RIOR/COWL GRILLE AND SCREEN - INSTALLA-
TION)

(7) Install the wiper arms. (Refer to 8 - ELECTRI-

CAL/WIPERS/WASHERS/WIPER ARMS - INSTAL-
LATION)

Fig. 6 WINDSHIELD FRAME WEATHERSTRIP

1 - WINDSHIELD FRAME
2 - UPPER HEADER WEATHERSTRIP
3 - PUSH-IN FASTENER
4 - WINDSHIELD TO COWL WEATHERSTRIP
5 - COWL
6 - VIEW OF ARROW Y
7 - PUSH-IN FASTENERS (2 per end)

TJ

WEATHERSTRIP/SEALS

23 - 89


Content   ..  559  560  561  562   ..